Creating super-long flat panoramic images from video
Prehistory
A couple of years ago on Habré there was an article dedicated to Adam Magyar Einstein's Camera: how one photographer depicts time . I found it very interesting, but, to be honest, I didn’t understand the technology for shooting Stainless video. I especially admired his photos of the subway train. After that, I wondered: can I create something like this myself?
Formulation of the problem
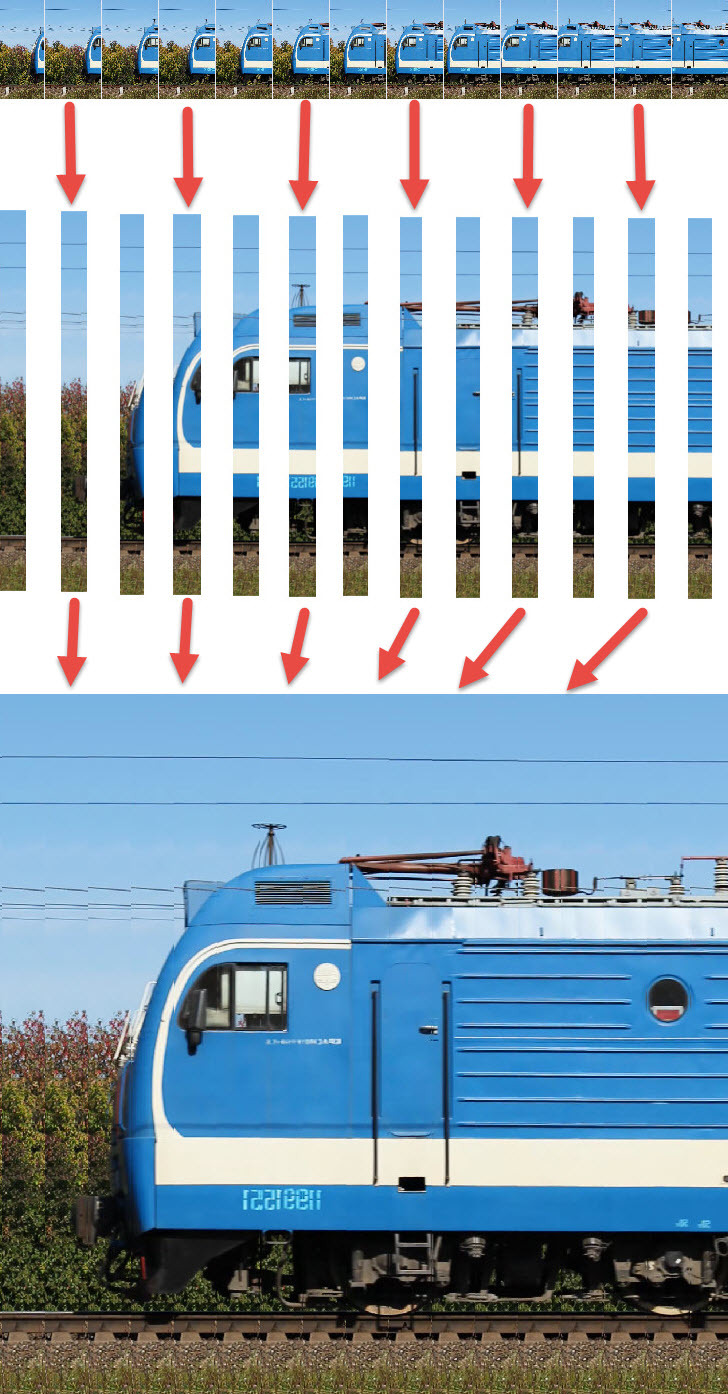
Not far from the village where my relatives live, the railway passes and once went to visit me, I grabbed a camera and a tripod with me. The essence of the task that I set for myself was to create a panoramic image of the train, long enough so that it could not be removed simply by assembling a flat panorama. That is, I was going to shoot a video and cut along the central strip from each frame to combine them in the hope of getting a very long and beautiful panorama. Since I was the proud owner of a Canon EOS 600D camera ( specifications ) with a maximum frequency of 60 FPS with a video resolution of 1280x720, I did not have to rely on a higher frequency. On the other hand, a panorama of 1280 pixels exceeds the vertical resolution of most monitors. Therefore, I believed, the quality of the result should suit me.
')
Internet examples
Before proceeding, I would like to give a list of references to work on this topic that I was able to detect.
- Fundamentals and Experiments of Line Scan Camera . Actually panoramas themselves: one and two
- Bending time. A showcase of photographs from Andreas Chudowski and Adam Magyar
- Kropilak
Shooting! Motor! Go!
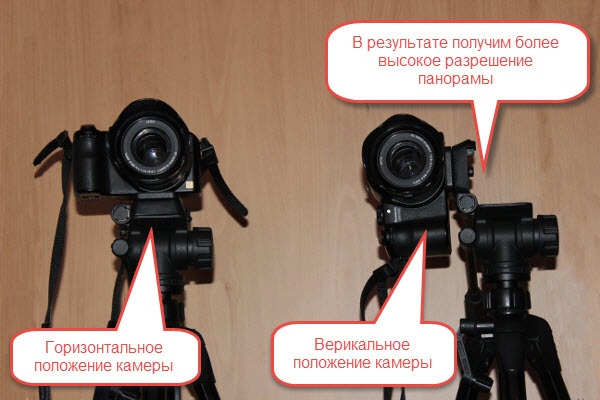
So, I set the tripod at a distance of about 10 meters from the rails (the closer to the rails, the stronger the shaking of the camera) and set the camera in an upright position. Since we need only a middle bar from the entire video frame, it is more correct to install the camera in a vertical, not horizontal position, since in this case the resolution of the panorama will be higher. For example, if the horizontal orientation is 1920X1080, it will give us a panorama of 1080 pixels in height, and a vertical orientation of 1080x1920 will give us a panorama of 1920 pixels in height.
Shooting video is best done in manual mode, that is, without the participation of automation. When an object enters the frame, the illumination of the scene can change dramatically, causing the camera to change the shutter speed or aperture, and this is undesirable. Otherwise, different parts, for example, trains may be different in brightness. The frame rate for the selected resolution should naturally be maximal. We start shooting for 5-10 seconds before the moment the object enters the frame. Firstly, just in case, secondly, the camera stopped moving after pressing the record button, and thirdly, you could select a background frame (if the lighting changes quickly, for example, because of clouds). We also finish the shooting not immediately, but after 5 seconds. From my personal experience, I became convinced that when shooting, it is advisable to calculate whether the object will enter the frame completely and whether there will be extra empty space. I have a few panoramas of the upper part of the trains a little cropped. And of course, it is advisable to focus manually and focus on the object in advance (although it is difficult to do this, because the object itself is not yet available).
Software part
I have written the program Trainz Pano (C ++ Builder XE3). 64-bit application, OS - Windows 7/8/10. She sharpened precisely on the creation of panoramas from the video. The program is available as a commercial product and easily googled.
Work with the application
In order to make life easier for myself and users, I have broken the process of creating a panorama into two parts: the actual assembly and editing. This was done due to the fact that a large amount of data should be saved at an intermediate stage in order not to lose them. For this reason, the application is 64-bit.
Opening video
I did not bother with decoding the video myself, my application uses FFMPEG and first receives a set of images from the video, and then it works with them.
Background settings
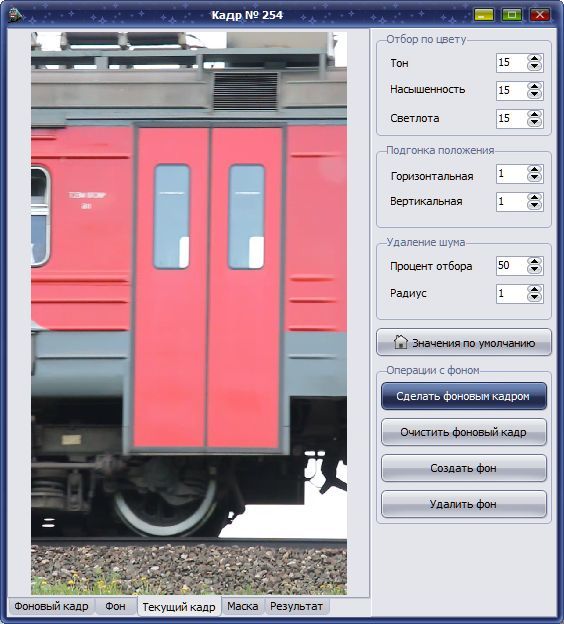
In the very first image you can see a repeating pattern as a background. This is due to the fact that a strip with a width of the order of several tens of pixels is cut out of each frame. Actually they are repeated, if not overlapped by the object. To get rid of such a background and replace it with monotonous lines in the application, it is possible to automate this process. Unfortunately, the result sometimes disappoints me a little, so to get a quality result after the build process, you can proceed to retouching. So, set up the background parameters.
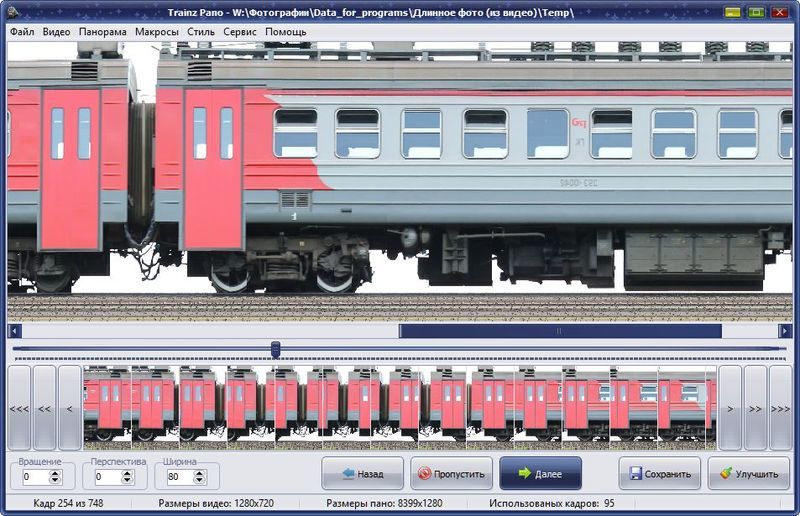
Assembling the panorama
When shooting a video camera, with respect to the object, it may not be located directly, but at a certain angle. In addition, the camera may be located at an angle to the trajectory of the object. To compensate for their influence, the application has two controls: Rotation and Perspective . They are determined by selection in such a way that the resulting image does not have chipping when joining individual sections. Another parameter is Width . It is needed to specify the width of the strips that will be cut from the current frame and added to the resulting panorama. All three parameters can be changed in the process of assembling the panorama. However, Rotation and Perspective are most often configured at the initial stage and do not change in the future. But the Width parameter may vary, since the speed of the object may be variable. In my case, I have many times encountered acceleration and deceleration of trains.

If we shoot a video in a vertical orientation, then we will need to specify in the main menu a rotation angle multiple of 90 degrees. There is one more thing to consider. When I wrote the program, I proceeded from the fact that the movement of an object is carried out from right to left. What if the object is actually moving from left to right? To do this, you can use the item at the assembly stage to reflect from left to right , with all the inscriptions we will receive in mirror image. And at the retouching stage we will use the Reflection Panorama command from left to right and everything will fall into place.
Retouching panorama
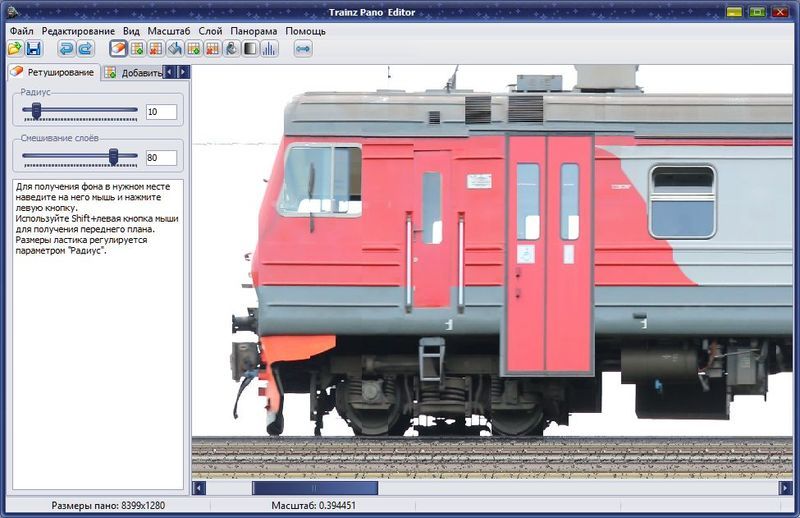
To get rid of the repeating background (if the program could not do it itself) or to restore the image of the object, if it was incorrectly defined as the background, we load our image (more precisely, the image layers, there are 3 of them) into the program Trainz Pano Editor. Here is a brief list of features that the program provides:
- Retouching
- Adding pillars
- Deleting columns
- Vertical background shading
- Adding lines
- Delete rows
- Horizontal background shading
- Gradient transition
- Accelerated motion
Video of work with the program
On-line help is here .
View panoramas
When saving panoramas, one unpleasant detail emerged, namely, the JPEG format has a limit on the size of the image. 2 bytes are used for length and width, therefore, a panorama of more than 65535 pixels in length will not be recorded. At the same time, I had panoramas of 200,000 pixels or more in length. Saving in BMP and PNG does not create problems, only images in these formats take up a lot of disk space. When I tried to open large panoramas for viewing, there were also some problems. XnView and XnViewMP show a mash of pixels, what I wrote to the program's author, I hope this bug will be fixed in the next versions. The built-in Windows Photo Viewer opened with a bang, and InfanView did not let us down. In general, it should be assumed that not all viewers will show us long panoramas correctly.
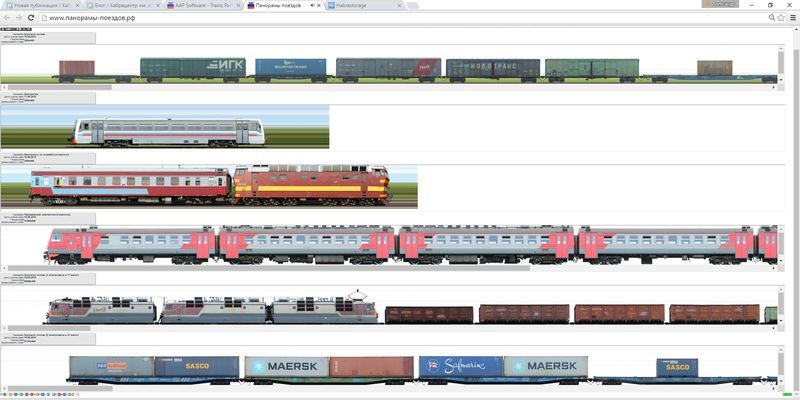
Examples of my work
You can get acquainted with some examples of my work on the site . True, there they are significantly reduced in size.
Possible scope
In addition to panoramic shooting of trains, the program can be used to create panoramas of columns of cars or motor vehicles, vessels, columns of people at parades, demonstrations, and demonstrations. If there are good roads, you can try to take panoramic images of streets or landscapes, for example, from a train, tram or car.
Plans to improve the application
- Reading frames directly to the application without the need to intermediately save images to disk.
- Improve the speed of the assembly of panoramas.
- Write a new algorithm for determining the background.
- Write a JavaScript library using HTML5 Canvas to display very long panoramas.
findings
- Currently there are no applications on the market for creating panoramic images from video files.
- Those single examples of panoramas that are available on the web are usually created using home-made blanks that are not ready-made commercial products.
- The program Trainz Pano to some extent solves the problem voiced above.
- Unfortunately, the Trainz Pano program has so far implemented an insufficiently high-quality technology for separating objects from the background, which (in general) leads to the need to retouch the panorama in a rather large volume.
- However, with proper use (choosing a good place to shoot against a monotonous background), the program can be used by both professionals and digital photo lovers.
Source: https://habr.com/ru/post/282265/
All Articles