Develop HTML5 games in Intel XDK. Part 7. Design of the game

Part 1 » Part 2 » Part 3 » Part 4 » Part 5 » Part 6 » Part 7 // End)
Last time we had an almost finished game. Now it remains only to bring beauty. Namely: to make a scoring system, menu screens and game completion, to work on the complexity. All this today and do.
Scoring system
This project involved a simple scoring system. Each time a snake eats a cookie, the player gets one point. In addition to scoring, you need to display them on the screen. To do this, create a ScoreLayer layer. It will be implemented everything that is related to the game points.
')
1. Optional step. Create a new “score.js” file and add the project.json file accordingly.
"jsList" : [ "src/resource.js", "src/biscuit.js", "src/score.js", "src/game.js" ] 2. Add the following code to the score.js file, or, if you decide to do without it, in game.js.
var ScoreLayer = cc.Layer.extend({ score: 0, labelScore: null, ctor: function() { /* */ this._super(); /* */ this.init(); }, init: function() { /* */ this.labelScore = cc.LabelTTF.create("Score: 0"); this.labelScore.setColor(cc.color(255, 255, 255, 255)); this.labelScore.setPosition(cc.p(240, 700)); this.addChild(this.labelScore); }, scoreIncrease: function() { /* */ this.score += 1; this.labelScore.setString("Score: " + this.score); } }); This layer is pretty simple. He has a sprite that is responsible for displaying information about points scored on the screen, and a method that increases the number of points scored by one each time it is called. Now we will connect the layer responsible for the points with the game.
1. Create a ScoreLayer instance in the GameScene class.
var GameScene = cc.Scene.extend({ snake_layer: {}, score_layer: {}, onEnter:function () { this._super(); // , this.score_layer = new ScoreLayer(); this.snake_layer = new SnakeLayer(); // , this.addChild(this.score_layer, 1); this.addChild(this.snake_layer, 0); } }); 2. Configure SnakeLayer so that the scoreIncrease method is invoked every time a snake eats a cookie. To do this, make the following changes to the checkCollision method, namely where the check for a snake collides with a cookie.
checkCollision: function() { ... /* */ if (head.x == this.biscuit.x && head.y == this.biscuit.y) { /* */ this.parent.score_layer.scoreIncrease(); /* */ this.updateBiscuit(); /* */ this.addPart(); } ... }, We get access to the layer responsible for the points through the layer on which the snake is located, through the common parent GameScene, and then call the scoreIncrease method.
After the above changes are made, the game screen should look like the one shown below.

Information about points earned on the game screen
Now, as soon as the snake eats another cookie, the number of points scored increases.
Menu screen
Let's do a menu screen. It will be no more difficult than the design with which we considered the points. This screen will consist of one scene containing two sprites. One, the title, will display the name of the game, the second, which plays the role of the subtitle, will invite the user to click the mouse or touch the screen to continue.
1. Optional step. Create a new file and name it "menu.js". Add it to the file list in project.json as shown below.
"jsList" : [ "src/resource.js", "src/biscuit.js", "src/score.js", "src/menu.js", "src/game.js" ] 2. Add the following code in menu.js, or, if you decide not to create this file, in game.js.
var MenuScene = cc.Scene.extend({ titleSprite: {}, subTitleSprite: {}, onEnter: function() { this._super(); /* */ var winSize = cc.view.getDesignResolutionSize(); /* */ this.titleSprite = cc.LabelTTF.create("Snake.", "Arial", 50); this.titleSprite.x = winSize.width / 2; this.titleSprite.y = winSize.height / 2; this.addChild(this.titleSprite); /* */ this.subTitleSprite = cc.LabelTTF.create("Click anywhere to play", "Arial", 20); this.subTitleSprite.x = winSize.width / 2; this.subTitleSprite.y = winSize.height / 2 - 80; this.addChild(this.subTitleSprite); /* */ cc.eventManager.addListener({ event: cc.EventListener.TOUCH_ONE_BY_ONE, onTouchBegan: function (touches, event) { cc.director.runScene(new GameScene()); }, }, this); }, }); When entering this scene, we create two text sprites and add a listener that waits for the screen to touch (or another input event) to start the game, that is, to launch GameScene.
3. In the main.js file, configure the control object so that it runs the MenuScene scene instead of the GameScene. To do this, edit the line below:
cc.director.runScene(new GameScene()); It should look like this:
cc.director.runScene(new MenuScene()); If you start the game now in the emulator, then instead of the game screen, the menu screen will appear.

Menu screen with a suggestion to start the game
Game completion screen
The last screen we are going to create is the one that the user sees after the game ends. It is very similar to the main menu screen. It will have three text sprites. One will contain the text "Game Over". The second is to display the points scored in the current session of the game, and the third will offer to play again.
1. Optional step. Create a new file, “gameOver.js”. Add his description in project.json:
"jsList" : [ "src/resource.js", "src/biscuit.js", "src/score.js", "src/gameOver.js", "src/menu.js", "src/game.js" ] 2. Paste the following code into the gameOver.js file, or, if you did not create it in the previous step, into game.js.
var GameOverScene = cc.Scene.extend({ finalScore: 0, labelGameOver: {}, labelScore: {}, labelPrompt: {}, ctor: function(score) { this._super(); this.finalScore = score; /* , */ cc.eventManager.addListener({ event: cc.EventListener.TOUCH_ONE_BY_ONE, onTouchBegan: function(touch, event) { cc.director.runScene(new MenuScene()); } }, this); }, onEnter: function() { this._super(); /* */ var winSize = cc.view.getDesignResolutionSize(); /* GameOver */ this.labelGameOver = new cc.LabelTTF("Game Over", "Arial", 60); this.labelGameOver.x = winSize.width * 0.50; this.labelGameOver.y = winSize.height * 0.50; this.addChild(this.labelGameOver); /* , */ this.labelScore = new cc.LabelTTF("Score: " + this.finalScore, "Arial", 30); this.labelScore.x = winSize.width * 0.50; this.labelScore.y = winSize.height * 0.43; this.addChild(this.labelScore); /* */ this.labelPrompt = new cc.LabelTTF("Click or Tap To Try Again"); this.labelPrompt.x = winSize.width * 0.50; this.labelPrompt.y = winSize.height * 0.39; this.addChild(this.labelPrompt); }, }); Notice that a parameter is passed to the scene designer that contains information about the score. If this is not done, the scene will not be able to properly perform its functions.
1. Add a reference to the control object in order to launch the GameOverScene scene, passing the information about the scores to the designer. This should be done after the collision of the head of the snake with one of the fragments of its body.
var SnakeLayer = cc.Layer.extend({ ... checkCollision: function() { ... /* */ for (var part = 1; part < body.length; part++) { if (head.x == body[part].x && head.y == body[part].y) { /* GameOver */ //this.snakeParts = null; // cc.director.runScene( new GameOverScene (this.parent.score_layer.score) ); } } ... }, ... }); Now, in case of loss, such a screen will appear.
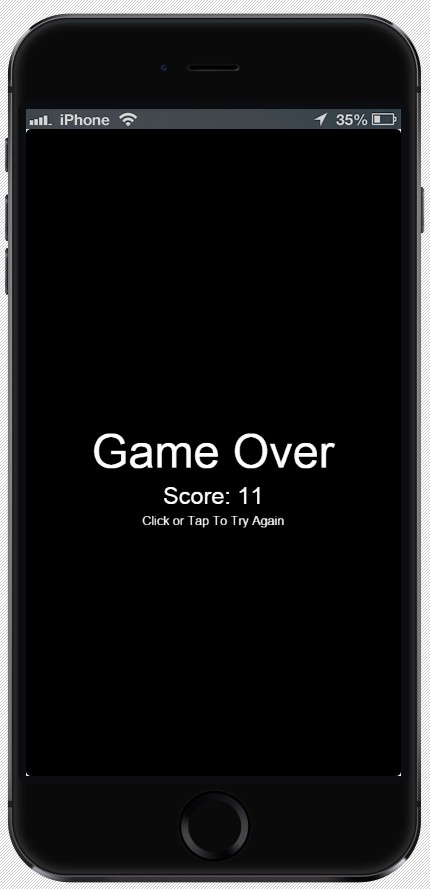
Game completion screen
Game difficulty setting
And finally, you need to increase the complexity of the game, based on how many points the user scored. If the snake is constantly moving at the same speed, playing Snake is pretty simple, which means it's boring.
1. Add the following method to the SnakeLayer code.
updateDifficulty: function(curScore) { var scoreToDiff = {}; /* , */ scoreToDiff[0] = 0.15; scoreToDiff[5] = 0.10; scoreToDiff[15] = 0.05; scoreToDiff[25] = 0.03; scoreToDiff[35] = 0.01; /* */ if (scoreToDiff[curScore] !== undefined) { this.interval = scoreToDiff[curScore]; } }, 2. Set the call to the updateDifficulty method at times when the snake eats a cookie and when creating the SnakeLayer layer.
var SnakeLayer = cc.Layer.extend({ ... ctor: function () { ... // /* */ this.updateDifficulty(); }, ... checkCollision: function() { /* */ if (head.x == this.biscuit.x && head.y == this.biscuit.y) { /* */ this.parent.score_layer.scoreIncrease(); /* */ this.updateBiscuit(); /* */ this.addPart(); // /* , */ this.updateDifficulty(this.parent.score_layer.score); } }, ... }); findings
So today you learned:
- How to create a menu screen.
- How to create a game completion screen.
- How to create a scoring system.
- How to customize the complexity of the game.
The game is ready! Congratulations on successfully completing this tutorial, and on having created your first HTML5 game in Intel XDK! Try the game, find out if everything works well, change it the way you want. And, if something in its functioning is still incomprehensible to you, sort it out.
To learn more about how to build a distribution of games for various platforms, such as iOS, Android and Windows 8, look in the documentation for the Intel XDK .
Now - it's time to do your own project.
Part 1 » Part 2 » Part 3 » Part 4 » Part 5 » Part 6 » Part 7 // End)
Source: https://habr.com/ru/post/281981/
All Articles