How we implemented DevOps: release management in Visual Studio Team Services
Hello! The next issue of the article from the series “How we implemented DevOps” from the Vorlon.JS team. Vorlon.JS is a node.js-based tool that allows web developers a convenient way to remotely test, control and debug a web application, especially on mobile and embedded systems. In their blog on MSDN, the team described the phased introduction of DevOps practices into the organization of work on Vorlon.JS and the selection of tools for solving daily tasks. Vorlon.JS is an open source project .
Cycle content:
- Project Planning and Management with Visual Studio Team Services
- Continuous integration with GitHub and Visual Studio Team Services build system
- Infrastructure-as-code with Microsoft Azure and Azure Resource Manager
- Release Management in Visual Studio Team Services
- Testing in production environment with Microsoft Azure App Service and Web Apps
In previous articles in this series, we discussed the use of continuous integration, which allows you to build code every time you change code in GitHub using the build system in Visual Studio Team Services. In addition, this assembly generates a number of artifacts: application code with its dependencies and scripts (in the DeploymentTools folder), which allow you to automatically create an infrastructure (“infrastructure-as-code” principle) in Microsoft Azure and deploy the application.
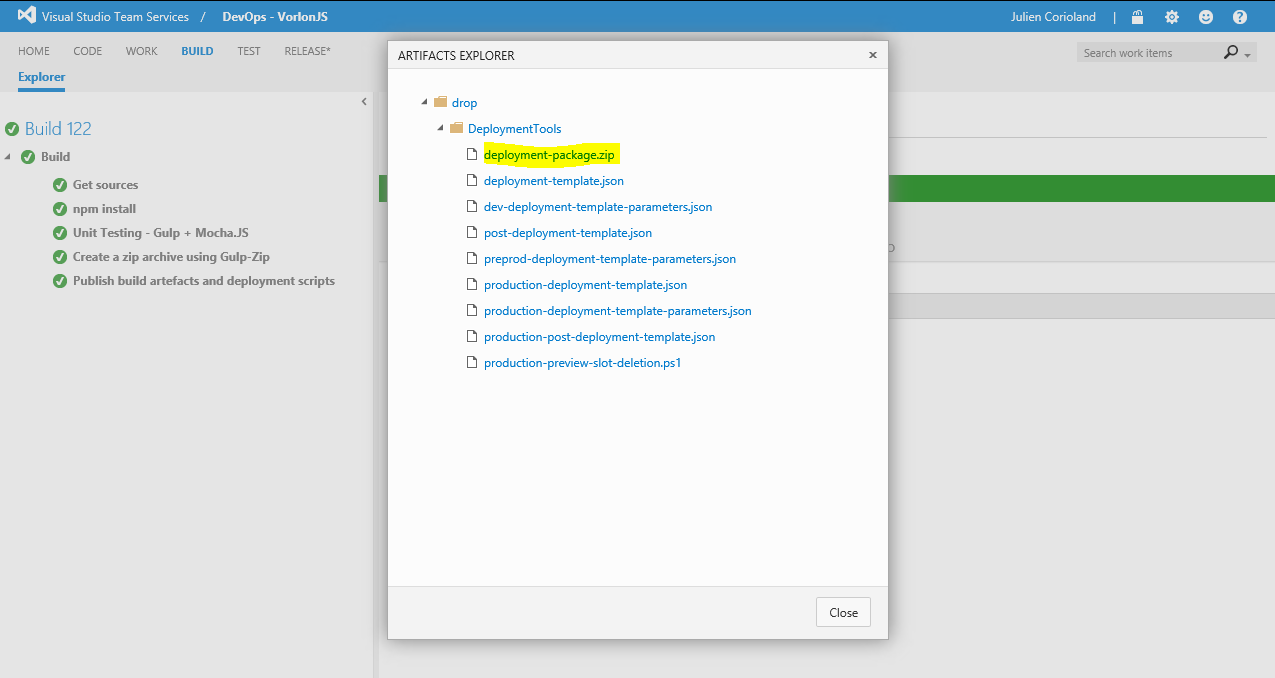
The screenshot above shows the artifacts generated during assembly. Among them, as you can see, is the deployment-package.zip archive and a number of JSON and PowerShell scripts.
')
Zip-archive contains the code of the application and its dependencies. This archive can be deployed to Azure Web App using Web Deploy. JSON scripts are Azure Resource Manager templates with which we will create different environments - for development, testing and production.
Note: you can view all these scripts in our GitHub repository , https : // github . com / MicrosoftDX / Vorlonjs / tree / dev / DeploymentToolsToday we will discuss the possibility of using these artifacts in Visual Studio Team Services Release Management to form a release management process that will automatically deploy the application in various environments.
Connect a Microsoft Azure subscription to Visual Studio Team Services
You have previously connected your GitHub account to access the source code during the build process. Now you need to similarly connect your Microsoft Azure subscription to Visual Studio Team Services to automatically deploy applications to the cloud using Release Management.
Press the button
 in the upper right corner of the window to open the settings of the team project, and go to the Services tab. Here you can add a new connection, in this case to your Microsoft Azure subscription:
All you need to do is enter your credentials. To find out the subscription ID, hover the mouse over the additional information icon and follow the link “publish settings file”, which will appear there:
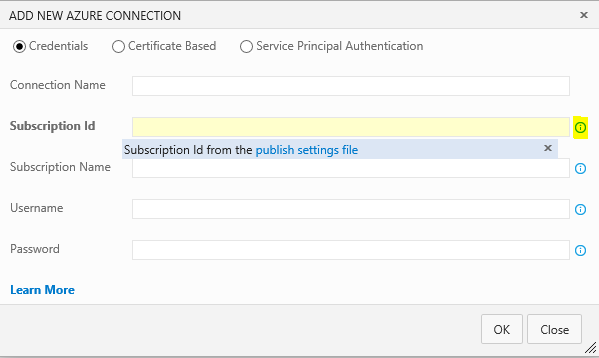
Note. If you do not have an account in Microsoft Azure , click on the link to create a new subscription, which can be used free of charge for a month.
Release Definition
The first stage of work in VSTS Release Management is the creation of a definition for shaping the application release process. Click the RELEASE tab.
Press the button
 in the left pane to create a new release definition. You can start working with an existing template or with an empty definition:
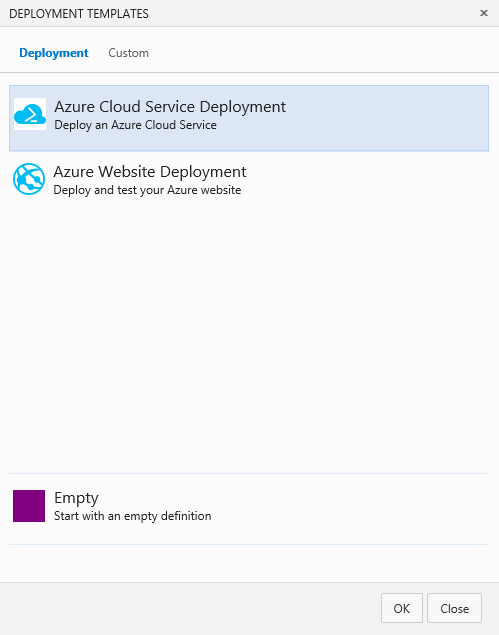
In the example, we selected an empty template. The constructor looks the same as the one with which you defined the new build, but now you will need to perform several more steps before determining the release.
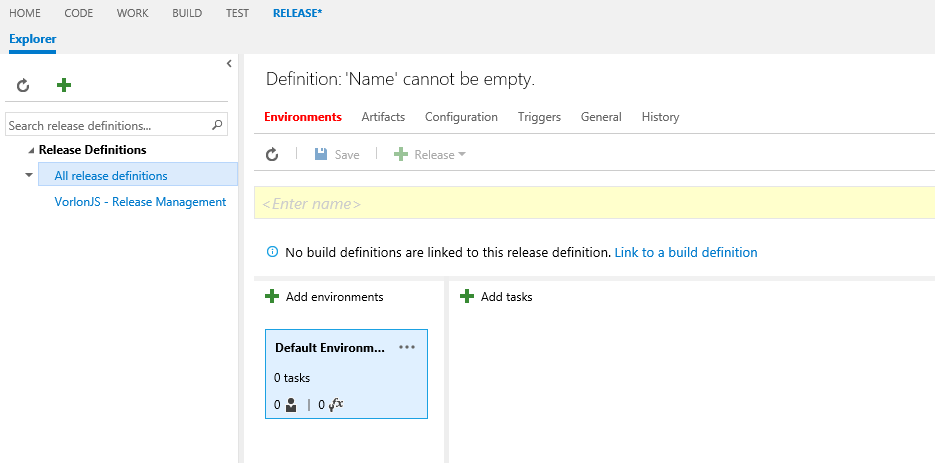
First, you must specify the name of the new release definition and associate it with the assembly definition. To do this, click the link “Link to a build definition”.

This stage is very important: after it, in the definition of release, it will be possible to use the artifact published after the assembly. In the case of Vorlon.JS, we associate the previously created CI assembly and scripts, which are published at the last stage of the assembly. These scripts allow you to initiate the release of the application after each successful completion of the assembly, if you want to continue (continuously) to deploy the application.
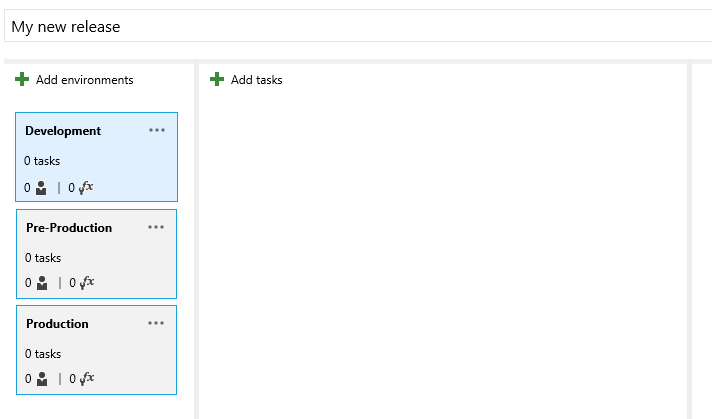
Now you can define the environments in which the application will be released. We use three environments: Development ,
Pre - Production and Production . To add a new environment, click the Add environments button and specify a name for each new environment:
Note: if the stages for all environments are identical, then you can define the first environment and then clone it by clicking the "..." icon in the menu:
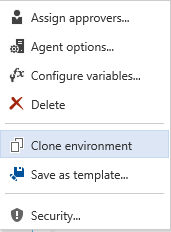
Note: The Save as template command allows you to create a template based on the environment definition. It will be available when creating a new release or environment definition.
For each environment, you can define a set of tasks to be performed. There are many ready-made tasks that you can use. To add a new task to the environment, click
 :
: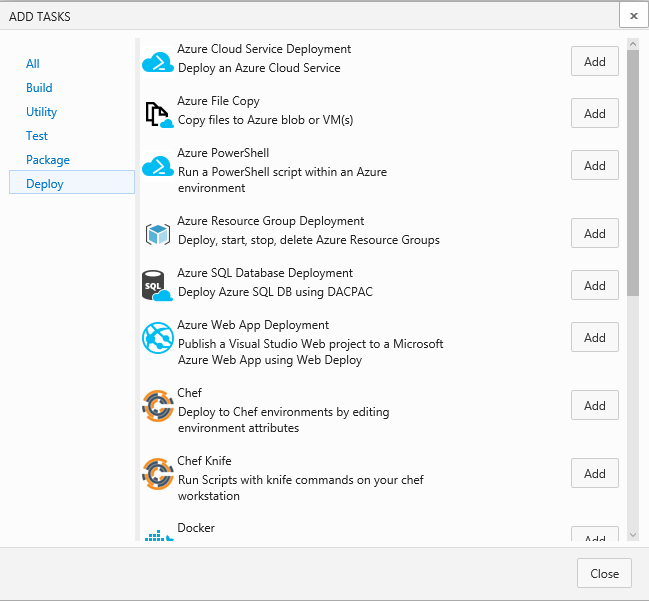
For example, you can select the “Azure Resource Group Deployment” task, which will allow you to create or update a new resource group using a JSON template with the Azure Resource Manager, or “Azure Web App Deployment” to deploy a web application. Another task will help you deploy using external tools - Chef or Docker.
The screenshot below shows the stages we set up for the release of Vorlon.JS in the Development environment:
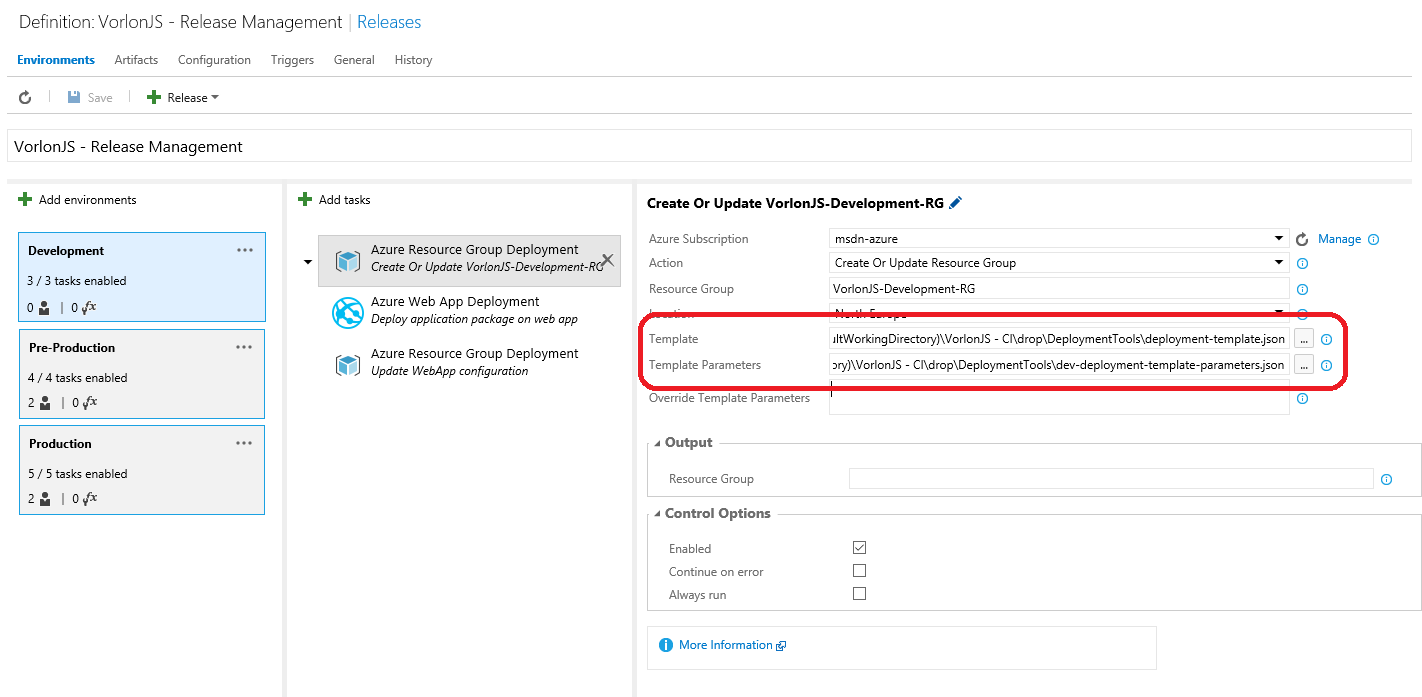
The first stage creates or adds a VorlonJS-Development-RG resource group using deployment templates that were published when the assembly started during the continuous integration process. To view the artifacts published during the build and select the files, click the "..." button:

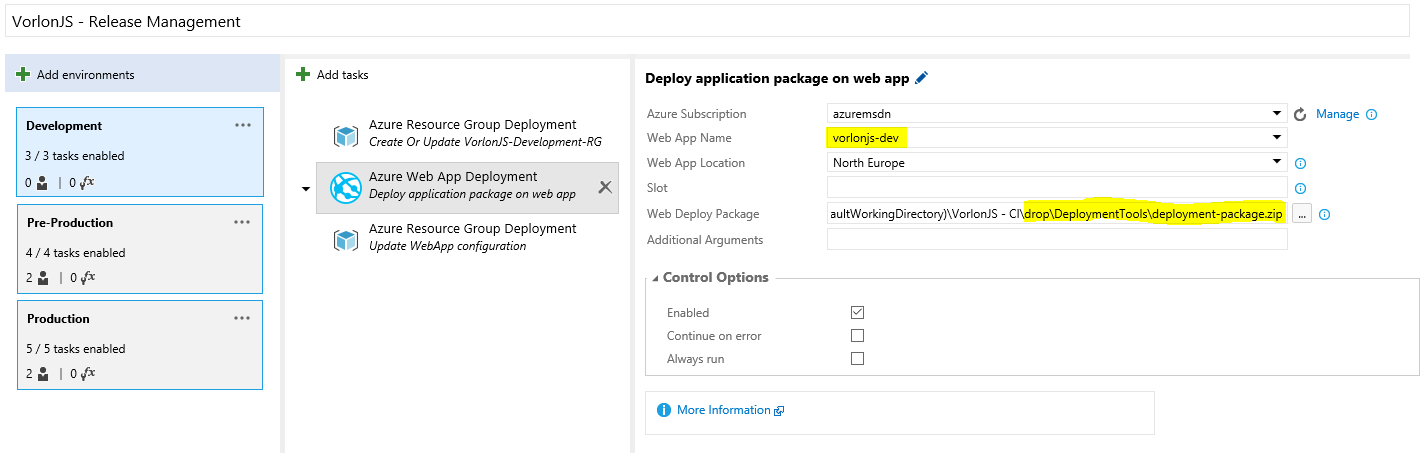
The second stage publishes the application to Azure Web Apps using the deployment-package.zip archive generated during the build:
Stage three updates the Azure Web App configuration using the Azure Resource Manager template.
You can also delete a resource group using the Azure Resource Group Deployment task. We wanted to customize the Vorlon.JS release process in Production so that the infrastructure of the unused environment is immediately removed. Therefore, the first stage of release in the Pre-Production environment is the removal of Development environment, i.e. release of resources. We also remove the Pre-Production environment at the beginning of the deployment of the project to Production:
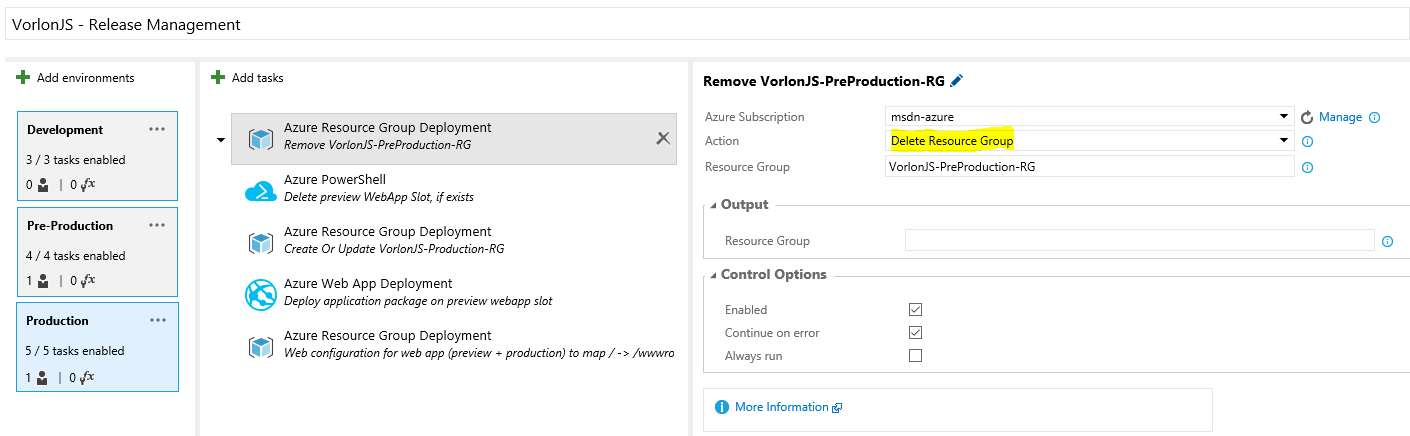
Thus, we optimally use Microsoft Azure resources, without loading them with execution and support of unused applications and environments.
After setting up all the media and stages of release, click
 in the toolbar to save the release definition.
Assign responsible
Each environment is a group of tasks for your release process. To control the transition from one environment to another, you can designate responsible people - those who will make decisions before and after deployment.
In the case of Vorlon.JS, we set up a confirmation request prior to deployment to the test and production environments. To designate those responsible, click on the “...” icon of the environment you want to configure, and select “Assign approvers ...”:
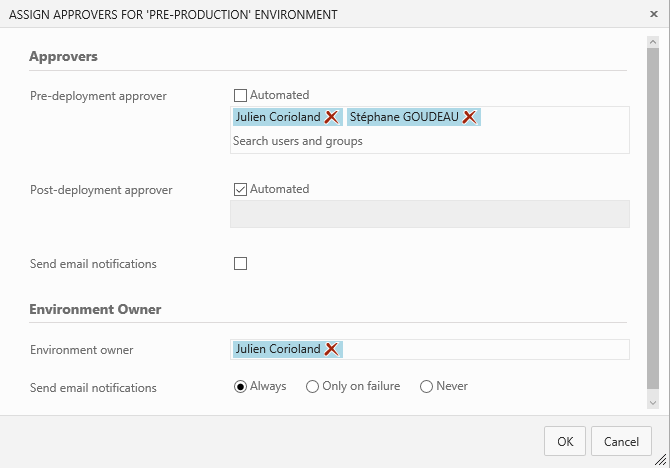
In this example, the deployment in the Pre - Production environment will begin only after Stephan and I have approved the deployment in the Development environment. This feature is very useful if different teams work on different environments.
For example, the development team first checks the application in the Development environment before sending the application to the Pre-Production environment. A team of quality control or test engineers then performs user interface tests or stress tests in the Pre-Production environment, obtains the approval of the person in charge of the product and initiates the deployment in the Production environment.
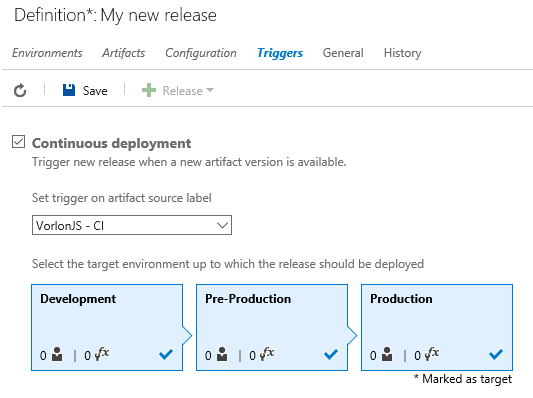
Configure Continuous Deployment
Continuous deployment is another great feature of Release Management. You can configure VSTS so that after each successful completion of the assembly, the release (release) of the application occurs automatically. To do this, go to the Triggers tab and select the Continuous Deployment checkbox.
Next, select the build and environment:
Create new release
When the release definition is ready, you can check it out by initiating a new release. To do this, click
 on the toolbar and select Create Release:
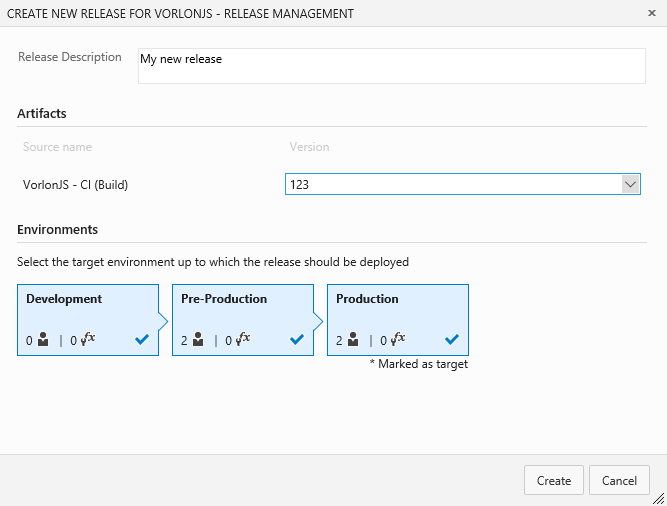
Click Create and wait for the release to start.
Getting release status
To find out the release status, double-click on its row in the Releases table. Summary tab provides general information about the results of the release:

In our example, the release of the application in the Development environment was successfully completed, and to continue the release in the Pre-Production environment, we need to receive confirmation. To approve or reject the release, just click the link on the message in the yellow box:
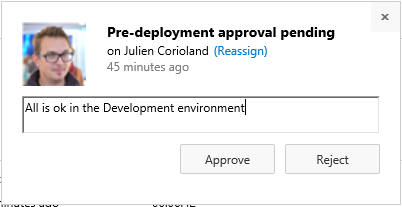
If the application deployed in the first environment suits you, click Approve, if not, click Reject and the application will not be deployed in other environments.
The Logs tab contains detailed information about each phase of release:
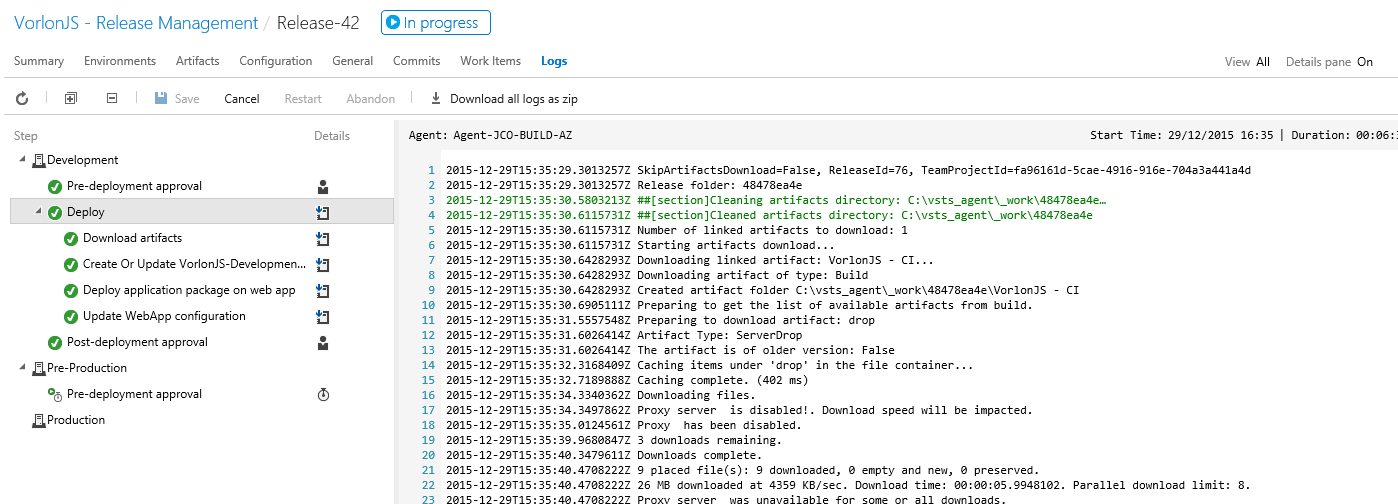
To get more information about the release, click on its name in the panel on the left, and on the Overview tab:
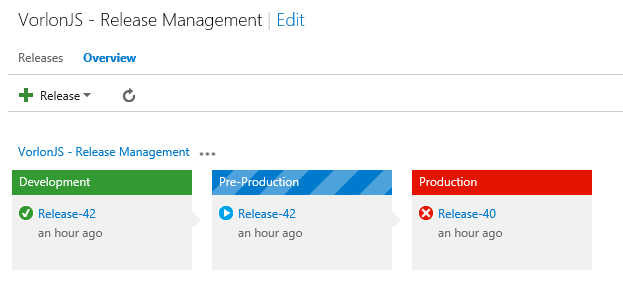
In this example, the release of release at number 42 was successfully completed in the Development environment and not completed in the Pre-Production environment, and release at number 40 was rejected and was not released to Production.
Conclusion
Now you can manage releases of all your applications to automate and improve the way you provide new features and products to your customers. But with the deployment of an application in production, its life cycle does not end. Now you need to get information about this application. Continuous improvement may require diagnostic data or usage information.
In the work on Vorlon.JS, we used a number of tools that could be useful to you. We will talk about them in the following articles.
About the authors

Julien Corioland is a technology evangelist from Microsoft, France. The main direction of work is the Microsoft Azure application platform. He helps developers create cloud-based applications, and also belongs to the Vorlon.JS tool development group, in which he helps to implement DevOps practices.
We are pleased to announce that the developers of the Vorlon.JS project - Julien Corioland and Ettiene Margraff will speak at the DevCon 2016 conference, where they will talk about their experience of implementing practices live exclusively for the participants of the DevOps Intensive by hands.
If you have questions about this series of publications or about the DevOps methodology, you can contact the author directly via Twitter: twitter.com/jcorioland
useful links
- Visual Studio 2015, Visual Studio Team Services, Visual Studio Code: free offers for developers
- Additional and free tools and services in Visual Studio Dev Essentials
- Laboratory work on the development, testing and management of the life cycle of software for Visual Studio 2015
Source: https://habr.com/ru/post/281895/
All Articles