Integration of two Dynamics CRM Online tenants using the Azure Service Bus and the Azure Cloud Service
In this article, I would like to share the experience of using Microsoft Azure for the integration of two cloud CRM systems. As part of the task, you need to build a simple cloud-based application that exchanges messages between two Dynamics CRM Online implementations that are in different Office 365 subscriptions. We will look at the specifics of using the Azure Service Bus in the context of Dynamics CRM Online, not a lot of talk about supported interaction mechanisms role for the process of analyzing and processing messages.
When implementing integration, which provides two branches of the company with important and relevant data, we need to ensure the delivery of messages, even if one of the systems does not respond to requests. Naturally, in this case, we resort to the services of messaging systems, which can provide storage and deferred delivery in case of a lack of connection or any other problems.
Speaking of the Microsoft cloud, I would like to note that the corporation today pays enough attention to integrating various products into one homogeneous system, which allows us to simplify and speed up the process of building and deploying solutions, as well as to avoid some annoying mistakes.
If we talk about Dynamics CRM, then this product out of the box supports work with the Azure Service Bus, which allows you to send your data to a queue or section without a single line of code.
')
There is a specificity here. In order to configure the integration between these two systems, the Service Bus must know something about CRM, and CRM must be authenticated correctly using the appropriate cloud bus services. Today, Dynamics CRM supports authentication via ACS (Azure Active Directory Access Control). You can read more about what ACS is in the following article: What is ACS ?
So, the first thing we need to do is actually create a Service Bus, which we will use to work with our message queue, but unfortunately it will not work out to create it in a simple way through the portal, since in this case the Service Bus will not support authentication via ACS. In order to create a Service Bus with ACS support, use the Azure Power Shell. Learn more about what an Azure Power Shell is and how to use it in the next article: What is Azure PowerShell ?
The full version of the script I used is available here .
The script is quite simple, the parameters that can be used to create a queue are described in detail in the following article: Azure Service Bus - As I Understand It: Part II (Queues & Messages) . I’ll add that in order for our integration to work correctly, it is necessary to have a clear sequence of messages, since we will process the messages both for creating and changing records, and I don’t want to process the message about changing the record before it is created. In consequence, we do not forget to put the SupportOrdering field in the appropriate value, in this case the queue will work according to the FIFO principle (First In First Out).
After the script has successfully worked on your screen, you should get something like this.
Now, after everything is ready, we can make sure that the queue and the tire have been correctly created and are available on the portal.

So, in order to connect Dynamics CRM to the Azure Service Bus, you need to open the Plugin Registration Tool and establish a connection to the CRM system. After the list of Plugins opens, select the Register and Register New Service Endpoint options.

Next, in the window that opens, fill in the connection settings.

Name is the name of our event. As an example: ContactIntegration.
Description - a description of the call.
Solution Namespace is the name of our service bus. In my case: sb4crm2crm
Path - the name of the queue that will receive messages. In my case: q4depa2depb
Contract - a message transfer contract. There are several options: Queue, Topic, One - way, two - way, REST. We will consider Queue and Topic. You can read more about each of these contracts in the following article: Write a listener for a Microsoft Azure solution. For our integration, select Persistent Queue.
Claim - as additional information in the context of the message, you can send a user ID.
ID - a unique identifier of the created configuration.
After all fields are filled, you can proceed to configuring ACS. To do this, click on the Save & Configure ACS button.

Management Key - this key can be obtained from the Azure portal. To do this, go to the section of service tires.

Select the bus we created and click the Connection Information button.

A window will open in which you can find all the necessary information.
We need the Default Key from the ACS section.
Certificate File - a public certificate that was used when configuring Dynamics CRM for integration with Azure.
Issuer Name - Name of the issuer. The name must be the same as that used when configuring Dynamics CRM for integration with Azure.
The Certificate File and Issuer Name can be found in Dynamics CRM under Settings -> Customizations -> Developer Resources. As follows.
Download the certificate, fill in all the required fields and click on the Configure ACS button. If everything is correct, then after a short time, you will see the following messages:

After that, the window can be closed by clicking on the Close button.
Next, click on the Save & Verify Authentication button. We receive the following message:
Verifying Authentication: Success
Close the window, click the Save button and it's done.
Now it only remains to register which events we specifically want to process and send to our service bus.
To do this, you need to register Plugin Step, as you usually do for your plugins. I register the Create and Update messages for the Contact entity. To do this, just call the context menu on the newly created Service Endpoint and select Register New Step. Filling is intuitive.

Now our created contacts will be sent to the Service Bus.
In order to track the success or failure of sending messages from Dynamics CRM, just open the system and go to the Settings -> System Jobs section. Select the entity of interest and download the presentation.
Below is a screenshot of a potential error:
It remains for the small, to develop a code that will process our messages, upload them to another system and correctly respond to potential errors.
Any workflow must be running somewhere and in our case this is the Azure Cloud Service.
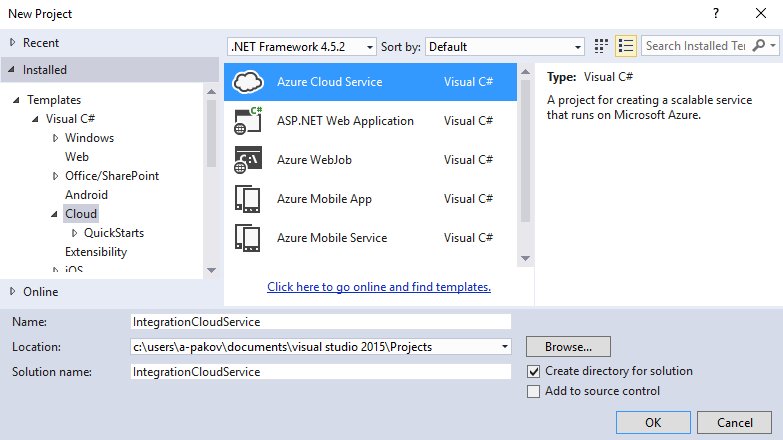
Let's create a new Azure Cloud Service in Visual Studio.
Further we specify that in the context of our Azure Cloud Service, we want to create Worker Role.

Now that we have the Azure Cloud Service and the Azure Worker Role, we can implement code that can receive messages from our queue. The easiest way to receive messages is shown below.
Any Worker Role contains three required methods - OnStart, Run and OnStop. Let's consider their implementation in the most general form. In the OnStart method, we define the parameters for connecting to our bus, here you can also initiate a connection to the system to which you want to fill data.
The Run method is the most interesting, because here we subscribe to receive messages from our queue and configure the method for receiving data.
The code is provided with sufficiently detailed comments, so in addition I will not comment on anything here.
Well, and lastly, let's see how the OnStop method looks.
Here we close all possible connections and finish the execution of the Run function. Learn more about the Azure Cloud Service, you can read in the following article: A detailed description of the development capabilities with Microsoft Azure Cloud Services
It is also worth noting that the publication of the working role can be performed in two variations: Staging and Production. If you publish your role with the Debug build type, you will end up with a Staging deployment, if you use the Release build type, then Production. Even if the role is published and is in the cloud, you can still debug it. In order to learn more about the possibilities of publishing and debugging a worker role in the cloud, I propose to refer to the following article: Debugging an Azure cloud service
In brief, I will describe how the processing of messages in the queue is arranged, which we developed and applied in integrating the two systems. Work begins with the CRMQueueProcessor class, its responsibilities include initializing connections, creating and configuring the “CrmMessageProcessor” message processor class, and also subscribing to receive messages from the bus. As soon as the entire initialization process is completed and a message is received from the bus that needs to be processed, the CrmMessageProcessor enters the work.
CrmMessageProcessor is an implementation of the “Observer” pattern. Its task is to monitor the changes occurring in the system and notify its subscribers about these changes. There may be as many subscribers as possible, each subscriber decides whether or not to process the message for himself. All subscribers are inherited from the base class CrmBaseIntegrationHandler. CrmBaseIntegrationHandler, being an abstract class, offers several methods for its implementation:
getProcessingEntityName () - must be overridden, returns the name of the entity, for example, contact.
getProcessingAction () - should be redefined, returns an action or a set of actions to which the handler should respond. For example: this is the creation of a record.
HandleCrmMessage (string entityLogicalNameValue, string requestNameValue, Entity entity) - accepts the message itself, as well as the nature and type of action, calls the overridden event handler if the event takes place
Entity OnProcessCreateEntity (Entity sourceEntity) - The entry creation handler, it accepts the entity that came from the queue and forms the entity that will be created.
Entity OnProcessUpdateEntity (Entity sourceEntity) - A change entry handler, it accepts an entity that comes from the queue and forms an entity that will be changed.
The CrmMessageProcessor class looks like this:
If none of the processors processed the message, then it is placed in the queue of the unprocessed messages with the corresponding mark. If an error occurred during the processing of the message, we will unblock the message in the queue and try to process it again, and so until the limit of attempts is reached, after which the message goes to the raw message queue. Next is an excerpt from the CrmQueueProcessor class.
To get the path to messages from the queue of unprocessed messages, call the FormatDeadLetterPath method on an existing instance of the QueueClient object and pass the name of the working queue as an argument:
QueueClient.FormatDeadLetterPath (queueName)
This line will form the appropriate path, then you can safely subscribe to receive messages and process them.
In the example that we have analyzed, a queue is used and all messages are processed by a single workflow. As an alternative to using a queue, you can also use sections (topics), you can configure them so that messages from different entities are processed by different threads within the same working role or in different ones. Each subscriber will have its own queue, and a correctly configured filter will receive only those messages that should be processed by this instance. If you need to synchronize the work of several working roles, then for this you can use Blob leasing, for more information about the synchronization of working roles in Azure, you can read in the following article: Preventing Jobs From Simultaneous to Multiple Role Instances.
The list of articles for which did footnotes:
What is ACS ?
What is Azure PowerShell ?
How to create a service bus queues, using a powershell script .
Azure Service Bus - As I Understand It: Part II (Queues & Messages)
Detailed description of development capabilities with Microsoft Azure Cloud Services
Azure Cloud Debugging Service or Virtual Machine in Visual Studio
Preventing Jobs From Running Simultaneously On Multiple Role Instances.
When implementing integration, which provides two branches of the company with important and relevant data, we need to ensure the delivery of messages, even if one of the systems does not respond to requests. Naturally, in this case, we resort to the services of messaging systems, which can provide storage and deferred delivery in case of a lack of connection or any other problems.
Speaking of the Microsoft cloud, I would like to note that the corporation today pays enough attention to integrating various products into one homogeneous system, which allows us to simplify and speed up the process of building and deploying solutions, as well as to avoid some annoying mistakes.
If we talk about Dynamics CRM, then this product out of the box supports work with the Azure Service Bus, which allows you to send your data to a queue or section without a single line of code.
')
1. Configure Azure Service Bus to work with Dynamics CRM Online.
There is a specificity here. In order to configure the integration between these two systems, the Service Bus must know something about CRM, and CRM must be authenticated correctly using the appropriate cloud bus services. Today, Dynamics CRM supports authentication via ACS (Azure Active Directory Access Control). You can read more about what ACS is in the following article: What is ACS ?
So, the first thing we need to do is actually create a Service Bus, which we will use to work with our message queue, but unfortunately it will not work out to create it in a simple way through the portal, since in this case the Service Bus will not support authentication via ACS. In order to create a Service Bus with ACS support, use the Azure Power Shell. Learn more about what an Azure Power Shell is and how to use it in the next article: What is Azure PowerShell ?
[CmdletBinding(PositionalBinding=$True)] Param( # [Parameter(Mandatory = $true)] # [ValidatePattern("^[a-z0-9]*$")] [String]$Path = "q4depa2depb", # required needs to be alphanumeric [Bool]$EnableDeadLetteringOnMessageExpiration = $True , # optional default to false [Int]$LockDuration = 30, # optional default to 30 [Int]$MaxDeliveryCount = 10, # optional default to 10 [Int]$MaxSizeInMegabytes = 1024, # optional default to 1024 [Bool]$SupportOrdering = $True, # optional default to true # [Parameter(Mandatory = $true)] # [ValidatePattern("^[a-z0-9]*$")] [String]$Namespace = "sb4crm2crm", # required needs to be alphanumeric [Bool]$CreateACSNamespace = $True, # optional default to $false [String]$Location = "West Europe" # optional default to "West Europe" ) # Create Azure Service Bus namespace $CurrentNamespace = Get-AzureSBNamespace -Name $Namespace if ($CurrentNamespace) { Write-Output "The namespace [$Namespace] already exists in the [$($CurrentNamespace.Region)] region." } else { Write-Host "The [$Namespace] namespace does not exist." Write-Output "Creating the [$Namespace] namespace in the [$Location] region..." New-AzureSBNamespace -Name $Namespace -Location $Location -CreateACSNamespace $CreateACSNamespace -NamespaceType Messaging $CurrentNamespace = Get-AzureSBNamespace -Name $Namespace Write-Host "The [$Namespace] namespace in the [$Location] region has been successfully created." } $NamespaceManager = [Microsoft.ServiceBus.NamespaceManager]::CreateFromConnectionString($CurrentNamespace.ConnectionString); if ($NamespaceManager.QueueExists($Path)) { Write-Output "The [$Path] queue already exists in the [$Namespace] namespace." } else { Write-Output "Creating the [$Path] queue in the [$Namespace] namespace..." $QueueDescription = New-Object -TypeName Microsoft.ServiceBus.Messaging.QueueDescription -ArgumentList $Path $QueueDescription.EnableDeadLetteringOnMessageExpiration = $EnableDeadLetteringOnMessageExpiration if ($LockDuration -gt 0) { $QueueDescription.LockDuration = [System.TimeSpan]::FromSeconds($LockDuration) } $QueueDescription.MaxDeliveryCount = $MaxDeliveryCount $QueueDescription.MaxSizeInMegabytes = $MaxSizeInMegabytes $QueueDescription.SupportOrdering = $SupportOrdering $NamespaceManager.CreateQueue($QueueDescription); Write-Host "The [$Path] queue in the [$Namespace] namespace has been successfully created." } The full version of the script I used is available here .
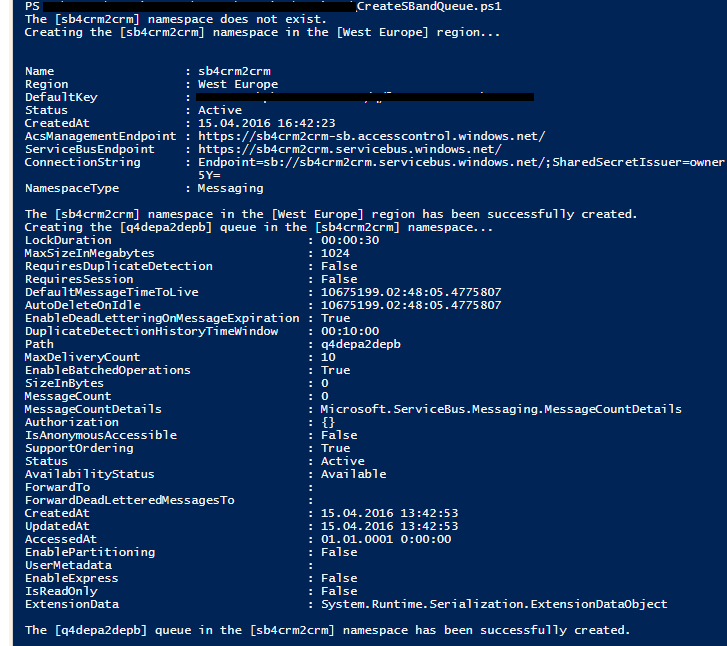
The script is quite simple, the parameters that can be used to create a queue are described in detail in the following article: Azure Service Bus - As I Understand It: Part II (Queues & Messages) . I’ll add that in order for our integration to work correctly, it is necessary to have a clear sequence of messages, since we will process the messages both for creating and changing records, and I don’t want to process the message about changing the record before it is created. In consequence, we do not forget to put the SupportOrdering field in the appropriate value, in this case the queue will work according to the FIFO principle (First In First Out).
After the script has successfully worked on your screen, you should get something like this.
Now, after everything is ready, we can make sure that the queue and the tire have been correctly created and are available on the portal.
2. Connect Dynamics CRM Online to the Azure Service Bus.
So, in order to connect Dynamics CRM to the Azure Service Bus, you need to open the Plugin Registration Tool and establish a connection to the CRM system. After the list of Plugins opens, select the Register and Register New Service Endpoint options.
Next, in the window that opens, fill in the connection settings.
Name is the name of our event. As an example: ContactIntegration.
Description - a description of the call.
Solution Namespace is the name of our service bus. In my case: sb4crm2crm
Path - the name of the queue that will receive messages. In my case: q4depa2depb
Contract - a message transfer contract. There are several options: Queue, Topic, One - way, two - way, REST. We will consider Queue and Topic. You can read more about each of these contracts in the following article: Write a listener for a Microsoft Azure solution. For our integration, select Persistent Queue.
Claim - as additional information in the context of the message, you can send a user ID.
ID - a unique identifier of the created configuration.
After all fields are filled, you can proceed to configuring ACS. To do this, click on the Save & Configure ACS button.
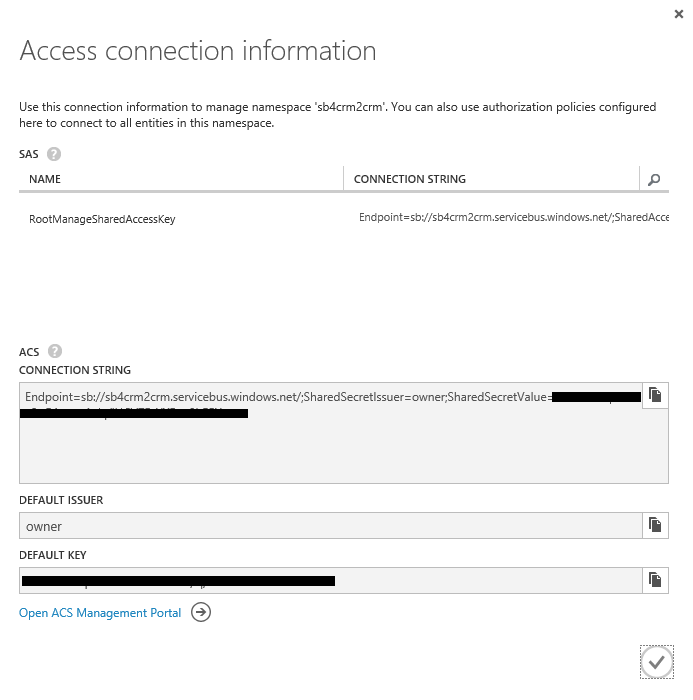
Management Key - this key can be obtained from the Azure portal. To do this, go to the section of service tires.
Select the bus we created and click the Connection Information button.
A window will open in which you can find all the necessary information.
We need the Default Key from the ACS section.
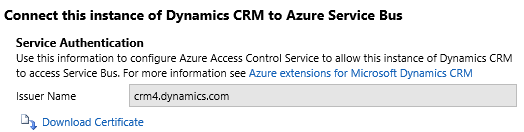
Certificate File - a public certificate that was used when configuring Dynamics CRM for integration with Azure.
Issuer Name - Name of the issuer. The name must be the same as that used when configuring Dynamics CRM for integration with Azure.
The Certificate File and Issuer Name can be found in Dynamics CRM under Settings -> Customizations -> Developer Resources. As follows.
Download the certificate, fill in all the required fields and click on the Configure ACS button. If everything is correct, then after a short time, you will see the following messages:
After that, the window can be closed by clicking on the Close button.
Next, click on the Save & Verify Authentication button. We receive the following message:
Verifying Authentication: Success
Close the window, click the Save button and it's done.
Now it only remains to register which events we specifically want to process and send to our service bus.
To do this, you need to register Plugin Step, as you usually do for your plugins. I register the Create and Update messages for the Contact entity. To do this, just call the context menu on the newly created Service Endpoint and select Register New Step. Filling is intuitive.
Now our created contacts will be sent to the Service Bus.
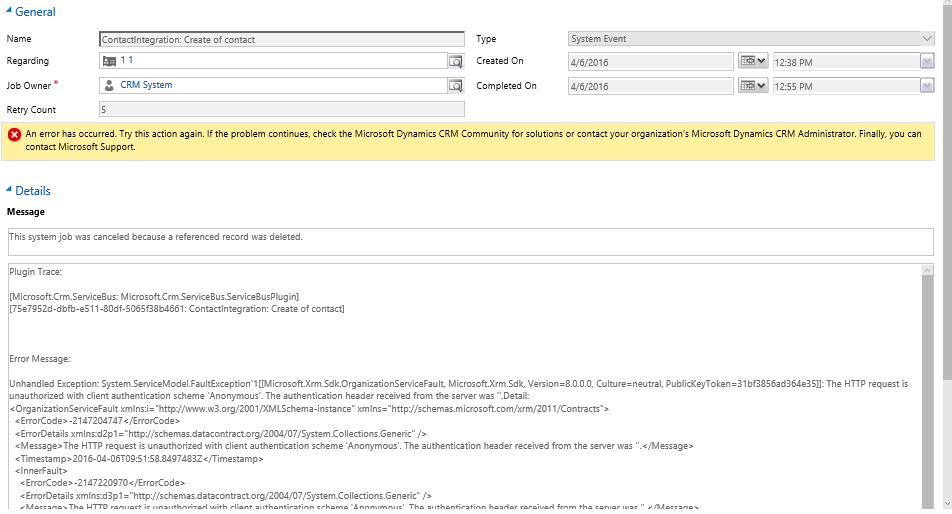
In order to track the success or failure of sending messages from Dynamics CRM, just open the system and go to the Settings -> System Jobs section. Select the entity of interest and download the presentation.
Below is a screenshot of a potential error:
3. Develop a Worker Role to process messages.
It remains for the small, to develop a code that will process our messages, upload them to another system and correctly respond to potential errors.
Any workflow must be running somewhere and in our case this is the Azure Cloud Service.
Let's create a new Azure Cloud Service in Visual Studio.
Further we specify that in the context of our Azure Cloud Service, we want to create Worker Role.
Now that we have the Azure Cloud Service and the Azure Worker Role, we can implement code that can receive messages from our queue. The easiest way to receive messages is shown below.
Any Worker Role contains three required methods - OnStart, Run and OnStop. Let's consider their implementation in the most general form. In the OnStart method, we define the parameters for connecting to our bus, here you can also initiate a connection to the system to which you want to fill data.
public override bool OnStart() { Trace.WriteLine("Creating Queue"); string connectionString = "*** provide your connection string here***"; var namespaceManager = NamespaceManager.CreateFromConnectionString(connectionString); // Client = QueueClient.CreateFromConnectionString(connectionString, QueueName); return base.OnStart(); } The Run method is the most interesting, because here we subscribe to receive messages from our queue and configure the method for receiving data.
public override void Run() { OnMessageOptions options = new OnMessageOptions(); options.AutoComplete = true; // receivedMessage options.MaxConcurrentCalls = 1; // options.ExceptionReceived += LogErrors; // // Start receiveing messages Client.OnMessage((receivedMessage) => // { try { // Trace.WriteLine("Processing Service Bus message: " + receivedMessage.SequenceNumber.ToString()); } catch { // } }, options); CompletedEvent.WaitOne(); } The code is provided with sufficiently detailed comments, so in addition I will not comment on anything here.
Well, and lastly, let's see how the OnStop method looks.
public override void OnStop() { Client.Close(); CompletedEvent.Set(); // Run base.OnStop(); } Here we close all possible connections and finish the execution of the Run function. Learn more about the Azure Cloud Service, you can read in the following article: A detailed description of the development capabilities with Microsoft Azure Cloud Services
It is also worth noting that the publication of the working role can be performed in two variations: Staging and Production. If you publish your role with the Debug build type, you will end up with a Staging deployment, if you use the Release build type, then Production. Even if the role is published and is in the cloud, you can still debug it. In order to learn more about the possibilities of publishing and debugging a worker role in the cloud, I propose to refer to the following article: Debugging an Azure cloud service
4. Architecture of integration of two CRM systems.
In brief, I will describe how the processing of messages in the queue is arranged, which we developed and applied in integrating the two systems. Work begins with the CRMQueueProcessor class, its responsibilities include initializing connections, creating and configuring the “CrmMessageProcessor” message processor class, and also subscribing to receive messages from the bus. As soon as the entire initialization process is completed and a message is received from the bus that needs to be processed, the CrmMessageProcessor enters the work.
CrmMessageProcessor is an implementation of the “Observer” pattern. Its task is to monitor the changes occurring in the system and notify its subscribers about these changes. There may be as many subscribers as possible, each subscriber decides whether or not to process the message for himself. All subscribers are inherited from the base class CrmBaseIntegrationHandler. CrmBaseIntegrationHandler, being an abstract class, offers several methods for its implementation:
getProcessingEntityName () - must be overridden, returns the name of the entity, for example, contact.
getProcessingAction () - should be redefined, returns an action or a set of actions to which the handler should respond. For example: this is the creation of a record.
HandleCrmMessage (string entityLogicalNameValue, string requestNameValue, Entity entity) - accepts the message itself, as well as the nature and type of action, calls the overridden event handler if the event takes place
Entity OnProcessCreateEntity (Entity sourceEntity) - The entry creation handler, it accepts the entity that came from the queue and forms the entity that will be created.
Entity OnProcessUpdateEntity (Entity sourceEntity) - A change entry handler, it accepts an entity that comes from the queue and forms an entity that will be changed.
public class ContactIntegrationHandler : CrmBaseIntegrationHandler { public override string getProcessingEntityName() { return "contact"; } public override CrmMessageType getProcessingAction() { return CrmMessageType.Create | CrmMessageType.Update; } public override Entity OnProcessCreateEntity(Entity sourceEntity) { Entity output = new Entity("contact"); output["new_integrationid"] = sourceEntity.Id.ToString(); output["firstname"] = sourceEntity.GetAttributeValue<string>("firstname"); output["lastname"] = sourceEntity.GetAttributeValue<string>("lastname"); output["jobtitle"] = sourceEntity.GetAttributeValue<string>("jobtitle"); return output; } public override Entity OnProcessUpdateEntity(Entity sourceEntity) { Entity output = new Entity("contact"); output.Id = sourceEntity.Id; if (sourceEntity.Contains("firstname")) { output["firstname"] = sourceEntity.GetAttributeValue<string>("firstname"); } if (sourceEntity.Contains("lastname")) { output["lastname"] = sourceEntity.GetAttributeValue<string>("lastname"); } if (sourceEntity.Contains("jobtitle")) { output["jobtitle"] = sourceEntity.GetAttributeValue<string>("jobtitle"); } return output; } } The CrmMessageProcessor class looks like this:
public class CrmMessageProcessor { List<CrmBaseIntegrationHandler> integrationSubscribers; public CrmMessageProcessor(List<CrmBaseIntegrationHandler> subscribers) { this.integrationSubscribers = subscribers; } public void Subscribe(CrmBaseIntegrationHandler observer) { integrationSubscribers.Add(observer); } public void Unsubscribe(CrmBaseIntegrationHandler observer) { integrationSubscribers.Remove(observer); } public bool ProcessMessage(BrokeredMessage receivedMessage) { object entityLogicalNameValue, requestNameValue; ExtractCrmProperties(receivedMessage, out entityLogicalNameValue, out requestNameValue); if (entityLogicalNameValue == null || requestNameValue == null) { return false; } var context = receivedMessage.GetBody<RemoteExecutionContext>(); Entity entity = (Entity)context.InputParameters["Target"]; foreach (var handler in integrationSubscribers) { var status = handler.HandleCrmMessage((string)entityLogicalNameValue, (string)requestNameValue, entity); if (status.ProcessMessgae) { switch (status.MessageType) { case CrmMessageType.Create: { CrmConnector.Instance.CreateEntity(status.EntityToProcess); return true; } case CrmMessageType.Update: { var guid = CrmConnector.Instance.checkEntityForExistance(status.EntityToProcess); if (guid != Guid.Empty) { status.EntityToProcess.Id = guid; CrmConnector.Instance.UpdateEntity(status.EntityToProcess); return true; } break; } default: { break; } } } } return false; } /// <summary> /// CRM /// </summary> /// <param name="receivedMessage"> </param> /// <param name="entityLogicalNameValue">out: </param> /// <param name="requestNameValue">out: </param> private void ExtractCrmProperties(BrokeredMessage receivedMessage, out object entityLogicalNameValue, out object requestNameValue) { string keyRoot = "http://schemas.microsoft.com/xrm/2011/Claims/"; string entityLogicalNameKey = "EntityLogicalName"; string requestNameKey = "RequestName"; receivedMessage.Properties.TryGetValue(keyRoot + entityLogicalNameKey, out entityLogicalNameValue); receivedMessage.Properties.TryGetValue(keyRoot + requestNameKey, out requestNameValue); } } If none of the processors processed the message, then it is placed in the queue of the unprocessed messages with the corresponding mark. If an error occurred during the processing of the message, we will unblock the message in the queue and try to process it again, and so until the limit of attempts is reached, after which the message goes to the raw message queue. Next is an excerpt from the CrmQueueProcessor class.
public void OnMessageRecieved(BrokeredMessage receivedMessage) { try { if (processor.ProcessMessage(receivedMessage)) receivedMessage.Complete(); else receivedMessage.DeadLetter("Canceled", "No event handler found"); } catch (Exception ex) { receivedMessage.Abandon(); logger.LogCrmMessageException(receivedMessage, ex); } } To get the path to messages from the queue of unprocessed messages, call the FormatDeadLetterPath method on an existing instance of the QueueClient object and pass the name of the working queue as an argument:
QueueClient.FormatDeadLetterPath (queueName)
This line will form the appropriate path, then you can safely subscribe to receive messages and process them.
5. Conclusion
In the example that we have analyzed, a queue is used and all messages are processed by a single workflow. As an alternative to using a queue, you can also use sections (topics), you can configure them so that messages from different entities are processed by different threads within the same working role or in different ones. Each subscriber will have its own queue, and a correctly configured filter will receive only those messages that should be processed by this instance. If you need to synchronize the work of several working roles, then for this you can use Blob leasing, for more information about the synchronization of working roles in Azure, you can read in the following article: Preventing Jobs From Simultaneous to Multiple Role Instances.
The list of articles for which did footnotes:
What is ACS ?
What is Azure PowerShell ?
How to create a service bus queues, using a powershell script .
Azure Service Bus - As I Understand It: Part II (Queues & Messages)
Detailed description of development capabilities with Microsoft Azure Cloud Services
Azure Cloud Debugging Service or Virtual Machine in Visual Studio
Preventing Jobs From Running Simultaneously On Multiple Role Instances.
Source: https://habr.com/ru/post/281797/
All Articles