Unity and MVC: how to pump game development
From translator
Hi, Habr!
I’m not a real welder and the translation of the article was hard for me, so I’ll call it free - I’ll clear my conscience beforehand, if I rephrase the original somewhere too much. I would be happy to point out mistakes in translation, grammar, etc. in lichku.
I publish the translation with the permission of the Toptal site, where the original author Eduardo Dias da Costa is posted.
Usually programmers are introduced to the profession, starting with Hello World. Then they set more and more goals, and each new task leads to an important lesson: the larger the project, the more confusing the code.
And in large and small teams, no one kodit as he pleases. The code must be supported and extensible. After all, the company in which you worked does not appeal to you whenever you need to fix a bug or improve the code. Yes, and you hardly want it.
Therefore, there are design patterns; they are collections of rules for standardized project structuring, which help to divide and organize a large code base, and simplify work with unfamiliar code.
These rules, when followed by all project developers, facilitate support, navigating through the old code and writing a new one. Less time is spent on planning a design approach. But since the problems sometimes differ, the patterns are not a silver bullet. It is necessary to carefully consider the strengths and weaknesses of each before choosing the right one for a particular situation
In this tutorial I will talk about my experience with the popular Unity3D game engine and using the Model-View-Controller (MVC) template. For seven years of work and struggle with spaghetti code in game projects, I have achieved an excellent code structure and speed of development when using it.
I’ll start by explaining the basic Unity architecture: the Entity Component (EC) template, and then tell you how MVC is built on top of it. And I will give an example of a small project layout.
Motivation
To adapt existing design patterns for a specific task, programmers have to change them. This freedom in programming is proof that we have not found the only true software architecture. This article is also not meant as a solution to all problems. It shows the capabilities of two well-known design patterns: EC and MVC.
Template Entity-Component
Entity-Component (EC) is a design pattern, where the hierarchy of the elements of which the application consists (Entities) is first determined, and then the logic and data for each of them (Components) are specified. In "programmer" terms, an Entity may be an object with an array of zero or more Components. We describe it like this: some-entity [component0, component1, ...]
An example of a simple EC tree:
- app [Application] - game [Game] - player [KeyboardInput, Renderer] - enemies - spider [SpiderAI, Renderer] - ogre [OgreAI, Renderer] - ui [UI] - hud [HUD, MouseInput, Renderer] - pause-menu [PauseMenu, MouseInput, Renderer] - victory-modal [VictoryModal, MouseInput, Renderer] - defeat-modal [DefeatModal, MouseInput, Renderer] EC is a good template for leveling multiple inheritance problems, when an intricate class structure can create problems like the diamond problem : class D inherited from B and C with general class A may contain conflicts due to different redefinitions of capabilities A by classes B and C.
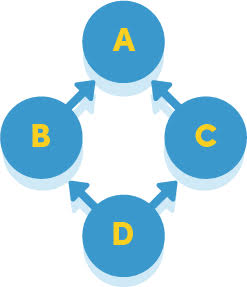
Similar problems often occur with the active use of inheritance.
If you break tasks and data handlers into small Components, they can attach (attach) to Entities and reuse without multiple inheritance, which is not found in C # and JavaScript, the main Unity programming language.
Where Entity-Component does not meet expectations
Being a higher level of OOP , EC helps to defragment and better organize the architecture of the code. However, in large projects we remain “too free” and in the “ocean of possibilities” it is difficult for us to isolate the Entities and Components correctly and organize their interaction. There are an infinite number of options for building Entities and Components.

One way to avoid the mess is to follow additional principles on top of EC. I divide the program into three categories:
- Some process raw data and allow you to create, receive, update, delete and search for them (ie, CRUD);
- Others implement interfaces (user, rather than software, lane) to interact with other elements, detect events related to their area of responsibility, and send notifications about these events;
- Still others are responsible for receiving these notifications, implement the business logic and decide how to change the data.
Fortunately, a design pattern already exists that describes this behavior.
Template Model-View Controller (MVC)
Model-View-Controller divides the program into three main components: Model (CRUD), View (Interface / Detection) and Controller (Solution / Action). MVC is quite flexible and is implemented on top of EC and OOP.
In game and user interface design, there are everyday means of waiting for user input or triggering triggers, sending event notifications, responding to them, and updating data. These actions illustrate the compatibility of the application with MVC.
This methodology introduces another layer of abstraction, which helps in planning software and navigating new developers even for large projects. Separating data, interfaces, and business logic reduces the number of files that a developer will need to touch to add or modify application capabilities.
Unity and EC
Now take a closer look at the possibilities of Unity.
Unity is an EC based platform where GameObject instances appear as Entities, and the ability to make them visible, moving, etc. is provided by the inheritors of the Component class
The Hierarchy Panel and the Inspector Panel are a powerful tool for assembling an application, assigning Components to Entities, configuring their initialization state, and starting the game. Without them, much more code would be required.
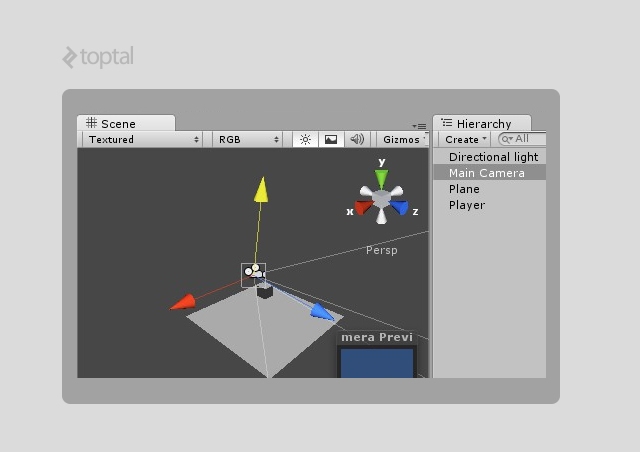
Hierarchy Panel with four GameObjects on the right.
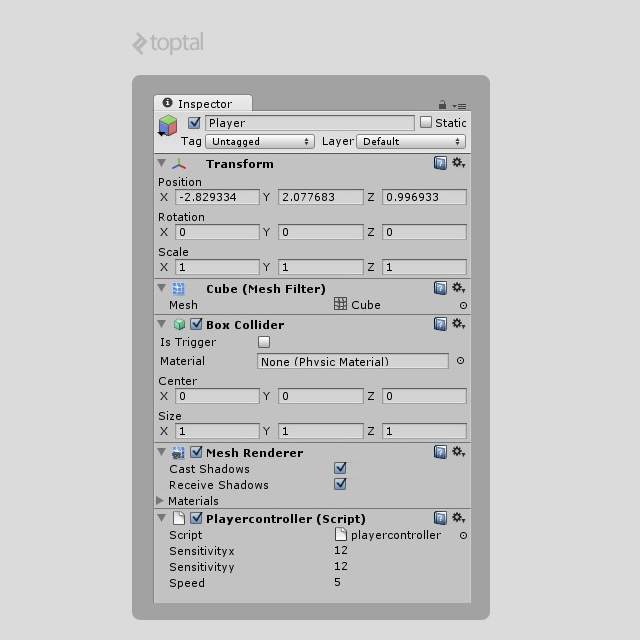
Inspector (Inspector Panel) with GameObject components.
As discussed above, we may face the problem of too many opportunities and end up in a giant hierarchy with business logic scattered here and there.
However, MVC will help us out: we will divide the Entities according to their purpose and structure the application, as shown in the screenshot:
Adaptation MVC for game dev
The time has come for two modifications of the overall MVC pattern to adapt it to Unity-specific MVC-specific situations:
- References to MVC classes should be easy on the code.
- To give another object access to the instance, in Unity, the developer has to drag and drop object references in the editor or use cumbersome (and slow, approx.) Calls to
GetComponent(...). - If Unity has crashed or because of some bug the links built in the editor have broken, the real Hell begins.
- Because of this, you need a root object through which you can access all instances used in the Application .
- To give another object access to the instance, in Unity, the developer has to drag and drop object references in the editor or use cumbersome (and slow, approx.) Calls to
- Some elements encapsulate logic that does not belong to any of the MVC categories and is often reused. I will call them Components . They are also Components in the Essence-Component structure, but in the MVC framework they act as auxiliary classes.
- Example: A
Rotatorcomponent that simply rotates an object. But it does not send notifications, does not store anything and does not contain business logic.
- Example: A
To solve these problems, I modified the original template and called it AMVCC or Application-Model-View-Controller-Component (Application-Model-View-Controller-Component).
- Application - a single point of entry into the application and container for all critical instances and application-dependent data.
- MVC - now you know what it is :)
- Component is a small self-contained and easily reusable script.
In my projects, these two innovations are more than enough.
Example: 10 Bounces
Apply the AMVCC pattern on a small game, let's call it “10 Bounces”. The installation of the game is simple: Ball with SphereCollider and Rigidbody , which will start to fall at the start of the game; Cube as land and 5 scripts to create the AMVCC.
Hierarchy
Before proceeding with the code, I will sketch out the hierarchy of classes and assets, following the AMVCC style.
GameObject view contains all visual elements and View scripts. The model and controller objects in small projects usually contain only one corresponding script, and in larger projects there will be many scripts responsible for specific actions, data, etc.
When does anyone want to access:
- Data : will follow in
application > model > ... - Logic / Workflow (workflow) :
application > controller > ... - Render / Interface / Detection :
application > view > ...
If all teams follow these three rules, legacy projects will not be a problem.
Notice that the hierarchy does not have a separate container for the Component , since they can be independently used by different elements.
Scripting
Pay attention : the scripts shown below is a generalization of the real code. If you want to study a question in more detail, here is the link to my MVC framework Unity MVC. It is structured under AMVCC, so there you will find the base classes needed in most applications.
Now let's take a look at the structure of the “10 Bounces” scripts.
For those unfamiliar with the Unity device, I will briefly explain how GameObjects interact. “Components” from the Entity-Component template are represented by the MonoBehaviour class. To make it available while the application is running, the developer must drag and drop the source file on the GameObject (which is the “Entity” in the EC template) or use the AddComponent<YourMonobehaviour>() command in the AddComponent<YourMonobehaviour>() . After that, the script will be instantiated and ready to use.
Declare two classes.
Application (“A” in AMVCC) is a main class that has only one instance containing references to all elements instantiated in the game. Inside, we will declare three public variables: model , view and controller , which will provide access to the MVC root objects.
Element is an auxiliary base class that gives MVC child instances access to Application .
Remember that both classes are heirs of MonoBehaviour . They are the “Components” attached to the Essence GameObject.
// BounceApplication.cs // Base class for all elements in this application. public class BounceElement : MonoBehaviour { // Gives access to the application and all instances. public BounceApplication app { get { return GameObject.FindObjectOfType<BounceApplication>(); }} } // 10 Bounces Entry Point. public class BounceApplication : MonoBehaviour { // Reference to the root instances of the MVC. public BounceModel model; public BounceView view; public BounceController controller; // Init things here void Start() { } } Inheriting from the BounceElement base classes MVC. Usually BounceModel , BounceView and BounceController act as containers of specialized MVC objects, but in a simplified example, only the View will have a nested structure. Models and Controller enough for one script.
// BounceModel.cs // Contains all data related to the app. public class BounceModel : BounceElement { // Data public int bounces; public int winCondition; } // BounceView .cs // Contains all views related to the app. public class BounceView : BounceElement { // Reference to the ball public BallView ball; } // BallView.cs // Describes the Ball view and its features. public class BallView : BounceElement { // Only this is necessary. Physics is doing the rest of work. // Callback called upon collision. void OnCollisionEnter() { app.controller.OnBallGroundHit(); } } // BounceController.cs // Controls the app workflow. public class BounceController : BounceElement { // Handles the ball hit event public void OnBallGroundHit() { app.model.bounces++; Debug.Log(“Bounce ”+app.model.bounce); if(app.model.bounces >= app.model.winCondition) { app.view.ball.enabled = false; app.view.ball.GetComponent<RigidBody>().isKinematic=true; // stops the ball OnGameComplete(); } } // Handles the win condition public void OnGameComplete() { Debug.Log(“Victory!!”); } } All scripts are created, now you can assign them to GameObjects and configure.
The hierarchy will be:
- application [BounceApplication] - model [BounceModel] - controller [BounceController] - view [BounceView] - ... - ball [BallView] - ... Let's look at how this looks in the Unity editor using the example of BounceModel :
BounceModel with bounces and winCondition .
After installing the scripts and launching the game, the output to the Console will be as follows:
Notifications
When the ball hits the ground, its representation calls the app.controller.OnBallGroundHit() method. This is not to say that this is the “wrong” way to send notifications in the application, but in my experience it is much more convenient to use the simple notification system implemented in the Application class.
Update the BounceApplication:
// BounceApplication.cs class BounceApplication { // Iterates all Controllers and delegates the notification data // This method can easily be found because every class is “BounceElement” and has an “app” // instance. public void Notify(string p_event_path, Object p_target, params object[] p_data) { BounceController[] controller_list = GetAllControllers(); foreach(BounceController c in controller_list) { c.OnNotification(p_event_path,p_target,p_data); } } // Fetches all scene Controllers. public BounceController[] GetAllControllers() { /* ... */ } } Now we need a new script, where developers will specify the names of events, notifications of which may come:
// BounceNotifications.cs // This class will give static access to the events strings. class BounceNotification { static public string BallHitGround = “ball.hit.ground”; static public string GameComplete = “game.complete”; /* ... */ static public string GameStart = “game.start”; static public string SceneLoad = “scene.load”; /* ... */ } Because of this, the developer will be able to open one file and understand the overall behavior of the application, instead of searching for code methods like controller.OnSomethingComplexName .
Now we are adapting BallView and BounceController to work with the new system.
// BallView.cs // Describes the Ball view and its features. public class BallView : BounceElement { // Only this is necessary. Physics is doing the rest of work. // Callback called upon collision. void OnCollisionEnter() { app.Notify(BounceNotification.BallHitGround,this); } } // BounceController.cs // Controls the app workflow. public class BounceController : BounceElement { // Handles the ball hit event public void OnNotification(string p_event_path,Object p_target,params object[] p_data) { switch(p_event_path) { case BounceNotification.BallHitGround: app.model.bounces++; Debug.Log(“Bounce ”+app.model.bounce); if(app.model.bounces >= app.model.winCondition) { app.view.ball.enabled = false; app.view.ball.GetComponent<RigidBody>().isKinematic=true; // stops the ball // Notify itself and other controllers possibly interested in the event app.Notify(BounceNotification.GameComplete,this); } break; case BounceNotification.GameComplete: Debug.Log(“Victory!!”); break; } } } More projects may have a lot of notifications. To get rid of huge switch-cases, it is advisable to create specialized controllers and process different groups of notifications in them.
AMVCC in the real world
“10 Bounces” shows the simplest use of the AMVCC pattern. To use it in practice, you will have to sharpen the thinking within the three MVC categories and learn to visualize entities in the form of an ordered hierarchy.
In large projects, developers are faced with more complex scenarios and often doubt whether this or that entity is a View or Controller, and it may be worthwhile to divide the class into parts.
Practical rules (from Eduardo)
This is not a “Universal Guide to Organizing MVC”, but a set of simple rules that help me to separate the Model, View and Controller.
Usually it happens by itself when I think over the architecture or write the script.
Class division
Models
- Contains the basic data of the application such as the health or stock of the player’s patrons.
- Serialized, deserialized and / or converted between types.
- Load / save data (locally or over the web).
- Inform Controllers about the progress of the operation.
- Store the state of the game state machine.
- Never cause Submissions.
Representation
- Can receive data from Models to display the current state of the game. For example, the Representation method
player.Run()can usemodel.speedto visually display the player’s abilities. - Never changes Models.
- Strictly follows class assignment. For example:
PlayerViewnever detects entering or changing game state.- The view acts like a black interface box and alerts you to important events.
- It does not store important data like speed, health, lives and so on.
Controllers
- Do not store basic game data.
- Can filter notifications from Views.
- Update and use data models.
- Manage actions on the Unity scene.
Class hierarchy
I understand which classes need to be split, when there are too many prefixes in the variables, or the possibility of branching is clearly seen (such as the Player classes in the MMO or the Gun types in the FPS). But for the sake of completeness, I could not get around this point.
For example, the Model with player data has a lot of playerDataA, playerDataB ,… variables or the Controller that handles player notifications, the OnPlayerDidA, OnPlayerDidB,… methods OnPlayerDidA, OnPlayerDidB,… We want to reduce the amount of code and get rid of the player and OnPlayer . Since the Model is easier to understand, I will demonstrate this with her example.
I usually start with a single Model that contains all the game data:
// Model.cs class Model { public float playerHealth; public int playerLives; public GameObject playerGunPrefabA; public int playerGunAmmoA; public GameObject playerGunPrefabB; public int playerGunAmmoB; // Ops Gun[CDE ...] will appear... /* ... */ public float gameSpeed; public int gameLevel; } But the harder the game, the more variables there will be. With enough complexity, we end up with a giant class containing model.playerABCDFoo variables. Nested elements will simplify the code and allow you to switch between data variations.
// Model.cs class Model { public PlayerModel player; // Container of the Player data. public GameModel game; // Container of the Game data. } // GameModel.cs class GameModel { public float speed; // Game running speed (influencing the difficulty) public int level; // Current game level/stage loaded } // PlayerModel.cs class PlayerModel { public float health; // Player health from 0.0 to 1.0. public int lives; // Player “retry” count after he dies. public GunModel[] guns; // Now a Player can have an array of guns to switch ingame. } // GunModel.cs class GunModel { public GunType type; // Enumeration of Gun types. public GameObject prefab; // Template of the 3D Asset of the weapon. public int ammo; // Current number of bullets public int clips; // Number of reloads possible } With such an organization of classes, at once the developer considers one logical unit, which simplifies the understanding of the code. Let's imagine a first-person shooter with a variety of weapons. The data in the GunModel class allows you to create a set of prefabs for each type of weapon and then use them in the game. Prefab - pre-prepared GameObject, ready for quick copying and reuse.
gun0Ammo , gun1Ammo , gun0Clips .., , Gun , Model , Player . , GunModel .
, . . MVC .
: Unity MVC.
Conclusion
. , . . , - .
AMVCC, , Unity MVC , AMVCC.
')
Source: https://habr.com/ru/post/281783/
All Articles