Programming and debugging ARM Cortex-M4 microcontrollers by Atmel in the environment of the Linux operating system. Part 1
We present the electronic version of the article from issue No. 2 for 2016 of the magazine Components and Technologies . Posted by Andrey Kurnits.
This article describes the process of deploying the Atmel SAM4S series microcontroller application ecosystem in a Linux operating system environment. The reader will also get acquainted with the SAM4S-EK evaluation board and the ARM Cortex-M4 family of Atmel microcontrollers. The recommendations for working with the SAM-ICE debug adapter (also known as J-LINK) and the OpenOCD program are given.
The choice of the Linux operating system as the programming environment for Atmel's ARM Cortex-M4 microcontrollers can hardly be called a common practice. On the contrary, to develop for its microcontrollers Atmel freely distributes the Atmel Studio 7 environment, designed exclusively for Windows operating systems. It will not be a secret that the deployment and configuration of the Atmel Studio 7 environment for a beginner will be much easier than the path chosen by the author.
The author suggests using the Qt Creator development environment in conjunction with the GCC cross-compilation toolkit and the OpenOCD debugging package. As the operating system, the author chose Linux Lubuntu 14.04 LTS (running on a virtual machine, but this is not essential). This approach allows you to easily switch to other ARM (and not only) microcontrollers, without changing the usual set of tools. For example, in [1] an example of development for microcontrollers STM32F4 of ST microelectronics firm using the same set of tools is given.
A few words about the terminology used. The hardware device that connects to the target microcontroller and to the workstation is referred to as a debug adapter. A computer program will be called a debugger, which serves for step-by-step execution of a program, viewing values of memory cells, etc.
')
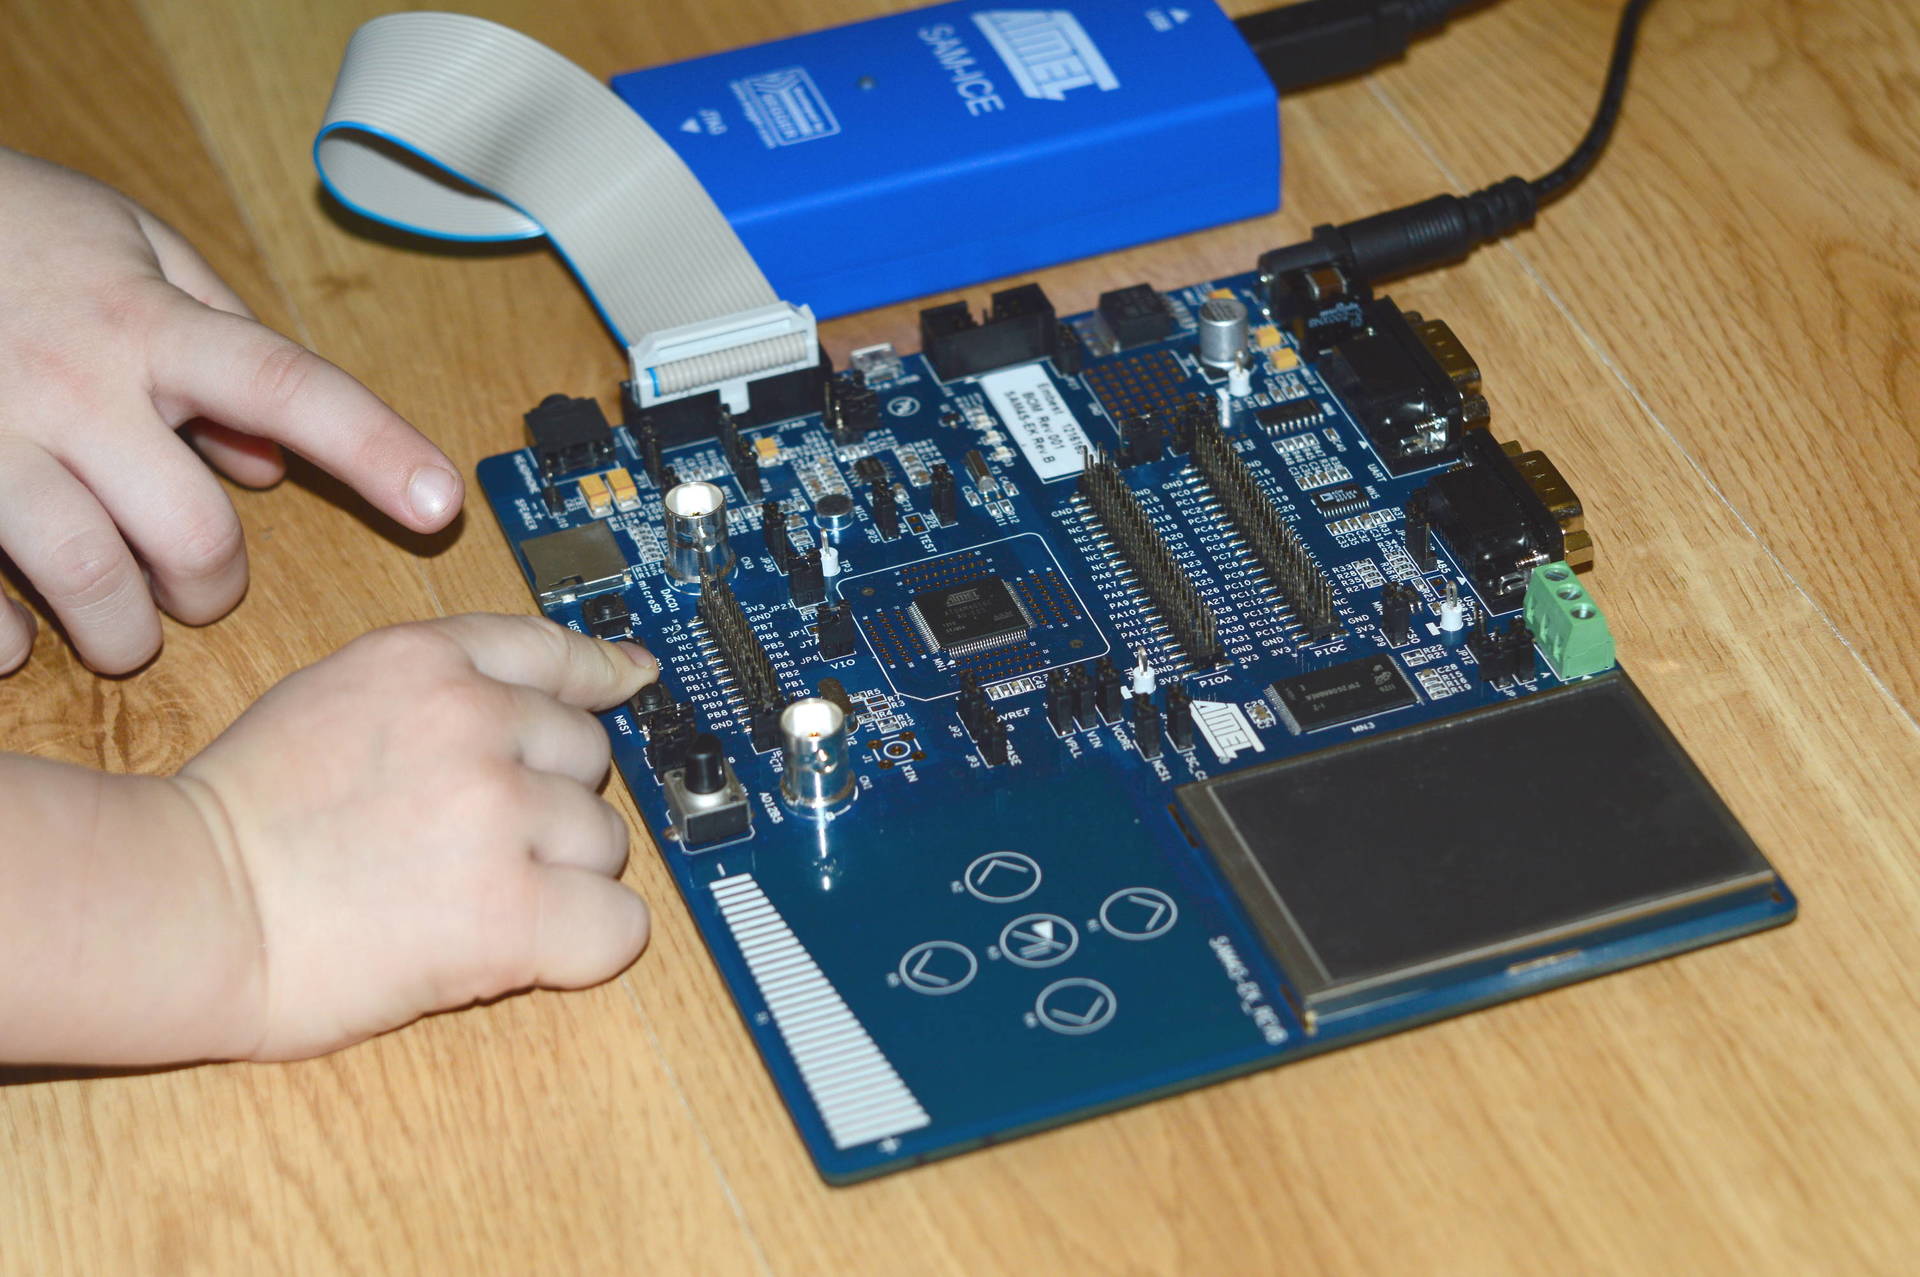
Fig. 1. Appearance of the SAM4S-EK board with a debug adapter attached.
The evaluation board is based on the Atmel SAM4S16C microcontroller, the key features of which are given below:
Among the features of the evaluation board SAM4S-EK are the following:
More details about both the SAM4S-EK board and the SAM4S16C microcontroller can be found on the Atmel website [ 12 ].
When the hardware (SAM4S-EK board) and software (Linux Lubuntu operating system) are identified, you can build a system of hardware and software tools for programming and debugging the target microcontroller (Fig. 2)

Fig. 2. Block diagram of the microcontroller debugging process
The JTAG microcontroller is connected to the SAM-ICE debug adapter, which in turn is connected to the workstation via the USB interface. The power supply of the debug adapter is also supplied via the USB interface, and the power supply of the developer board together with the microcontroller must be carried out separately (not shown in Fig. 2).
A workstation must run some program that will interact with the SAM-ICE debug adapter on the one hand and the GDB debugger, included in the GCC toolkit, on the other. The open-source OpenOCD program [4-6] is ideally suited for this role, which, in addition to debugging, can be used to load the firmware into the flash memory of the microcontroller and for in-circuit testing.
The OpenOCD program supports both the SAM-ICE debug adapter (in fact, it is an analog of the popular J-LINK) and the SAM4S-EK evaluation board (respectively, and the Atmel SAM4 microcontrollers). In addition, OpenOCD is available as source code and can be compiled for the Linux operating system.
The Qt Creator integrated development environment (Fig. 2) receives debugging information through the GDB debugger and provides it in a convenient form for the developer (breakpoints, variable values, step-by-step program execution, etc.)
The OpenOCD program works in server mode and allows connection of other client programs, for example, a telnet client (Fig. 2). This can be convenient for serial programming of microcontrollers in production.
You can install OpenOCD in the least time-consuming way - from the Ubuntu repositories, for which you should run the command:
However, in this case, an outdated version 0.7.0 will be installed (you can check the version of the installed OpenOCD program by running the openocd --version command).
To get the current version (at the time of writing this article - 0.9.0), you need to build OpenOCD from source codes. To do this, follow these steps:
1. Download the OpenOCD sources from the site [ 2 ] by running the command:
As a result, the openocd-0.9.0.tar.bz2 archive file should appear in the home directory.
2. Next, unzip OpenOCD by running the following command:
As a result, the source directory openocd-0.9.0 should appear in the home directory.
3. Check whether the libusb-dev library is installed, which is necessary for the interaction between the workstation and the SAM-ICE adapter via the USB interface. To check for the presence of the libusb-dev library, run the following command:
If the library is installed, the output should be something like this:
If the library is not installed, you can install it by running the command:
4. To build OpenOCD you also need the following packages:
You can check their availability in the same way as libusb-dev libraries, as described above.
5. Now you can build the OpenOCD package with support for the SAM-ICE adapter, for which you should execute the following commands in sequence:
The --enable-jlink switch instructs to enable J-LINK adapter support. The fact is that the SAM-ICE adapter is a modified J-LINK BASE from Segger, so that it can only work with Atmel microcontrollers. However, the program interface for working with J-LINK is fully compatible with the SAM-ICE adapter.
Next, you need to connect the SAM-ICE adapter to the workstation and check the list of USB devices connected with the command:
lsusb
If the SAM-ICE adapter is connected, the command output should contain the following line:
Where 1366 is the VID number (manufacturer code of the USB device), 0101 is the PID number (product code). These numbers will be required later to configure the udev device manager.
In order for the OpenOCD debug server to communicate with the SAM-ICE USB adapter, you must create a rule file for the udev device manager, for example:
In the Nano editor window, enter the following text:
Where the idVendor and idProduct fields correspond to the VID and PID received earlier.
Next, restart the workstation.
If udev is configured as described in [ 3 ], then the OpenOCD debug server can only be started with superuser privileges, which further creates problems with debugging from the QtCreator environment.
It is necessary in the project directory (the author used the ~ / sam / directory) to create an openocd.cfg configuration file with the following contents:
The openocd.cfg file contains prescriptions for the OpenOCD server, namely:
Now that the necessary software is installed, and the debugger is connected to the workstation and the target microcontroller, you can check the performance of the system. To do this, being in the project directory (~ / sam /), start the OpenOCD server with the command
If done correctly, the terminal will be displayed:
In this case, the command line prompt will not be displayed, which indicates that the server has been successfully started and a connection has been established with the target microcontroller via the SAM-ICE debug adapter.
Now you can connect to the debug server via telnet protocol, for which you need to open a second terminal and execute the command:
Where 4444 is the port number specified earlier in the openocd.cfg configuration file. As a result, a connection to the debug server will be established and an invitation to enter commands will appear:
When the connection to the server is established, you can execute any of the OpenOCD commands (the full list is in [ 7 ]), for example, view the contents of the microcontroller's core registers. To do this, stop the program in the microcontroller using the halt command:
Then view the register contents directly with the reg command:
You can shut down the OpenOCD server using the shutdown command, and the telnet connection will also automatically close:
Bundle "SAM-ICE adapter - OpenOCD program" can be used for mass production to download the finished firmware in the flash memory of the microcontroller. For example, to clear the entire flash memory of an Atmel SAM4S16C microcontroller, run the command:
Where 0x00400000 is the address of the beginning of the flash memory in the address space, 0x100000 is the size of the flash memory in hexadecimal number system, for the SAM4S16C microcontroller is 1 MB = 2 ^ 20 bytes = 0x100000 (16) bytes. The address of the beginning of the flash memory and its size is obtained from the documentation for this microcontroller [ 12 ].
If successful, the OpenOCD program output should contain the line:
To write the firmware directly to flash memory, run the following command:
Where sam.hex is the name of the file with the firmware in the Intel HEX format. OpenOCD also accepts other firmware file formats, such as binary and ELF.
If the firmware is successfully loaded into the flash memory, the output should contain the lines:
That is, in this case, only those sectors of flash-memory are cleared into which the firmware will be placed.
Now that the “debug adapter – debug server” bundle is set up and ready to go, you can begin setting up an integrated development environment, in our case, Qt Creator.
It is assumed that the GCC toolkit for the ARM microcontroller is already installed on the workstation, and the Qt Creator environment itself is installed and configured, the installation and configuration process of which is described in detail in [1].
First of all, you need to add a debug server, to do this, in Qt Creator, call the settings (main menu item “Tools -> Options ...”), select the “BareMetal” tab, click “Add” and select the item “OpenOCD ". A window will appear where you can specify the server start-up parameters (Fig. 3). It should be noted that OpenOCD support is added to the Qt Creator environment when the “BareMetal” module is enabled, how to do this is described in [1].

Fig. 3. Adding an OpenOCD debug server to Qt Creator.
The debug server name can be set to “OpenOCD + SAM-ICE” (Fig. 3), the “Run mode” should be set to “Run in TCP / IP mode”, since the OpenOCD server will run on the workstation, the “Host” field should contain the computer name "localhost" and port 3333, specified earlier in the openocd.cfg configuration file.
Enter the name of the openocd executable file (or the full path to it, if necessary) in the "Executable file" field. The “Configuration File” field should contain the path to the OpenOCD configuration file created earlier, in this case ~ sam / openocd.cfg. The "Initialization Commands" and "Reset Commands" fields by default contain commands for managing the server, no need to change their contents.
Then you can add a new device for which the assembly and debugging will be done - the Atmel SAM4S microcontroller family. To do this, in the settings of Qt Creator, select the "Devices" tab and click "Add ...".
After that, enter the device name, for example, “Atmel SAM” and select the previously configured debug server “OpenOCD + SAM-ICE”.
When the device is added, you can finally customize the kit for assembly as shown in Fig. four.

Fig. 4. Adding a kit for Atmel SAM4S microcontrollers in Qt Creator.
The GCC compiler and the GDB debugger are specified from the GCC toolkit for ARM microcontrollers as described in [1].
The continuation of the article will be issued as a separate publication in order not to inflate the volume.
This article describes the process of deploying the Atmel SAM4S series microcontroller application ecosystem in a Linux operating system environment. The reader will also get acquainted with the SAM4S-EK evaluation board and the ARM Cortex-M4 family of Atmel microcontrollers. The recommendations for working with the SAM-ICE debug adapter (also known as J-LINK) and the OpenOCD program are given.
Introduction
The choice of the Linux operating system as the programming environment for Atmel's ARM Cortex-M4 microcontrollers can hardly be called a common practice. On the contrary, to develop for its microcontrollers Atmel freely distributes the Atmel Studio 7 environment, designed exclusively for Windows operating systems. It will not be a secret that the deployment and configuration of the Atmel Studio 7 environment for a beginner will be much easier than the path chosen by the author.
The author suggests using the Qt Creator development environment in conjunction with the GCC cross-compilation toolkit and the OpenOCD debugging package. As the operating system, the author chose Linux Lubuntu 14.04 LTS (running on a virtual machine, but this is not essential). This approach allows you to easily switch to other ARM (and not only) microcontrollers, without changing the usual set of tools. For example, in [1] an example of development for microcontrollers STM32F4 of ST microelectronics firm using the same set of tools is given.
A few words about the terminology used. The hardware device that connects to the target microcontroller and to the workstation is referred to as a debug adapter. A computer program will be called a debugger, which serves for step-by-step execution of a program, viewing values of memory cells, etc.
')
Hardware platform
Fig. 1. Appearance of the SAM4S-EK board with a debug adapter attached.
The evaluation board is based on the Atmel SAM4S16C microcontroller, the key features of which are given below:
- ARM Cortex-M4 core, maximum clock frequency 120 MHz
- The amount of memory on a chip: 1 MB of flash-memory and 128 KB of RAM
- Among the peripheral devices, you can highlight: USB controller (work only in the Device mode), external NAND flash memory controller, SD memory card controller
- Interface controllers UART, I2C, SPI, etc.
- 100-pin package
Among the features of the evaluation board SAM4S-EK are the following:
- Microchip NAND flash-memory Micron MT29F2G08ABAEA 2 Gb
- FTM280C34D color display module with a resolution of 320x240 pixels, 2.8 inches diagonal and a resistive touch panel. The display contains an integrated Ilitek ILI9320 controller connected to the microcontroller via a parallel interface.
- Controller resistive touch panel Texas Instruments ADS7843E
- Two DB9 connectors for two RS-232 ports (one of them with RTS, CTS signals) are wired, RS-485 interface is also output
- The elements of the touch control technology Atmel QTouch, located directly on the PCB (touch buttons 5 pcs. And the slider)
- Electret microphone and operational amplifier TS922 for him
- Audio amplifier for connecting headphones TPA022, as well as a 3.5mm jack-type jack.
- Two coaxial BNC connectors that are connected to the built-in ADC and DAC microcontroller units.
- Micro SD card holder
- 63 general-purpose outputs (GPIO) are output to IDC connectors in 2.54 mm pitch.
More details about both the SAM4S-EK board and the SAM4S16C microcontroller can be found on the Atmel website [ 12 ].
Tool kit
When the hardware (SAM4S-EK board) and software (Linux Lubuntu operating system) are identified, you can build a system of hardware and software tools for programming and debugging the target microcontroller (Fig. 2)
Fig. 2. Block diagram of the microcontroller debugging process
The JTAG microcontroller is connected to the SAM-ICE debug adapter, which in turn is connected to the workstation via the USB interface. The power supply of the debug adapter is also supplied via the USB interface, and the power supply of the developer board together with the microcontroller must be carried out separately (not shown in Fig. 2).
A workstation must run some program that will interact with the SAM-ICE debug adapter on the one hand and the GDB debugger, included in the GCC toolkit, on the other. The open-source OpenOCD program [4-6] is ideally suited for this role, which, in addition to debugging, can be used to load the firmware into the flash memory of the microcontroller and for in-circuit testing.
The OpenOCD program supports both the SAM-ICE debug adapter (in fact, it is an analog of the popular J-LINK) and the SAM4S-EK evaluation board (respectively, and the Atmel SAM4 microcontrollers). In addition, OpenOCD is available as source code and can be compiled for the Linux operating system.
The Qt Creator integrated development environment (Fig. 2) receives debugging information through the GDB debugger and provides it in a convenient form for the developer (breakpoints, variable values, step-by-step program execution, etc.)
The OpenOCD program works in server mode and allows connection of other client programs, for example, a telnet client (Fig. 2). This can be convenient for serial programming of microcontrollers in production.
Install OpenOCD
You can install OpenOCD in the least time-consuming way - from the Ubuntu repositories, for which you should run the command:
sudo apt-get install openocd However, in this case, an outdated version 0.7.0 will be installed (you can check the version of the installed OpenOCD program by running the openocd --version command).
To get the current version (at the time of writing this article - 0.9.0), you need to build OpenOCD from source codes. To do this, follow these steps:
1. Download the OpenOCD sources from the site [ 2 ] by running the command:
cd ~ wget http://downloads.sourceforge.net/project/openocd/openocd/0.9.0/openocd-0.9.0.tar.bz2. As a result, the openocd-0.9.0.tar.bz2 archive file should appear in the home directory.
2. Next, unzip OpenOCD by running the following command:
tar xvf openocd-0.9.0.tar.bz2 As a result, the source directory openocd-0.9.0 should appear in the home directory.
3. Check whether the libusb-dev library is installed, which is necessary for the interaction between the workstation and the SAM-ICE adapter via the USB interface. To check for the presence of the libusb-dev library, run the following command:
sudo dpkg --get-selections | grep libusb If the library is installed, the output should be something like this:
libusb-0.1-4:i386 install libusb-1.0-0:i386 install libusb-1.0-0-dbg:i386 install libusb-1.0-0-dev:i386 install libusb-1.0-doc install libusbmuxd2 install If the library is not installed, you can install it by running the command:
sudo apt-get install libusb-dev 4. To build OpenOCD you also need the following packages:
- make,
- libtool,
- pkg-config version 0.23 and higher
- autoconf version 2.64 and higher
- automake version 1.9 and higher
- texinfo
You can check their availability in the same way as libusb-dev libraries, as described above.
5. Now you can build the OpenOCD package with support for the SAM-ICE adapter, for which you should execute the following commands in sequence:
cd ~/openocd-0.9.0 ./configure --enable-jlink make sudo make install The --enable-jlink switch instructs to enable J-LINK adapter support. The fact is that the SAM-ICE adapter is a modified J-LINK BASE from Segger, so that it can only work with Atmel microcontrollers. However, the program interface for working with J-LINK is fully compatible with the SAM-ICE adapter.
SAM-ICE adapter connection
Next, you need to connect the SAM-ICE adapter to the workstation and check the list of USB devices connected with the command:
lsusb
If the SAM-ICE adapter is connected, the command output should contain the following line:
Bus 002 Device 003: ID 1366:0101 SEGGER J-Link ARM Where 1366 is the VID number (manufacturer code of the USB device), 0101 is the PID number (product code). These numbers will be required later to configure the udev device manager.
In order for the OpenOCD debug server to communicate with the SAM-ICE USB adapter, you must create a rule file for the udev device manager, for example:
sudo nano /etc/udev/rules.d/45-jlink.rules In the Nano editor window, enter the following text:
SUBSYSTEMS=="usb", ATTRS{idVendor}=="1366", ATTRS{idProduct}=="0101", \ MODE:="0666", \ SYMLINK+="jlink_%n" Where the idVendor and idProduct fields correspond to the VID and PID received earlier.
Next, restart the workstation.
If udev is configured as described in [ 3 ], then the OpenOCD debug server can only be started with superuser privileges, which further creates problems with debugging from the QtCreator environment.
SAM-ICE adapter and OpenOCD debug server collaboration
It is necessary in the project directory (the author used the ~ / sam / directory) to create an openocd.cfg configuration file with the following contents:
telnet_port 4444 gdb_port 3333 source [find interface/jlink.cfg] source [find board/atmel_sam4s_ek.cfg] gdb_flash_program enable The openocd.cfg file contains prescriptions for the OpenOCD server, namely:
- allow connection to the server via telnet protocol on port 4444,
- set port 3333 to connect the GDB debugger,
- Connect to the J-LINK adapter (SAM-ICE)
- target platform — Atmel SAM4S_EK Evaluation Board,
- enable flash memory programming
Now that the necessary software is installed, and the debugger is connected to the workstation and the target microcontroller, you can check the performance of the system. To do this, being in the project directory (~ / sam /), start the OpenOCD server with the command
openocd If done correctly, the terminal will be displayed:
Open On-Chip Debugger 0.9.0 (2015-12-29-14:45) Licensed under GNU GPL v2 For bug reports, read http://openocd.org/doc/doxygen/bugs.html Info : auto-selecting first available session transport "jtag". To override use 'transport select <transport>'. adapter speed: 500 kHz adapter_nsrst_delay: 100 jtag_ntrst_delay: 100 cortex_m reset_config sysresetreq Info : J-Link ARM V8 compiled Nov 25 2013 19:20:08 Info : J-Link caps 0xb9ff7bbf Info : J-Link hw version 80000 Info : J-Link hw type J-Link Info : J-Link max mem block 9296 Info : J-Link configuration Info : USB-Address: 0x0 Info : Kickstart power on JTAG-pin 19: 0xffffffff Info : Vref = 3.313 TCK = 1 TDI = 0 TDO = 0 TMS = 0 SRST = 1 TRST = 1 Info : J-Link JTAG Interface ready Info : clock speed 500 kHz Info : JTAG tap: sam4.cpu tap/device found: 0x4ba00477 (mfg: 0x23b, part: 0xba00, ver: 0x4) Info : sam4.cpu: hardware has 6 breakpoints, 4 watchpoints In this case, the command line prompt will not be displayed, which indicates that the server has been successfully started and a connection has been established with the target microcontroller via the SAM-ICE debug adapter.
Now you can connect to the debug server via telnet protocol, for which you need to open a second terminal and execute the command:
telnet localhost 4444 Where 4444 is the port number specified earlier in the openocd.cfg configuration file. As a result, a connection to the debug server will be established and an invitation to enter commands will appear:
Trying 127.0.0.1... Connected to localhost. Escape character is '^]'. Open On-Chip Debugger > When the connection to the server is established, you can execute any of the OpenOCD commands (the full list is in [ 7 ]), for example, view the contents of the microcontroller's core registers. To do this, stop the program in the microcontroller using the halt command:
> halt target state: halted target halted due to debug-request, current mode: Thread xPSR: 0x81000000 pc: 0x004003e6 msp: 0x20003488 Then view the register contents directly with the reg command:
> reg ===== arm v7m registers (0) r0 (/32): 0x00000013 (1) r1 (/32): 0x00000800 (2) r2 (/32): 0x004023D8 (3) r3 (/32): 0x00000000 (4) r4 (/32): 0x81CBF6AB (5) r5 (/32): 0x788E2033 (6) r6 (/32): 0x5C2195CC (7) r7 (/32): 0x20003488 … … … You can shut down the OpenOCD server using the shutdown command, and the telnet connection will also automatically close:
> shutdown shutdown command invoked Connection closed by foreign host. andy@andy-vm:~$ Bundle "SAM-ICE adapter - OpenOCD program" can be used for mass production to download the finished firmware in the flash memory of the microcontroller. For example, to clear the entire flash memory of an Atmel SAM4S16C microcontroller, run the command:
openocd -f interface/jlink.cfg -f board/atmel_sam4s_ek.cfg -c init -c halt -c "flash erase_address 0x00400000 0x100000" -c reset -c shutdown Where 0x00400000 is the address of the beginning of the flash memory in the address space, 0x100000 is the size of the flash memory in hexadecimal number system, for the SAM4S16C microcontroller is 1 MB = 2 ^ 20 bytes = 0x100000 (16) bytes. The address of the beginning of the flash memory and its size is obtained from the documentation for this microcontroller [ 12 ].
If successful, the OpenOCD program output should contain the line:
erased address 0x00400000 (length 1048576) in 4.685278s (218.557 KiB/s) To write the firmware directly to flash memory, run the following command:
openocd -f interface/jlink.cfg -f board/atmel_sam4s_ek.cfg -c init -c halt -c "flash write_image erase sam.hex" -c reset -c shutdown Where sam.hex is the name of the file with the firmware in the Intel HEX format. OpenOCD also accepts other firmware file formats, such as binary and ELF.
If the firmware is successfully loaded into the flash memory, the output should contain the lines:
Info : sam4 does not auto-erase while programming (Erasing relevant sectors) Info : sam4 First: 0x00000000 Last: 0x00000000 Info : Erasing sector: 0x00000000 wrote 8192 bytes from file sam.hex in 2.979438s (2.685 KiB/s) That is, in this case, only those sectors of flash-memory are cleared into which the firmware will be placed.
Creating a Kit in Qt Creator
Now that the “debug adapter – debug server” bundle is set up and ready to go, you can begin setting up an integrated development environment, in our case, Qt Creator.
It is assumed that the GCC toolkit for the ARM microcontroller is already installed on the workstation, and the Qt Creator environment itself is installed and configured, the installation and configuration process of which is described in detail in [1].
First of all, you need to add a debug server, to do this, in Qt Creator, call the settings (main menu item “Tools -> Options ...”), select the “BareMetal” tab, click “Add” and select the item “OpenOCD ". A window will appear where you can specify the server start-up parameters (Fig. 3). It should be noted that OpenOCD support is added to the Qt Creator environment when the “BareMetal” module is enabled, how to do this is described in [1].
Fig. 3. Adding an OpenOCD debug server to Qt Creator.
The debug server name can be set to “OpenOCD + SAM-ICE” (Fig. 3), the “Run mode” should be set to “Run in TCP / IP mode”, since the OpenOCD server will run on the workstation, the “Host” field should contain the computer name "localhost" and port 3333, specified earlier in the openocd.cfg configuration file.
Enter the name of the openocd executable file (or the full path to it, if necessary) in the "Executable file" field. The “Configuration File” field should contain the path to the OpenOCD configuration file created earlier, in this case ~ sam / openocd.cfg. The "Initialization Commands" and "Reset Commands" fields by default contain commands for managing the server, no need to change their contents.
Then you can add a new device for which the assembly and debugging will be done - the Atmel SAM4S microcontroller family. To do this, in the settings of Qt Creator, select the "Devices" tab and click "Add ...".
After that, enter the device name, for example, “Atmel SAM” and select the previously configured debug server “OpenOCD + SAM-ICE”.
When the device is added, you can finally customize the kit for assembly as shown in Fig. four.
Fig. 4. Adding a kit for Atmel SAM4S microcontrollers in Qt Creator.
The GCC compiler and the GDB debugger are specified from the GCC toolkit for ARM microcontrollers as described in [1].
The continuation of the article will be issued as a separate publication in order not to inflate the volume.
Literature
- Kurnits A. Development for STM32 microcontrollers in the environment of the Linux operating system // Components and technologies. 2015. № 10.
- www.sourceforge.net/projects/openocd
- www.we.easyelectronics.ru/CADSoft/ubuntueclipse-code-sourcery-openocd-j-link-arm-ilibystryy-start-dlya-somnevayuschihsya.html
- www.microsin.net/programming/arm/openocdmanual-part1.html
- www.microsin.net/programming/ARM/openocdmanual-part2.html
- www.microsin.net/programming/ARM/openocdmanual-part3.html
- www.openocd.org/doc/html/General-Commands.html
- www.asf.atmel.com/docs/latest/download.html
- www.atmel.com/tools/ATMELSTUDIO.aspx
- www.sourceware.org/newlib/libc.html#Syscalls
- www.e-kit.ru
- www.atmel.com/images/atmel-11100-32-bit%20cortex-m4-microcontroller-sam4s_datasheet.pdf
Source: https://habr.com/ru/post/281665/
All Articles