Development for copters
Recently, copters from toys and flying cameras are becoming Big Business. Copters deliver cargoes, take pictures of the terrain, guard the perimeter, spray chemicals in the fields and even paint, in general, perform various kinds of tasks. Of course, most actions are not done manually, from the console, but are performed programmatically.
Copters are different. There is no uniform standard. At the heart of any copter is a flight controller that accumulates data from sensors, controls stabilization and position in space. Controlling from the console you send commands to the flight controller, as a result of which the engine revolutions change, which allows you to move in the air. In more advanced copters other than the console, control is available from the Ground Station (Ground Station). Using an on-board mini-computer with a connection directly to the flight controller combines the advantages of a hand-held control unit and a ground station, allows you to automate the flight and interact with the outside world.
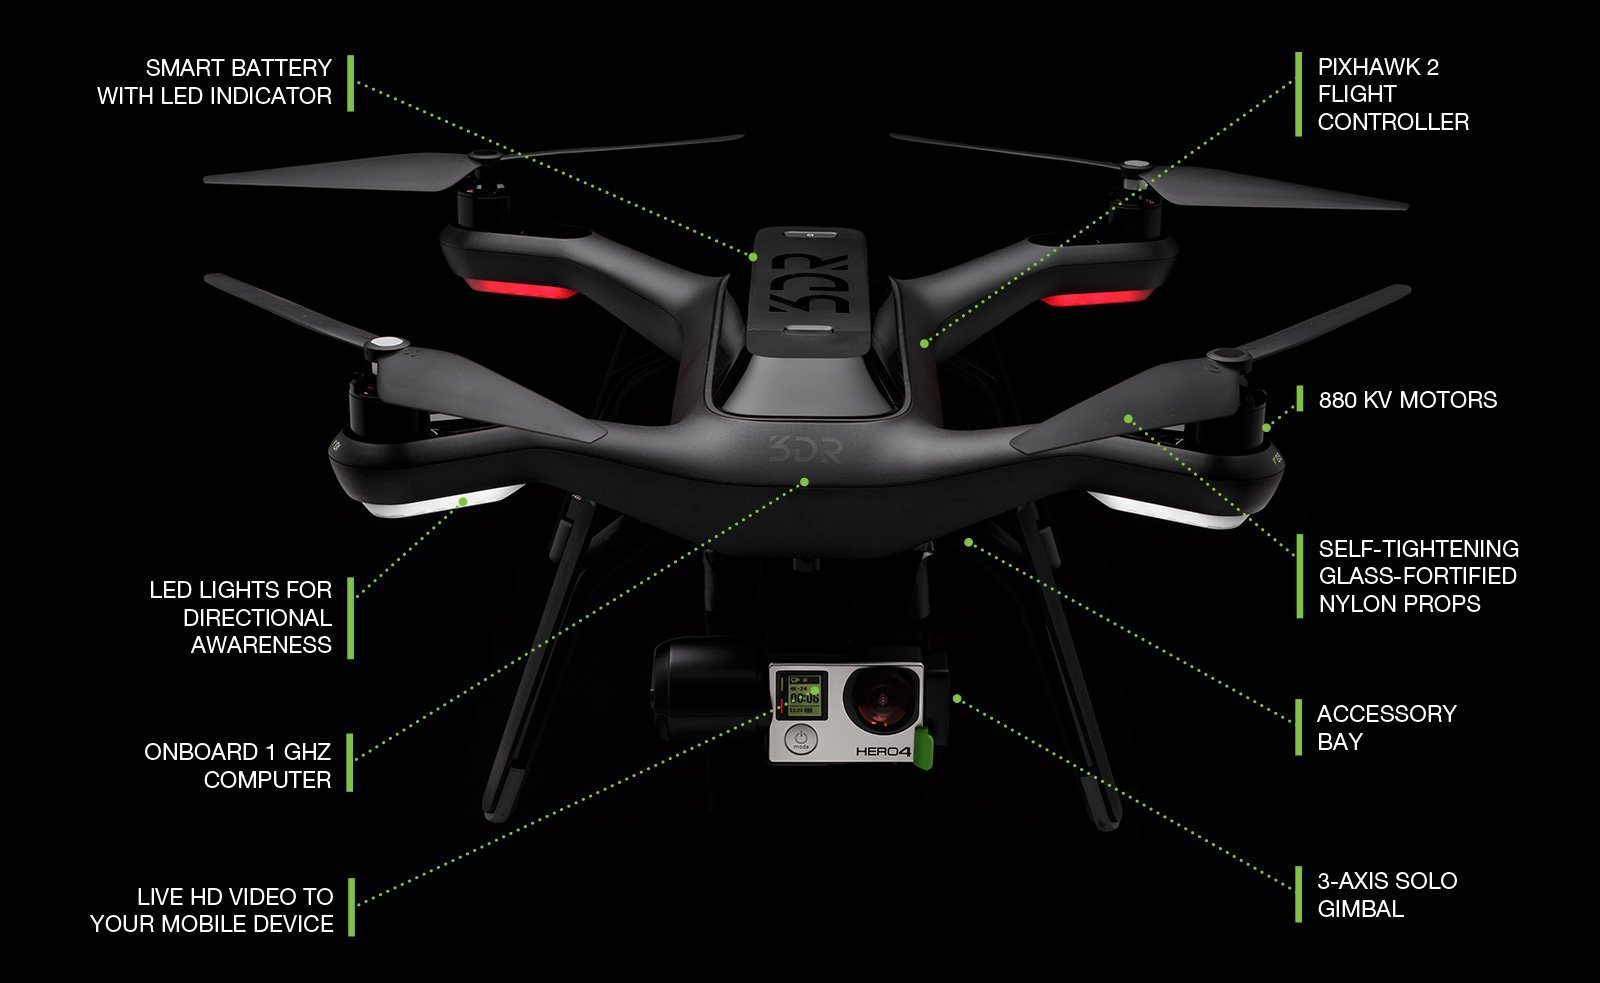
My project required a ready-made platform with the possibility of expansion. At the same time, I would like everything to work out of the box. It is necessary to lift 500-600 grams of cargo, including the on-board mini-computer for data processing directly in flight. And of course the price should be within reasonable limits. At that time, Solo was released - a new model from 3DR on Pixhawk 2 , in which, in addition to “full stuffing,” a mini-computer running Linux was installed, communicating via WiFi, and the ability to connect directly to the flight controller and to the onboard computer. Load capacity up to 700 grams. In general, what is needed and after a while he was with me.
')
When enabled, the controller creates a WiFi network, the copter is available at 10.1.1.10, and the controller is 10.1.1.1. in either case, there is ssh access:
Inside, Linux is used, which is based on the Yocto Project 1.5.1 on the ARM Cortex A9 / Freescale i.MX6. The system is reduced by an 8Gb microSD card, of which 7.2Gb occupies the section for flight logs. By default, for the OS and the code is the minimum. If you are going to change something in the system, then be sure to make a backup. You will have to remove the engines, open the case and get the main board. The size of the microSD partitions in this case will have to change or replace the card with a larger one before copying the data through ddresque and changing the size of the ext3 partitions.
At the bottom of the Solo there is a connector through which USB, UAVCAN , UART outputs for accessing imx6 and Pixhawk are output. Additional conclusions are available from the board, including those from under Pixhawk, but you will have to pick up a soldering iron. For example, a USB cable is used to connect third-party devices and works in OTG host mode, for connecting external devices when closing a jumper, or as a device when connecting to an external computer. For those who do not want to mess around with a soldering iron, we developed the Accessory Breakout Board on which most of the findings already exist, it remains only to use the appropriate connectors.

When there is no interference, the signal from the controller to the copter reaches more than 500 meters, 800 according to the specification, which allows you to control it online from a laptop through a WiFi network. In good weather, the copter is observed at a distance of up to 300-400 meters, everything that further turns into a point and manual control is available only with the help of FPV or automation. For long and complex distances, it is better to fill the control scripts directly on Solo to eliminate problems with communication and visibility. By default, scripts can be loaded via sftp, rsync, as well as through the solo utility. For scripts, it is highly desirable to use virtualenv, otherwise versions of packages may conflict with the system ones.
Mavlink (Micro Air Vehicle Communication Protocol) is an open communication protocol that most open flight controllers support: APM / Pixhawk, MultiWii, Navio, and others. With mavlink, you can send control commands, set missions and receive telemetry. From the time of its appearance, it began to be used not only for micro aviation (copter, plane), but also for controlling micro cars, boats and even submarines. Depending on the type of vehicle and controller used, the functionality is slightly different.
For python, the mavlink protocol is implemented in the pymavlink module. Directly using it is not very comfortable and partially implemented its wrapper in DroneKit . Partly, because in practice, far from everything has been done, and we constantly have to contact mavlink. Unrealized mavlink features are in flight controllers, i.e. the presence of one or another functional has to be checked and tested. Some commands and modes may be not only not implemented, but also have different names from others. Therefore, it is better to develop a specific controller and be confident in its future support.
Solo is large enough, 46 cm between the motors, with screws even more, i.e. in a small room it is better not to run it. Navigation in the room via GPS does not work, so we go further into the street. Before the flight, look at the current parameters of the copter:
Modes are a set of predefined actions and available functionality. So in ALT_HOLD the set height will be saved and the movement functions are available, AUTO starts the missions, and LAND sets the rotor and turns off the motors. In some modes, GPS and GPS Lock are required before starting, others work without it. If necessary, you can make your own modes and program the desired behavior.
It's time to take off:
After the connection, we wait until all the preflight checks are completed and the vehicle.is_armable becomes True. Next, switch to GUIDED mode which allows you to consistently set points when reaching which the copter will wait for "further instructions." A coefficient of 0.95 is not necessary, but the accuracy of the sensors is not ideal, and this has to be taken into account. On the other hand, this allows not to lose time, because there is inertia and speed in flight is not uniform. The last centimeters will take a few extra seconds, but our battery quickly sits down and ± the extra meter of height is not critical.
It is time tofly off somewhere. We set the latitude, longitude and height of the place where we send the copter.
Do not forget to change the coordinates to yours! If you suddenly forget, you can take over the control of the Solo by pressing the Pause button on the remote control or by lifting both sticks to the upper right corner. As a last resort, I hope that you connect the tablet and get data from gps, and on board you can consider the phone number for communication.
In flight, you can control some parameters, such as speed:
In this case, there is no notification mechanism about the achievement of a given goal ... remember that we made a mavlink connection via UDP? Our message can go nowhere, and this sometimes happens, especially at long distances.
Knowing the speed and distance to calculate the arrival time and set the timer is not a problem. Ideally, this will work. For a copter, any wind, headwind, tailwind, side wind makes its own adjustments. The calm “on the ground” does not mean at all that there is no wind at 30-50-100 meters, so the linear calculation will be very, very approximate.
A more accurate way is of course to check the position on the GPS / Glonass / Gallileo / Beidou. Depending on the chip used and its settings, the check makes sense no more than 1-10 times per second, sometimes the interval is longer. In this case, the accuracy of the location can be plus or minus a few meters.
Reaching a given point, we return home. By analogy, to set a coordinate and to land using LAND mode on arrival as well is a difficult way. The fact is that at the start, the initial position data is stored for the entire duration of the flight, and there is an RTL (Return To Launch) mode for returning home. In RTL, the copter first rises to the “return height” RTL_ALT, this eliminates the possibility of colliding with trees and high-altitude objects, returns the copter to the starting point, automatically puts the device and turns off the motors.
After some time, the copter will arrive and after landing, happily scribing about the arrival. You can breathe out ... all is well! Result on video:
The problem is that it may not fly, not fly, or fly the wrong way. Any mistake is expensive. And this is not only a kopter, but also a load on it. In addition to purely software errors and problems with the equipment, there are problems with the service. For example, it is desirable to have an even and clean platform for takeoff / landing, you can sit with one foot on a rock ... and roll over. Even with takeoff, certain problems appear, for example, if you need to take off from a yacht swinging on the waves.
Whatever the pain of falls and other troubles, we test scripts in SITL (Software in the Loop). SITL is a flight simulator that allows you to work out various situations, including some weather conditions, terrain features, GPS malfunction, loss of signal, etc. SITL does not always work correctly, but overall not bad. Full testing replace in any case will not work. For 3D visualization, use SITL with FlightGear or jMAVSim .
Take off, check in and return - it's easy. Many useful functions have already been implemented for missions, flying along a radius, following an object, controlling standard equipment: a camera and a suspension. However, the kopter flies "blind", does not see and does not analyze the situation. We have to set the maximum parameters as in RTL or use various sensors, cameras, additional equipment for calculations, eventually making our own sensors and situation assessment systems. Therefore, it is desirable to have at least a general idea of electronics, robotics, level matching, data transfer protocols, and sensors. All this will be needed anyway if you go deep into this topic.
Copters are different. There is no uniform standard. At the heart of any copter is a flight controller that accumulates data from sensors, controls stabilization and position in space. Controlling from the console you send commands to the flight controller, as a result of which the engine revolutions change, which allows you to move in the air. In more advanced copters other than the console, control is available from the Ground Station (Ground Station). Using an on-board mini-computer with a connection directly to the flight controller combines the advantages of a hand-held control unit and a ground station, allows you to automate the flight and interact with the outside world.
My project required a ready-made platform with the possibility of expansion. At the same time, I would like everything to work out of the box. It is necessary to lift 500-600 grams of cargo, including the on-board mini-computer for data processing directly in flight. And of course the price should be within reasonable limits. At that time, Solo was released - a new model from 3DR on Pixhawk 2 , in which, in addition to “full stuffing,” a mini-computer running Linux was installed, communicating via WiFi, and the ability to connect directly to the flight controller and to the onboard computer. Load capacity up to 700 grams. In general, what is needed and after a while he was with me.
')
About DJI and self-collection
Ready-made platforms can be divided into DJI and mavlink. Last year, DJI released the onboard SDK for the Matrice 100, but the price is very high. Another very controversial point in the production of DJI is the registration of applications on the type of Apple Store. In industrial applications, this is not only a binding to the platform, but also a serious limitation.
For Phantom, official support for third-party software and hardware is not provided. Mobile SDK does not count, because do not fit into my tasks.
At the same time, mavlink is supported by a large number of available flight controllers and there is every opportunity not only to build any platform for a task, but also to switch to another controller without rewriting the entire code.
Assembling a kopter from individual parts is now becoming too expensive, the competition in the kopter market is very high and prices for factory models are rapidly falling. Modifying the finished model to the required level is often cheaper and faster than collecting everything from scratch.
When enabled, the controller creates a WiFi network, the copter is available at 10.1.1.10, and the controller is 10.1.1.1. in either case, there is ssh access:
ssh root@10.1.1.10
password TjSDBkAu
Inside, Linux is used, which is based on the Yocto Project 1.5.1 on the ARM Cortex A9 / Freescale i.MX6. The system is reduced by an 8Gb microSD card, of which 7.2Gb occupies the section for flight logs. By default, for the OS and the code is the minimum. If you are going to change something in the system, then be sure to make a backup. You will have to remove the engines, open the case and get the main board. The size of the microSD partitions in this case will have to change or replace the card with a larger one before copying the data through ddresque and changing the size of the ext3 partitions.
At the bottom of the Solo there is a connector through which USB, UAVCAN , UART outputs for accessing imx6 and Pixhawk are output. Additional conclusions are available from the board, including those from under Pixhawk, but you will have to pick up a soldering iron. For example, a USB cable is used to connect third-party devices and works in OTG host mode, for connecting external devices when closing a jumper, or as a device when connecting to an external computer. For those who do not want to mess around with a soldering iron, we developed the Accessory Breakout Board on which most of the findings already exist, it remains only to use the appropriate connectors.
When there is no interference, the signal from the controller to the copter reaches more than 500 meters, 800 according to the specification, which allows you to control it online from a laptop through a WiFi network. In good weather, the copter is observed at a distance of up to 300-400 meters, everything that further turns into a point and manual control is available only with the help of FPV or automation. For long and complex distances, it is better to fill the control scripts directly on Solo to eliminate problems with communication and visibility. By default, scripts can be loaded via sftp, rsync, as well as through the solo utility. For scripts, it is highly desirable to use virtualenv, otherwise versions of packages may conflict with the system ones.
Mavlink (Micro Air Vehicle Communication Protocol) is an open communication protocol that most open flight controllers support: APM / Pixhawk, MultiWii, Navio, and others. With mavlink, you can send control commands, set missions and receive telemetry. From the time of its appearance, it began to be used not only for micro aviation (copter, plane), but also for controlling micro cars, boats and even submarines. Depending on the type of vehicle and controller used, the functionality is slightly different.
For python, the mavlink protocol is implemented in the pymavlink module. Directly using it is not very comfortable and partially implemented its wrapper in DroneKit . Partly, because in practice, far from everything has been done, and we constantly have to contact mavlink. Unrealized mavlink features are in flight controllers, i.e. the presence of one or another functional has to be checked and tested. Some commands and modes may be not only not implemented, but also have different names from others. Therefore, it is better to develop a specific controller and be confident in its future support.
Solo is large enough, 46 cm between the motors, with screws even more, i.e. in a small room it is better not to run it. Navigation in the room via GPS does not work, so we go further into the street. Before the flight, look at the current parameters of the copter:
#!/usr/bin/python #-*- coding: utf-8 -*- from dronekit import connect # # DroneKit. vehicle = connect('udpin:0.0.0.0:14550', wait_ready=True) # print "Vehicle state:" # , , . # , . print " Global Location: %s" % vehicle.location.global_frame print " Global Location (relative altitude): %s" % vehicle.location.global_relative_frame print " Local Location: %s" % vehicle.location.local_frame # pitch, yaw, roll print " Attitude: %s" % vehicle.attitude # , print " Battery: %s" % vehicle.battery # . print " Last Heartbeat: %s" % vehicle.last_heartbeat # , print " Heading: %s" % vehicle.heading # print " Groundspeed: %s" % vehicle.groundspeed # print " Airspeed: %s" % vehicle.airspeed # print " Is Armable?: %s" % vehicle.is_armable # print " Armed: %s" % vehicle.armed # print " Mode: %s" % vehicle.mode.name vehicle.close() print "Done." Modes are a set of predefined actions and available functionality. So in ALT_HOLD the set height will be saved and the movement functions are available, AUTO starts the missions, and LAND sets the rotor and turns off the motors. In some modes, GPS and GPS Lock are required before starting, others work without it. If necessary, you can make your own modes and program the desired behavior.
It's time to take off:
#!/usr/bin/python #-*- coding: utf-8 -*- import time from dronekit import connect, VehicleMode, LocationGlobalRelative # vehicle = connect('unpin:10.1.1.10:14550', wait_ready=True) def arm_and_takeoff(aTargetAltitude): """ aTargetAltitude """ print " " while not vehicle.is_armable: print " ..." time.sleep(1) print " " # GUIDED vehicle.mode = VehicleMode("GUIDED") # vehicle.armed = True # . # , . while not vehicle.armed: print " ..." time.sleep(1) print "!" # vehicle.simple_takeoff(aTargetAltitude) # # … . while True: print " : ", vehicle.location.global_relative_frame.alt # , if vehicle.location.global_relative_frame.alt>=aTargetAltitude*0.95: print " %d " % vehicle.location.global_relative_frame.alt break time.sleep(1) print " " # 20 arm_and_takeoff(20) After the connection, we wait until all the preflight checks are completed and the vehicle.is_armable becomes True. Next, switch to GUIDED mode which allows you to consistently set points when reaching which the copter will wait for "further instructions." A coefficient of 0.95 is not necessary, but the accuracy of the sensors is not ideal, and this has to be taken into account. On the other hand, this allows not to lose time, because there is inertia and speed in flight is not uniform. The last centimeters will take a few extra seconds, but our battery quickly sits down and ± the extra meter of height is not critical.
It is time to
# a_location = LocationGlobalRelative(-27.114346, -109.357912, 20) # vehicle.simple_goto(a_location) Do not forget to change the coordinates to yours! If you suddenly forget, you can take over the control of the Solo by pressing the Pause button on the remote control or by lifting both sticks to the upper right corner. As a last resort, I hope that you connect the tablet and get data from gps, and on board you can consider the phone number for communication.
In flight, you can control some parameters, such as speed:
# , / vehicle.groundspeed = 7.5 In this case, there is no notification mechanism about the achievement of a given goal ... remember that we made a mavlink connection via UDP? Our message can go nowhere, and this sometimes happens, especially at long distances.
Knowing the speed and distance to calculate the arrival time and set the timer is not a problem. Ideally, this will work. For a copter, any wind, headwind, tailwind, side wind makes its own adjustments. The calm “on the ground” does not mean at all that there is no wind at 30-50-100 meters, so the linear calculation will be very, very approximate.
Weather conditions
The wind is of course one of the most obvious factors, but all variables affect the flight. For example, the thrust force of the engines depends on the magnitude of the pressure and temperature of the atmospheric air. Low pressure as well as high temperature reduce thrust. Temperatures below -10-20 ° C have a very negative effect on batteries, optics and electronics.
A more accurate way is of course to check the position on the GPS / Glonass / Gallileo / Beidou. Depending on the chip used and its settings, the check makes sense no more than 1-10 times per second, sometimes the interval is longer. In this case, the accuracy of the location can be plus or minus a few meters.
def is_arrived(lat, lon, alt, precision=0.3): # veh_loc = vehicle.location.global_relative_frame # diff_lat_m = (lat - veh_loc.lat) * 1.113195e5 diff_lon_m = (lon - veh_loc.lon) * 1.113195e5 diff_alt_m = alt - veh_loc.alt # dist_xyz = math.sqrt(diff_lat_m**2 + diff_lon_m**2 + diff_alt_m**2) if dist_xyz < precision: print " " return True else: print " " return False # while not is_arrived(lat, lon, alt): # 3 time.sleep(3) # - time.sleep(10) Reaching a given point, we return home. By analogy, to set a coordinate and to land using LAND mode on arrival as well is a difficult way. The fact is that at the start, the initial position data is stored for the entire duration of the flight, and there is an RTL (Return To Launch) mode for returning home. In RTL, the copter first rises to the “return height” RTL_ALT, this eliminates the possibility of colliding with trees and high-altitude objects, returns the copter to the starting point, automatically puts the device and turns off the motors.
print "" vehicle.mode = VehicleMode("RTL") After some time, the copter will arrive and after landing, happily scribing about the arrival. You can breathe out ... all is well! Result on video:
Result in the terminal
>>> APM: Copter V3.4-dev (6358876f)
>>> Frame: QUAD
Preflight checks
We start the engines
We are waiting for the motors ...
>>> Arming motors
>>> Initialising APM
Takeoff!
Current height: 0.01
Current height: 0.01
Current height: 0.15
Current height: 1.78
Current height: 3.69
Current height: 5.79
Current height: 8.0
Current height: 10.26
Current height: 12.52
Current height: 15.37
Current height: 17.57
Current height: 19.12
Climbed 19 meters
Reached a given height
Not yet flown
Not yet flown
Not yet flown
Not yet flown
Not yet flown
Not yet flown
Not yet flown
Not yet flown
Not yet flown
Not yet flown
Arrived at the scene
Come back
The problem is that it may not fly, not fly, or fly the wrong way. Any mistake is expensive. And this is not only a kopter, but also a load on it. In addition to purely software errors and problems with the equipment, there are problems with the service. For example, it is desirable to have an even and clean platform for takeoff / landing, you can sit with one foot on a rock ... and roll over. Even with takeoff, certain problems appear, for example, if you need to take off from a yacht swinging on the waves.
Whatever the pain of falls and other troubles, we test scripts in SITL (Software in the Loop). SITL is a flight simulator that allows you to work out various situations, including some weather conditions, terrain features, GPS malfunction, loss of signal, etc. SITL does not always work correctly, but overall not bad. Full testing replace in any case will not work. For 3D visualization, use SITL with FlightGear or jMAVSim .
Take off, check in and return - it's easy. Many useful functions have already been implemented for missions, flying along a radius, following an object, controlling standard equipment: a camera and a suspension. However, the kopter flies "blind", does not see and does not analyze the situation. We have to set the maximum parameters as in RTL or use various sensors, cameras, additional equipment for calculations, eventually making our own sensors and situation assessment systems. Therefore, it is desirable to have at least a general idea of electronics, robotics, level matching, data transfer protocols, and sensors. All this will be needed anyway if you go deep into this topic.
Source: https://habr.com/ru/post/281591/
All Articles