Develop HTML5 games in Intel XDK. Part 3. Meet the Snake

Part 1 » Part 2 » Part 3 » Part 4 » Part 5 » Part 6 » Part 7 // End)
Today we will talk about the architecture of the game Snake, built on the Cocos2d-JS platform and proceed to its creation. Please read this material, go to the Cocos2d-JS documentation and download the game resource set . We will use them during development.

Game Architecture Overview
If you have never played Snake, here is a finished project . Download it to your computer, import it into Intel XDK and try it out. To do this, go to the Project tab and click the Open An Intel XDK Project button in the lower left corner.
')

Snake is a simple game. At first, only the snake's head is on the screen. Driving a snake, you need to aim it at something edible, appearing randomly on the screen. In our case, this is a “cookie” represented by a red dot. The snake, finding a treat, eats it and increases in size. At the same time, the speed of its movement increases. The game ends if the grown-up snake, in pursuit of a yummy, inadvertently snaps its own tail.
In our version of the game, a character can go beyond the screen and appear on the other side of it. To control the game on the computer, use the keys W, S, A, D. They, respectively, allow you to direct the snake up, down, left and right. On devices with a touchscreen display, the same function is performed by tapping the screen with pulling in the desired direction. On the emulator, this can be reproduced by clicking on the screen with the mouse, and without releasing the left button, dragging the pointer in the direction in which the snake should move.
Implementation
The game consists of three scenes. This menu (MenuScene), game screen (GameScene) and the game completion screen (GameOver).
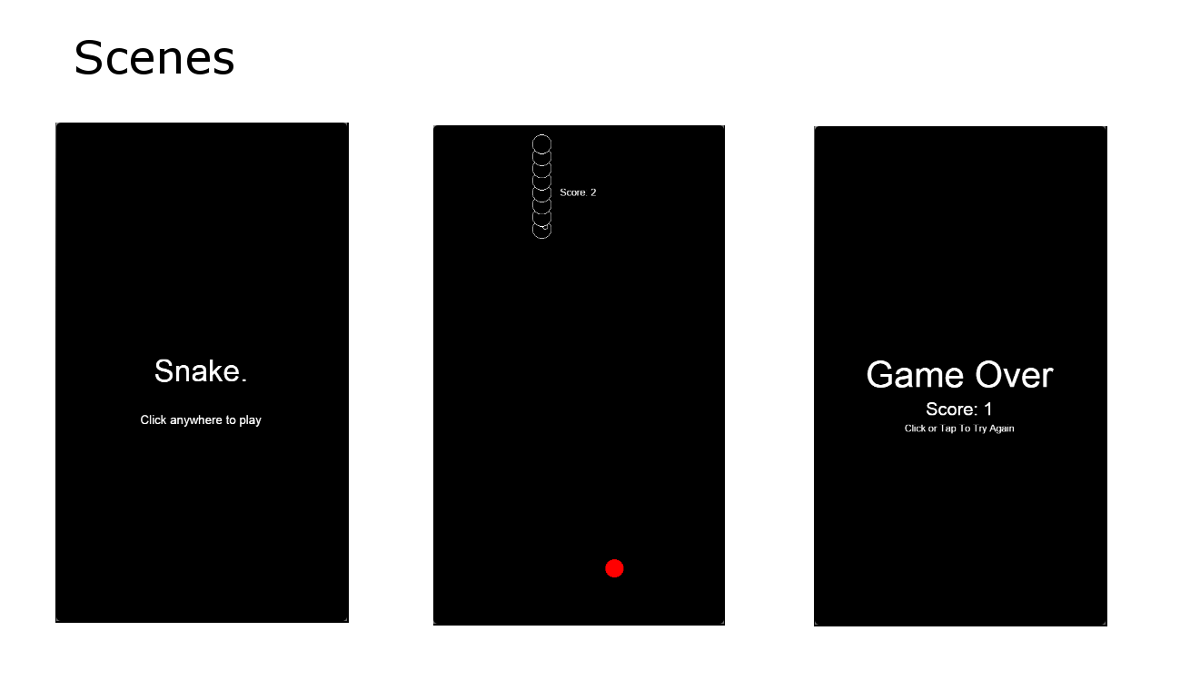
MenuScene includes two sprites that display text. This is the name of the game and an invitation to touch the screen (or click on it) to start the game. There are no layers on this scene. The GameOverScene scene is the same. The only difference is that it contains three sprites, the data for one of which, which displays the number of points scored, is taken from GameScene.
Main game screen
The GameScene scene, which is the main game screen, is the place where almost everything that is called a “game” takes place. Mastering this guide, you will create a game here in parts.
We remove the excess from the project template
The standard project template that the Intel XDK gives us contains components that we will not use. Remove from it all the excess.
- Open Explorer or another system file manager.
- Enter the folder with game resources (www / assets), which is located in the project folder.
- Remove from it all that is there.
- Extract to this folder all that is in the archive with the resources of the game.
- Open the resource.js file.
var asset = { HelloWorld_png : "asset/HelloWorld.jpg", CloseNormal_png : "asset/CloseNormal.png", CloseSelected_png : "asset/CloseSelected.png" }; var g_resources = []; for (var i in asset) { g_resources.push(asset[i]); } - Fill in the asset variable with information about new resources by deleting old data. Do not change the rest of the code in the file.
var asset = { SnakeHead_png : "asset/snake_head.png", SnakeBody_png : "asset/snake_body.png", SnakeBiscuit_png : "asset/snake_biscuit.png" }; - Delete the app.js file
- Open the project.json file
"jsList" : [ "src/resource.js", "src/app.js" ] - Remove the app.js file from jsList
- Add a game.js file to jsList
"jsList" : [ "src/resource.js", "src/game.js" ] - Open the index.html file
- Find the tags ""
- Replace what they contain with “Snake.”
As a result, the project file structure should look like the one below.

If the deleted files are still visible in the file manager of the Brackets editor, app.js, for example, restart the XDK.
The frame of the game is ready, however, if you open it now in the emulator, nothing will work. In order to fix this, we will deal with the implementation of the GameScene.
GameScene implementation
- Create a game.js file. To do this, go to the Develop tab (Develop), execute the File> New menu command and save the file in the www / src folder, giving it the name game.js.
- Add the following code to the file:
var GameScene = cc.Scene.extend({ onEnter:function () { this._super(); } });
Here we describe the GameScene variable and call the onEnter method of the parent object of the new layer. - Below "this._super ();" add the following code:
var GameScene = cc.Scene.extend({ snake_layer: {}, onEnter: function() { this._super(); // this.snake_layer = new SnakeLayer(); this.addChild(this.snake_layer, 0); } });
This is where the SnakeLayer layer is created, which we will implement later. This layer is added as a descendant of GameScene. GameScene only includes a layer of SnakeLayer, and already in the layer will contain the logic of the game.
We deal with the head of the snake
To make the game character look like a snake, we create it from the many fragments that follow its head. This is done due to the fact that the snake must be able to grow in size and make turns 90 degrees. The classic version of the game Snake is designed that way. We, creating our own version, follow the established tradition.
We proceed to implement our plans by adding the following class to game.js.
var SnakePart = cc.Sprite.extend({ ctor: function(sprite) { /* , */ this._super(sprite); }, move: function(posX, posY) { /* */ this.x = posX; this.y = posY; }, }) This class serves to describe a single snake segment. It already contains a move method that allows you to independently move each of the segments.
The snake itself will be in the SnakeLayer layer. This is the driving force and the brain of our character.
We describe the layer by adding the following code to game.js.
var SnakeLayer = cc.Layer.extend({ ctor: function () { this._super(); } }); With a similar description, we have already met, in GameScene, for example. Only, instead of the onEnter method, here is the object constructor. The point here is that we do not just “go over” to the layer (under the direction of the controlling object), but create it. In addition, in this class there will be a property symbolizing a fragment of the snake's body (for now, only its head). This variable will be used to place the corresponding sprites on the layer.
In the course of work on the game, the constructor of the SnakeLayer layer will grow - initialization commands for various objects will be added to it.
Let's start with the creation of the head of a snake. It is, in fact, one of the body segments with special properties and its own graphical representation.
In order to initialize the snake head (snakeHead variable), add the following code to SnakeLayer.
var SnakeLayer = cc.Layer.extend({ snakeHead: null, ctor: function () { /* */ this._super(); /* */ this.snakeHead = new SnakePart(asset.SnakeHead_png); /* - */ this.addChild(this.snakeHead); }, }); Here we add an object of the SnakePart class as a descendant object of the SnakeLayer layer. We are almost ready to run the project in the emulator and see something interesting there, but first you need to correct the control object code.
- Go to the main.js file
- Find the runScene line
cc.director.runScene(new HelloWorldScene()); - Replace HelloWorldScene with a GameScene.
cc.director.runScene(new GameScene());
Save the changes and run the project in the emulator.
The result of our works is quite noticeable, but the snake's head rolled into a corner, and it was also blocked by a frame rate counter. Remove the counter. To do this, do the following.
- Open the project.json file
- Change "showFPS: true," to "showFPS: false,"
findings
Let's summarize today's lesson.
- The game that we will develop is a variant of the classic Snake.
- The game includes three scenes: menu (Menu), game screen (Game), game completion screen (GameOver).
- The game character, a snake, consists of several parts
That's what you now know how.
- Add game resources to the project and delete them.
- Update resourse.js to account for new or missing resources.
- Delete from the project files with code and add them.
- Update the title of the game.
- Create a game scene (GameScene).
- Create layers (using the example of SnakeLayer).
- Implement snake body part (SnakePart).
- Initialize the snake head.
- Disable frame rate information.
At this stage of the project, we have a game screen and a snake head in the corner. Next time, let's take a coordinate system and let the snake move to a more interesting place.
Part 1 » Part 2 » Part 3 » Part 4 » Part 5 » Part 6 » Part 7 // End)
Source: https://habr.com/ru/post/281523/
All Articles