Develop HTML5 games in Intel XDK. Part 2. Cocos2d-JS

Part 1 » Part 2 » Part 3 » Part 4 » Part 5 » Part 6 » Part 7 // End)
We continue a series of materials on Intel XDK (the first part was here ). Today we will talk about the Cocos2d-JS engine and its internal structure.

Engine
Cocos2d-JS is a game development platform. Like many JavaScript platforms that are used in web programming, it facilitates the process of creating applications due to a certain level of abstraction and support for certain constructions and techniques of work. Among them - the processing of input events, the display of objects on the screen, the game cycle. The engine was created taking into account its own concept of the device of the game.
')
Cocos2d-JS game
In Cocos2d-JS there are so-called nodes (nodes). It is their configuration and relationship that determines what the game will be. They are the basic blocks of the application. Here are three types of nodes that we will use. These are Scenes, Layers and Sprites.

Scenes are top level nodes. This means that they represent the most general abstraction located at the top level of the hierarchy of objects of which the application consists. They can be compared with the levels of the game or with scenes in the film. In the Cocos2d-JS project there is a so-called “control object” (Director). Sometimes it is called "director". It is he who performs the scenes in a given order. Scenes can be launched for execution in any sequence, it can be done as many times as necessary. So, at the highest level of abstraction, the game on Cocos2d-JS is just a set of scenes that run in a certain order, shaping the gameplay. Scenes, in turn, contain layers and sprites.
Layers are containers for other nodes that can overlap each other. They are the next level of hierarchy in the game. This means that a certain scene can contain multiple layers, each of which can include other nodes that need to be grouped. For example, one layer may contain objects of the background, another one - a game character, another one - a scoreboard for displaying points scored by a player.
Sprites - this is what creates the bulk of interactive game elements. First, they can be modified, moved, for example, and secondly, some images are usually associated with them. Anything can be a sprite - a menu item, a game character, an element of the game world.
Actions and Hierarchy
Sprites can be moved; this is done only after applying the so-called “Actions” to them.
Action is exactly what comes to mind when you see this word. Although, you need to clarify that not sprites perform actions, and actions are performed on sprites.
Actions are usually moving objects around the screen. They can be very different. For example, an instantaneous change of location, a movement that takes a certain time, or one whose parameters are set by a certain function (some kind of curve or another way of indicating the way).
Node relationships are defined by parent-child relationships. A node can be the parent or descendant of some other node. Nodes can have many descendants, but only one parent.
Any transformations performed with the parent node will also be applied to its descendants. This can be compared with a children's leash for learning to walk, which at one end is tied to the backpack of the baby, and the other to the hand of the parent. If, on a walk, the parent stops, the child will not go further.
In terms of building a hierarchy of nodes, there are no special rules. This means, for example, that sprites can be direct descendants of scenes, and layers can be direct descendants of sprites.
Customize template game
Now that we have reviewed the basic concepts, it is time to put the knowledge gained into practice, take a look at how it all looks in code. To do this, open the app.js file created by expanding the game template. It is located in the www / src folder. Make some changes to it.
- Paste the following code snippet into the body of the ctor function in the HelloWorldLayer. This is needed in order to add a new sprite to the layer - an inscription.
var tsLabel = new cc.LabelTTF("Tunnel Snakes Rule!", "Arial", 38); tsLabel.x = size.width / 2; tsLabel.y = size.height / 2; this.addChild(tsLabel, 5);Added new inscription to the scene
- Experiment with the numbers that we write in tsLabel.x and tsLabel.y to change the position of the label Now the line is aligned to the center of the screen.
The very basics of the engine Cocos2d-JS, we have disassembled. Now we will study the sample project.
Details about the template project
The template game consists of a single scene with one layer, which is a descendant of the scene and a parent for several sprites.
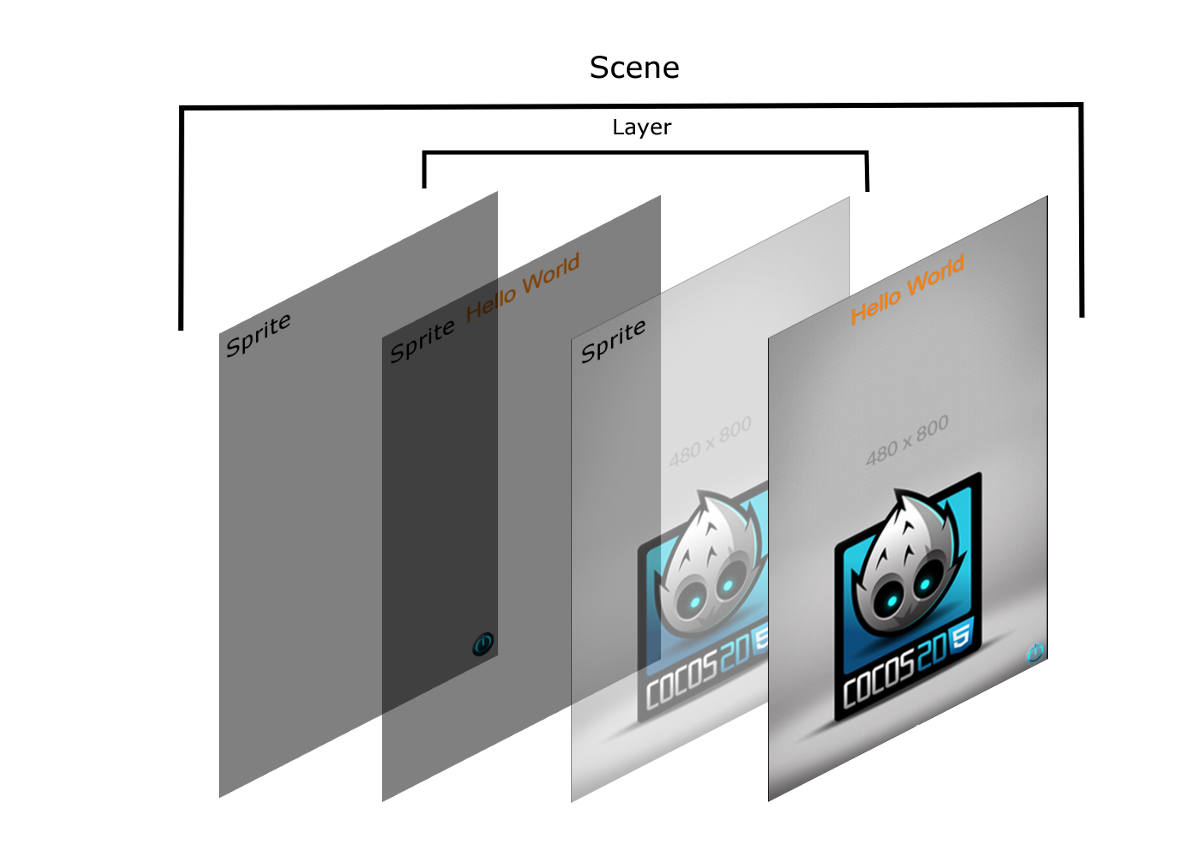
Sprites are the background image, the “Hello World” text and the power button. In turn, the scene and the layer do not have their own visible components.
The template set in motion two actions. The first controls the “Hello World” caption, the second is responsible for the background image. You probably already saw their effect when you started the project in the emulator.
Classes
API Cocos2d-JS consists of the main object "cc", in which the entire engine is located. The cc.Class object in the engine is used to implement classes. A class can be thought of as a drawing or a recipe for making a dish. A recipe is just a description, based on it you can cook something tasty, but it is not suitable for food.
Cocos2d-JS provides the developer with classes so that he can create his own objects - nodes. It must be said that there are no ready-made units that can be taken and immediately used. If you need a node - first you need to create it yourself.
If, in the Cocos2d-JS API reference , the cc.Class branch is expanded, and cc.Node is in it, cc.Scene, cc.Layer, and cc.Sprite can be found there. We can use these classes to create our own scenes, layers and sprites using the extend method, as is usually done in JavaScript.
Node code
At the bottom of the app.js file (in the src folder) you can find the following code:
var HelloWorldScene = cc.Scene.extend({ onEnter: function() { this._super(); var layer = new HelloWorldLayer(); this.addChild(layer); } }); Here a new scene is created called HelloWorldScene. The onEnter method is executed whenever a control object (Director) executes a scene or when a scene is created. Since we override the onEnter method, it is necessary to call this method of the parent class with the command this._super () ;, at the very beginning of the method code. This allows us to work out the parent onEnter method, to do for us everything that is provided for by the system logic for Scene objects, and, thus, to relieve a lot of problems. This can be compared to cooking, for example, gingerbread. You can take a recipe, collect flour, butter, eggs, and you never know what else. Then start the dough, preheat the oven ... And you can take a semi-finished product, where you already have everything you need, pour it into the bread maker, add water and press a button. Here in this case, when we call the method of the parent class, we simply press the button. After it works, we simply create a new layer and add it as a descendant to the scene.
This design pattern is used to create almost all nodes. First, create a child node, then add it to the parent (the one in whose code we are) node. The definition of the HelloWorldLayer layer in the app.js file is based on the principles described above. It only contains more code: layer initialization, creating multiple nodes, setting their location and movement.
///////////////////////////// // 3. ... // "Hello World" // var helloLabel = new cc.LabelTTF("Hello World", "Arial", 38); // helloLabel.x = size.width / 2; helloLabel.y = 0; // this.addChild(helloLabel, 5); cc.LabelTTF is a special kind of sprite, which is a text. This node can be positioned on the screen and moved like any other.
Pay attention to the “ctor” method. It plays the role of a constructor, which is executed whenever an object is created.
We continue to customize the template code
Let's return to the sprite that we added to the project above, try to change it a bit in order to better understand the project structure.
- Find the following code in the ctor method:
helloLabel.runAction( cc.spawn( cc.moveBy(2.5, cc.p(0, size.height - 40)), cc.tintTo(2.5,255,125,0) ) );
Replace it with the snippet below in order to change the “Hello World” text behavior.helloLabel.runAction( cc.sequence( cc.spawn( cc.moveBy(2.5, cc.p(0, size.height - 40)), cc.tintTo(2.5,255,125,0) ), cc.delayTime(1.5), cc.moveBy(0.2, cc.p(0, size.height + 40)) ) ); - In the same method, find the following code:
tsLabel.y = size.height / 2;
And replace it with this:tsLabel.y = 0; - Add this line to the same method:
tsLabel.runAction(cc.moveBy(4, cc.p(0, size.height - 40)));
If everything is done correctly, you will see how the inscription “Tunnel Snakes Rule!” Flies after “Hello World”, and when it reaches the top of the screen - the latter disappears.

Using the control object
Now that we have a look at the application code, let's look at what sets it in motion.
If you glance into main.js, there will be a lot of incomprehensible, but for the time being do not pay attention to anything except for a small fragment, which is located almost at the very end.
// , g_resources // g_resources www/src/resource cc.LoaderScene.preload(g_resources, function () { // HelloWorldScene // www/src/app.js cc.director.runScene(new HelloWorldScene()); }, this); The runScene method of the control object is called in order to launch the first scene in the game. This method can be called anywhere in the code to switch between scenes.
findings
Let's summarize today's lesson.
- The game consists of nodes
- Scenes are the top level of the project hierarchy. They contain nodes, they can be “reproduced” with the help of a managing object (Director).
- Scenes contain layers that can be located one above the other.
- Layers contain sprites, 2D shapes, often animated, that form different parts of the scene.
- You can perform actions on sprites - thanks to this they move.
- Nodes are connected to each other through parent-child relationships; these relationships define a hierarchy of nodes.
- The template game project consists of one scene, with one layer on which sprites are located.
- Cocos2d-JS has a built-in object-oriented development model based on classes.
- The HelloWorldScene scene contains the HelloWorldLayer layer.
- The HelloWorldLayer layer is a descendant of the HelloWorldScene scene. It, in turn, contains sprites.
- The managing object (Director) is called to start the first scene in the main.js file.
Now you know about Cocos2d-JS so much that you are almost ready to create your own game. In the next part we will do it.
Part 1 » Part 2 » Part 3 » Part 4 » Part 5 » Part 6 » Part 7 // End)
Source: https://habr.com/ru/post/281453/
All Articles