Computer vision and mobile robots. Part 1 - V-REP, Python, OpenCV
When I read the publication about the launch of unmanned racing cars - I thought it would be interesting to do something like that. Certainly not a racing car, but at least a mobile robot, which is oriented in space through the camera - by pattern recognition.
In our hackspace - creating a robot is not such a big problem. But not everyone and not always have the opportunity to experiment with real "iron" - so it was interesting to try to solve the problem - in a virtual environment, and then revive the "iron".
')
And so the idea of a series of articles arose, about solving the simplest task of orienting a robot in space - from a virtual simulation to an embodiment in a real mobile robot:
Part 1 . Setting up a virtual environment, integration with python and OpenCV for pattern recognition from the virtual world.
Part 2 . Creating a virtual mobile robot, an algorithm for autonomous movement (object search)
Part 3 Creating a real robot, transferring logic to it.
I want to achieve this result - so that the python script that manages the virtual robot would be as identical as the one that will control the real robot.
The brain of the robot will be the RaspberryPi2 microcomputer - on which both python and OpenCV work without problems. Thus, it is necessary to interface the V-REP virtual robotics system with Python and OpenCV. That's about it and will be the first part - this publication.
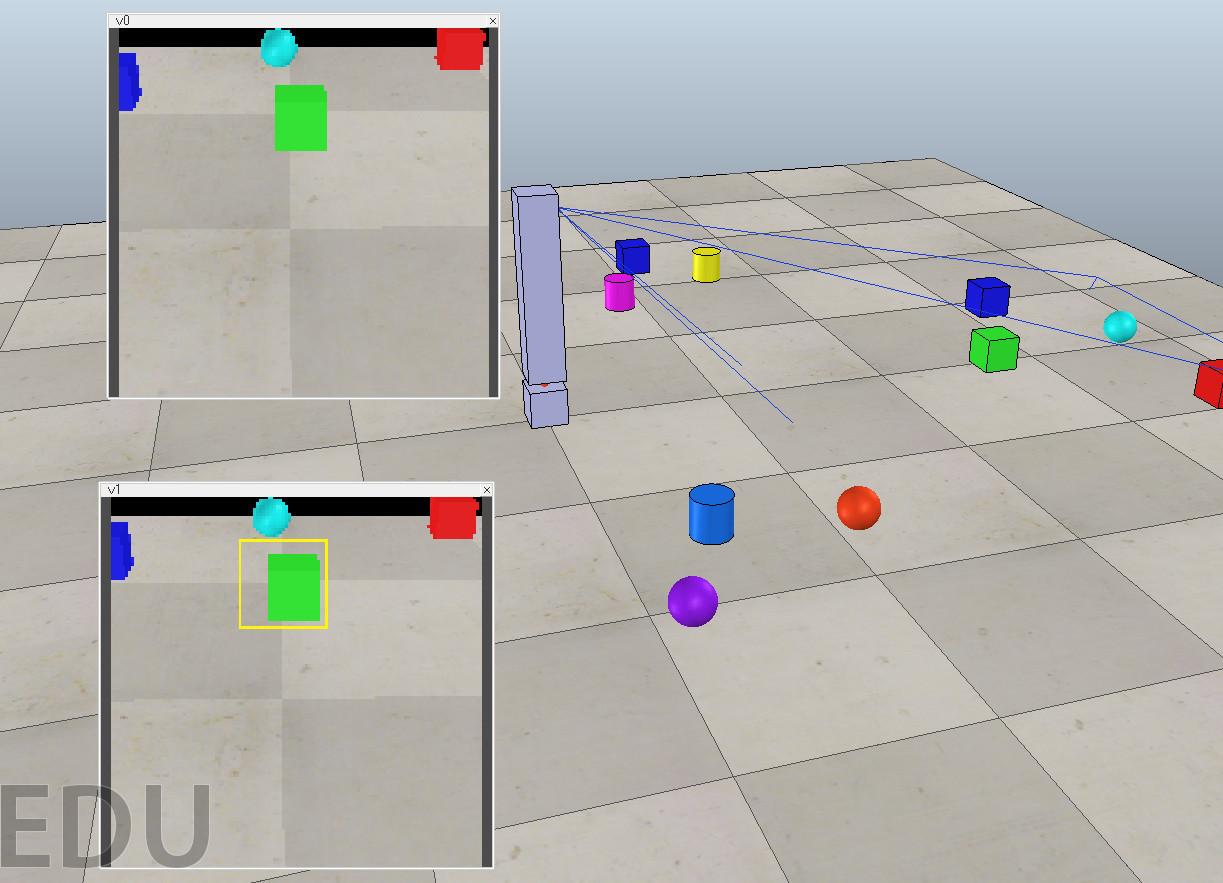
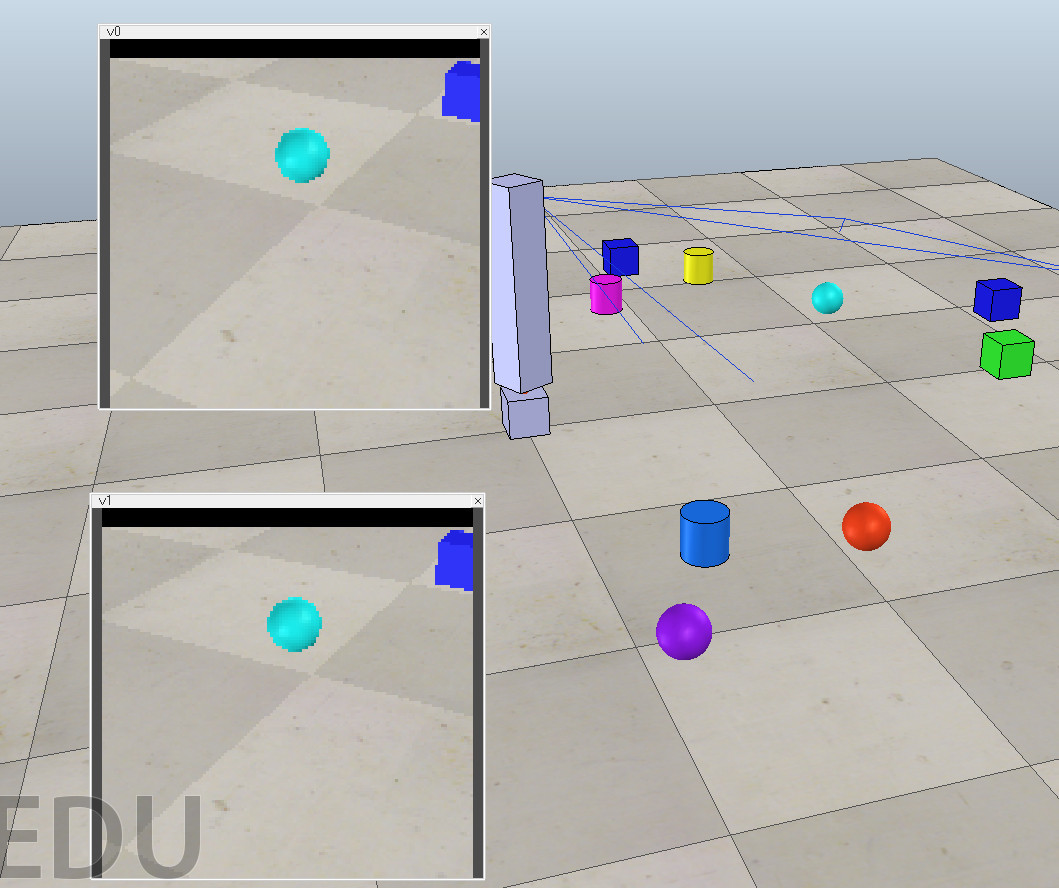
Video what happened (search for green object)
In the upper window - a direct image from a video camera in the 3D virtual world, in the lower window - the result of the python script that receives the image passes it to OpenCV and draws a marker around the found object.
In the upper window - a direct image from a video camera in the 3D virtual world, in the lower window - the result of the python script that receives the image passes it to OpenCV and draws a marker around the found object.
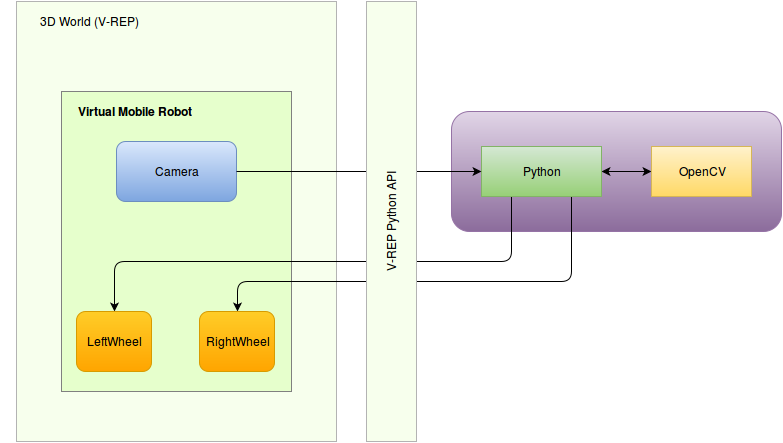
Let's draw the architecture of our mobile robot.
Mobile Robot Architecture
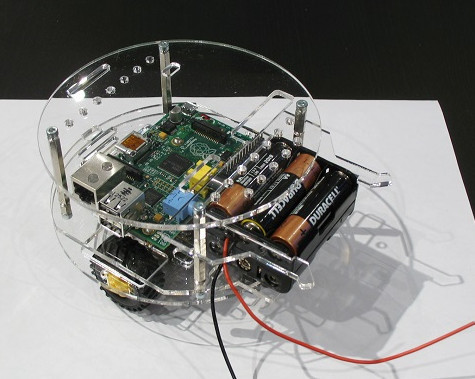
A real robot will look something like this (we'll add another camera)
Architecturally:

As we can see, the “brain” of the robot receives an image, recognizes (via OpenCV) and transmits control commands to the wheels. And replacing the image from the camera with a 3D image, and controlling the wheels with the management of virtual wheels of a 3D robot in the virtual world, we will get a bench for working out the logic.
We get the following architecture for a virtual stand:
In our first part today - we need to solve the V-REP bundle problem with an external python script that performs pattern recognition using OpenCV, and displays a marker around the found object.
It turns out this architecture:

Install V-REP
There were several Russian-language publications about the free robo-simulation system V-REP :
- We program robots - free robosimulator V-REP. First steps
- Using the Remote API in the V-REP Robosimulator ,
- V-REP is a flexible and scalable platform for robotic modeling .
Therefore, the installation and the first steps - you can see in them.
Scene
We believe that the V-REP is installed and working. We need to create a scene.
On the stage there will be a camera that looks at an area with different 3D objects, this image needs to be transmitted to an external python script, which should call OpenCV for recognition and mark generation, and return this image back to V-REP for control.
Fortunately, among the examples that come with V-REP was a similar example, though he used ROS (which was not required for current tasks):

On the basis of this demo, the following scene appeared:
- movable tripod that rotates
- v0 (vision sensor) is fixed on this tripod
- placed v1 sensor, the data to which is transmitted from the external system
The scene scene.ttt can be downloaded from here .
Python API
We believe that you have Python installed (tested on 2.7.6)
When you start V-REP, the plugin automatically provides a link to the Python API. To work with the API through the python script, you must have three files in the folder:
- remoteApi.so (or remoteApi.dll)
- vrep.py
- vrepConst.py
They can be copied from the V-REP directory (programming / remoteApiBindings / python / python, programming / remoteApiBindings / lib / lib /). You can then import the V-REP module:
import vrep The simplest script that connects to the API looks like this:
import vrep vrep.simxFinish(-1) # just in case, close all opened connections clientID = vrep.simxStart('127.0.0.1', 19997, True, True, 5000, 5) if clientID!=-1: print 'Connected to remote API server' while (vrep.simxGetConnectionId(clientID) != -1): print "some work" else: print "Failed to connect to remote API Server" vrep.simxFinish(clientID) On our stage there are two objects - v0 and v1 - this is a Visual Sensor - from the first we read the picture, on the second we have to record the result. Therefore, we need to get these objects in the context of our python script, this is done using the vrep.simxGetObjectHandle API command
res, v0 = vrep.simxGetObjectHandle(clientID, 'v0', vrep.simx_opmode_oneshot_wait) res, v1 = vrep.simxGetObjectHandle(clientID, 'v1', vrep.simx_opmode_oneshot_wait) Please note that all functions available through the API are also available through internal scripts (Lua), the only difference is that in the name instead of simx - sim, that is, in our case the function call on Lua will be “simGetObjectHandle”.
To get pictures and recordings from Vision Sensor, there are two functions: vrep.simxGetVisionSensorImage and vrep.simxSetVisionSensorImage respectively.
And in python code it will look like this (where v0 and v1 are the corresponding objects):
# v0 err, resolution, image = vrep.simxGetVisionSensorImage(clientID, v0, 0, vrep.simx_opmode_buffer) # v1 vrep.simxSetVisionSensorImage(clientID, v1, image, 0, vrep.simx_opmode_oneshot) The only thing for the Vision Sensor that receives data from an external source, in the parameters you must set the appropriate flag:
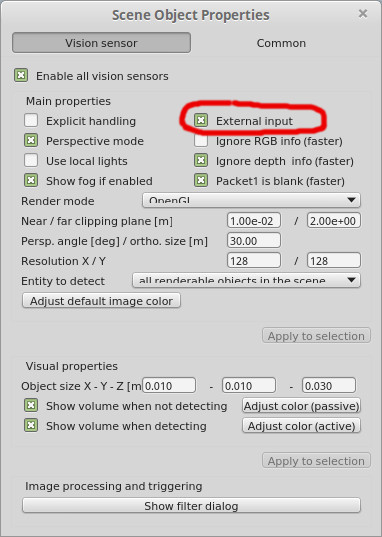
Image Relay
Thus, now we can make a python script that, through the V-REP API, takes an image from the video sensor and retransmits it:
simple_image_retranslate.py
To check, we have to start the scene (the “Play” button up), and then run the file simple_image_retranslate.py on the command line # simple_image_retranslate.py import vrep import time vrep.simxFinish(-1) clientID = vrep.simxStart('127.0.0.1', 19997, True, True, 5000, 5) if clientID!=-1: print 'Connected to remote API server' # get vision sensor objects res, v0 = vrep.simxGetObjectHandle(clientID, 'v0', vrep.simx_opmode_oneshot_wait) res, v1 = vrep.simxGetObjectHandle(clientID, 'v1', vrep.simx_opmode_oneshot_wait) err, resolution, image = vrep.simxGetVisionSensorImage(clientID, v0, 0, vrep.simx_opmode_streaming) time.sleep(1) while (vrep.simxGetConnectionId(clientID) != -1): err, resolution, image = vrep.simxGetVisionSensorImage(clientID, v0, 0, vrep.simx_opmode_buffer) if err == vrep.simx_return_ok: vrep.simxSetVisionSensorImage(clientID, v1, image, 0, vrep.simx_opmode_oneshot) elif err == vrep.simx_return_novalue_flag: print "no image yet" else: print err else: print "Failed to connect to remote API Server" vrep.simxFinish(clientID) And here is the result (v1 - displays an image from the python script):
Ok, there is a basic workpiece, now you need to connect pattern recognition (computer vision)
Computer vision, OpenCV
I think everyone heard about the open computer vision system, OpenCV , which developed
Gary bradski
Gary Bradski visited our Hackspace booth at Innoprome 2014
Gary Bradski visited our Hackspace booth at Innoprome 2014
First, openCV should be installed, installing opencv2 on Linux Mint (Ubuntu) looked quite simple:
sudo apt-get install libopencv-dev python-opencvAfter this, it became possible to connect the library in python code:
import cv2 Now you need to implement the simplest recognition function. The base was to take this example , searching for the green ball in the picture.
The def function track_green_object (image) appeared , which returns the coordinates of the green object, if found.
And it is also necessary to note a marker around the found object, for this we use the basic OpenCV function to draw a rectangle: cv2.rectangle .
And our code snippet is that:
- gets image (from v0)
- finds an object (something green)
- adds a marker (yellow rectangle)
- returns image (in v1)
looks like that:
# get image from vision sensor 'v0' err, resolution, image = vrep.simxGetVisionSensorImage(clientID, v0, 0, vrep.simx_opmode_buffer) if err == vrep.simx_return_ok: image_byte_array = array.array('b', image) image_buffer = I.frombuffer("RGB", (resolution[0],resolution[1]), image_byte_array, "raw", "RGB", 0, 1) img2 = numpy.asarray(image_buffer) # try to find something green ret = track_green_object(img2) # overlay rectangle marker if something is found by OpenCV if ret: cv2.rectangle(img2,(ret[0]-15,ret[1]-15), (ret[0]+15,ret[1]+15), (0xff,0xf4,0x0d), 1) # return image to sensor 'v1' img2 = img2.ravel() vrep.simxSetVisionSensorImage(clientID, v1, img2, 0, vrep.simx_opmode_oneshot) Result
Now it remains to start everything together: start the scene, run the script and see what happens:
The source code of the project can be found on github .
In the next part, we will create a robot in V-REP, and program it to search for a green ball.
Source: https://habr.com/ru/post/281186/
All Articles