Wi-Fi module WF121 and HTTP server in addition
After reading the article [HOW-TO] Add HTML button press functionality to the application on the Silicon Labs website about using the built-in HTTP server of the WF121 Wi-Fi module, I wanted to try how it works. Moreover, the debug board of the module was at hand.
* Useful links - at the end of the article.
I had a simple plan - to implement control of the lights (or rather, the LEDs of the debugging board) from the phone / tablet / PC via Wi-Fi via the WEB interface, using the capabilities of the built-in HTTP server of the WF121 module and the BGScript language.
Of course, you can control the light bulb with just TCP commands, but this requires creating and installing a special application on your phone / tablet / PC, and this is not always convenient. The advantage of the built-in HTTP server is that you can forget about installing the application and use any browser on any device. Actually, therefore the HTTP server is implemented in WF121.
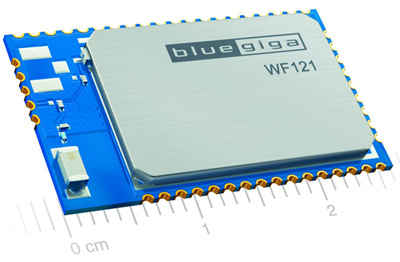
What is WF121?
WF121 - Wi-Fi-module b / g / n 2.4 GHz for embedded systems, which can work both as a client and as an access point. The features of the module include:
- support for up to five clients in the access point mode;
- the ability to redirect traffic from one client to another in access point mode;
- in addition to UART, SPI, I2C, USB, GPIO, the presence of an RMII interface that allows you to connect to an Ethernet module;
- availability of a configurable HTTP server;
- the ability to flexibly manage all of this by loading into the module applications written in BGScript.
There are three options for controlling the WF121 module:
- With the help of an external controller and BGAPI protocol;
- Using the BGScript application that loads into the module itself;
- Combined when using both BGAPI and BGScript at the same time.
The possibilities of BGAPI are of little interest to me now, since I am going to realize my plans using BGScript.
')
What is BGScript?
BGScript is a simple scripting language “invented” by Bluegiga for its Bluetooth and Wi-Fi modules. Using BGScript, a developer can write his own application and load it into a module, so that the module becomes a self-contained device and does not require external control. After the unification of Bluegiga and SiLabs, the language continues to evolve and improve under the flag of Silicon Labs.
When using BGScript, the developer describes the reaction of the system to the events occurring in it approximately as follows:
event system_boot(major,minor,patch,build,bootloader,tcpip,hw) # – Wi-Fi- call sme_wifi_on() # Wi-Fi end event sme_wifi_is_on(result) # - Wi-Fi call sme_connect_ssid(6,"myWiFi") # myWiFi end Those. the module is turned on -> we turn on Wi-Fi,
Wi-Fi turned on -> connect to the access point and so on.
In addition to Wi-Fi control, from BGScript you can work with interfaces, timers, create TCP / UDP sockets (client / server), save important data in non-volatile memory, etc. If you want more details, I invite you to familiarize yourself with BGScript for WF121 Developer Guide (links - at the end of the article).
When BGScript is ready, it is included in the WF121 project as a file with the .bgs extension.
What is a WF121 project?
Project WF121 - a set of files that contain a description of the settings and the logic of the Wi-Fi-module WF121. A list of project files is contained in the project.xml file. In the case of the http_serv project, the project.xml file looks like this:
<?xml version="1.0" encoding="UTF-8" ?> <project> <scripting> <script in="main.bgs" /> </scripting> <software> <binary in="fw/wifi_http_serv.juo" /> </software> <hardware> <uart channel="1" baud="5000000" api="true" handshake="True" /> <sleep interrupts="0x1"/> </hardware> <files> <file path="404.html"/> <file path="main.html"/> <file path="ap.html"/> <file path="appl.html"/> <file path="client.html"/> <file path="index.html"/> <file path="logo.gif"/> <file path="style.css"/> </files> </project> As you have already guessed, the name of the file containing BGScript is placed in the <scripting> tags.
The wifi_http_serv.juo file is not available for configuration and will not be considered here.
The <hardware> tags of the project.xml file describe the configuration of the external interfaces of the module, in general - UART, SPI, I2C, Ethernet, ADC, GPIO. In this case, an example of UART configuration is shown - this configuration will be useful to preserve the possibility of flashing the module using the Bluegiga WiFi GUI program. Alternatively, the interface description can be moved to a separate file. A detailed description of how to configure the WF121 interfaces is provided in the WF121 Configuration Guide .
The <image> tag contains the names of the firmware files that we get after compilation and will be loaded into the module. You can generate files in two formats: dfu and hex. We are now more interested in the dfu format, which is used by the Bluegiga WiFi GUI program.
Finally, the <files> tag contains descriptions of files related to our HTTP server.
If details are interesting, welcome to the WF121 Configuration Guide (see links at the end of the article).
Modify the source project to turn lights on and off from the browser.
To control light bulbs (LEDs) from the browser of your favorite smartphone or tablet, we need:
- include in the project a web page with buttons;
- describe with the help of BGScript the response of the Wi-Fi module to pressing individual buttons;
- Do not forget in the BGScript file to configure the pins of the module to which our LEDs are connected.
There are examples of creating buttons and configuring outputs in the original project, we just have to add event handling for pressing WEB buttons. A total of 4 LEDs are installed on the DKWF121 debug board, which can be controlled: RD4, RD5, RD6 and RD7. Since the RD6 and RD7 LEDs are used in this example to indicate the status of the module, we use the RD4 and RD5 LEDs to simulate light bulbs. We will make minimal changes to adapt the project to our needs:
1. The HTTP server of the original example contains several pages and many unnecessary buttons for us — all this can be carefully removed and only two pairs of buttons left to control the LEDs (see the project’s appl.html file):
<body> </form> <form action="/button.cgi" method="get"> <br /> <Input type="submit" name="1" value="On 1" class="btn_body"> <Input type="submit" name="2" value="On 2" class="btn_body"> <br /> <Input type="submit" name="3" value="Off 1" class="btn_body"> <Input type="submit" name="4" value="Off 2" class="btn_body"> </form> </body> 2. When the button is pressed on the WEB-page in the module, the event https_button (number) is generated. The reaction to this event will be described in the main.bgs file as follows:
event https_button(number) if number = 1 then call hardware_io_port_write(3, $0010, $0010) # 1 – RD4 end if if number = 2 then call hardware_io_port_write(3, $0020, $0020) # 2 – RD5 end if if number = 3 then call hardware_io_port_write(3, $0010, $0000) # 3 – RD4 end if if number = 4 then call hardware_io_port_write(3, $0020, $0000) # 4 – RD5 end if end 3. Configure the pins to which the RD4 and RD5 LEDs are connected:
event system_boot(major, minor, patch, build, bootloader_version, tcpip_version, hw) ... ... call hardware_io_port_config_direction(3, $0020, $0000) # RD4 call hardware_io_port_write(3, $0020, $0000) # RD4 0 call hardware_io_port_config_direction(3, $0010, $0000) # RD5 call hardware_io_port_write(3, $0010, $0000) # RD5 0 ... end ... Of course, the changes made are minimally necessary, and for the normal operation of the module, further BGScript combing and beauty guidance in other project files is required.
I note that I assigned different buttons to turn on and off the LEDs, since during the testing it turned out that when using Mozilla Firefox or IE and pressing the WEB button in the module, one event https_button (number) is generated, and when using Chrome - as many as two! Therefore, when using Chrome and the combined on / off button, the light turns on and then turns off, causing testers displeasure. As a result, I preferred to make separate buttons “On” and “Off” to turn on and off the LEDs, respectively. All this applies to the SDK 1.2.4-73.
When the project is ready, it remains only to generate the firmware file and load it into the module.
Compile the project and load the resulting code in WF121
To quickly compile the firmware and download them into the module, the Bluegiga WiFi GUI program is designed. It is also convenient to use for quick configuration / testing of the module, as well as BGAPI research. The program works only under 64-bit OS, when launched on 32-bit OS it says that 64 bits are needed. It is believed that this restriction can be circumvented, but I have not tried it, I don’t know the details, and I will not lie. The Bluegiga WiFi GUI program, along with sample applications, is included with the SDK.
In general, the algorithm of actions when compiling a project and loading it into the module is as follows:
- install on the PC SDK WF121;
- launch the Bluegiga WiFi GUI ;
- select the port, speed and click "Connect";
- go to the tab “Firmware upgrade”;
- select the project with the “Open project” button;
- compile it with the “Build” button;
- click "Boot into DFU mode" to put the module in programming mode;
- and load our firmware with the “Upload” button.
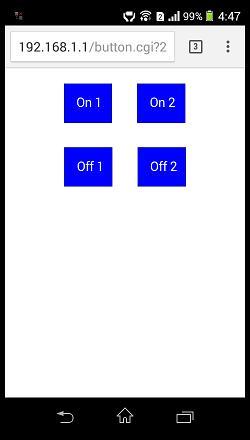
After the project is loaded into the module, you can connect your phone, tablet, etc. to the Wi-Fi Bluegiga access point, launch the browser, go to the page at 192.168.1.1, then press the buttons and watch the LEDs react. The screen of the smartphone at the same time turned out like this:
Documentation on WF121, SDK, the project can be downloaded on the site wless.ru
Please note that now there are two current versions of the SDK: 1.2.4-73 and 1.3.0-85, and they are not completely compatible with each other. In this case, it is assumed that you are using this example with version 1.2.4-73, otherwise it will not work.
All success and good mood!
WF121 on wless.ru
BGScript for WF121 Developer Guide
WF121 Configuration Guide
WF121 Datasheet
DKWF121 Datasheet
SDK 1.2.4-73
Draft http_serv as amended
WF121 on the Bluegiga website (registration required)
Community SiLabs Wi-Fi
Source: https://habr.com/ru/post/280894/
All Articles