16 cores and 30 GB under the hood of your Jupyter for $ 0.25 per hour
If you are not very lucky, and there is no n-nuclear monster at work that you can load with your scripts, then this article is for you. Also, if you are used to running scripts for the whole night (and in the morning to read that you forgot your brace somewhere, and 6 hours of calculations were gone) - you have a chance to finally get acquainted with Amazon Web Services.

In this article I will tell you how to start working with the EC2 service. In essence, this is a step-by-step instruction on the semi-automatic lease of an AWS spot instance for working with Jupyter notebooks and building Anaconda libraries. It will be useful, for example, to those who are still using their toy poppy in Kaggle competitions.
')
Probably, the reaction of everyone who visited Amazon Web Services for the first time is the confusion of the abundance of services offered and virtual machines (which are called instances there).
In this tutorial, I’ll show you how inexpensively to rent an AWS computing instance and quickly set up a Jupyter server on it to use your favorite notebooks. We will focus on the Anaconda assembly and machine learning tasks, but it is clear that the server can be used for various purposes, even if bitcoins are mine :)
Motivation : we want to quickly (within 5-7 minutes) access from Jupyter notebooks to computing resources more seriously than from a home computer.
In general, there is a good tutorial for this business. The article you are reading is a free translation with additions. We will also write a script that will run every time you rent a car. And here is the result for those who are in a hurry.
We will rent a spot instance with 3.4xlarge with 16 cores and 30 GB of RAM.
“Spot” means that in essence we will participate in the auction and, having set the price per hour of using the machine, have access to it until demand increases. If demand increases, and the market price exceeds the one we have appointed, the car will “run away” from us, and all of a sudden. It is for this reason (instability) that many are afraid to use spot instances, although you can save a lot on them compared to on-demand instances. The same machine, but in a more “stable” mode, will cost about $ 0.85 / hour, but we will spend four times less.
Now about the types of machines. They are well described in the AWS documentation, so we choose type C - machines optimized for calculations.
To get started, sign up at Amazon Web Services. I will not write instructions here - everything is as usual, it will only be necessary to confirm both by phone and by e-mail. You will need to link a credit card to your account, but if you are afraid of spending, you can take the m4large instance (2 CPU, 8 Gb RAM) for $ 0.05 / hour.
Go to your AWS console and find EC2 (Elastic Compute Cloud) in Services

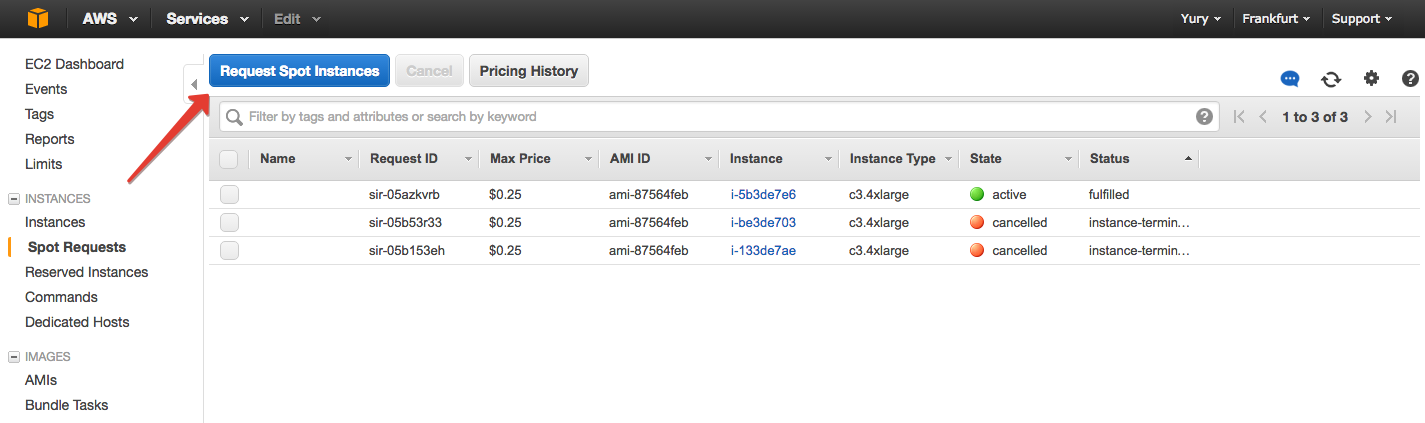
In the Spot Requests section, click “Request Spot Instance”.
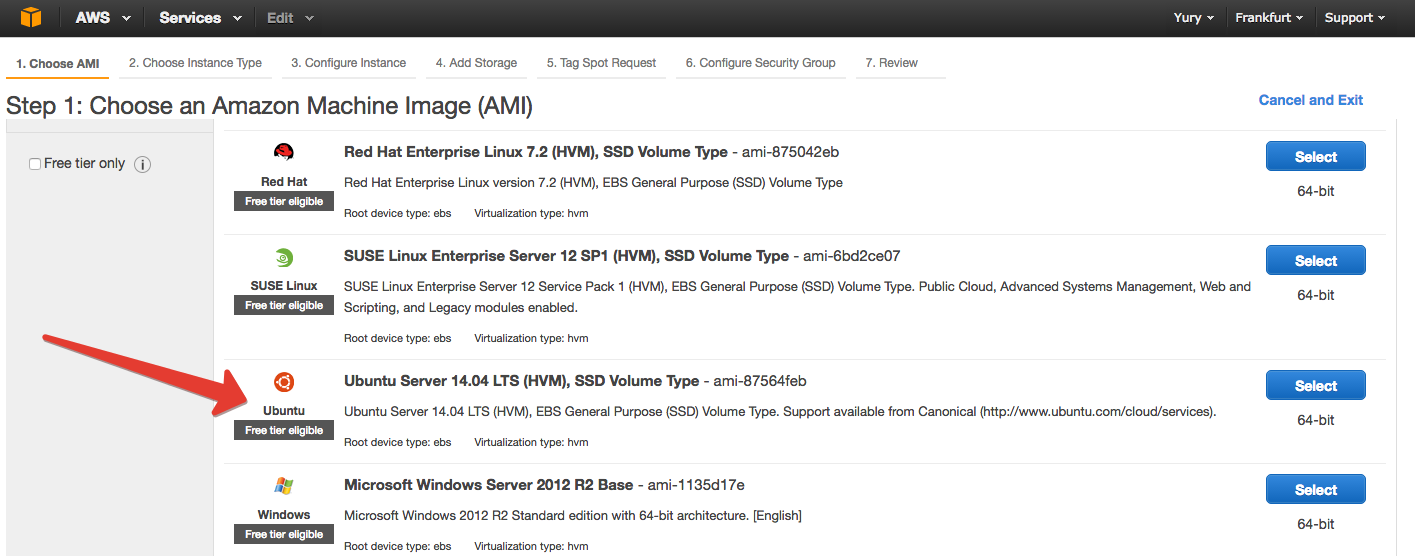
Select the type of OS that will be in the virtual machine. In general: Windows is more expensive, among * Nix it is not so important which one to choose, let it be Ubuntu.
On the next tab we are offered to choose the instance itself. Here we pop, level ( here everything is described in more detail) and scroll to c3.4xlarge.

Then the most important thing is to set the price per hour of using the virtual machine. We see current prices in selected regions.

If you see that your prices are much higher than in the screenshot, it means that there is a surge in the current region - change the region (in the upper right corner next to your name). I still successfully use the Frankfurt region, but you can study the statistics, see which regions are cheaper and with stable prices.
The price is best set at 1.5 times the current market value of the instance in the region. In this situation, the price will fluctuate a little, but rarely exceed what you declared. Accordingly, so the car will not often fall off.
Now we connect the repository. Amazon treats thirty GB, so why not take all 30 ...

Instance tagging can be skipped. And further port setting. The main thing here is to open the port that we will use under the Jupyter server. Let it be traditionally 8888. Click “Add rule”, leave the option “Custom TCP rule” and specify port 8888. We also add the HTTP and HTTPS protocols and say who can listen on the ports. It is enough to choose My IP daws on the right.

In the next step, we create a key (pem-file) that will identify us when remotely connecting to the machine via the SSH protocol. You can call it whatever you like - the main thing after downloading is to know where it lies and in no case (!!!) do not upload it on GitHub or anywhere else online. Treat this file almost like a password from a bank card. Amazon recommends updating pem files periodically (you can have 2 in each region; you can’t download the same key a second time).

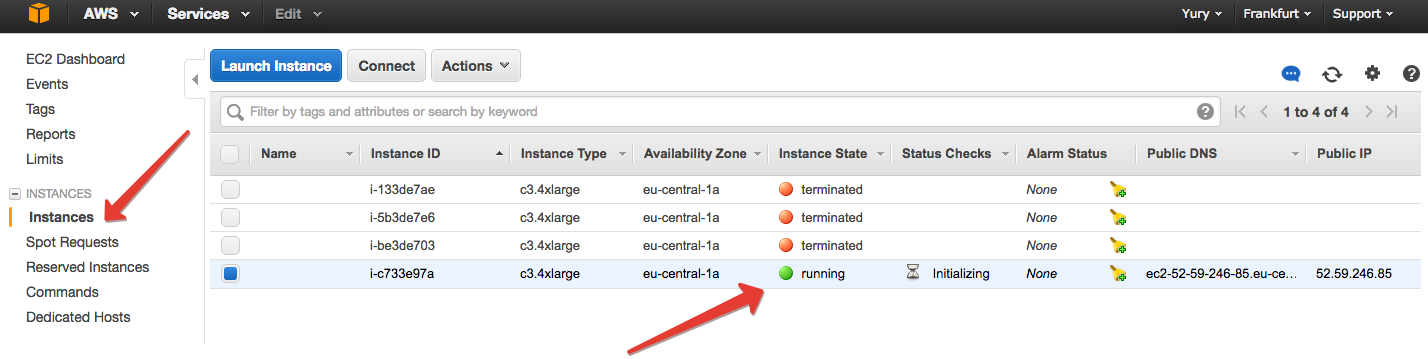
Finally, we confirm everything, wait a couple of minutes for the instance to start, and in EC2 on the “Instances” tab, we notice that something has appeared.
Select the instance that appears and click Connect. Amazon gives instructions on what to do next.
If you are sitting under Windows, then the reading of the article does not end for you (usually at this place in the tutorials you can read “Windows? Good luck!”). All you need to do is read Amazon’s instructions on how to connect using Putty.
If you are under * NIX, then we execute the following 2 commands:
The first is to ensure that not everyone who is passing has access to your pem-file. The second is the actual connection to the virtual machine with its unique host.
If everything went smoothly, you, as a user of ubuntu, will get to the terminal of the remote machine.
We can do anything, run any scripts, but we will focus on setting up the instance for machine learning tasks with Jupyter. All the commands are described below to make them easier to understand (and to make sure that everything went without rum-rf / jokes), but in general we will run it a bash script a second time.
Download and install Miniconda. It is still much easier than Anaconda, and we will install the necessary libraries (however, seaborn is not good for me, but everything is fine with Anaconda). We are with the machine for a short time, hardly for more than a few hours, so without perfectionism - we set everything up in the home directory.
Now install all the libraries that we want.
It is possible, for example, to put Vabpal Wabbit (nimble linear models, which on large samples are sometimes considered faster MapReduce-implementations).
Git won't hurt either - you can download the necessary repository right away (I don’t consider using Amazon S3 in this tutorial).
Creating a certificate to log in to Jupyter with a password is so much safer. Now we’ll do this with our hands; the second time this generated certificate will be used by the script.
You will be prompted for user information. In principle, it is not necessary to fill out.
Now create a password to log in to the Jupyter server.
You can use the passwd function from ipython
Your password hash will appear. We copy it.
Finally, we create an IPython profile and start the server by first specifying in the settings file which port we want to use and from which addresses access is allowed. We specify the hashed password. Your password will be different - you need to insert your own.
The last thing we do only on a remote machine is to start the IPython server.
(Why IPython, but not Jupyter? .. Why is certfile explicitly specified? The answer is simple: crutches. Jupyter did not want to see the config file, and then did not want to see the certificate file settings in it. Check if it can start with the jupyter command , and without explicitly specifying the configuration file and certificate).
If everything went well, you will see at the end read something like this.
Now go to the browser on HOST : 8888, where HOST is still the address of your instance. Attention! The protocol must be HTTPS, you may also need to confirm the certificate. (For example, in Chrome you need to poke "Advanced" and confirm the transition to the site).
We enter our password (here, of course, not hashed, but “normal”) and see a nice picture - the file system from Jupyter.

Create a new notebook and enjoy the abundance of cores under the hood.

Now let's go back to the terminal (our company, not the remote machine) and drop some data set on our instance. For example, from the Kaggle competition " Forest Cover Type Prediction ".
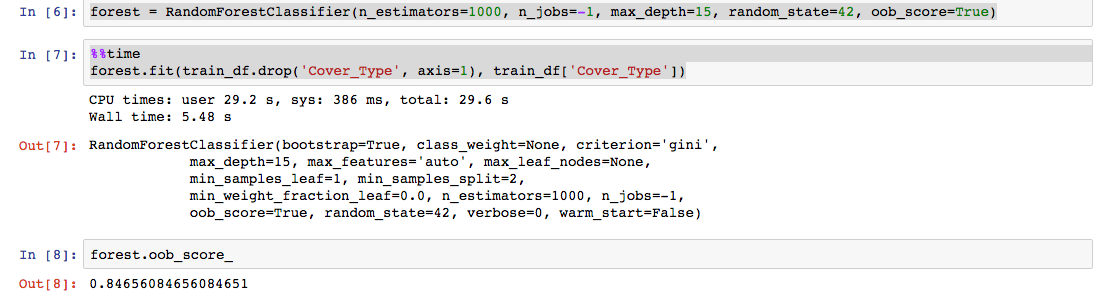
About machine learning, of course, it's interesting to talk, but here we just run the random Sklearn forest on raw data.

Pay attention to the parameter n_jobs - here we just use all 16 cores.
1000 trees with a maximum depth of 15 learned ~ in 5 seconds - 3 times faster than on my MacBook Air with 4 cores and 4 GB of memory. On large samples, the difference, of course, will be more significant.
The process can be automated. Using the Python Amazon SDK by the name of boto, you can do a backup instance instance with a script. But for now, we will look at the scripts that prepare the machine for working with Jupyter after it has been launched.
All this is in the Github repository .
In total, you will need 3 files:
In the desired directory run:
5-7 minutes and that's it! You can work with Jupyter server.
Already I was about to pour tea. But! Very important moment!
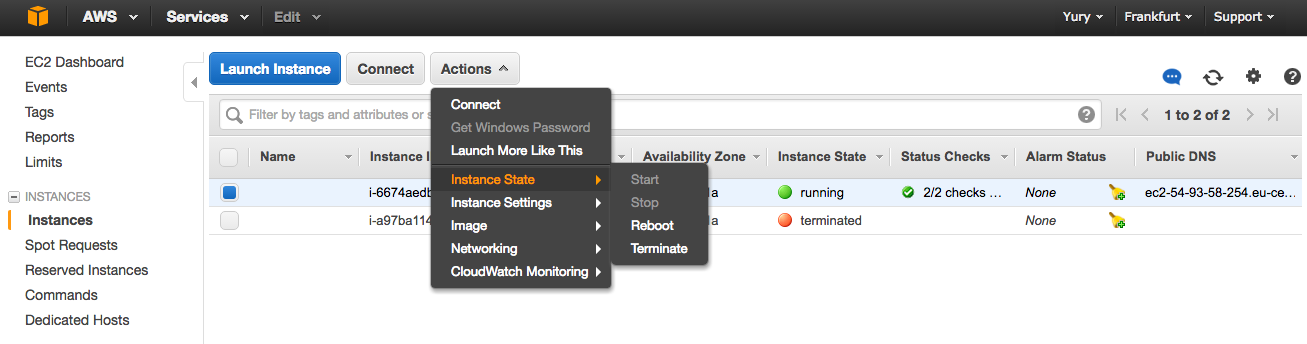
At the end of the work, stop your instance.
EC2 -> Instances -> Actions -> Instance State -> Terminate.
It is the terminate, not the stop (although this is only available for the spot ones). But in the case of instances running on demand, stop does not completely turn off the machine, they can run into money for data exchange.
Finally, you can discuss a little finance. The current account is checked at Amazon when you click on your name and then on “Billing & Cost Management”.
$ 0.25 / hour is about $ 25 per month, if you use for 4 hours every weekday. Then everyone decides for himself whether he is ready for such expenses.
You can advertise here and the GitHub Student Developer's Pack - I personally got the Amazon certificate for $ 110 with them, I still use it. In addition, you can get an Amazon grant for serious research projects.
That's all for now. I think for some it was a jump-start in Amazon Web Services EC2. Let our cars rest at night!
Ps. Comments / tips / experience sharing / pull requests are welcome.
In this article I will tell you how to start working with the EC2 service. In essence, this is a step-by-step instruction on the semi-automatic lease of an AWS spot instance for working with Jupyter notebooks and building Anaconda libraries. It will be useful, for example, to those who are still using their toy poppy in Kaggle competitions.
')
Probably, the reaction of everyone who visited Amazon Web Services for the first time is the confusion of the abundance of services offered and virtual machines (which are called instances there).
In this tutorial, I’ll show you how inexpensively to rent an AWS computing instance and quickly set up a Jupyter server on it to use your favorite notebooks. We will focus on the Anaconda assembly and machine learning tasks, but it is clear that the server can be used for various purposes, even if bitcoins are mine :)
Motivation : we want to quickly (within 5-7 minutes) access from Jupyter notebooks to computing resources more seriously than from a home computer.
In general, there is a good tutorial for this business. The article you are reading is a free translation with additions. We will also write a script that will run every time you rent a car. And here is the result for those who are in a hurry.
We will rent a spot instance with 3.4xlarge with 16 cores and 30 GB of RAM.
“Spot” means that in essence we will participate in the auction and, having set the price per hour of using the machine, have access to it until demand increases. If demand increases, and the market price exceeds the one we have appointed, the car will “run away” from us, and all of a sudden. It is for this reason (instability) that many are afraid to use spot instances, although you can save a lot on them compared to on-demand instances. The same machine, but in a more “stable” mode, will cost about $ 0.85 / hour, but we will spend four times less.
Now about the types of machines. They are well described in the AWS documentation, so we choose type C - machines optimized for calculations.
Car rental
To get started, sign up at Amazon Web Services. I will not write instructions here - everything is as usual, it will only be necessary to confirm both by phone and by e-mail. You will need to link a credit card to your account, but if you are afraid of spending, you can take the m4large instance (2 CPU, 8 Gb RAM) for $ 0.05 / hour.
Go to your AWS console and find EC2 (Elastic Compute Cloud) in Services
In the Spot Requests section, click “Request Spot Instance”.
Select the type of OS that will be in the virtual machine. In general: Windows is more expensive, among * Nix it is not so important which one to choose, let it be Ubuntu.
On the next tab we are offered to choose the instance itself. Here we pop, level ( here everything is described in more detail) and scroll to c3.4xlarge.
Then the most important thing is to set the price per hour of using the virtual machine. We see current prices in selected regions.
If you see that your prices are much higher than in the screenshot, it means that there is a surge in the current region - change the region (in the upper right corner next to your name). I still successfully use the Frankfurt region, but you can study the statistics, see which regions are cheaper and with stable prices.
The price is best set at 1.5 times the current market value of the instance in the region. In this situation, the price will fluctuate a little, but rarely exceed what you declared. Accordingly, so the car will not often fall off.
Now we connect the repository. Amazon treats thirty GB, so why not take all 30 ...
Instance tagging can be skipped. And further port setting. The main thing here is to open the port that we will use under the Jupyter server. Let it be traditionally 8888. Click “Add rule”, leave the option “Custom TCP rule” and specify port 8888. We also add the HTTP and HTTPS protocols and say who can listen on the ports. It is enough to choose My IP daws on the right.
In the next step, we create a key (pem-file) that will identify us when remotely connecting to the machine via the SSH protocol. You can call it whatever you like - the main thing after downloading is to know where it lies and in no case (!!!) do not upload it on GitHub or anywhere else online. Treat this file almost like a password from a bank card. Amazon recommends updating pem files periodically (you can have 2 in each region; you can’t download the same key a second time).
Finally, we confirm everything, wait a couple of minutes for the instance to start, and in EC2 on the “Instances” tab, we notice that something has appeared.
Select the instance that appears and click Connect. Amazon gives instructions on what to do next.
If you are sitting under Windows, then the reading of the article does not end for you (usually at this place in the tutorials you can read “Windows? Good luck!”). All you need to do is read Amazon’s instructions on how to connect using Putty.
If you are under * NIX, then we execute the following 2 commands:
chmod 400 <PEM-file name>.pem ssh -i <PEM-file name>.pem ubuntu@<HOST> The first is to ensure that not everyone who is passing has access to your pem-file. The second is the actual connection to the virtual machine with its unique host.
Machine setup
If everything went smoothly, you, as a user of ubuntu, will get to the terminal of the remote machine.
We can do anything, run any scripts, but we will focus on setting up the instance for machine learning tasks with Jupyter. All the commands are described below to make them easier to understand (and to make sure that everything went without rum-rf / jokes), but in general we will run it a bash script a second time.
Download and install Miniconda. It is still much easier than Anaconda, and we will install the necessary libraries (however, seaborn is not good for me, but everything is fine with Anaconda). We are with the machine for a short time, hardly for more than a few hours, so without perfectionism - we set everything up in the home directory.
wget -c http://repo.continuum.io/miniconda/Miniconda-latest-Linux-x86_64.sh bash Miniconda-latest-Linux-x86_64.sh -b -p ~/miniconda export PATH=~/miniconda/bin:$PATH Now install all the libraries that we want.
conda install -y numpy scipy pandas scikit-learn jupyter It is possible, for example, to put Vabpal Wabbit (nimble linear models, which on large samples are sometimes considered faster MapReduce-implementations).
sudo apt-get -qq install vowpal-wabbit Git won't hurt either - you can download the necessary repository right away (I don’t consider using Amazon S3 in this tutorial).
sudo apt-get -qq install git Creating a certificate to log in to Jupyter with a password is so much safer. Now we’ll do this with our hands; the second time this generated certificate will be used by the script.
openssl req -x509 -nodes -days 365 rsa:2048 -keyout jupyter.pem -out jupyter.pem You will be prompted for user information. In principle, it is not necessary to fill out.
Now create a password to log in to the Jupyter server.
You can use the passwd function from ipython
python >>> from IPython.lib import passwd >>> passwd('Sample password') Your password hash will appear. We copy it.
'sha1:d0c0b7eb515e:f0e59fcd04aec7bb50886084ae8e1fa9a273f88e' Finally, we create an IPython profile and start the server by first specifying in the settings file which port we want to use and from which addresses access is allowed. We specify the hashed password. Your password will be different - you need to insert your own.
ipython profile create nbserver printf "\n# Configuration file for ipython-notebook.\n c = get_config()\n # Notebook config\n c.NotebookApp.ip = '*'\n c.NotebookApp.password = u''sha1:d0c0b7eb515e:f0e59fcd04aec7bb50886084ae8e1fa9a273f88e''\n c.NotebookApp.open_browser = False\n c.NotebookApp.port = 8888\n" >> ~/.ipython/profile_nbserver/ipython_notebook_config.py The last thing we do only on a remote machine is to start the IPython server.
(Why IPython, but not Jupyter? .. Why is certfile explicitly specified? The answer is simple: crutches. Jupyter did not want to see the config file, and then did not want to see the certificate file settings in it. Check if it can start with the jupyter command , and without explicitly specifying the configuration file and certificate).
ipython notebook --config="~/.ipython/profile_nbserver/ipython_notebook_config.py" --certfile=jupyter.pem If everything went well, you will see at the end read something like this.
[I 10:09:08.774 NotebookApp] Serving notebooks from local directory: /home/ubuntu [I 10:09:08.775 NotebookApp] 0 active kernels [I 10:09:08.775 NotebookApp] The Jupyter Notebook is running at: https://[all ip addresses on your system]:8888/ [I 10:09:08.775 NotebookApp] Use Control-C to stop this server and shut down all kernels (twice to skip confirmation). Profit
Now go to the browser on HOST : 8888, where HOST is still the address of your instance. Attention! The protocol must be HTTPS, you may also need to confirm the certificate. (For example, in Chrome you need to poke "Advanced" and confirm the transition to the site).
We enter our password (here, of course, not hashed, but “normal”) and see a nice picture - the file system from Jupyter.
Create a new notebook and enjoy the abundance of cores under the hood.
Now let's go back to the terminal (our company, not the remote machine) and drop some data set on our instance. For example, from the Kaggle competition " Forest Cover Type Prediction ".
scp -i <PEM-file name>.pem <LOCAL_PATH_TO_DATA> ubuntu@<HOST>:/~ About machine learning, of course, it's interesting to talk, but here we just run the random Sklearn forest on raw data.
Pay attention to the parameter n_jobs - here we just use all 16 cores.
1000 trees with a maximum depth of 15 learned ~ in 5 seconds - 3 times faster than on my MacBook Air with 4 cores and 4 GB of memory. On large samples, the difference, of course, will be more significant.
Same script
The process can be automated. Using the Python Amazon SDK by the name of boto, you can do a backup instance instance with a script. But for now, we will look at the scripts that prepare the machine for working with Jupyter after it has been launched.
All this is in the Github repository .
In total, you will need 3 files:
- In config.txt, write the path to your pem-file, the host of the newly issued instance, as well as the hashed password to access the Jupyter server, which we created a little earlier.
pemfile='<PEM-file>.pem' host='<HOST>' jupyter_password='<JUPYTER_PASSWORD>' - In remote_setup.sh, you add everything you want to do on a remote machine.
# Installing Miniconda wget -c http://repo.continuum.io/miniconda/Miniconda-latest-Linux-x86_64.sh bash Miniconda-latest-Linux-x86_64.sh -b -p /home/ubuntu/miniconda export PATH=/home/ubuntu/miniconda/bin:$PATH #Installing neccesary libraries conda install -y numpy scipy pandas scikit-learn jupyter #Can add whatever you want to install #sudo apt-get -qq install vowpal-wabbit #sudo apt-get -qq install git ipython profile create nbserver printf "\n# Configuration file for ipython-notebook.\n c = get_config()\n # Notebook config\n c.NotebookApp.password = u'"$1"'\n c.NotebookApp.ip = '*'\n c.NotebookApp.open_browser = False\n c.NotebookApp.port = 8888\n" > ~/.ipython/profile_nbserver/ipython_notebook_config.py ipython notebook --config="~/.ipython/profile_nbserver/ipython_notebook_config.py" --certfile=jupyter.pem - The launch_remote_setup.sh script simply executes remote_setup.sh with the necessary parameters on the remote machine.
source 'config.txt' scp -i $pemfile ./ipython.pem ubuntu@$remote_host:~ ssh -i $pemfile ubuntu@$remote_host 'bash -s' < remote_setup.sh $jupyter_password
In the desired directory run:
sh launch_remote_setup.sh 5-7 minutes and that's it! You can work with Jupyter server.
Already I was about to pour tea. But! Very important moment!
At the end of the work, stop your instance.
EC2 -> Instances -> Actions -> Instance State -> Terminate.
It is the terminate, not the stop (although this is only available for the spot ones). But in the case of instances running on demand, stop does not completely turn off the machine, they can run into money for data exchange.
Finally, you can discuss a little finance. The current account is checked at Amazon when you click on your name and then on “Billing & Cost Management”.
$ 0.25 / hour is about $ 25 per month, if you use for 4 hours every weekday. Then everyone decides for himself whether he is ready for such expenses.
You can advertise here and the GitHub Student Developer's Pack - I personally got the Amazon certificate for $ 110 with them, I still use it. In addition, you can get an Amazon grant for serious research projects.
Conclusion
That's all for now. I think for some it was a jump-start in Amazon Web Services EC2. Let our cars rest at night!
Ps. Comments / tips / experience sharing / pull requests are welcome.
Source: https://habr.com/ru/post/280562/
All Articles