Some features of development for Ubuntu Touch

Spring came. Cats think about cats, men about women, and the programmer - where else to port the existing code. Last fall I won the Meizu MX4 Ubuntu Edition, and therefore the choice was obvious for a long time. And then there was time and strength.
Mastering the new platform consisted in porting the Allegro library to it first, and then my Return of Dr. game. Destructo, about which I have already written here, and the mobile version of which is still in development for iOS and Android, but already about to be released sometime soon.
However, I’ll not focus on the features of porting my project in this post, but I’ll just tell you what reefs I met this time. I have two goals: firstly, to systematize and combine in one place information that can be useful to novice developers under Ubuntu Touch, and secondly - just to remind everyone about the existence of this platform, with the hope of making common efforts to make it world-leading , and then on the main couple of leaders I have a professional allergy.
')
My experience with this platform extends exclusively to the development of OpenGL applications, so if you are more interested in using the native UI (Qt), here you may not find much interesting for yourself. However, the development of Qt and QML applications is fairly well documented on official resources, unlike my tasks (and MORE, one platform again forgot about gameplay at the start ...).
What is good about Ubuntu Touch, and how to start working with it
For me personally, as a game developer, Ubuntu Touch is good, first of all, because, unlike Android, C ++ programs here are first-class citizens. All system libraries and services have C ++ interfaces, no need to write any code in strange languages to create a window or send a request for payment. The official IDE, QtCreator, is not without flaws, especially in terms of debugging UI, but in general it is very good, and most importantly, out of the box well supports debugging C ++ applications on a device that Google can’t normally screw in its Android Studio, be-be-be. Well, a plus compared to iOS, the main thing is that you don’t need to have a Mac (or suffer from badly running virtual machines)
Now about the minuses. First, you still have to install Ubuntu or some more or less compatible Linux. And putting it on the Virtual Box is a bad option! The developers of the Ubuntu Touch plugin under QtCreator used OpenGL (QtQuick) to render their UI, and as a result, everything in the Virtual Box works very badly - for example, the QtCreator window is always on top of any other windows.
Ubuntu IDE welcomes us
Also, I personally failed to get the Ubuntu SDK to see my device while I was trying to work in the Virtual Box, despite the fact that Ubuntu saw it. But here, perhaps, was my joint, I did not understand, and put Ubuntu on real hardware.
To start developing an application for Ubuntu Touch, the easiest way is to install the Ubuntu SDK. In general, no one bothers to download the necessary components with your hands, but it seems to me that this is more pain than the body needs. According to the instructions for installing the SDK, you need to connect the PPA in which it lives (in fact, the SDK is in the usual Software Center, but maybe some kind of wrong version?).
If you are content with an emulator for now, then you need to create it in the Devices tab. The process is described in detail , but I did not manage to get it to work - it seems that the emulator was created as it was, but the IDE did not want to see it (perhaps I indicated when creating a version of the framework different from the one with which I compiled the program).
To run on the device, you will have to enable the developer mode on it. To my incredible surprise, for this it was necessary to install a PIN-code on it, which I had not used before! It is very inconvenient, Canonical minusik, Android does not force such garbage.
In addition, the computer will see the phone only if the screen is turned on and the lock screen is removed (which is with a circle). What is interesting, just do not need to dial the PIN.
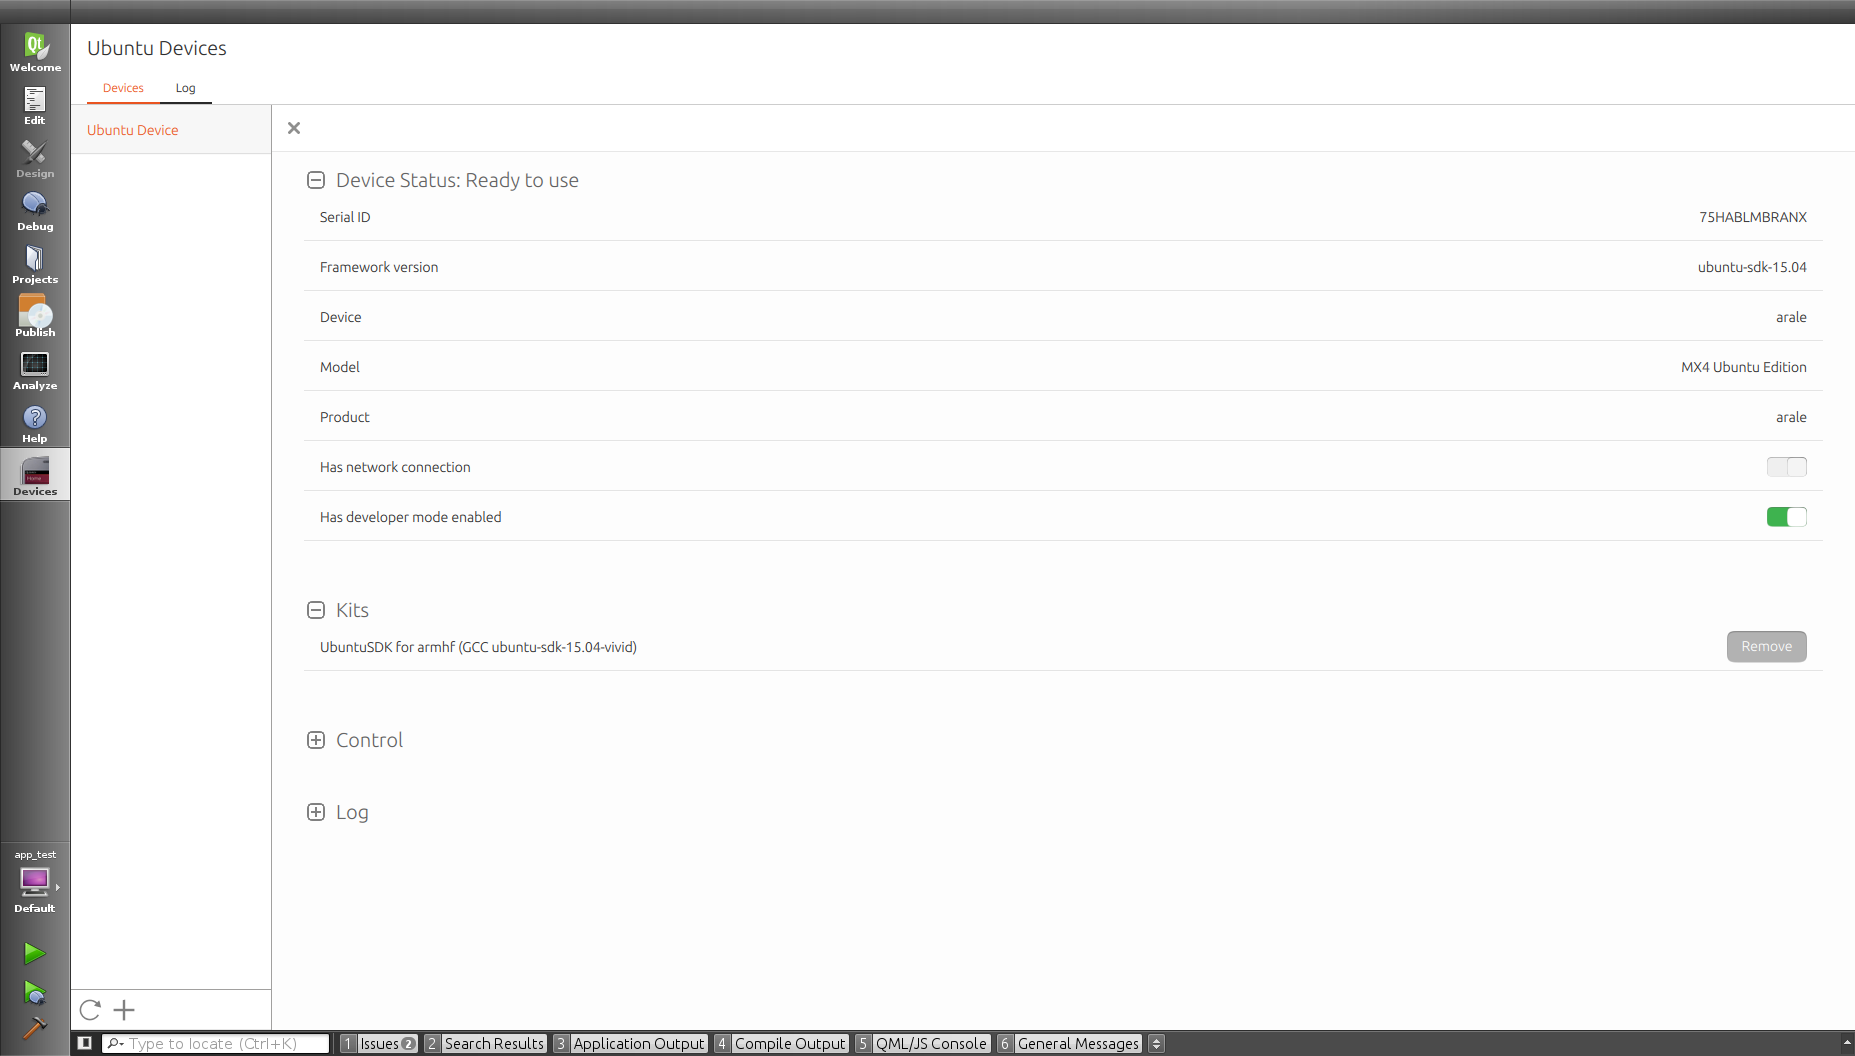
Connected device healthy person
If even after that your phone (and maybe a tablet) still does not appear in the list of devices in the Devices tab, you will have to recall the skills you got when communicating with the same Android, and go and edit the ADB configuration (for now all the available devices with Ubuntu Touch is basically Android devices. Posts ( 1 , 2 ) recommend adding to the file ~ / .android / adb_usb.ini vendorID of your device.
chroot, why is it needed to compile under Ubuntu Touch, and what to do with it
Experienced linuksoidy, long familiar with the chroot, schroot, and maybe even with a click, can skip this section, so as not to laugh at how pathetic Windu understand the power of Linux.
To compile the application, of course, you need a cloud of everything - a compiler, linker, a mountain of libraries. All this should be available under the platform under which we compile. Google solved this problem by setting several environment variables and creating its own build scripts (ndk-build). The solution, I must say, is rather bad, hardly working with external build systems, and unreliable, like all support for C ++ by the “corporation of good”. But platform-independent (well, in theory).
The Ubuntu SDK works only under Ubuntu so far, it has nothing to lose, so everything is different here. For the assembly, a file system is created that fully reflects the normal Linux, but with gcc under ARM, and with libraries for the armhf architecture in the correct directories. Further, this FS is declared rutovoe at the time of the build, and everything works as if we just had such a clever one, specially sharpened for the build for ARM Linux.
This is achieved with the help of the chroot mechanism, which allows you to work with these very tricky filesystems. Ubuntu SDK creates the necessary chroot files by your command, so it’s not necessary to deal with them thoroughly. But keep in mind that the process is quite long, because the entire contents of chroot (and this is a lot of packages, about 1.5Gb) is downloaded from the network, and it should be created for a specific architecture (i386 for the emulator, or armhf for a real device or another emulator) and a specific SDK version.
The interesting thing starts when you decide that you want to use not only those libraries that come as standard with chroot, but also some additional ones. Documentation says that everything included in the delivery of chroot is guaranteed to be on the phone, always in compatible versions, so you can link dynamically with such libraries and expect that the user will earn everything on the phone. But much of what is needed for the life of a game developer is not there: libpng, libfreetype, libogg ... You have to put all this on your hands, and here you need to know more about the chroot.
The fact is that chroot supports not only working with a separate replacement file system, but also creating its images. The base, source snapshot during normal operation remains the same no matter what you do. Moreover, you can create sessions, and each session will also have its own source snapshot, which will live as long as the session is alive (and, importantly, will not reflect changes in the source, if they occur during this time!). Sessions created by the Ubuntu SDK experience not only the restart of the editor, but even the restart of the computer!
The correct way to put new libraries in chroot is to use the “Maintain” button in the “Click” tab in the “Ubuntu” section in the IDE settings. This will give you a console where you can call apt-get install libpng-dev: armhf and the like. At the same time, the source chroot will change. True, I don’t know if the editor will restart their sessions.

Here's a screenshot for you not to get lost
If you wanted to climb on the chroot with your hands, from outside the IDE, or, say, write a script that automates the installation of the necessary packages in the freshly downloaded chroot, then the commands for this are described in the documentation , but I will repeat them here because I personally I missed them there for the first time, and slowed them down for a long time.
click chroot -a armhf -f ubuntu-sdk-15.04 run COMMANDNAME - launches COMMANDNAME inside (not source!) chroot and immediately exits. The -a option is the architecture for which chroot was created, -f is the SDK version. With this command, nothing can be installed in chroot (everything installed will disappear right away), but you can run, for example, an assembly, or find, in order to find something inside the chroot file system.
click chroot -a armhf -f ubuntu-sdk-15.04 install PKGNAME - runs apt-get install PKGNAME, changes the source chroot
click chroot -a armhf -f ubuntu-sdk-15.04 maint - similar to the “Maintain” button, launches the console to change the source chroot'a
And a couple of important teams:
schroot --list --all-sessions - shows us a list of all active sessions
schroot --end-session SESSION_ID - will kill the specified session
If you put the library in chroot yourself using install or maint - do not forget to kill the sessions belonging to the Ubuntu SDK, otherwise QtCreator will not notice the changes made (I lost due to ignorance of this day)!
Finally, I will clarify: what you put in the chroot with your hands will be absent on the phone by default! Therefore, you should either link statically with such libraries, or drag them with you in the click-package (just indicate which ones you need, and hope that when installing your package in the system, dependencies are downloaded themselves, as when using deb, you cannot - click so not able ideologically).
Miru - Mir
There are no familiar X on Ubuntu Touch. Instead of them, there is a long-promised Canonical Mir, which still will not come to the desktops, and on mobile phones - please, hello, here he is. According to its API, Mir is very cute - everything is simple, fairly well documented, and, wonder of wonders, most of the functions have a synchronous and asynchronous option, what is super in general, that there is no other way. Moreover, if you suddenly want for some reason to call an asynchronous function, and then, at another point, wait for its result - there is mir_wait_for, which allows you to do this. It’s just as if people were writing, and not just ordinary aliens!
Of the minuses, it should be noted the almost complete absence of official examples of the Mir-client. What lies on the wiki demonstrates only the very basics, and does not demonstrate what we need - namely, how to connect MirSurface and the OpenGL context. Fortunately, examples can be found elsewhere.
Note that the Mir API is not very stable yet, so the example above is not compiled - the mir_surface_get_egl_native_window function does not exist. Instead, to get a window compatible with eglCreateWindowSurface from MirSurface, you should use a bunch of mir_buffer_stream_get_egl_native_window
(mir_surface_get_buffer_stream (surface)) .
Also, be aware that Ubuntu Touch does not support OpenGL ES of the first version - only OpenGL ES2 and 3! The necessary headers and libraries are simply missing. Therefore, if you, like mine, have the Legacy code of Ochakov times lying around somewhere and essentially until the new subjugation of the Crimea, you will have to impose it with ifdefs.
Don't forget to pass a pair in the eglChooseConfig attribute list.
EGL_RENDERABLE_TYPE, EGL_OPENGL_ES2_BIT
And in the list of context attributes for eglCreateContext -
EGL_CONTEXT_CLIENT_VERSION, 2
Otherwise, you will long be surprised to look at the significant errors BAD_CONFIG and BAD_ATTRIBUTE. Damn it, XXI century is in the yard, OpenGL still cannot tell which attribute is bad and what he didn’t like in the config ...
Processing input to Mir is done by setting up an event handler. Which is perfectly fine - if you use Mir from a C ++ program, then you will be able to access the API version with std :: function support as callbacks. Well, if you prefer the usual C, then you will be an option with simple pointers to functions and void * context.
And the Mir key codes are sent the same as X11, so don’t be in a hurry to throw out your version of the get_key_name function!
Make it Click
And now, let's say, the code we are porting has compiled, and is ready to run. The question arises how to shove it on the device, along with resources, dynamic libraries and other horned hell. The deb is not currently fashionable, on rpm, which you love dearly with Mandrake 6.0, Ubuntu Touch will not even look, but you need to use the new package format - Click . This is what Ubuntu IDE collects for uploading to the phone.
In my opinion, a significant disadvantage of Click-packages compared to IPA or APK is that it is not a ZIP, but something of its own, a tricky one. As a result, just take it, and see what was attacked there - I’m going to have to climb into the console, understand the click keys. However, of course, soon someone will write a plug-in for the Midnight Commander to have Click VFS, and everything will be more or less good again.
A significant advantage of click is that you can stick anything into it and arrange it (almost) inside as you like. All that is there, during the launch of the package will be mounted as a file system from the root, and then you will be able to search for libraries and data along your usual paths in some / usr / local. This, of course, if your application has moved to Touch with the usual Linux. If it is a guest with hostile Windows, then maybe you don’t need to duplicate the folder structure that Linux users are used to, but just flop the executable file right into the root, and the data nearby, not to search, and everything is convenient and simple. By default, the Ubuntu IDE does exactly the first option, but to persuade it to go to the second one by editing CMake or QMake files is not difficult if you are already familiar with their INSTALL directives.
And there is, then, another subtle point, or rather, three. To prepare the click-file, you still need:
a) manifest.json - a file with a description of what your program is, what architecture it is for, and whom to beat if something is not working. It also contains the names for the following two files in the “hooks” section.
b) AppName.desktop - a file that describes how the application on the phone looks like - name, icon, etc. - and how it behaves. The latter concerns, for example, the settings of the splash screen, as well as the allowable orientations (see below)
c) AppName.apparmor - a file where it is listed that your program is available (by default, everything is impossible). Analog permissions in AndroidManifest.xml.
Here we come across with a lack of perplexity at the lack of documentation. The basic content of all three files is not a problem - it can be peeped in templates, or online, but I will give them here for completeness.
manifest.json:
 {
     "name": "APPNAME.DOMAINNAME",
     "description": "DESCRIPTION",
     "architecture": "ARCH",
     "title": "TITLE",
     "hooks": {
         "APPNAME": {
             "apparmor": "APPNAME.apparmor",
             "desktop": "APPNAME.desktop"
         }
     },
     "version": "VERSION",
     "maintainer": "NAME SURNAME <EMAIL@ISP.COM>",
     "framework": "FRAMEWORK"
 }
The content of manifest.json is easily edited using the built-in Ubuntu IDE editor.
AppName.apparmor:
 {
     "policy_groups": [
         "networking"
     ],
     "policy_version": 1.3
 }
Here you need to add the permissions you need. This is also more convenient to do through the IDE editor.
AppName.desktop:
 [Desktop Entry]
 _Name = VISIBLE_APP_NAME
 Exec = EXECUTABLE_NAME
 Icon = ICON
 Terminal = false
 Type = Application
 X-Ubuntu-Touch = true
 X-Ubuntu-Supported-Orientations = landscape
But for some reason, the desktop file is not edited in the IDE, more precisely, it opens simply as text. At first glance, this is not a problem, but on the second, when you get to the end and see all these X-Ubuntu-Whatever, you immediately have questions - how many of these settings are there at all, and what are they. Developers for a new platform - they are like researchers of a new continent, and therefore asking them about such things is the same as asking a researcher how many rivers there are on the new continent - “but the hell knows”. There is almost no documentation on our Ubuntu continent. The following is known:
General documentation on the format is available here , and contains a lot of useful, but not the X-fields.
X-Ubuntu-Touch = [true / false] is a carrying crutch , which shows that the application is a telephone, not a desktop one.
X-Ubuntu-Supported-Orientations = [portrait / landscape / primary] - permissible for screen orientation applications (primary is, as I understand, portrait for phones and landscape for tablets). The list is taken from here , in the more formal docks there are only the first two options; To support all possible screen positions - do not specify this key at all.
X-Ubuntu-Gettext-Domain = [?] - refers to the choice of the translation file that will be used. More precisely - I did not understand, everything is rotten with the documentation.
Fields that control splash screen behavior:
X-Ubuntu-Splash-Show-Header = [true / false] - whether to show the application title on the splash screen.
X-Ubuntu-Splash-Title = [TEXT] - which text to show in the title.
X-Ubuntu-Splash-Image = [FILENAME] - the image that will be displayed on the splash screen. The image will be shown in the size in which it is, without adjustment to the screen size.
X-Ubuntu-Splash-Color = [COLOR] - (solid) background color splash screen in QColor format :: setNamedColor .
X-Ubuntu-Splash-Color-Header = [COLOR] and X-Ubuntu-Splash-Color-Footer = [COLOR] are the colors of the top and bottom splash screen between which the gradient will be drawn.
There is no general list of these additional fields yet. The attempt to get it from the Unity8 source code has not yet been crowned with success - I found a place where a couple of settings are processed, but the rest are not even mentioned anywhere - although they work.

The manifest file editor. Here I want the same for desktop files
Ubuntu IDE: CMake vs. QMake
A hardened Linux user, of course, looks at all these your IDEs with disdain, builds programs with the help of good old make, installs them on a device from the console, and debugs the console with gdb. We, pampered with the charms of Visual Studio and other idiotic IDEs, want us to be on a platter with a blue graphical interface. Therefore, we are trying to use Ubuntu IDE, as well as slightly less alien assembly systems, for example, CMake or QMake.
If you are a QMake fan and have been using it for all your projects for a long time, I have great news for you - on Ubuntu Touch everything will be all zashib! Connect the required module using load (ubuntu-click) , add the manifests described above to the project, and everything should work.
With CMake, in theory, too, everything is simple. In order for Ubuntu IDE to start running your projects on the phone, it is enough to specify the following line in your CMakeLists.txt with the path to the manifest file of your application:
set (UBUNTU_MANIFEST_PATH "manifest.json" CACHE INTERNAL "Path to manifest file")
A very important point - be sure to indicate that the variable is in the cache! IDE will search for it there, and if it does not find it, it will not say anything, but everything will work incorrectly. In addition, my experiments showed that you can not specify the path to the manifest through variables CMake. In any case, the value of "$ {CMAKE_SOURCE_DIR} /manifest.json" had the same effect as if I hadn’t specified anything at all.
Further, there is a place to be strange, and I would even say the IDE's main behavior. Even if you specified everything perfectly, the IDE will create two launch configurations for your application. The first one will be the same as yours in CMakeLists.txt in add_executable. This is a bad, bad configuration, and it is selected by default! In this configuration, the assembly of the code and the package goes under the ARM, but the IDE will try to run all this on the desktop. Naturally, it won’t work for her (unless you have an ARM desktop), and you’ll see errors in the Application Output
 Selected architecture i386: x86-64
 Architecture rejected target-supplied description Debugging has finished
To avoid it, you need to go to the Run tab in the Projects section of your project, and there switch to the second configuration. Her name will be taken from the manifest file, from the “hooks” section. If it coincides with what was specified in add_executable, then the number 2 will be added to it (for example, “cmake_test2”). This is a good configuration, if you select it, then the project will try to run on the device (or emulator).
By the way, with the libraries compiled by CMake, another unpleasant surprise awaits you: if you decide to build dependencies between the libs and the application within the IDE session, then you will not succeed. The fact is that the Ubuntu IDE for the assembled libraries will try to call the Deploy step (that is, Install in CMake terms), and it will break off, because the library has a surprise-surprise, no manifest.json (which it doesn’t look for). The developers say that this way of using IDE is not provided, and, most likely, nothing will change in this regard. Add libraries with sub-projects - then everything will be fine.
By the first strange behavior, I got a bug in a bug tracker Ubuntu IDE.
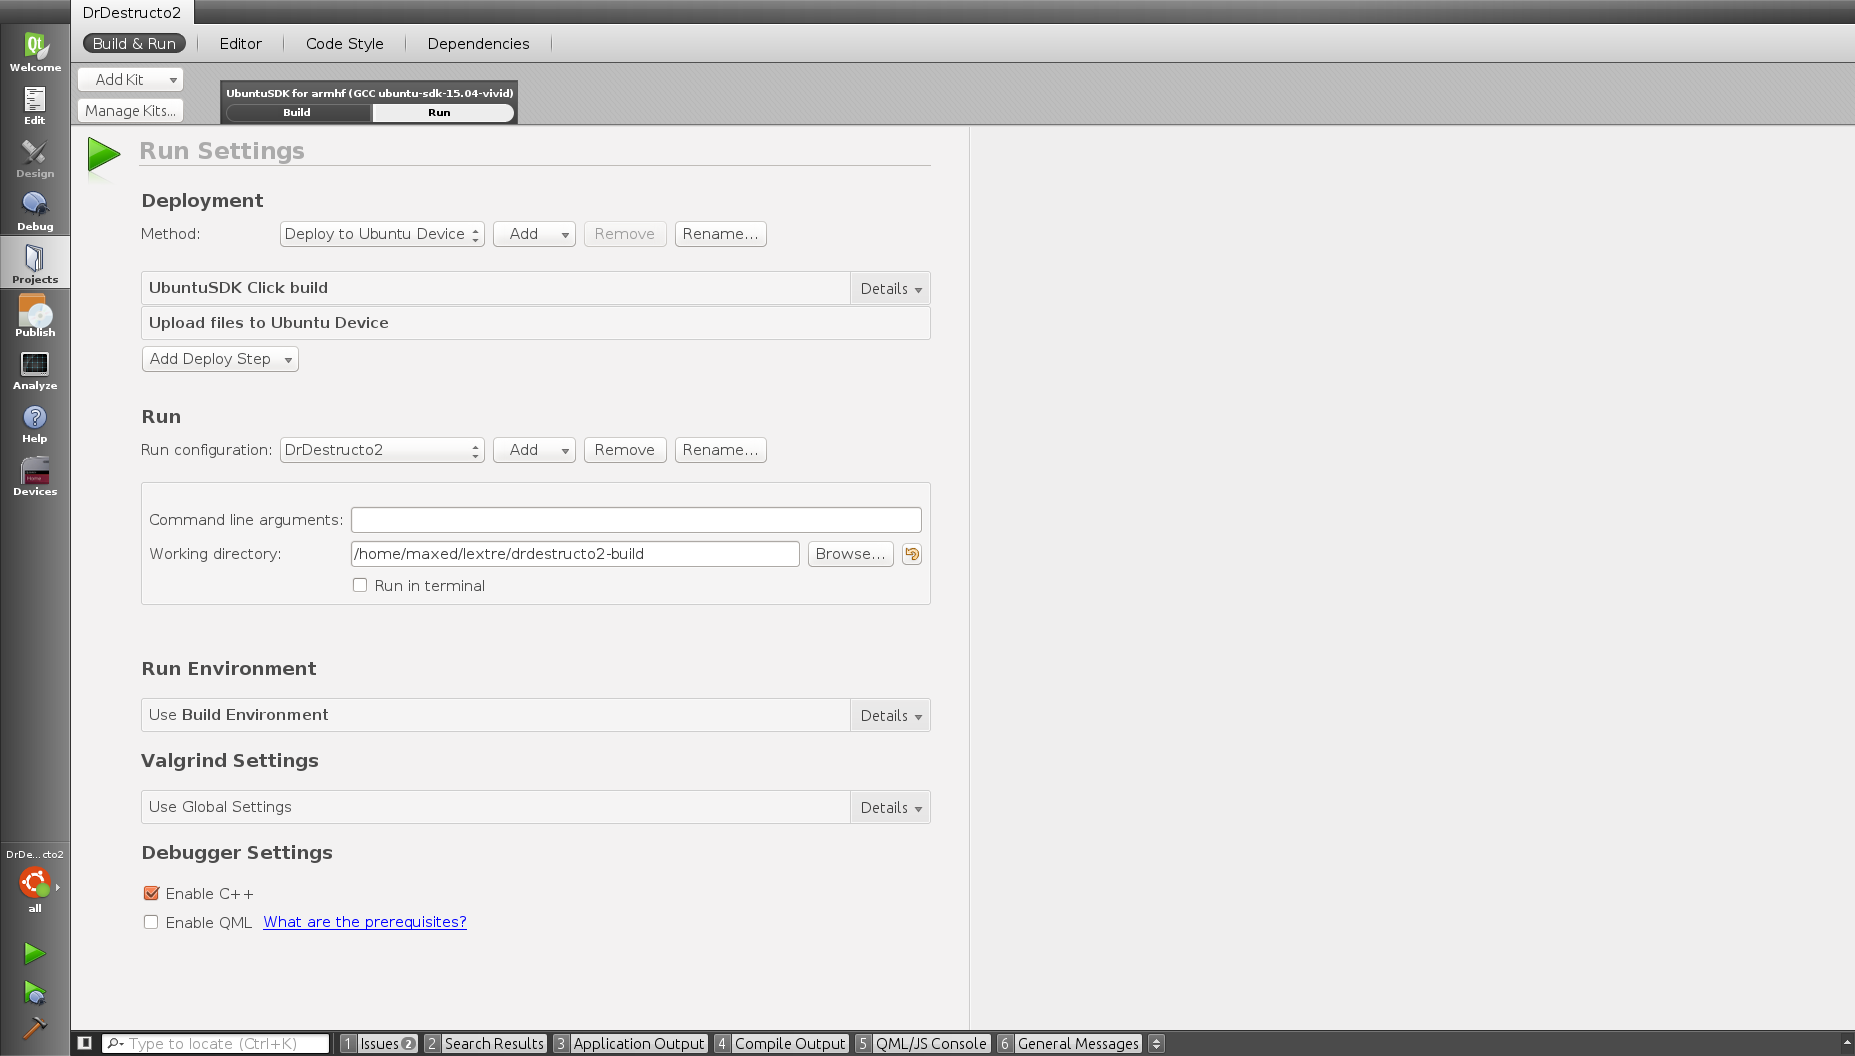
“Bad” configuration. Note the startup parameters - command line arguments and working folder. This is a sure sign that the IDE will try to run your project on the desktop instead of the phone! Do not pay attention to the “Deploy to Ubuntu Device” step in the list of startup steps — your device may be flooded with the device, but it will still be launched on the desktop.
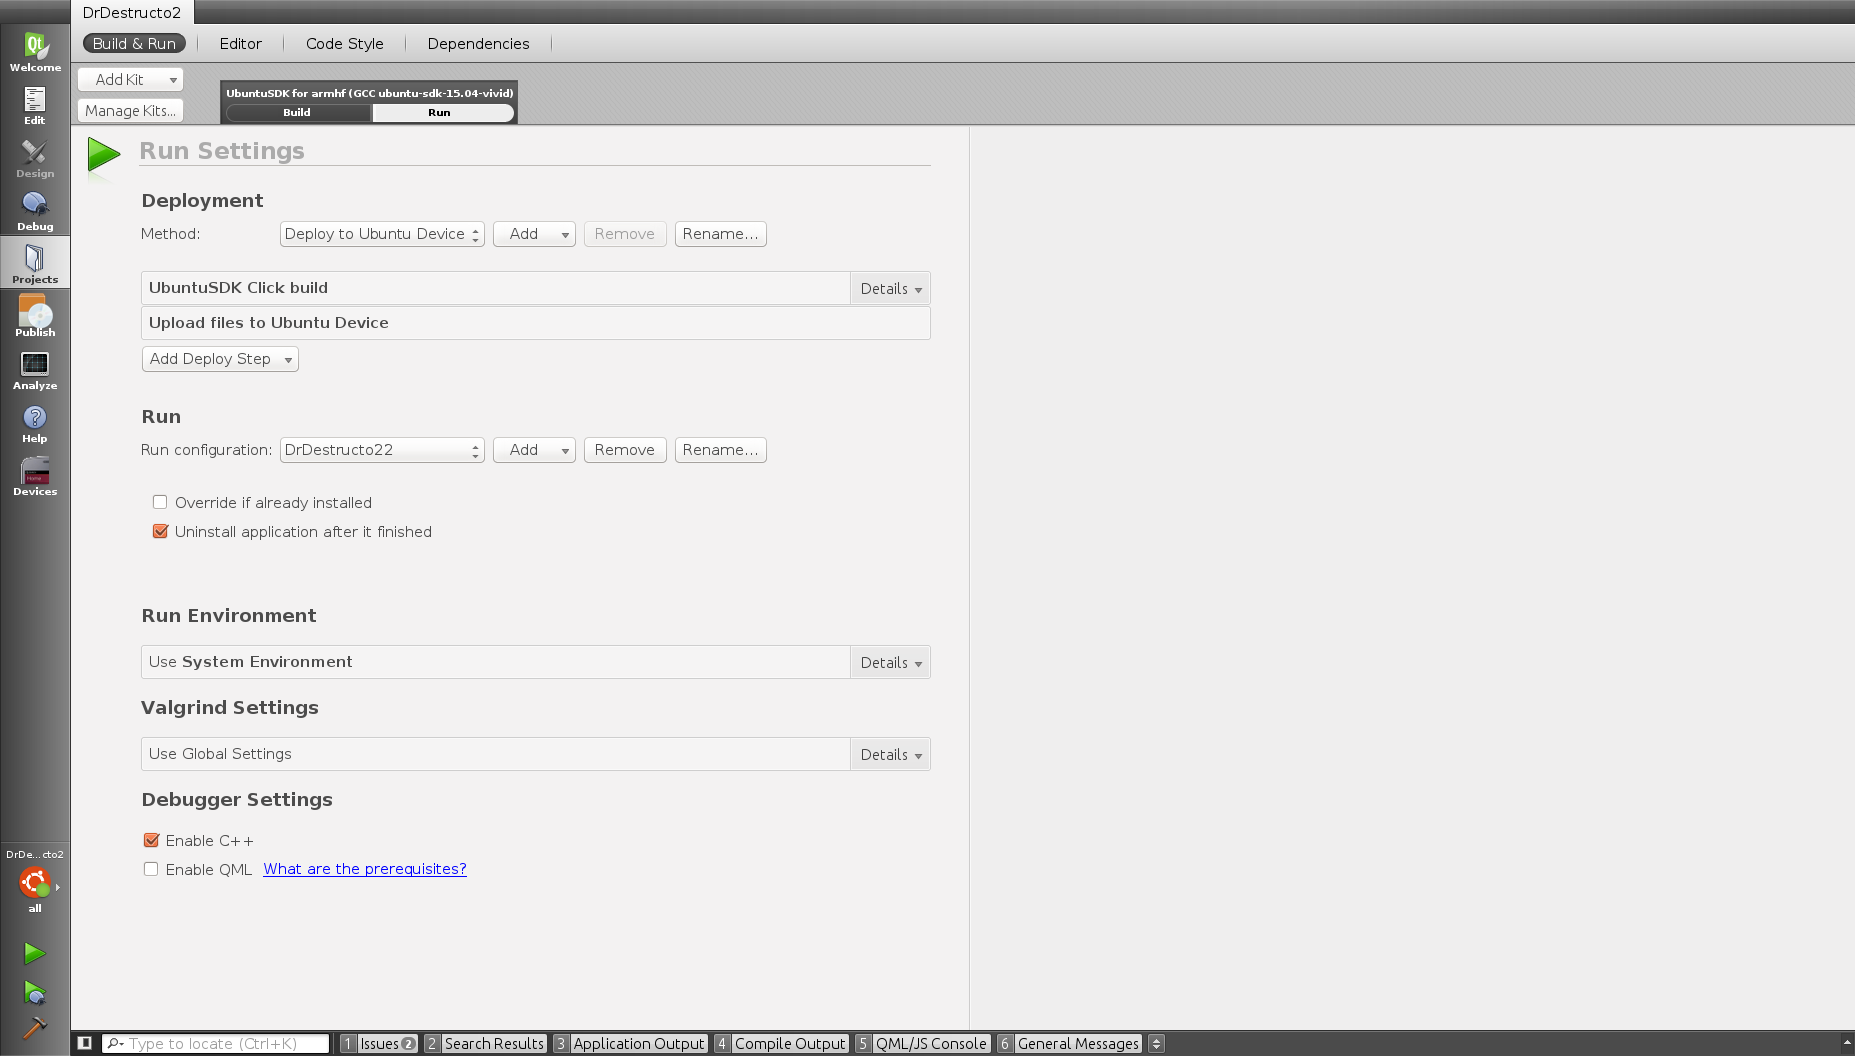
“Good” configuration. As you can see, instead of the command line and working folder there are completely different settings.
How did I live without it before ?!
Finally, I will share a trick that has nothing to do with Ubuntu Touch, but which I learned only recently, but I wanted to find out - at least a year ago, if not more. Sometimes, the task is to link the application not with a dynamic, but with a static version of the library. Of course, gcc has a -static flag, but it is not very convenient (and, in my experience, it does not work in some cases). But it turns out, you can do this:
gcc yourprogram.o -ldynamiclib -l: libstaticLib.a
In this case, the first library will be the one that is (that is, usually dynamic), and the second one is strictly static. Please note that after the colon you need to specify the FULL file name, along with lib and .a!
This trick will work in a QMake file, but if you want to link to a static library in CMake, then you just need to write in the arguments target_link_libraries not libname, but libname.a, and everything will work automatically.
Conclusion
Development under Ubuntu Touch is so far full of difficulties and adventures. The only component of the system that didn’t bother me is Mir. The main difficulties are the almost complete lack of documentation and, in some places, the strange and unpredictable behavior of the IDE. In addition, the constant updating of all the software participating in the development always has a chance to break something (for example, during my day the chroot was broken for assembly - but not quite, but simply could not be updated; after rolling out the fix, I had to rebuild it, there is a big waste of time).
Help on issues related to Ubuntu Touch and development for it can be obtained through the following channels:
AskUbuntu - StackOverflow for Ubuntu as a whole. Questions about the Touch are answered, but few and with long delays.
Ubuntu Phone Mailing List - mailing list for Ubuntu Touch users . The developers' questions are almost never answered here, but if you have something buggy in your phone, then there is a high probability that it will help you here.
# ubuntu-app-devel IRC - IRC channel for communicating developers under Ubuntu Touch. - , Core Apps, , , IRC, , « » . Hint: appdevs, (. )!
, , . IRC , Ubuntu Touch, . .
, , . , , , , . , — API Ubuntu Pay, , , , . , , - .

, , , . , ( IRC , )
Source: https://habr.com/ru/post/280404/
All Articles