SaaS solutions to protect any device anywhere: why it’s simpler and cheaper + implementation example

Nowadays, enterprises of all sizes in doing business are increasingly dependent on their IT systems and, as a result, they have become more sensitive to vulnerabilities and other IT security problems. Add to this the increased staff mobility and objective difficulties in managing remote and mobile devices. As a result, we have a scenario in which the management of security operations has become more complex, expensive and complex. In fact, many of the failures and downtime of IT systems are caused by human errors due to the manual nature of managing traditional local IT solutions.
To solve these problems, new SaaS class solutions are emerging that can replace or expand the capabilities of traditional local solutions. In particular, SaaS solutions for endpoint security, such as Panda Endpoint Protection , can be accessed at any time from any device via a standard web browser, providing simple and intuitive centralized management of the firewall and anti-malware protection of any device regardless of their locations (on the local network, at remote offices or at mobile employees) without additional infrastructure.
')
In addition, often the implementation and use of SaaS solutions does not require special technical skills. For example, to implement centralized protection with Panda Endpoint Protection in a company of 15-20 computers, even a system administrator is not required.
The advantages of SaaS solutions
Compared to traditional local on-premise solutions to protect end devices from malicious programs, the first advantage of SaaS solutions such as Panda Endpoint Protection is the lack of initial investment to implement it.
Traditional protection requires investment in local hardware and software (administrative servers, repositories, databases), adding points of failure, vulnerabilities and associated maintenance and upgrade costs. The SaaS solution, on the contrary, transfers the entire management infrastructure to the manufacturer's infrastructure.
In this regard, the more distributed the environment, the higher the level of savings (usually, each office requires at least one server when using local solutions).
Considering the average case of the introduction of an antivirus solution in an enterprise with 50-100 computers, the savings in implementing a SaaS solution can reach 50% of all costs.
The second advantage is the “natural” ability of the SaaS approach to solve issues related to mobile and remote personnel. Today, monitoring and managing mobile workers with laptops and smartphones, as well as computers in small remote offices, is a source of concern for administrators. With a solution like Panda Endpoint Protection, the administrator can remotely monitor and configure the antivirus and firewall on laptops and smartphones, regardless of their location or type of Internet connection. Since A SaaS solution is not tied to a local network (domain), then it doesn’t matter where the protected device is located: thus, the solution allows you to easily and centrally protect any remote and mobile devices without additional infrastructure.
Finally, another important advantage will be interesting for IT outsourcers: SaaS solutions allow remotely and centrally with low operating costs to serve customers regardless of their location (Moscow, St. Petersburg, Yekaterinburg, Vladivostok ...). For example, the dedicated partner web console Panda Partner Center allows IT outsourcers to centrally manage the entire life cycle of their clients: keep a virtual repository of non-activated Panda SaaS solutions licenses, independently activate trial licenses, commercial licenses and their renewals (including the option of automatic renewal), without additional authorization, go to the management consoles SaaS solutions of their customers and manage the protection, IT infrastructure, monitor, remote support and much more.
An example of a simple implementation of a SaaS solution for centralized device protection
To make sure of this, let's consider the situation, how you can quickly and easily implement the Panda Endpoint Protection Plus SaaS solution for central protection of end devices (Windows, Linux, Mac, Android):
• antivirus (in a broad sense);
• firewall;
• control devices;
• server and mail Exchange security;
• URL filtering;
• Anti-theft features for Android and other options.
To do this, you can register 10 licenses for 1 month on the website for free or use the demo console:
URL: demologin.pandasecurity.com
Login: DRUSSIAN_FEDERATION_C9@panda.com
Password: DRUSSIAN # 123
Do not pay attention to the fact that the demo console has HTTP protocol, since This console is still a demo for displaying the interface. The console of "real" licenses works entirely under HTTPS.
Preliminary actions
Before you start installing Panda Endpoint Protection Plus , make sure that you have familiarized yourself with the system requirements as well as the URL and port availability requirements (in most cases, everything should be fine).
There are two approaches when implementing Panda Endpoint Protection Plus:
1. Quick installation allows you to quickly install "default" protection on your computer or send a link to the required users to automatically install on their devices.
2. A full installation allows you to pre-configure security profiles and user groups, after which you can now go directly to the remote installation of local agents to the required devices.
Quick Start Panda Endpoint Protection Plus
Connecting to the management console
In order to install Panda Endpoint Protection Plus protection, you need to log into the management console. If you have a trial license, then open the page www.pandacloudsecurity.com and enter your login and password. Or you can track everything in the demo console (see above).
Quick install protection
If you are logging in to the management console for the first time and / or within your account you have never installed security, you will see the initial page offering a quick installation. As part of a quick installation, you can install protection on the required computers within the security profile and the default user group offered by default. In any case, you can later change the profile and group settings as you like.
To perform a quick installation on the current computer, click the “Install on this computer now” button.

Fig. 1. Quick install protection
1. Save the WAAgent.msi file to your computer.
2. Delete your current anti-virus solution (it is recommended to delete it yourself, although this operation can be performed automatically when launching the installation file - see clause 3 below).
3. Launch WAAgent.msi to begin the installation of Panda Endpoint Protection Plus.
4. Click the Next button to continue the installation process. The local Panda Endpoint Agent will be installed on the computer.
5. Click the Finish button to complete the installation wizard.
6. Double-click the Panda icon located in the system tray on the taskbar to see the Panda Endpoint Protection Plus installation indicator. The installation process may take several minutes.
You can also see the installation indicator in the console. Connect to the console and select Computers from the main menu.
During the installation process, you will be asked to restart your computer to complete the installation. Please restart your computer when required.
After completing the steps above, your computer is protected with Panda Endpoint Protection Plus.
Verifying the protection operation
To verify that your protection is working correctly, you can take the following action:
Go to www.eicar.org/download/eicar.com . In this case, an attempt will be made to download a file that every anti-virus solution recognizes as Eicar-Test-File.
Congratulations! Now your computer is correctly protected with Panda Endpoint Protection Plus. Further you can already tune security profiles and other parameters.
Full Panda Endpoint Protection Plus installation
The chapter above was devoted to a quick installation of Panda Endpoint Protection Plus within the default settings. This chapter presents three basic and very simple steps, the implementation of which will allow you to more correctly configure the protection of all the required computers and devices using Panda Endpoint Protection Plus.
If you need reference information about the product, access to the administrator’s manual, etc., simply click on the button
 in the upper right corner of the web console and in the drop-down menu select the corresponding item.
Step 1: Set Up Security
The protection provided by Panda Endpoint Protection Plus is designed to be installed and distributed throughout your entire IT network. Therefore, the protection that needs to be installed will depend heavily on the computers that it needs to protect, as well as on your specific security needs.
Security is configured using security profiles and computer groups. A profile contains security settings that should be applied to a specific group of computers.
To configure protection, go to Settings .
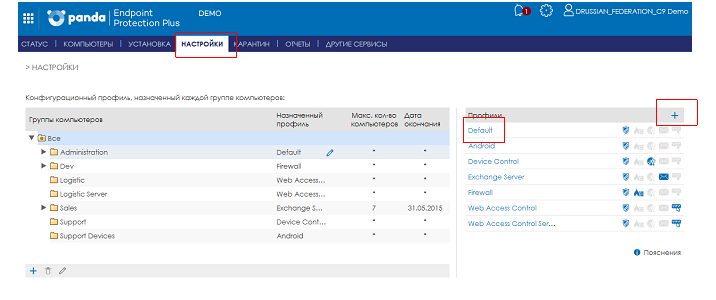
Fig. 2. Section Settings
Profile Setup
You can make a change to the Default profile provided by default. To do this, click on its name. If you need to add a new profile, then click the button as a plus.
You can create any number of security profiles depending on your needs: for example, one profile is for computers of ordinary employees, the second profile is for computers of company management, the third is for file servers, the fourth is for Exchange server, etc.
When adding or changing a profile, you need to make the required settings. The default settings are universal settings, but you can change them as you like.
Using the menu on the left, configure the security modules you want to activate.
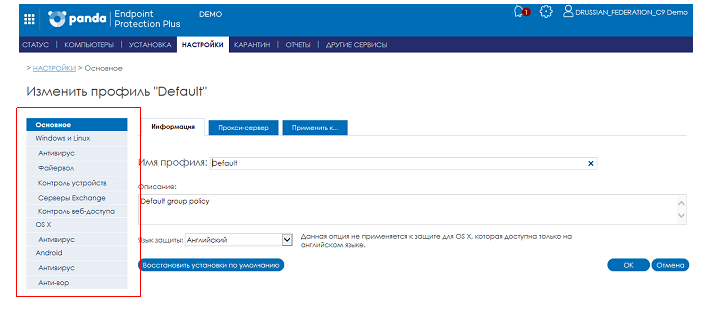
Fig. 3. Profile Settings
Setting up a group of computers
After configuring the security profiles, you need to configure computer groups. You can create any number of groups with varying degrees of nesting. For example, you can group computers by department, office, etc.
In fig. 4 shows an example of the organization of groups of computers according to various criteria and levels of nesting.

Fig. 4. List of computer groups
To add, edit and delete groups, use the corresponding buttons located below the list of computer groups.
To add a group:
1. Left-click the group of computers within which you want to create the required group. If you do not have groups yet, then the created group will be inside the All group.
2. Click the plus button.
3. Specify the name of the group.
4. Select the required security profile that you previously configured.
5. Specify the type of group. The default value is Manual, but if in the product parameters there are no restrictions on groups, then you can select the Automatic group type (for details, see the Administrator’s Guide)

Fig. 5. Adding a group
You can move computers between groups later in the Computers section.
Step 2: Install Security
Panda Endpoint Protection Plus offers you three ways to install protection. But regardless of the method chosen, the installation process downloads and installs the Communication Agent (.msi), which in turn starts the process of installing the local Endpoint Protection protection on the required computers.
Ways to install Panda Endpoint Protection in your network:
1.Installer
It allows you to download an msi file that you can distribute to the required computers using third-party software distribution tools (SMS, Tivoli, etc.) or manually. It is suitable in those cases if you use automated means of software implementation in your network.
2.URL
Allows you to generate a URL, when clicked, which will start the automatic installation process. This URL can be sent by email. This method is most suitable for automated installation of the product on remote computers outside the local network, to which you may not have direct administrative access, or if you do not have the knowledge / ability to use automated software implementation tools or your network is rather small.
3. Distribution utility
If you want to install protection on computers located inside the local network, you can use the built-in distribution utility Panda as an automated means of implementing software.
To start installing Panda Endpoint Protection Plus on your network, select the Installation section in the main menu.

Fig. 6. Installation of protection
Implementing a product with the installer
To implement the product using the installer, please follow these steps:
1.In the Installation section, click the appropriate button to download the installer, depending on the type of operating system installed on the computer (s) where you want to install Panda Endpoint Protection Plus.

Fig. 7. Download Installer
2. Select in the drop-down list the group to which the computers on which you plan to install Panda Endpoint Protection Plus with the downloaded installer should belong. Click the Download button.
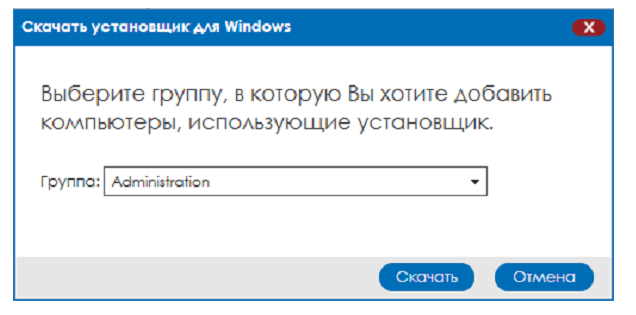
Fig. 8. Group selection for installer
As a result of these actions, you will download the installation file in msi format to your computer, which you can then distribute using automated software deployment tools or run manually. Keep in mind that all computers on which this installer will be launched will be automatically added to the group of computers that you selected when downloading it.
Implementing a product using a URL
To implement a product using a URL, please follow these steps:
1.In the Installation section, go to the Generate installation URL block.
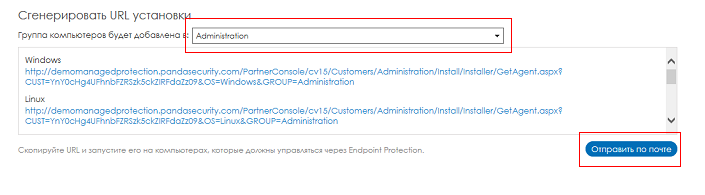
Fig. 9. URL generation
2.In the drop-down list, select the group for which you want to generate the URL.
3. Submit URLs to users of computers that should belong to the selected group. If you want to send the URL data by email, then click the Send by mail button.
Note that within this method, the installation process depends on the end user (he must click on the URL to start the automatic installation process). To avoid problems with the use of licenses (one end user can make several installations on different computers and, thus, use several product licenses instead of the one license you intended), you can set an additional limit on the number of installations in a group.
To do this, follow these steps:
1. In the upper right corner of the Panda Endpoint Protection Plus web console, click the button.
.2. In the pop-up menu, select Settings .
3. In the Group Restrictions section, activate the Allow to assign restrictions to groups option.
4. In the Settings section of the list with computer groups, go to the group to which you want to apply additional restrictions. Configure the required options ( select end date and select the maximum number of allowed settings) and click OK .

Fig. 10. Setting group limits
When the group has reached the maximum number of installations, an attempt will be made to the next installation in the group, which will indicate that the maximum number of licenses has been reached. The end date is the date when the licenses for this group will expire.
As a result of these steps, you will be able to provide users with the appropriate links to install protection on their computers and devices. Keep in mind that all computers on which this URL will be opened will be automatically added to the group of computers that you selected when generating it.
Implementing a product with the integrated Panda distribution utility
To implement a product using the built-in Panda distribution utility, please follow these steps:
1.In the Installation section, go to the Use Distribution Utility section.

Fig. 11. Downloading the distribution utility
2. Click the Download distribution link link.
As a result, a special program will be downloaded to your computer to automatically implement Panda Endpoint Protection Plus on your local network. Install the downloaded utility on your computer. Having administrative permissions to the local network, you can select the computers on which you want to install protection within the required profile in this utility.
For more information about the distribution utility, see the Administrator's Guide.
Step 3: Protection Monitoring
To check the correctness of the implementation of Panda Endpoint Protection Plus on your network, and to monitor and control the protection status of computers and devices, you need to go to the Computers section.
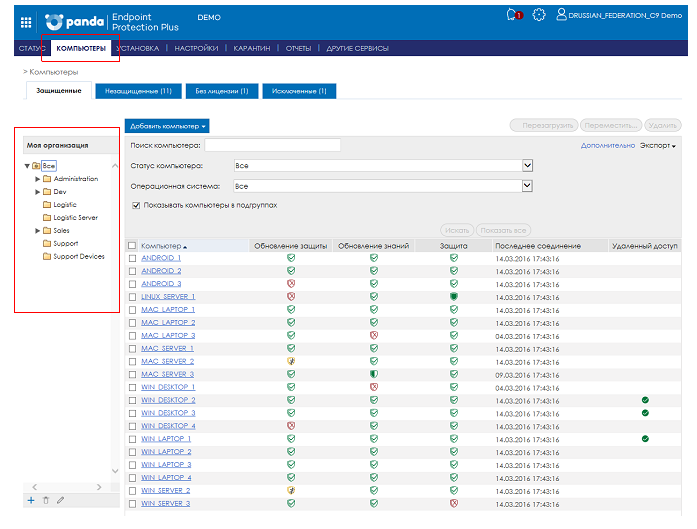
Fig. 12. List of computers
Do the following:
1. In the My organization block, select the group for which you want to view the protection status. To view the protection status of all computers, select All.
2. In the Advanced menu, you can enable a filter that allows you to search for computers depending on the protection status. Select a status from the drop-down menu and click Search .
3. For more detailed information on the status of the protection update, knowledge update and enabled protection modules, left-click on the corresponding icon of the required computer or device. As a result, a pop-up window will appear in which additional information will be displayed.
Conclusion
As a result of the above steps, you can centrally and remotely deploy Panda Endpoint Protection protection on the required computers and devices.
We invite you to familiarize yourself with the Administrator’s Guide to learn how to configure the product operation parameters, centralized updates, automatically generate and send reports, connect remotely to the required computers using integrated remote access utilities and much more.
In this case, you will be able to maximize the full potential of Panda Endpoint Protection Plus to provide effective and reliable protection with a low total cost of ownership.
Thank you for your interest in Panda solutions!
Contact Technical Support:
support@rus.pandasecurity.com
+7 495 105 94 51
www.cloudav.ru
Source: https://habr.com/ru/post/280390/
All Articles