Flume - manage data streams. Part 1
Hi, Habr! In this series of articles, I plan to talk about how data collection and transfer can be organized using one of the Hadoop tools, Apache Flume .

The first article focuses on the basic elements of Flume, their settings and how to launch Flume. On Habr's expanses, there is already an article on how to work with Flume , so some basic sections will be very similar to it.
In the continuation of the cycle, I will try to highlight in more detail each of the components of Flume, tell you how to set up monitoring for it, write your own implementation of one of the elements and much more.
Flume is a tool that allows you to manage data streams and, ultimately, transfer them to some “destination” (for example, to a file system or HDFS).
')
In general, organizing the transportation of data through Flume resembles the creation of such a “pipeline” or “water supply system”. This “pipeline” consists of various sections (nodes), on which the flow of data is controlled (filtering, splitting the flow, etc.).
Flume is a reliable and convenient tool for transporting data. Reliability is provided first of all by transactional data transmission. Those. when properly configured, the Flume node chain can not be a situation in which data is lost or not fully transmitted. Convenience is in configuration flexibility — most tasks are solved by adding several parameters to the configuration, and more complex ones can be solved by creating your own Flume elements.
To begin with, we denote the basic terms, and then we look at the structure of a single Flume node.
It would be more correct to call this subsection “Flume Agent Structure”, since a Flume node can consist of several agents. But within the framework of this article, all the examples will be cited as “one node - one agent”, so I will allow myself liberty and will not separate these concepts yet.
Consider several configurations for different life situations.
Simple knot
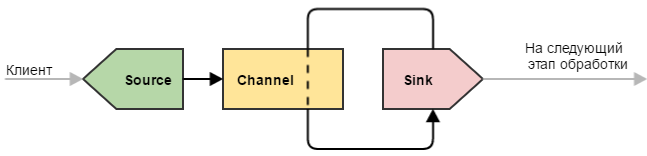
By simple node, I mean the most minimalist configuration of Flume, which can only be: source → channel → drain .
Such a configuration can be used for simple purposes - for example, a node is closing in the chain of nodes of our “water supply system” and performs only one role: it receives data and writes them to a file (the sink deals with recording). Alternatively, the node is intermediate and simply transfers data further (sometimes it is useful to do this to ensure fault tolerance — for example, deploy such a node on a machine with a Flume client to avoid data loss in case of network problems).
Divider
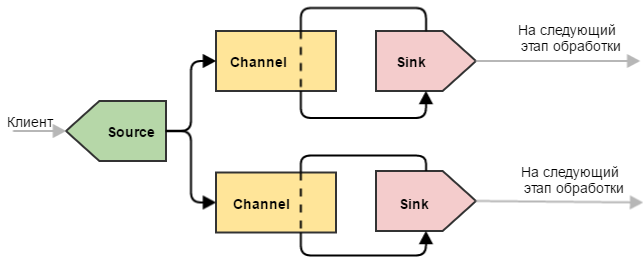
A more complex example that can be used to separate data. Here the situation is slightly different compared to a single drain: our canal is devastated by two drains. This leads to the fact that incoming events are divided between two stocks (they are not duplicated, but they are divided). This configuration can be used to share the load across multiple machines. At the same time, if one of the end machines fails and the drain attached to it cannot send events to it, the other drains will continue to operate normally. Naturally, with this machine running will have to take the rap for two.

Note: Flume has thinner tools for load balancing between drains, for this purpose Flume Sink Processors are used. They will be discussed in the following parts of the cycle.
Duplicator
Such a Flume node allows you to send the same events to multiple stocks. The question may arise - why two channels, can not a channel duplicate events at once into two streams? The answer is no, because not “the channel is distributing events”, but “the drain is emptying the channel”. Even if such a mechanism existed, the failure of one of the drains would lead to the inoperability of the others (since the channel would have to work according to the principle “either everyone could or no one”). This is explained by the fact that in case of a failure at the level of a drain, the sent packet of events does not disappear “to nowhere”, but remains to lie in the channel. For the transaction.
Note : in this example, unconditional duplication is used - i.e. everything is copied to both channels. Flume allows not to duplicate, but to separate events according to some conditions - for this purpose Flume Channel Selector is used. He will also be discussed in the next articles of the cycle.
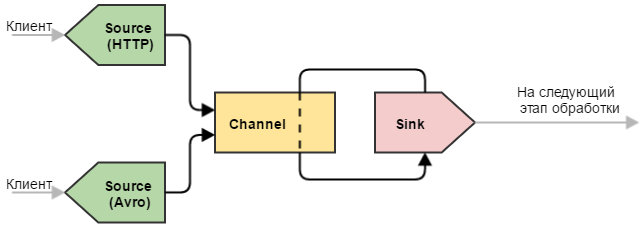
Universal Receiver
Another useful configuration option is multiple sources. Extremely useful configuration when you need to “merge” the same type of data obtained in various ways.
Summary:
I think it's time for practical examples. The standard package Flume contains many implementations of sources / channels / sinks for different occasions - a description of how to configure them can be found here . In this article, I will limit myself to the simplest implementations of the components:
Perhaps this is the simplest configuration for the Flume node:
It remains now to start the node with our configuration. This can be done in two ways:
Since the process of launching Flume using Cloudera Manager is covered in some detail, let's consider the second option - using Java.
First you need to add Flume dependencies to our project. To do this, add the Clodera repository to the pom.xml and two Flume artifacts - ng-sdk and ng-node .
After that create a class with an entry point:
Readers familiar with Java will notice that you can not create this class at all, but simply copy the necessary dependencies for Flume into a separate folder and start Java with the necessary command line arguments. But this is a matter of taste - I prefer that Maven himself tightens all the necessary dependencies, including the Flume components that we developed, and neatly wrapped it all up in a deb package.
If all the paths are specified correctly, and the configuration does not contain errors, we will see such a log from Flume in the console.
To make sure everything works correctly, we will send a small test file test.txt to our NetCat source, which contains 4 lines:
It is important that the file ends with a line break. For a NetCat source, it is an event separator. If we do not add this line break to the end of the file, the source will assume that the last event did not come completely. As a result of this, he will persist in waiting for the separator, which, naturally, will never come. So, we execute the command:
As a result, NetCat should display three “OK” messages as confirmation that all lines of the file have been safely sent and received by the Flume source. At the same time, the stock should display the following messages in the console:
Note: Flume registers its shutdownHook when it starts up, so there is no need to manually release any resources (connections, open files, etc.) - all components of the node will shut down the JVM themselves.
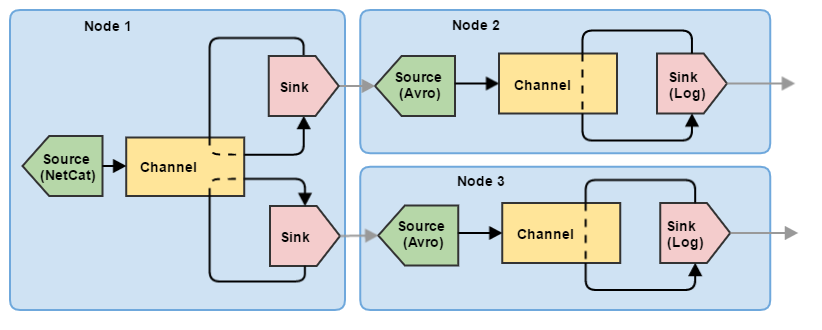
So, we figured out how to configure and run a single node Flume. However, to manage the flow of data from one node is clearly not enough. Let's try to build a small chain of three nodes that perform the task of division (essentially balancing): the first Flume node receives information from the client and sends events to the other two nodes. At the same time, events are not duplicated on the second and third nodes, but are evenly distributed between them.
Accordingly, for such a scheme requires several configurations (for each node - its own).
The configurations for nodes 2 and 3 are identical in this example, differing only in port numbers. Also for communication between the nodes, the standard Flume components are used here: Avro source and Avro drain. They will be described in more detail in the following articles, but for now it’s enough for us that Avro Sink can send events over the network, and Avro Source can receive them.
Accordingly, each node should be launched in a separate process, and the launch parameters will be as follows:
You can make sure that this configuration is working by feeding a text file with a hundred lines to the first node (small batches of data can be sent to one of the nodes in a bundle, and we will not see the desired effect of data separation).
This article is an introductory, here the examples of configuration of Flume nodes can be useful only for debugging or acquaintance with this tool. In real projects, the Flume topology goes far beyond one or two nodes, and component configurations are much more complex.
In the following article:
The first article focuses on the basic elements of Flume, their settings and how to launch Flume. On Habr's expanses, there is already an article on how to work with Flume , so some basic sections will be very similar to it.
In the continuation of the cycle, I will try to highlight in more detail each of the components of Flume, tell you how to set up monitoring for it, write your own implementation of one of the elements and much more.
1. What is Flume?
Flume is a tool that allows you to manage data streams and, ultimately, transfer them to some “destination” (for example, to a file system or HDFS).
')
In general, organizing the transportation of data through Flume resembles the creation of such a “pipeline” or “water supply system”. This “pipeline” consists of various sections (nodes), on which the flow of data is controlled (filtering, splitting the flow, etc.).
Flume is a reliable and convenient tool for transporting data. Reliability is provided first of all by transactional data transmission. Those. when properly configured, the Flume node chain can not be a situation in which data is lost or not fully transmitted. Convenience is in configuration flexibility — most tasks are solved by adding several parameters to the configuration, and more complex ones can be solved by creating your own Flume elements.
To begin with, we denote the basic terms, and then we look at the structure of a single Flume node.
2. Basic terms
- Event (event) - a data unit with additional meta-information. By structure, the event resembles a POST request.
- Headers (headers) - meta-information, a set of pairs “key” - ”value”.
- Content (body) - in fact, the data for the transfer of which everything is started. Transmitted as byte [].
- Client (client) - external, in relation to the node Flume, the service that supplies data.
- Source (source) - is responsible for receiving data. Flume provides two types of sources - EventDrivenSource and PollableSource. In the first case, the source decides when to add events to the channel (for example, HTTPSource adds events as it receives HTTP requests). PollableSource versus EventDrivenSource is passive — Flume just periodically polls the source for new events.
- Sink is the component responsible for transferring data to the next stage of processing. This could be another Flume node, file system, HDFS, etc.
- Channel (channel) - a component that acts as a buffer for transporting data. The channel is a passive component; it does not independently initiate any actions. Sources add events to the channel, while drains drain it.
- Agent (agent) - the process in which components of the Flume (sources, channels, drains). JVM Instance, in general. A single node can contain multiple agents.
3. The structure of the node Flume
It would be more correct to call this subsection “Flume Agent Structure”, since a Flume node can consist of several agents. But within the framework of this article, all the examples will be cited as “one node - one agent”, so I will allow myself liberty and will not separate these concepts yet.
Consider several configurations for different life situations.
Simple knot
By simple node, I mean the most minimalist configuration of Flume, which can only be: source → channel → drain .
Such a configuration can be used for simple purposes - for example, a node is closing in the chain of nodes of our “water supply system” and performs only one role: it receives data and writes them to a file (the sink deals with recording). Alternatively, the node is intermediate and simply transfers data further (sometimes it is useful to do this to ensure fault tolerance — for example, deploy such a node on a machine with a Flume client to avoid data loss in case of network problems).
Divider
A more complex example that can be used to separate data. Here the situation is slightly different compared to a single drain: our canal is devastated by two drains. This leads to the fact that incoming events are divided between two stocks (they are not duplicated, but they are divided). This configuration can be used to share the load across multiple machines. At the same time, if one of the end machines fails and the drain attached to it cannot send events to it, the other drains will continue to operate normally. Naturally, with this machine running will have to take the rap for two.
Note: Flume has thinner tools for load balancing between drains, for this purpose Flume Sink Processors are used. They will be discussed in the following parts of the cycle.
Duplicator
Such a Flume node allows you to send the same events to multiple stocks. The question may arise - why two channels, can not a channel duplicate events at once into two streams? The answer is no, because not “the channel is distributing events”, but “the drain is emptying the channel”. Even if such a mechanism existed, the failure of one of the drains would lead to the inoperability of the others (since the channel would have to work according to the principle “either everyone could or no one”). This is explained by the fact that in case of a failure at the level of a drain, the sent packet of events does not disappear “to nowhere”, but remains to lie in the channel. For the transaction.
Note : in this example, unconditional duplication is used - i.e. everything is copied to both channels. Flume allows not to duplicate, but to separate events according to some conditions - for this purpose Flume Channel Selector is used. He will also be discussed in the next articles of the cycle.
Universal Receiver
Another useful configuration option is multiple sources. Extremely useful configuration when you need to “merge” the same type of data obtained in various ways.
Summary:
- A node can have multiple sources, channels, and drains.
- One source can add events to several channels (duplicate or distribute according to a certain rule).
- Multiple sources add events to one channel.
- One stock can work with only one channel.
- Several stocks can take events from one channel (evenly or according to some balancing rule).
4. Configure and launch the Flume node
I think it's time for practical examples. The standard package Flume contains many implementations of sources / channels / sinks for different occasions - a description of how to configure them can be found here . In this article, I will limit myself to the simplest implementations of the components:
- Memchannel (a channel that uses memory to store events).
- NetCat Source.
- Logger Sink (stock output events to the console).
Perhaps this is the simplest configuration for the Flume node:
### ==================== ==================== ### # , : , # <agent>.sources - , ( : my_source) my-agent.sources = my-source # <agent>.channels - my-agent.channels = my-channel # <agent>.sinks - my-agent.sinks = my-sink ### ==================== my_source ================== ### # - netcat ( Flume -, # , .., ) my-agent.sources.my-source.type = netcat # , my-agent.sources.my-source.bind = 0.0.0.0 my-agent.sources.my-source.port = 11111 # ( , ), my-agent.sources.my-source.channels = my-channel ### ==================== my_channel ================== ### # Flume - memory ( , ), my-agent.channels.my-channel.type = memory # , _ my-agent.channels.my-channel.capacity = 10000 # ( , "") my-agent.channels.my-channel.transactionCapacity = 100 ### ==================== my_sink ================== ### # - , ( ) my-agent.sinks.my-sink.type = logger # my-agent.sinks.my-sink.channel = my-channel # logger - my-agent.sinks.my-sink.maxBytesToLog = 256 It remains now to start the node with our configuration. This can be done in two ways:
- On the Hadoop cluster, via Cloudera Manager ( this article has a detailed description of how to do this).
- As a Java service using the Flume libraries.
Since the process of launching Flume using Cloudera Manager is covered in some detail, let's consider the second option - using Java.
First you need to add Flume dependencies to our project. To do this, add the Clodera repository to the pom.xml and two Flume artifacts - ng-sdk and ng-node .
<repositories> <repository> <id>cloudera</id> <url>https://repository.cloudera.com/artifactory/cloudera-repos/</url> </repository> </repositories> <dependencies> <dependency> <groupId>org.apache.flume</groupId> <artifactId>flume-ng-sdk</artifactId> <version>1.5.0-cdh5.3.0</version> </dependency> <dependency> <groupId>org.apache.flume</groupId> <artifactId>flume-ng-node</artifactId> <version>1.5.0-cdh5.3.0</version> </dependency> </dependencies> After that create a class with an entry point:
package ru.flume.samples; import org.apache.flume.node.Application; public class FlumeLauncher { public static void main(String[] args) { // Log4j System.setProperty("log4j.configuration", "file:/flume/config/log4j.properties"); // Flume : Application.main(new String[]{ "-f", "/flume/config/sample.conf", // "-n", "my-agent" // }); } } Readers familiar with Java will notice that you can not create this class at all, but simply copy the necessary dependencies for Flume into a separate folder and start Java with the necessary command line arguments. But this is a matter of taste - I prefer that Maven himself tightens all the necessary dependencies, including the Flume components that we developed, and neatly wrapped it all up in a deb package.
If all the paths are specified correctly, and the configuration does not contain errors, we will see such a log from Flume in the console.
Conclusion Flume, if everything worked out
  INFO main conf.FlumeConfiguration - Processing: my-sink
 INFO main conf.FlumeConfiguration - Added sinks: my-sink Agent: my-agent
 INFO main conf.FlumeConfiguration - Processing: my-sink
 INFO main conf.FlumeConfiguration - Processing: my-sink
 INFO main conf.FlumeConfiguration - Post-validation flume configuration contains configuration for agents: [my-agent]
 INFO main node.AbstractConfigurationProvider - Creating channels
 INFO main channel.DefaultChannelFactory - Creating instance of channel my-channel type memory
 INFO main node.AbstractConfigurationProvider - Created channel my-channel
 INFO main source.DefaultSourceFactory - Creating instance of mycat source
 INFO main sink.DefaultSinkFactory - Creating instance of sink: my-sink, type: logger
 INFO main node.AbstractConfigurationProvider - Channel my-channel connected to [my-source, my-sink]
 INFO main node.Application - Starting new configuration:
 {
     sourceRunners: {
         my-source = EventDrivenSourceRunner: {
             source: org.apache.flume.source.NetcatSource {
                 name: my-source,
                 state: IDLE
             }
         }
     }
     sinkRunners: {
         my-sink = SinkRunner: {
             policy: org.apache.flume.sink.DefaultSinkProcessor@77f03bb1 counterGroup: {name: null counters: {}}
         }
     }
     channels: {
         my-channel = org.apache.flume.channel.MemoryChannel {
             name: my-channel
         }
     }
 }
 INFO main node.Application - Starting Channel my-channel
 INFO main node.Application - Waiting for channel: my-channel to start.  Sleeping for 500 ms
 INFO lifecycleSupervisor-1-0 instrumentation.MonitoredCounterGroup - CHANNEL, name: my-channel: Successfully registered new MBean.
 INFO lifecycleSupervisor-1-0 instrumentation.MonitoredCounterGroup - Component type: CHANNEL, name: my-channel started
 INFO main node.Application - Starting Sink my-sink
 INFO main node.Application - Starting Source my-source
 INFO lifecycleSupervisor-1-1 source.NetcatSource - Source starting
 INFO lifecycleSupervisor-1-1 source.NetcatSource - Created serverSocket: sun.nio.ch.ServerSocketChannelImpl [/ 0: 0: 0: 0: 0: 0: 0: 0: 11111]
To make sure everything works correctly, we will send a small test file test.txt to our NetCat source, which contains 4 lines:
Message 1 Message 2 Message 3 It is important that the file ends with a line break. For a NetCat source, it is an event separator. If we do not add this line break to the end of the file, the source will assume that the last event did not come completely. As a result of this, he will persist in waiting for the separator, which, naturally, will never come. So, we execute the command:
nc 127.0.0.1 11111 < test.txt As a result, NetCat should display three “OK” messages as confirmation that all lines of the file have been safely sent and received by the Flume source. At the same time, the stock should display the following messages in the console:
sink.LoggerSink - Event: { headers:{} body: 4D 65 73 73 61 67 65 20 31 0D Message 1. } sink.LoggerSink - Event: { headers:{} body: 4D 65 73 73 61 67 65 20 32 0D Message 2. } sink.LoggerSink - Event: { headers:{} body: 4D 65 73 73 61 67 65 20 33 0D Message 3. } Note: Flume registers its shutdownHook when it starts up, so there is no need to manually release any resources (connections, open files, etc.) - all components of the node will shut down the JVM themselves.
5. Chain of Flume nodes
So, we figured out how to configure and run a single node Flume. However, to manage the flow of data from one node is clearly not enough. Let's try to build a small chain of three nodes that perform the task of division (essentially balancing): the first Flume node receives information from the client and sends events to the other two nodes. At the same time, events are not duplicated on the second and third nodes, but are evenly distributed between them.
Accordingly, for such a scheme requires several configurations (for each node - its own).
Configuration for node 1 (node1.conf)
node1.sources = my-source node1.channels = my-channel # 2 : node1.sinks = my-sink1 my-sink2 node1.sources.my-source.type = netcat node1.sources.my-source.bind = 0.0.0.0 node1.sources.my-source.port = 11111 node1.sources.my-source.channels = my-channel node1.channels.my-channel.type = memory node1.channels.my-channel.capacity = 10000 node1.channels.my-channel.transactionCapacity = 100 # avro, # , # node1.sinks.my-sink1.type = avro node1.sinks.my-sink1.channel = my-channel node1.sinks.my-sink1.hostname = 127.0.0.1 node1.sinks.my-sink1.port = 11112 node1.sinks.my-sink1.batch-size = 100 node1.sinks.my-sink2.type = avro node1.sinks.my-sink2.channel = my-channel node1.sinks.my-sink2.hostname = 127.0.0.1 node1.sinks.my-sink2.port = 11113 node1.sinks.my-sink2.batch-size = 100 Configuration for node 2 (node2.conf)
node2.sources = my-source node2.channels = my-channel node2.sinks = my-sink # 1 avro, avro node2.sources.my-source.type = avro node2.sources.my-source.bind = 0.0.0.0 node2.sources.my-source.port = 11112 node2.sources.my-source.channels = my-channel node2.channels.my-channel.type = memory node2.channels.my-channel.capacity = 10000 node2.channels.my-channel.transactionCapacity = 100 node2.sinks.my-sink.type = logger node2.sinks.my-sink.channel = my-channel node2.sinks.my-sink.maxBytesToLog = 256 Configuration for node 3 (node3.conf)
node3.sources = my-source node3.channels = my-channel node3.sinks = my-sink # 1 avro, avro node3.sources.my-source.type = avro node3.sources.my-source.bind = 0.0.0.0 node3.sources.my-source.port = 11113 node3.sources.my-source.channels = my-channel node3.channels.my-channel.type = memory node3.channels.my-channel.capacity = 10000 node3.channels.my-channel.transactionCapacity = 100 node3.sinks.my-sink.type = logger node3.sinks.my-sink.channel = my-channel node3.sinks.my-sink.maxBytesToLog = 256 The configurations for nodes 2 and 3 are identical in this example, differing only in port numbers. Also for communication between the nodes, the standard Flume components are used here: Avro source and Avro drain. They will be described in more detail in the following articles, but for now it’s enough for us that Avro Sink can send events over the network, and Avro Source can receive them.
Accordingly, each node should be launched in a separate process, and the launch parameters will be as follows:
Application.main(new String[]{"-f", "/flume/config/node1.conf", "-n", "node1"}); // : //Application.main(new String[]{"-f", "/flume/config/node2.conf", "-n", "node2"}); //Application.main(new String[]{"-f", "/flume/config/node3.conf", "-n", "node3"}); You can make sure that this configuration is working by feeding a text file with a hundred lines to the first node (small batches of data can be sent to one of the nodes in a bundle, and we will not see the desired effect of data separation).
Conclusion
This article is an introductory, here the examples of configuration of Flume nodes can be useful only for debugging or acquaintance with this tool. In real projects, the Flume topology goes far beyond one or two nodes, and component configurations are much more complex.
In the following article:
- Using headers and channel selectors (Channel Selector).
- Flume combat components:
- Avro Source;
- File Channel;
- Avro Sink;
- HDFS Sink;
- File Roll Sink.
- Monitor the status of the Flume node.
Used sources and useful links
- Apache Flume official page
- The official guide for setting up the components of Flume
- Hadoop Part 2: Collecting Data with Flume | Selectel's blog - an article about setting up Flume with Cloudera.
- Hari Shreedharan: Using Flume is a good book that describes the capabilities of Flume.
Source: https://habr.com/ru/post/280386/
All Articles