MSLibrary. Creating and compiling cross-platform (universal) libraries in Xcode
The next article from the development team of the MSLibrary for iOS library is devoted to a fairly popular topic of creating and compiling cross-platform libraries.
Libraries are good because they allow you to use the previously developed program code in various programs. Thus, programmers can significantly simplify their work and reduce its execution time, using ready-made solutions that are part of libraries for a part of the standard functionality. The article discusses only static libraries, the code of which when compiled is fully included in the executable file, which makes the program easily portable.
We tried to shed light on the issue as thoroughly and systematically as possible, having considered the creation of a library from scratch and the packaging of a part of the functionality of a ready-made project into the library. By cross-platform or versatility, we meant library compatibility with simulators running on a processor with i386 or x86_64 architecture, and with real devices, the processor of which most likely has an armv7 or armv64 architecture.
')
When developing a library, there can be two ways for a developer, the first is a library created from scratch and the second is in your project there is some functionality on the basis of which you want to create a library. Consider both.
LIBRARY CREATED "WITH ZERO"
The sequence of actions is the same as when creating a new project:
The project window will look something like this:
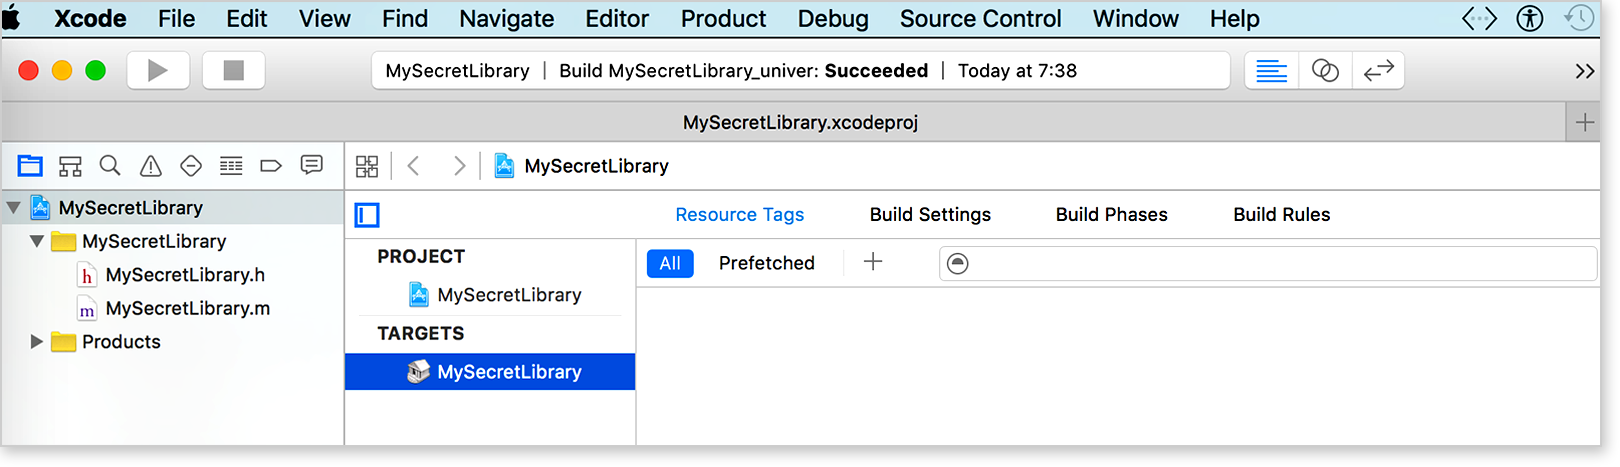 fig.1-4
LIBRARY IS CREATED FROM A PART OF THE FUNCTIONAL OF ANOTHER PROJECT
Suppose you have a ready-made MyApp project and you want to create a library based on several of its member classes. The project window might look like this:
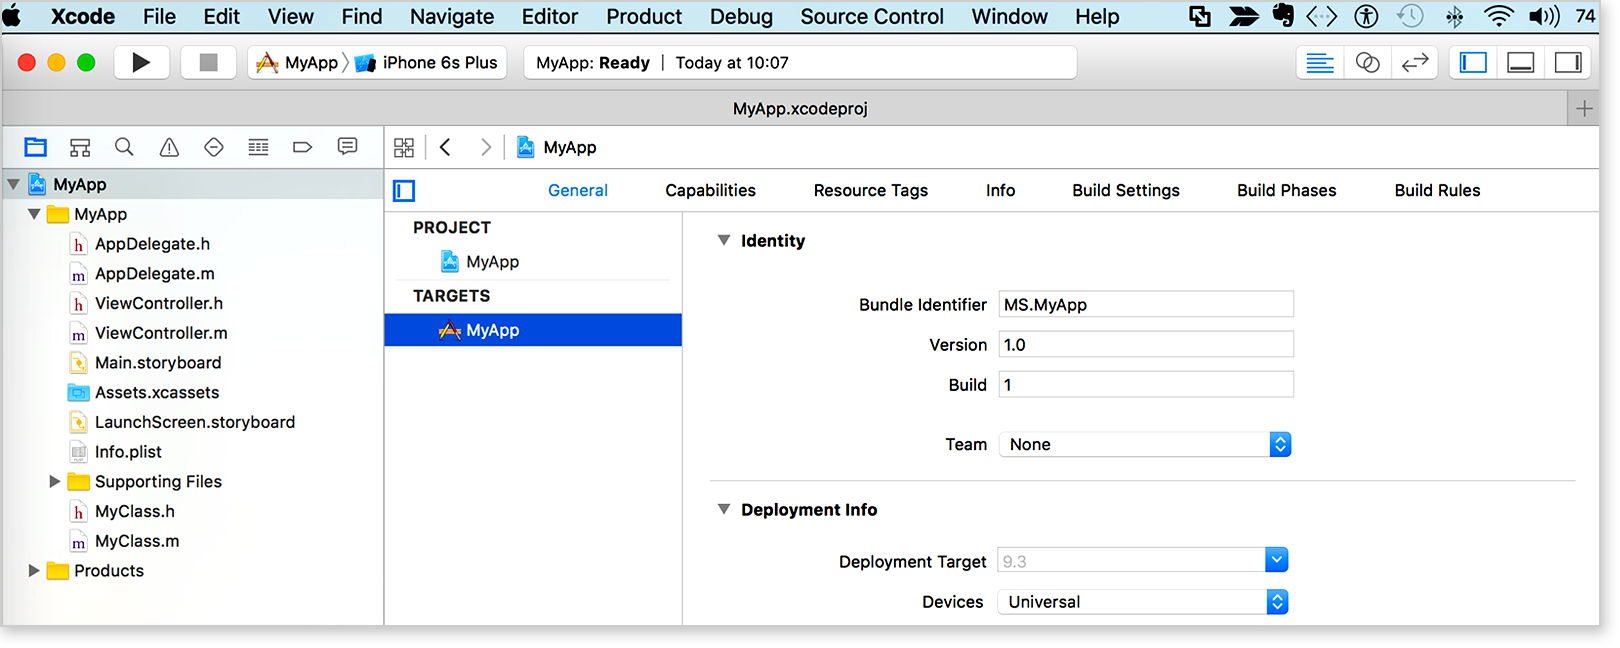
rice 2-0
Create a new target for a static library.
The sequence of actions is similar to the sequence when creating a new library from scratch:
The project window will look something like this:
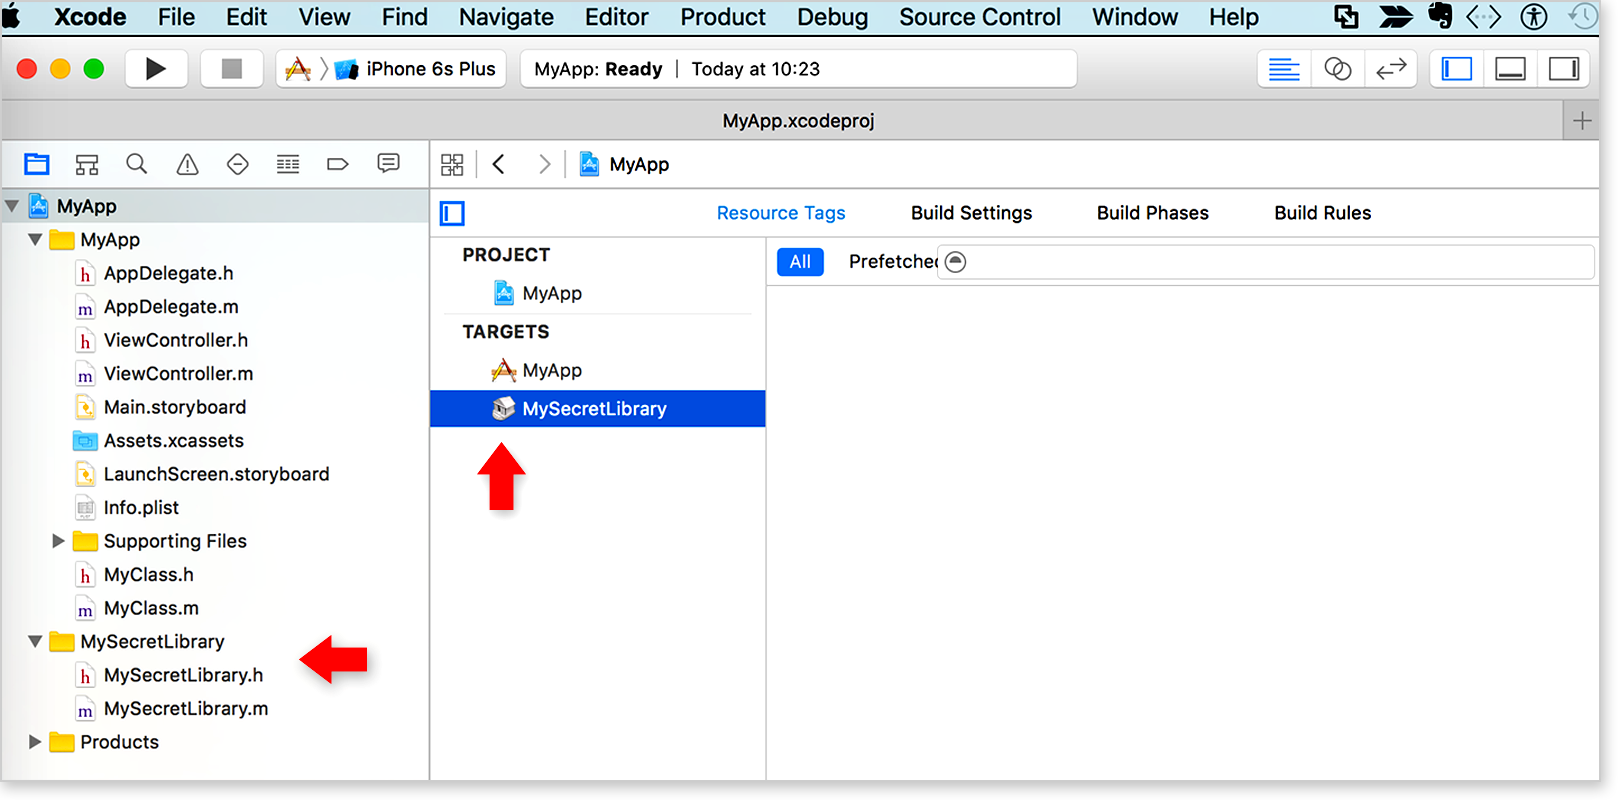
rice 1-4
You can see that a new target and folder with MySecretLibrary files appeared in the project.
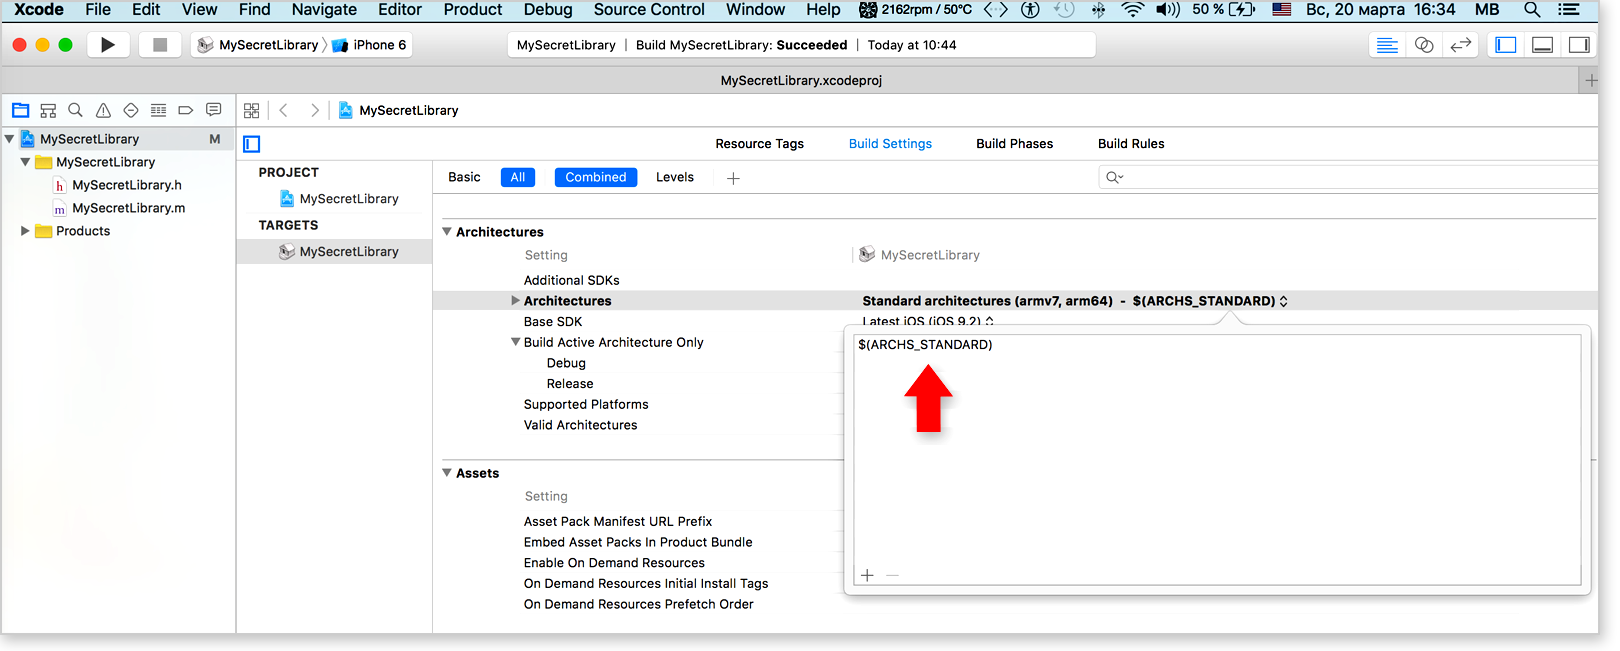
By default, the application configuration includes assemblies for armv7 and arm64. You can add armv7s (for iPhone 5, iPhone 5c and iPad 2012) and more, for example, armv6 and i386. It all depends on which platforms the library is supposed to work on.
For reference, we give. table of platforms used in various Apple devices in previous years
rice five
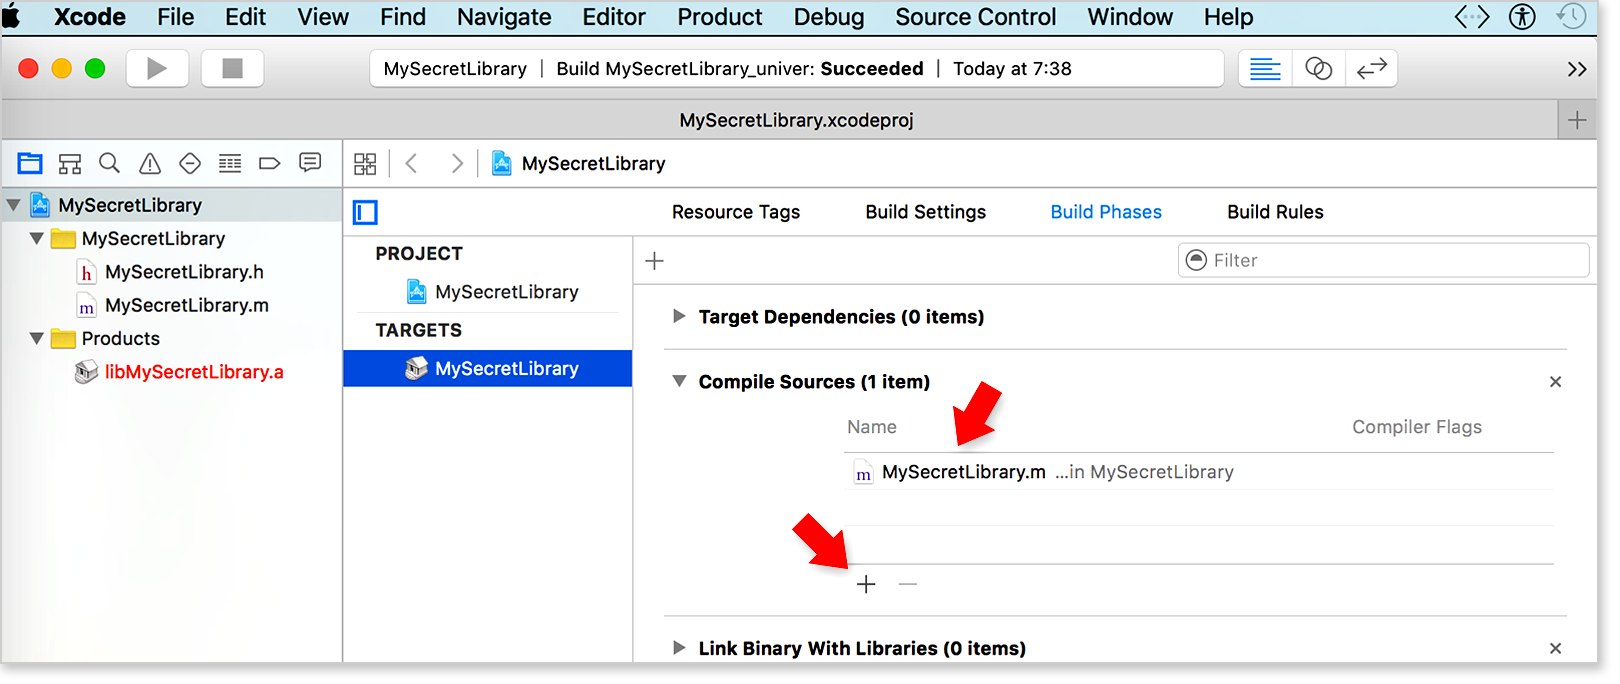
ADD FILES FOR COMPILATION
By default, the file MySecretLibrary.m is included for compilation. Our task is to add all the files necessary for the work of the library, including service procurement files (.h), resources, and so on:
rice 6-1
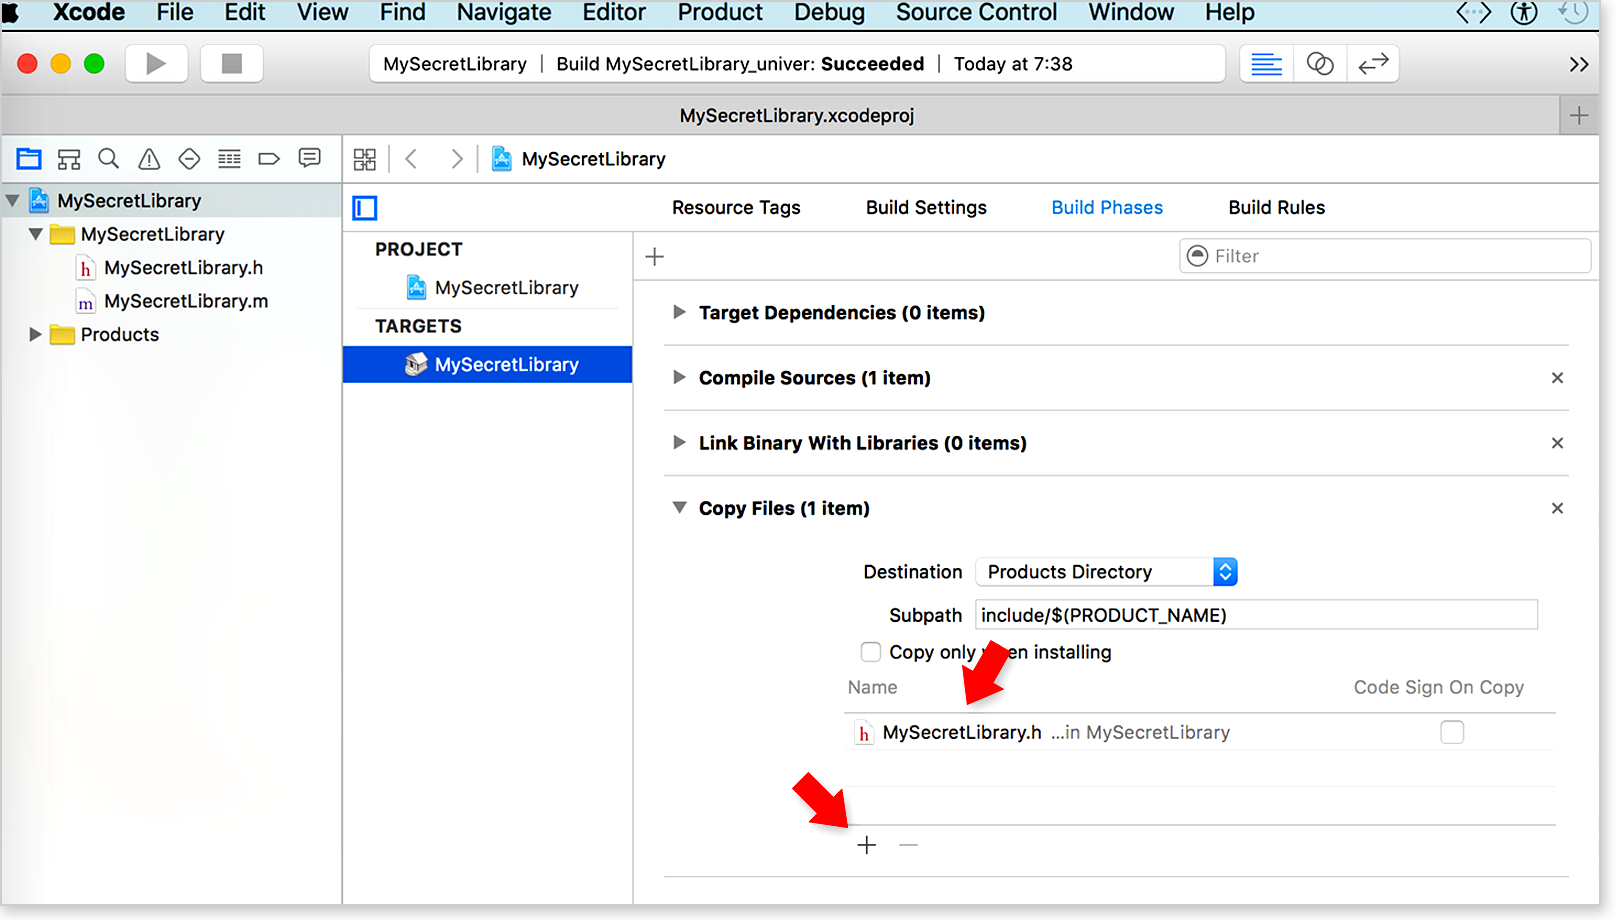
ADD TITLE FILES
By default, the file MySecretLibrary.h is included. We must add all the header files needed to connect the library to the new project.
Recall that each library should have a header file, which describes the prototypes (declarations) of all functions contained in this library. With the help of header files, the library tells your program code what functions are present in it and how you can use them.
rice 6-2
When you create a library from a ready-made application, you must perform the same steps to set up Build Phases. It should be understood that the Complite Sours and Copy Files can contain not only files from the MySecretLibrary group created by the same name target, but also any other resources of your application. The MySecretLibrary group is created solely to enable you to maneuver, for example, to transfer only individual classes and functions of your application to the files located there. Here it should be recalled that when compiling Xcode uses only those files that are listed in the Build Phases for this particular target. That is, in the above example, only files from the MySecretLibrary folder will be compiled.
In principle, at this stage all the preparatory work has been done and you can start assembling the library ... But, there is one subtlety here. The fact is that Xcode compiles the product based on the current settings, either for the simulator running on your computer, and therefore running on an i386 or x86_64 processor, or for a device whose processor most likely has an armv7, armv7s or armv64 architecture . Thus, the library compiled under the simulator will not work on real devices and vice versa, the compiled for devices will not work on simulators.
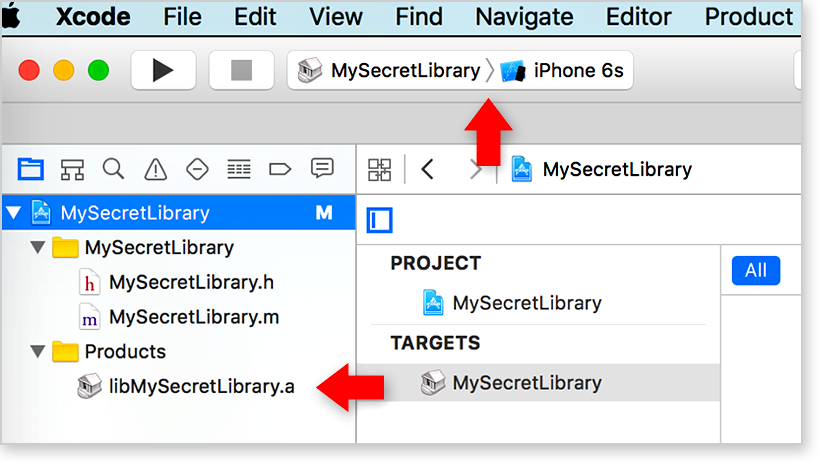
COMPILING FOR SIMULATOR
Set the “Active scheme” as the target library of the library - MySecretLibrary, choose a simulator, for example, MySecretLibrary> iPhone 6s

rice 7-1
and press the B key combination to compile the library project.
The result will be as shown in the picture:
rice 7-2
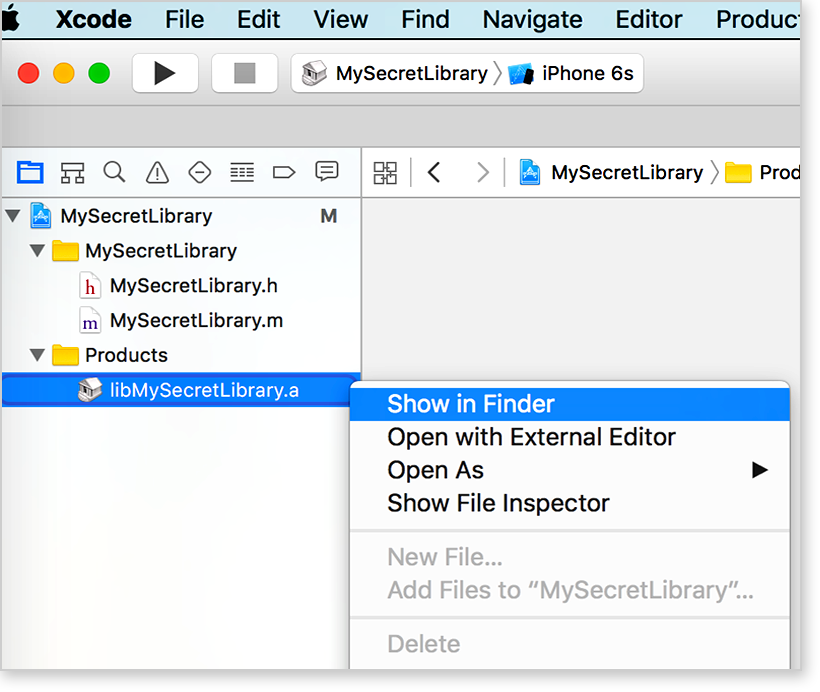
Please note that the name of the libMySecretLibrary.a file from red became black, that is, the compilation was successful and the file was saved on your computer. If you now click the "right button", a menu will appear in which we select the Show in Finder option.
rice 7-3
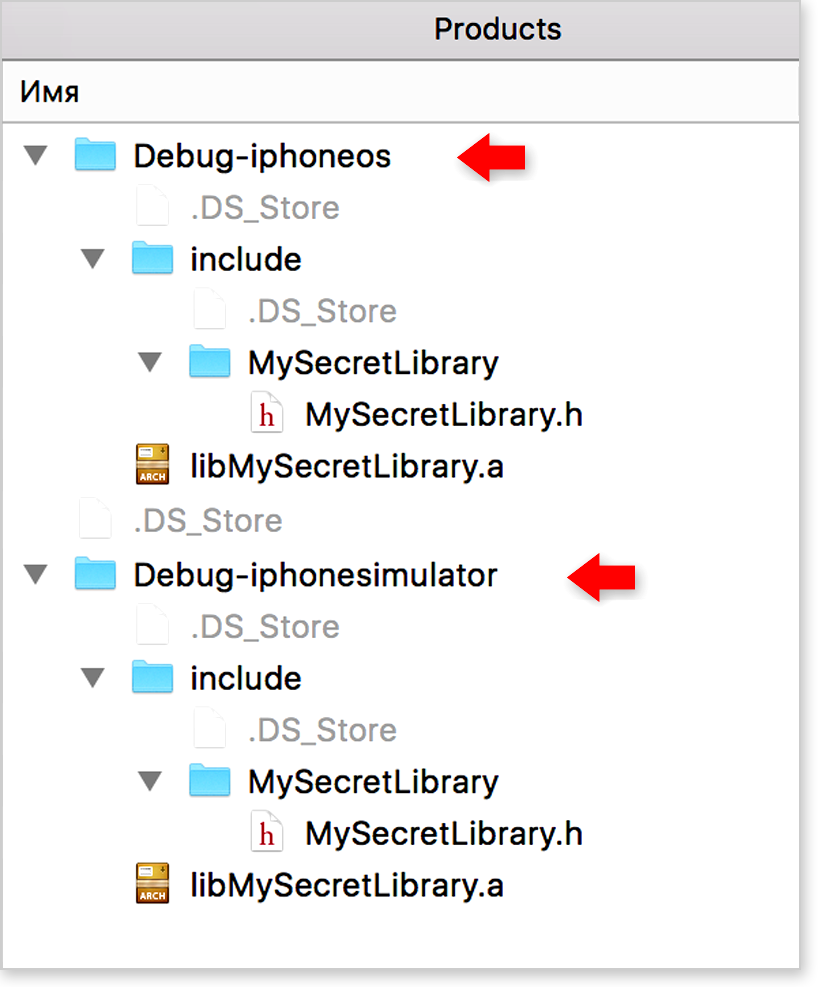
In the window that opens, we will see the Debug-iphonesimulator folder with the library file - libMySecretLibrary.a and the procurement file - MySecretLibrary.h
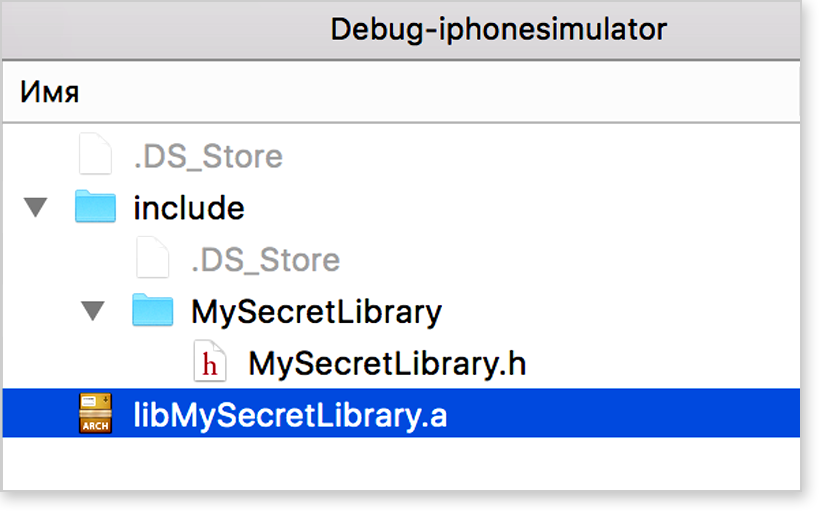
rice 7-4
If you go to the folder above, it will be clear that the folder compiled for the simulator library is in the Products folder.
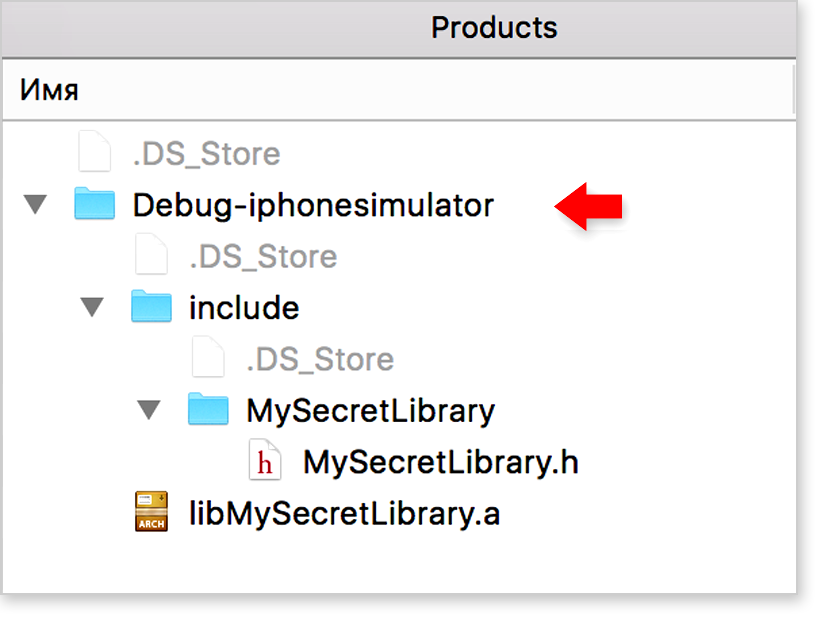
rice 7-5
The full path to the Debug-iphonesimulator folder in our case:
COMPILING FOR DEVICE
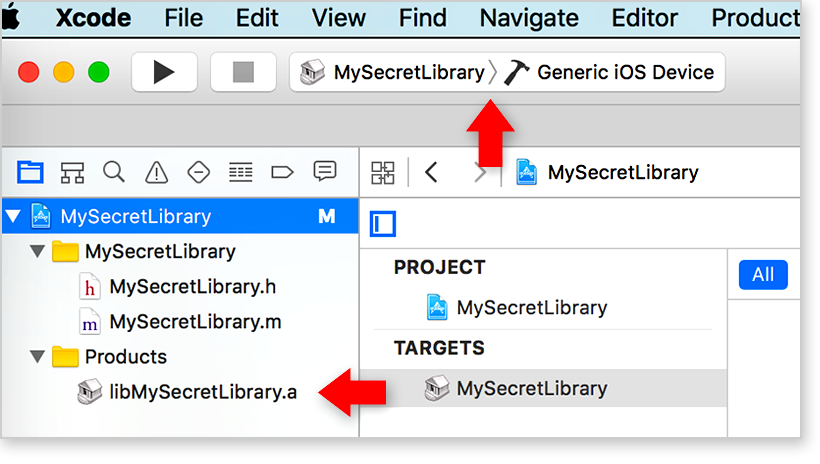
Set the “Active scheme” as the target library of the library - MySecretLibrary, choose “Generic iOS Device” (MySecretLibrary> Generic iOS Device)

rice 8-1
and press the B key combination to compile the library project.
rice 8-2
Choose> Show in Finder:

rice 8-3
Go to the library folder. It is similar to the previous one, but the library file libMySecretLibrary.a is compiled for the architecture of the device.
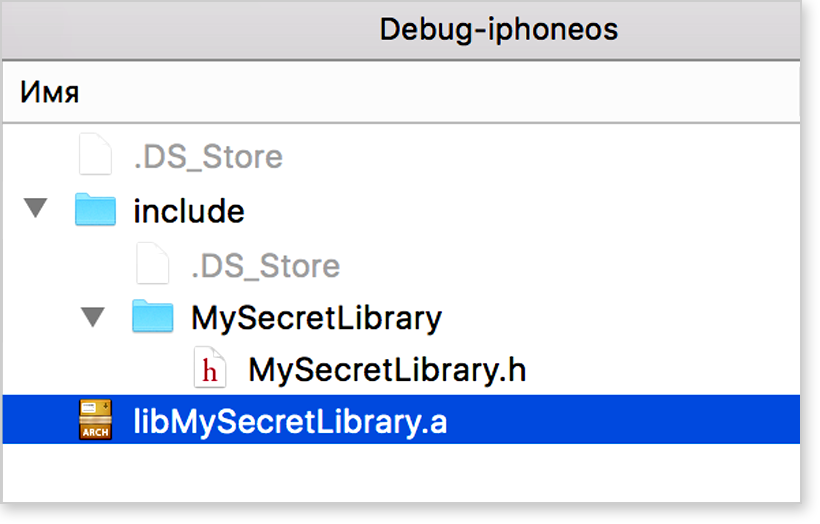
rice 8-4
Now the Products folder looks like this:
rice 8-5
The full path to the Debug-iphoneos folder in our case:
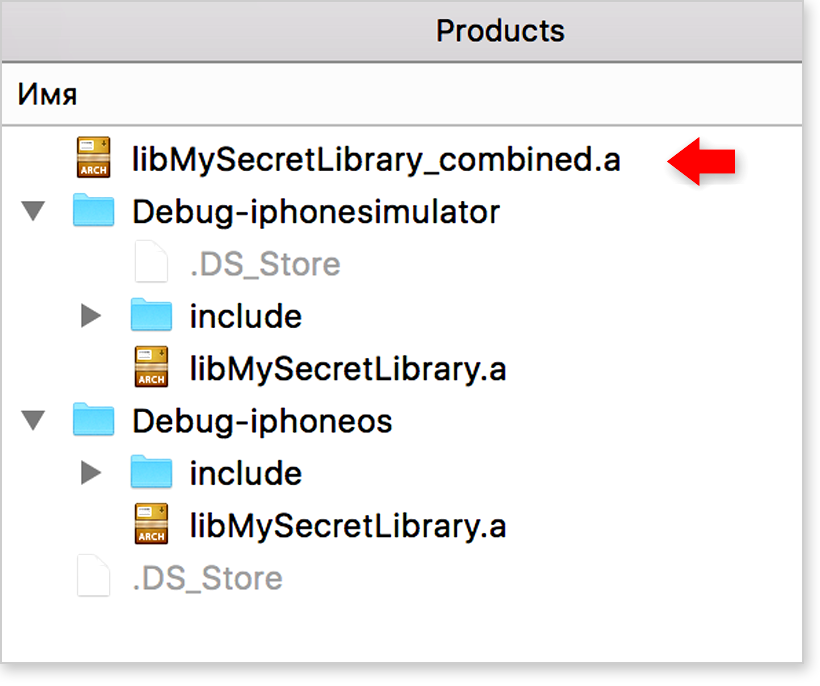
It can be seen that in the Products folder there are two libraries - for the simulator and for the device.
The next step is to create one binary file that combines both versions of the library.
There are quite a few options for creating a universal binary file, but in all cases the essence boils down to three consecutive actions:
- we generate library for a device
- we generate library for the simulator
- combine libraries and create a binary file using the lipo command
More information about the various commands (comand line) can be found here SS64.com
WE CREATE A UNIVERSAL BINARY LIBRARY FILE
- Compile the library for the device (as described above)
- Compile the library for the simulator (as described above)
- Opening the Terminal
- Go to the Products folder in the Terminal (cd command and folder path)
- Enter the following text:
As a result, we get the universal library file libMySecretLibrary_combined.a, stored in the Products folder. The header file can be used from the Debug-iphoneos or Debug-iphonesimulator folders.
rice 9-0
Naturally, you should use the name of your libraries in the code instead of libMySecretLibrary.
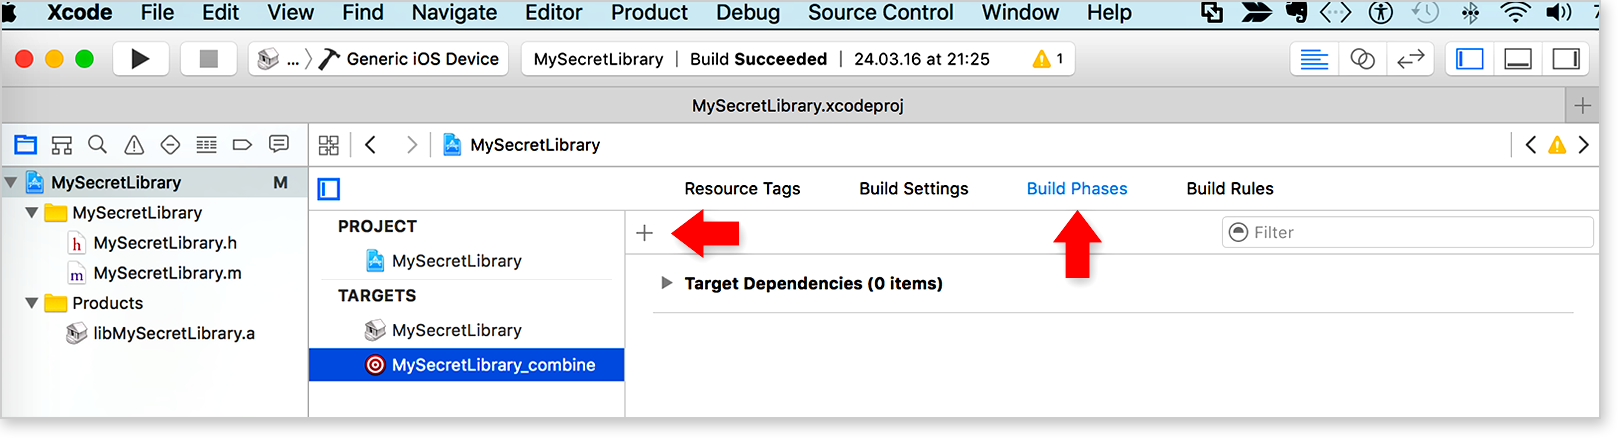
Actually this task is completed. However, Xcode offers tools for automating a number of processes; in particular, you can automate the creation and assembly of libraries using Aggregate targeting.
ADD TO THE PROJECT NEW TARGET - AGGREGATE
Xcode has a special target template, which is not necessarily
correspond to a specific type of product. These are special Aggregate targets that can be used for:
- Group Target Associations
- Copying files to a specific file system location
- Create product using external build system
- Run a command script
In our case, we will create a target for executing a command script with the help of which a universal library will be assembled, combining two layers - for the simulator and for the device.
The sequence of actions is the same as when adding other targets:
After this, the project window will look something like this:

rice 9-4
CONFIGURING AGGREGATE (add form to place the command script)
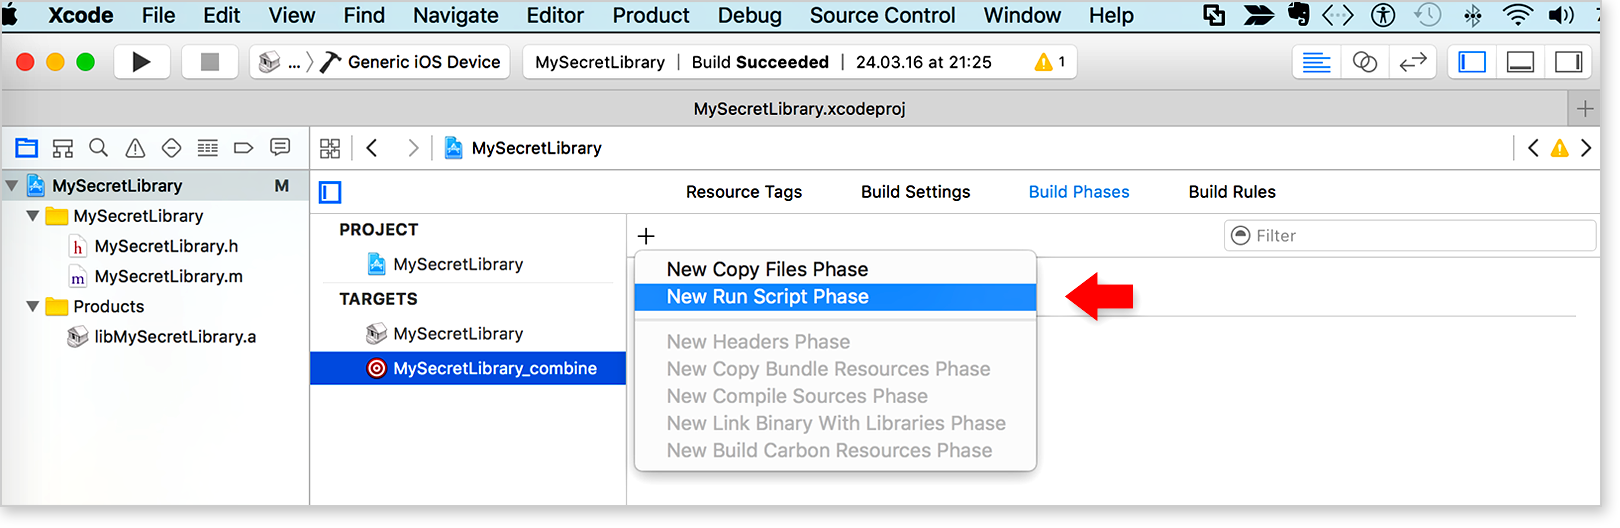
Select the target Aggregate, go to the section> Build Phases and click on the "+" icon
rice 10-1
In the menu that opens, select> New Run Script Phase
rice 10-2
A form opens to accommodate the script that manages the library build.
The project window should look like this (the arrow indicates the place where the script should be placed):
rice 10-3
ADD TEAM SCRIPT
Command script for creating a universal library:
It can be seen that the script automates the execution of the same three simple actions:
- generates a library for the simulator
- generates a library for the device
- combines libraries and creates a binary file using the lipo command
Copy this script and add> Run Script to the form:
rice 10-4
Set the aggregate MySecretLibrary target as the “active scheme”

rice 10-5
Press ⌘B to compile the library project.
As a result, the folder of your project (not in the Products! Folder) will appear in the folder where all generated files are located.
rice 10-6
That's all. As you can see, the issue is solved in just a few simple lines of code.
Outside the article were issues related to the elimination of duplication of related resources and updating the libraries already installed in the application. Recently, dependency management systems like CocoaPods have become very popular. The use of such systems is an ambiguous question. On the one hand, it is possible to avoid duplication of resources and maintain the current version of the library in ready-made applications. On the other hand, there is complete dependence on the repositories in which the libraries are stored and which belong to third parties and, besides, the possibility of the application crashing if the new version of the library is not fully compatible with the previous one.
We hope that the material was useful to you, the MSLibrary for iOS team
Other articles:
Capture and verify phone numbers using regular expressions, for iOS and not only ... Part 1
Capturing and verifying phone numbers using regular expressions, for iOS and not only ... Part 2
Implementing multiple selection of conditions using bitmasks, for iOS and not only ...
SIMPLE: remove unnecessary characters from a string using regular expressions for iOS and not only ...
Libraries are good because they allow you to use the previously developed program code in various programs. Thus, programmers can significantly simplify their work and reduce its execution time, using ready-made solutions that are part of libraries for a part of the standard functionality. The article discusses only static libraries, the code of which when compiled is fully included in the executable file, which makes the program easily portable.
We tried to shed light on the issue as thoroughly and systematically as possible, having considered the creation of a library from scratch and the packaging of a part of the functionality of a ready-made project into the library. By cross-platform or versatility, we meant library compatibility with simulators running on a processor with i386 or x86_64 architecture, and with real devices, the processor of which most likely has an armv7 or armv64 architecture.
')
1. Create a library project
When developing a library, there can be two ways for a developer, the first is a library created from scratch and the second is in your project there is some functionality on the basis of which you want to create a library. Consider both.
LIBRARY CREATED "WITH ZERO"
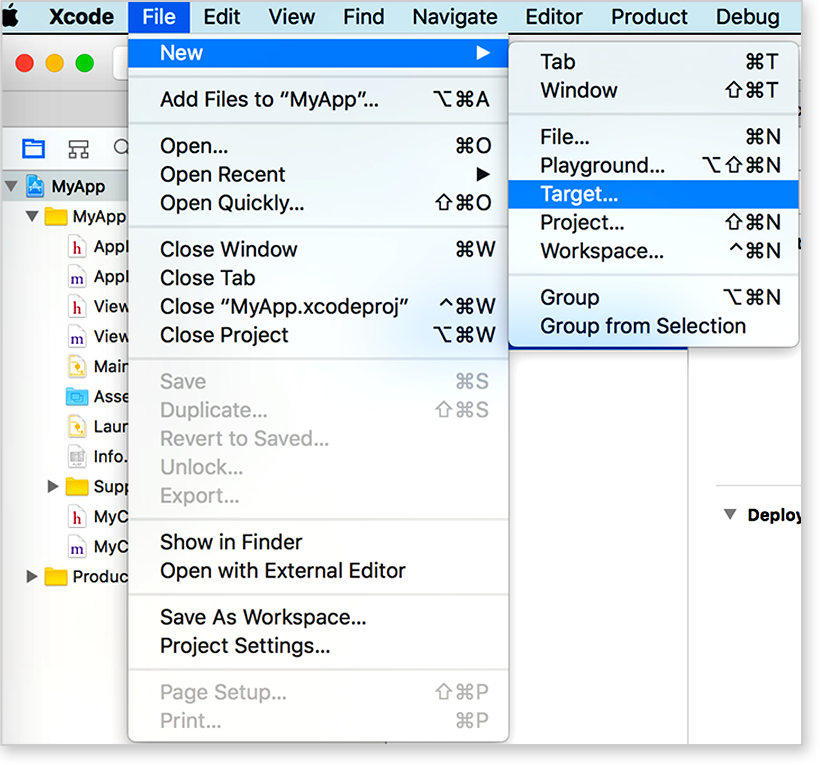
The sequence of actions is the same as when creating a new project:
	 File> New> Project ...
	 iOS> Framework & Library> Cocoa Touch Static Library
	 We set a name (for example - MySecretLibrary)
In more detail how this is done you can see here ↓

rice 1-1

rice 1-2
rice 1-3
Step 1. File> New> Project ...
rice 1-1
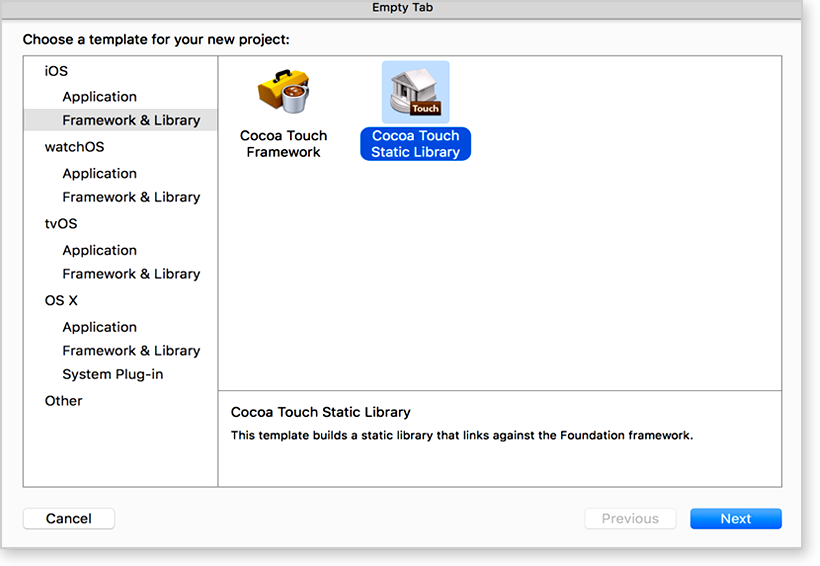
Step 2. Choosing Cocoa Touch Static Library
rice 1-2
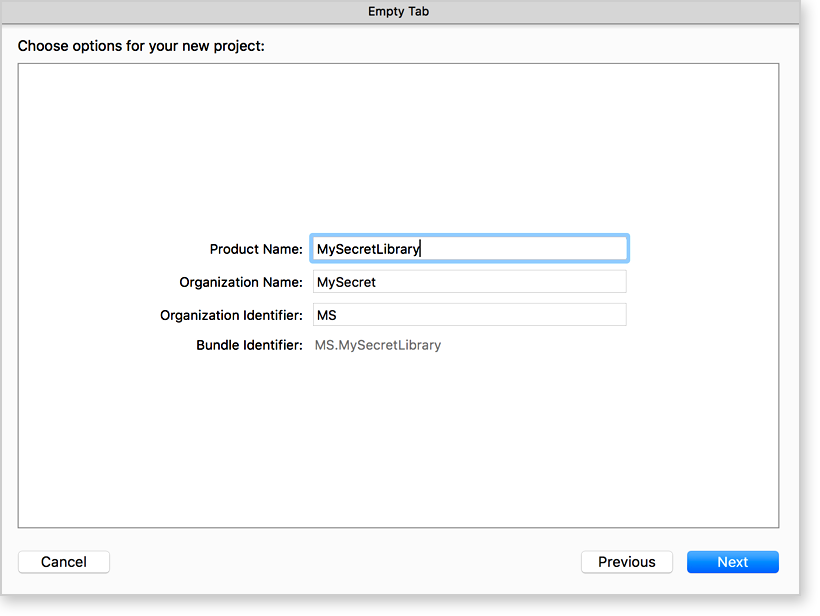
Step-3. Assign a library name (Product Name) ...
rice 1-3
The project window will look something like this:
fig.1-4LIBRARY IS CREATED FROM A PART OF THE FUNCTIONAL OF ANOTHER PROJECT
Suppose you have a ready-made MyApp project and you want to create a library based on several of its member classes. The project window might look like this:
rice 2-0
Create a new target for a static library.
The sequence of actions is similar to the sequence when creating a new library from scratch:
	 File> New> Targect ...
	 iOS> Framework & Library> Cocoa Touch Static Library
	 We set a name (for example - MySecretLibrary)
In more detail how this is done you can see here ↓
rice 1-1
rice 1-2

rice 1-3
Step 1. File> New> Target ...
rice 1-1
Step 2. Choosing Cocoa Touch Static Library
rice 1-2
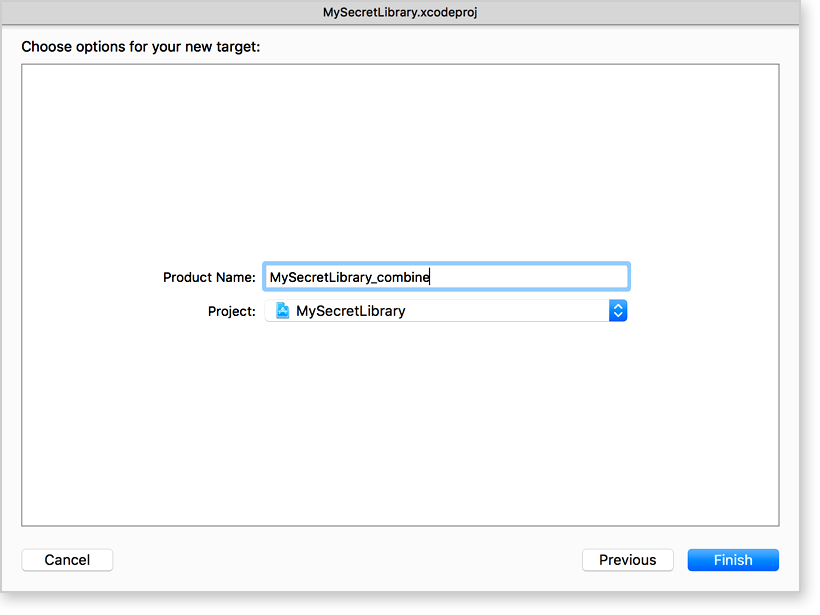
Step-3. Assign a library name (Product Name) ...
rice 1-3
The project window will look something like this:
rice 1-4
You can see that a new target and folder with MySecretLibrary files appeared in the project.
2. Configuring the library architecture
By default, the application configuration includes assemblies for armv7 and arm64. You can add armv7s (for iPhone 5, iPhone 5c and iPad 2012) and more, for example, armv6 and i386. It all depends on which platforms the library is supposed to work on.
For reference, we give. table of platforms used in various Apple devices in previous years
rice five
3. Configure Build Phases
ADD FILES FOR COMPILATION
Build Phases> Complite Sources
By default, the file MySecretLibrary.m is included for compilation. Our task is to add all the files necessary for the work of the library, including service procurement files (.h), resources, and so on:
rice 6-1
ADD TITLE FILES
Build Phases> Copy Files
By default, the file MySecretLibrary.h is included. We must add all the header files needed to connect the library to the new project.
Recall that each library should have a header file, which describes the prototypes (declarations) of all functions contained in this library. With the help of header files, the library tells your program code what functions are present in it and how you can use them.
Important! If you have several header files with the declaration of various classes and functions, then it is undesirable to connect them all separately to the new project. It is convenient to make ONE HEADLINE FILE of your library and connect all other files to it. An example would be standard frameworks, such as Foundation, whose header file looks like this:
Foundation header
/* Foundation.h Copyright (c) 1994-2015, Apple Inc. All rights reserved. */ #include <CoreFoundation/CoreFoundation.h> #import <Foundation/NSObjCRuntime.h> #import <Foundation/NSArray.h> #import <Foundation/NSAutoreleasePool.h> #import <Foundation/NSBundle.h> #import <Foundation/NSByteOrder.h> #import <Foundation/NSCalendar.h> #import <Foundation/NSCharacterSet.h> #import <Foundation/NSCoder.h> #import <Foundation/NSData.h> #import <Foundation/NSDate.h> #import <Foundation/NSDateFormatter.h> #import <Foundation/NSDateIntervalFormatter.h> #import <Foundation/NSMassFormatter.h> #import <Foundation/NSLengthFormatter.h> #import <Foundation/NSEnergyFormatter.h> #import <Foundation/NSPersonNameComponents.h> #import <Foundation/NSPersonNameComponentsFormatter.h> #import <Foundation/NSDecimal.h> #import <Foundation/NSDecimalNumber.h> #import <Foundation/NSDictionary.h> #import <Foundation/NSEnumerator.h> #import <Foundation/NSError.h> #import <Foundation/NSException.h> #import <Foundation/NSFileHandle.h> #import <Foundation/NSFileManager.h> #import <Foundation/NSFormatter.h> #import <Foundation/NSHashTable.h> #import <Foundation/NSHTTPCookie.h> #import <Foundation/NSHTTPCookieStorage.h> #import <Foundation/NSIndexPath.h> #import <Foundation/NSIndexSet.h> #import <Foundation/NSInvocation.h> #import <Foundation/NSJSONSerialization.h> #import <Foundation/NSKeyValueCoding.h> #import <Foundation/NSKeyValueObserving.h> #import <Foundation/NSKeyedArchiver.h> #import <Foundation/NSLocale.h> #import <Foundation/NSLock.h> #import <Foundation/NSMapTable.h> #import <Foundation/NSMethodSignature.h> #import <Foundation/NSNotification.h> #import <Foundation/NSNotificationQueue.h> #import <Foundation/NSNull.h> #import <Foundation/NSNumberFormatter.h> #import <Foundation/NSObject.h> #import <Foundation/NSOperation.h> #import <Foundation/NSOrderedSet.h> #import <Foundation/NSOrthography.h> #import <Foundation/NSPathUtilities.h> #import <Foundation/NSPointerArray.h> #import <Foundation/NSPointerFunctions.h> #import <Foundation/NSPort.h> #import <Foundation/NSProcessInfo.h> #import <Foundation/NSPropertyList.h> #import <Foundation/NSProxy.h> #import <Foundation/NSRange.h> #import <Foundation/NSRegularExpression.h> #import <Foundation/NSRunLoop.h> #import <Foundation/NSScanner.h> #import <Foundation/NSSet.h> #import <Foundation/NSSortDescriptor.h> #import <Foundation/NSStream.h> #import <Foundation/NSString.h> #import <Foundation/NSTextCheckingResult.h> #import <Foundation/NSThread.h> #import <Foundation/NSTimeZone.h> #import <Foundation/NSTimer.h> #import <Foundation/NSURL.h> #import <Foundation/NSURLAuthenticationChallenge.h> #import <Foundation/NSURLCache.h> #import <Foundation/NSURLConnection.h> #import <Foundation/NSURLCredential.h> #import <Foundation/NSURLCredentialStorage.h> #import <Foundation/NSURLError.h> #import <Foundation/NSURLProtectionSpace.h> #import <Foundation/NSURLProtocol.h> #import <Foundation/NSURLRequest.h> #import <Foundation/NSURLResponse.h> #import <Foundation/NSUserDefaults.h> #import <Foundation/NSValue.h> #import <Foundation/NSValueTransformer.h> #import <Foundation/NSXMLParser.h> #import <Foundation/NSZone.h> #import <Foundation/FoundationErrors.h> #if (TARGET_OS_MAC && !(TARGET_OS_EMBEDDED || TARGET_OS_IPHONE)) || (TARGET_OS_EMBEDDED || TARGET_OS_IPHONE) #import <Foundation/NSAttributedString.h> #import <Foundation/NSByteCountFormatter.h> #import <Foundation/NSCache.h> #import <Foundation/NSComparisonPredicate.h> #import <Foundation/NSCompoundPredicate.h> #import <Foundation/NSDateComponentsFormatter.h> #import <Foundation/NSExpression.h> #import <Foundation/NSExtensionContext.h> #import <Foundation/NSExtensionItem.h> #import <Foundation/NSExtensionRequestHandling.h> #import <Foundation/NSFileCoordinator.h> #import <Foundation/NSFilePresenter.h> #import <Foundation/NSFileVersion.h> #import <Foundation/NSFileWrapper.h> #import <Foundation/NSItemProvider.h> #import <Foundation/NSLinguisticTagger.h> #import <Foundation/NSMetadata.h> #import <Foundation/NSMetadataAttributes.h> #import <Foundation/NSNetServices.h> #import <Foundation/NSPredicate.h> #import <Foundation/NSProgress.h> #import <Foundation/NSUbiquitousKeyValueStore.h> #import <Foundation/NSUndoManager.h> #import <Foundation/NSURLSession.h> #import <Foundation/NSUserActivity.h> #import <Foundation/NSUUID.h> #endif #if (TARGET_OS_MAC && !(TARGET_OS_EMBEDDED || TARGET_OS_IPHONE)) || TARGET_OS_WIN32 #import <Foundation/NSArchiver.h> #import <Foundation/NSBackgroundActivityScheduler.h> #import <Foundation/NSCalendarDate.h> #import <Foundation/NSConnection.h> #import <Foundation/NSDistantObject.h> #import <Foundation/NSDistributedNotificationCenter.h> #import <Foundation/NSGeometry.h> #import <Foundation/NSPortCoder.h> #import <Foundation/NSPortMessage.h> #import <Foundation/NSPortNameServer.h> #import <Foundation/NSProtocolChecker.h> #import <Foundation/NSTask.h> #import <Foundation/NSXMLDTD.h> #import <Foundation/NSXMLDTDNode.h> #import <Foundation/NSXMLDocument.h> #import <Foundation/NSXMLElement.h> #import <Foundation/NSXMLNode.h> #import <Foundation/NSXMLNodeOptions.h> #import <Foundation/NSURLDownload.h> #import <Foundation/NSURLHandle.h> #endif #if (TARGET_OS_MAC && !(TARGET_OS_EMBEDDED || TARGET_OS_IPHONE)) #import <Foundation/NSAffineTransform.h> #import <Foundation/NSAppleEventDescriptor.h> #import <Foundation/NSAppleEventManager.h> #import <Foundation/NSAppleScript.h> #import <Foundation/NSClassDescription.h> #import <Foundation/NSDistributedLock.h> #import <Foundation/NSGarbageCollector.h> #import <Foundation/NSHFSFileTypes.h> #import <Foundation/NSHost.h> #import <Foundation/NSObjectScripting.h> #import <Foundation/NSScriptClassDescription.h> #import <Foundation/NSScriptCoercionHandler.h> #import <Foundation/NSScriptCommand.h> #import <Foundation/NSScriptCommandDescription.h> #import <Foundation/NSScriptExecutionContext.h> #import <Foundation/NSScriptKeyValueCoding.h> #import <Foundation/NSScriptObjectSpecifiers.h> #import <Foundation/NSScriptStandardSuiteCommands.h> #import <Foundation/NSScriptSuiteRegistry.h> #import <Foundation/NSScriptWhoseTests.h> #import <Foundation/NSSpellServer.h> #import <Foundation/NSUserNotification.h> #import <Foundation/NSUserScriptTask.h> #import <Foundation/NSXPCConnection.h> #endif rice 6-2
When you create a library from a ready-made application, you must perform the same steps to set up Build Phases. It should be understood that the Complite Sours and Copy Files can contain not only files from the MySecretLibrary group created by the same name target, but also any other resources of your application. The MySecretLibrary group is created solely to enable you to maneuver, for example, to transfer only individual classes and functions of your application to the files located there. Here it should be recalled that when compiling Xcode uses only those files that are listed in the Build Phases for this particular target. That is, in the above example, only files from the MySecretLibrary folder will be compiled.
In principle, at this stage all the preparatory work has been done and you can start assembling the library ... But, there is one subtlety here. The fact is that Xcode compiles the product based on the current settings, either for the simulator running on your computer, and therefore running on an i386 or x86_64 processor, or for a device whose processor most likely has an armv7, armv7s or armv64 architecture . Thus, the library compiled under the simulator will not work on real devices and vice versa, the compiled for devices will not work on simulators.
COMPILING FOR SIMULATOR
Set the “Active scheme” as the target library of the library - MySecretLibrary, choose a simulator, for example, MySecretLibrary> iPhone 6s
rice 7-1
and press the B key combination to compile the library project.
The result will be as shown in the picture:
rice 7-2
Please note that the name of the libMySecretLibrary.a file from red became black, that is, the compilation was successful and the file was saved on your computer. If you now click the "right button", a menu will appear in which we select the Show in Finder option.
rice 7-3
In the window that opens, we will see the Debug-iphonesimulator folder with the library file - libMySecretLibrary.a and the procurement file - MySecretLibrary.h
rice 7-4
If you go to the folder above, it will be clear that the folder compiled for the simulator library is in the Products folder.
rice 7-5
The full path to the Debug-iphonesimulator folder in our case:
/ Users / [userName] / Library / Developer / Xcode / DerivedData / MySecretLibrary-esufqblgaisjjeecltzoxyiyogogj / Build / Products / Debug-iphonesimulator
COMPILING FOR DEVICE
Set the “Active scheme” as the target library of the library - MySecretLibrary, choose “Generic iOS Device” (MySecretLibrary> Generic iOS Device)
rice 8-1
and press the B key combination to compile the library project.
rice 8-2
Choose> Show in Finder:
rice 8-3
Go to the library folder. It is similar to the previous one, but the library file libMySecretLibrary.a is compiled for the architecture of the device.
rice 8-4
Now the Products folder looks like this:
rice 8-5
The full path to the Debug-iphoneos folder in our case:
/ Users / [userName] / Library / Developer / Xcode / DerivedData / MySecretLibrary-esufqblgaisjjeecltzoxyiyogogj / Build / Products / Debug-iphoneos
It can be seen that in the Products folder there are two libraries - for the simulator and for the device.
The next step is to create one binary file that combines both versions of the library.
4. Generating a universal binary file
There are quite a few options for creating a universal binary file, but in all cases the essence boils down to three consecutive actions:
- we generate library for a device
- we generate library for the simulator
- combine libraries and create a binary file using the lipo command
For those interested, here is a complete description of the lipo command ↓
 lipo
 A binary file to convert it to a single architecture file, or vice versa.
 Syntax
       lipo [input_file] ... [-arch arch_type input_file] ... [-arch_blank arch_type] ...
               {-info |  -detailed_info}
                  [-output output_file] Operation
                     [-segalign arch_type value]

         where Operation is one of:
            [-create] [-arch_blank arch_type]
            [-thin arch_type]
            [-extract arch_type] ...
            [-extract_family arch_type] ...
            [-remove arch_type] ...
            [-replace arch_type file_name] ...
            [-verify_arch arch_type ...]

 Options
    -info Briefly list the input universal file.
           Lists the names of each archive.

    -detailed_info
           Display a detailed list of the universal file.
           Lists universal header info.  for each architecture in the file.

    -arch arch_type input_file
           Tell lipo that input_file contains the specified architecture type.
           This is a universal file,
           architecture (s) lipo can figure out.

    -arch_blank arch_type
           The output for the specified arch_type will be an MH_DYLIB_STUB file.
           This flag can not be used with any operation other than -create.

    -output output_file
           The output file.

    -create
           Create one universal output file from the input file (s).

    -thin arch_type
           Take one input file with the arch_type.

    -replace arch_type file_name
           Take one universal input file;  in the output file, replace the arch_type contents
           of the input file_name.

    -remove arch_type
           Take one universal input file from that universal file,
           placing the result in the output file.

    -extract arch_type
           Take one universal input file from
           a universal output file containing only that architecture.

    -extract_family arch_type
           For each family that
           archive file containing only those
           architectures.  If only one architecture is found.

    -verify_arch arch_type ...
           The arch_types are present in the file.
           If so then exit with a status of 0, then exit with a status of 1.

    -segalign arch_type value
           Create a universal file
           containing that architecture.  value is a hexadecimal number that must be an
           integral power of 2. It can't figure out the alignment
           of an input file (not currently an object file), or when it guesses at the
           alignment too conservatively.  For lipo is 0
           (2 ^ 0, or an alignment of one byte), and the default alignment for archives
           is 4 (2 ^ 2, or 4-byte alignment).

 arch_type A supported architecture name: i386 (32-bit intel) ppc (32-bit powerpc)
           ppc64 (64-bit powerpc) or x86_64 (64-bit intel)
 lipo produces the output file.
 lipo cans list;  create a single universal file from one or more input files;  thinnest design type;  extract,,,, and.
 Example
 $ cd / Applications
 $ lipo Stickies.app/Contents/MacOS/Stickies -info

 $ lipo Stickies.app/Contents/MacOS/Stickies -thin i386 -output Stickies.app/Contents/MacOS/Stickies.i386
 $ cd Stickies.app/Contents/MacOS/
 $ rm stickies
 $ mv Stickies.i386 Stickies
More information about the various commands (comand line) can be found here SS64.com
WE CREATE A UNIVERSAL BINARY LIBRARY FILE
- Compile the library for the device (as described above)
- Compile the library for the simulator (as described above)
- Opening the Terminal
- Go to the Products folder in the Terminal (cd command and folder path)
- Enter the following text:
lipo -create Debug-iphoneos/libMySecretLibrary.a Debug-iphonesimulator/libMySecretLibrary.a -output libMySecretLibrary_combined.a As a result, we get the universal library file libMySecretLibrary_combined.a, stored in the Products folder. The header file can be used from the Debug-iphoneos or Debug-iphonesimulator folders.
rice 9-0
Naturally, you should use the name of your libraries in the code instead of libMySecretLibrary.
Actually this task is completed. However, Xcode offers tools for automating a number of processes; in particular, you can automate the creation and assembly of libraries using Aggregate targeting.
ADD TO THE PROJECT NEW TARGET - AGGREGATE
Xcode has a special target template, which is not necessarily
correspond to a specific type of product. These are special Aggregate targets that can be used for:
- Group Target Associations
- Copying files to a specific file system location
- Create product using external build system
- Run a command script
In our case, we will create a target for executing a command script with the help of which a universal library will be assembled, combining two layers - for the simulator and for the device.
The sequence of actions is the same as when adding other targets:
	 File> New> Targect ...
	 Other (at the very bottom after OS X)> Aggregate
	 We set a name (for example - MySecretLibrary_combined)
In more detail how this is done you can see here ↓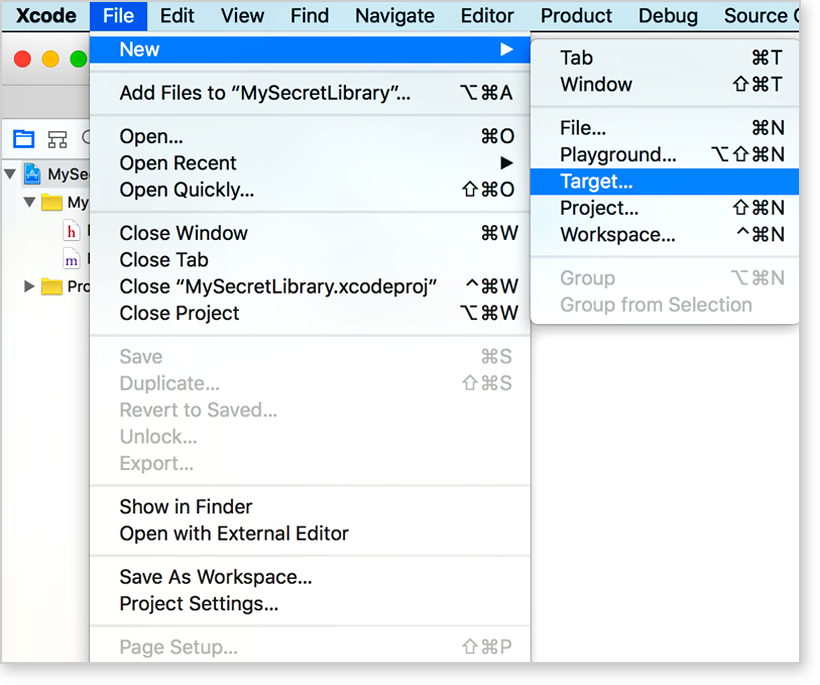
rice 9-1

rice 9-2
rice 9-3
Step 1. File> New> Target ...
rice 9-1
Step 2. Choose Other> Aggregate
rice 9-2
Step-3. Assign a library name (Product Name) ...
rice 9-3
After this, the project window will look something like this:
rice 9-4
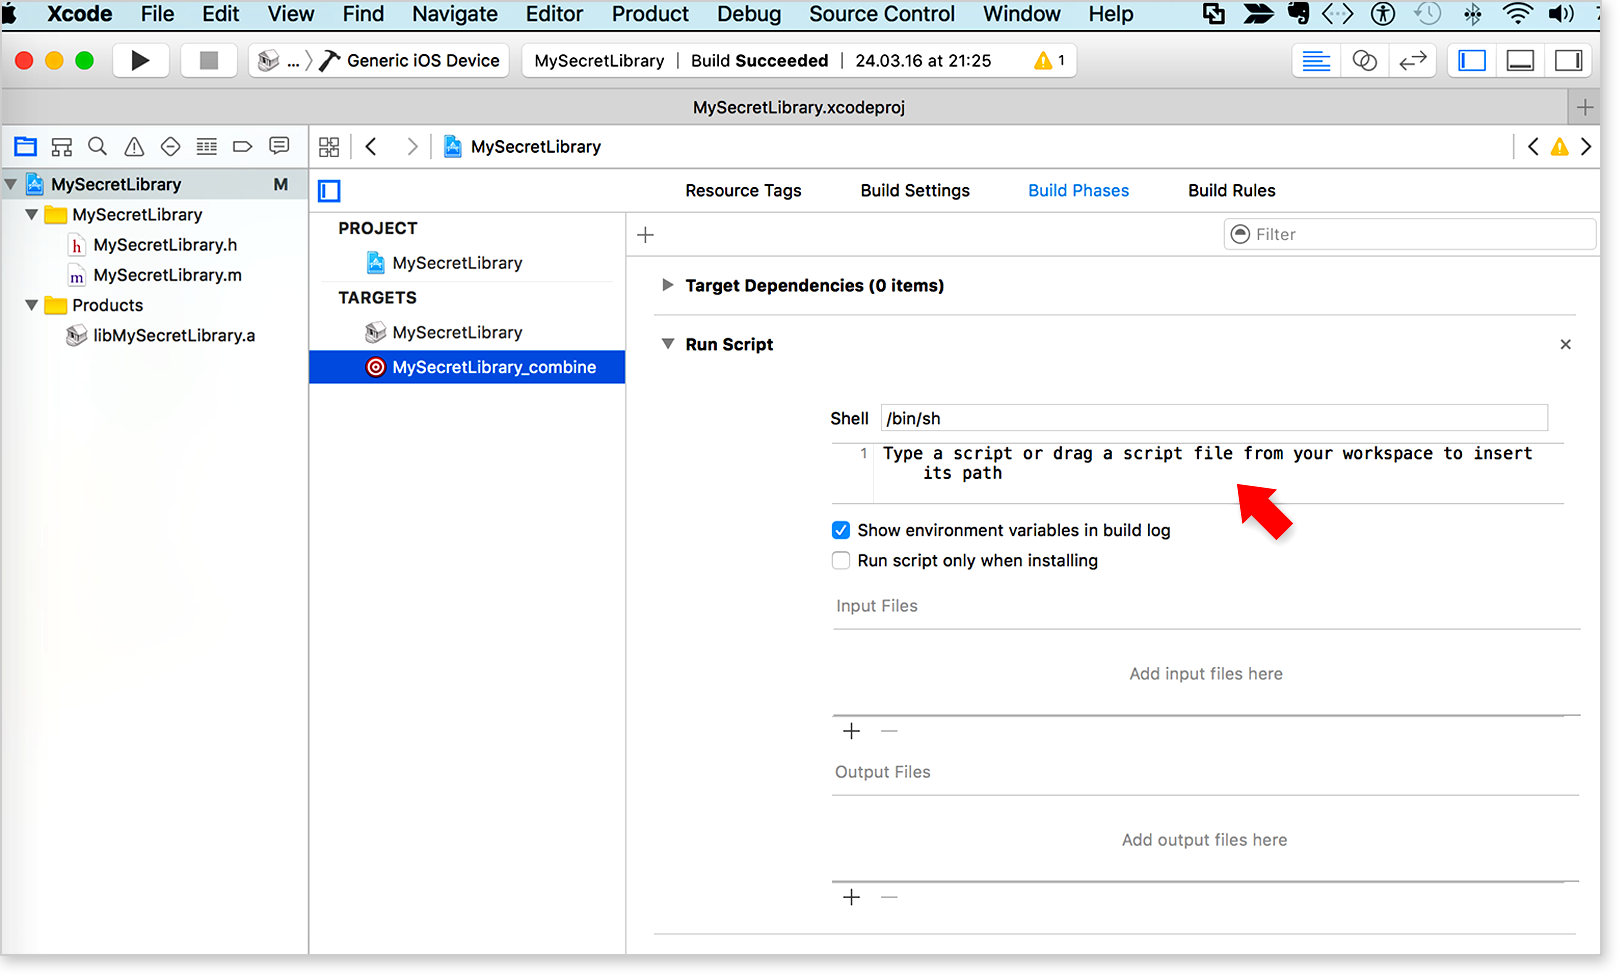
CONFIGURING AGGREGATE (add form to place the command script)
Select the target Aggregate, go to the section> Build Phases and click on the "+" icon
rice 10-1
In the menu that opens, select> New Run Script Phase
rice 10-2
A form opens to accommodate the script that manages the library build.
The project window should look like this (the arrow indicates the place where the script should be placed):
rice 10-3
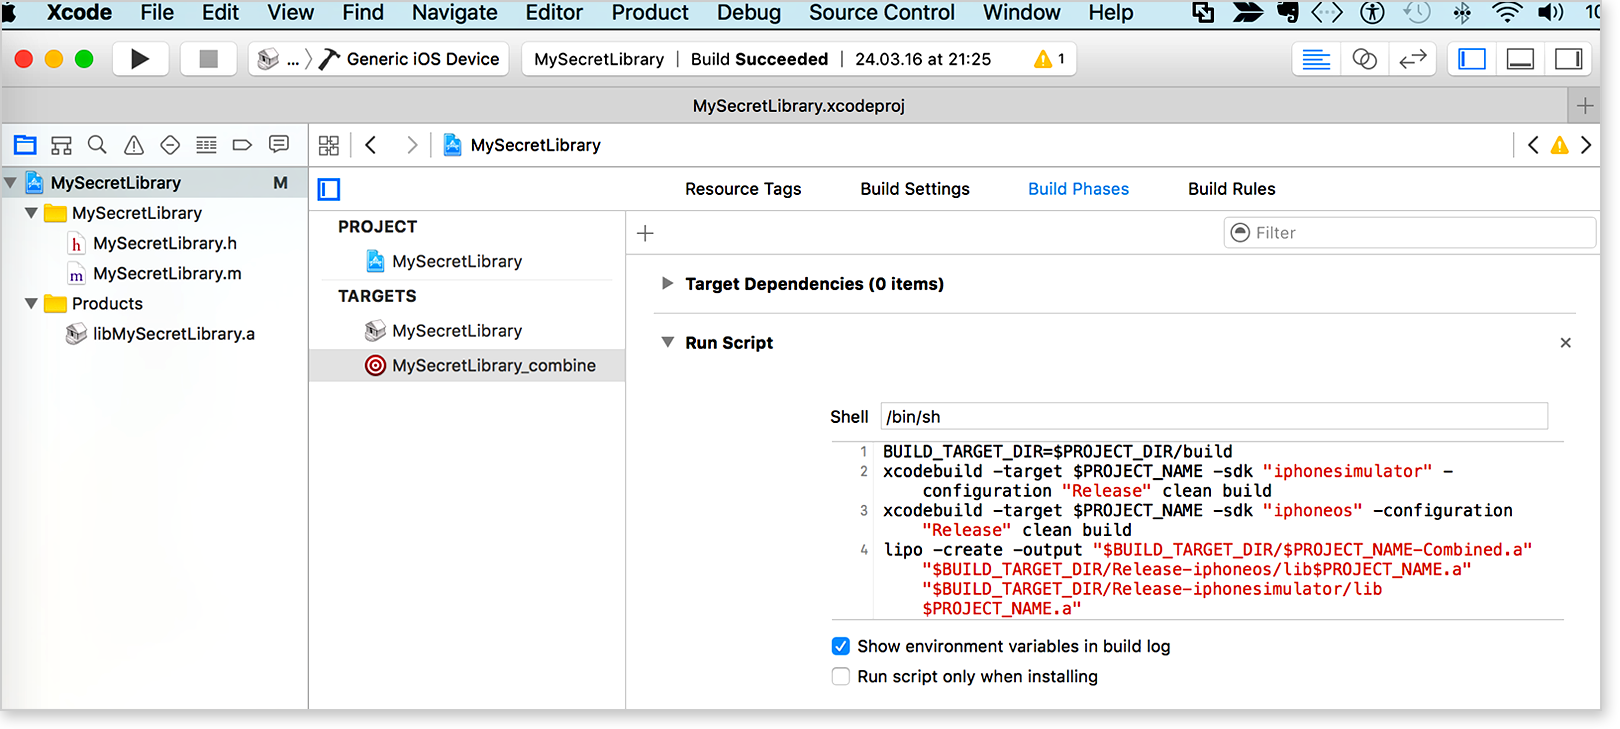
ADD TEAM SCRIPT
Command script for creating a universal library:
BUILD_TARGET_DIR=$PROJECT_DIR/build xcodebuild -target $PROJECT_NAME -sdk "iphonesimulator" -configuration "Release" clean build xcodebuild -target $PROJECT_NAME -sdk "iphoneos" -configuration "Release" clean build lipo -create -output "$BUILD_TARGET_DIR/$PROJECT_NAME-Combined.a" "$BUILD_TARGET_DIR/Release-iphoneos/lib$PROJECT_NAME.a" "$BUILD_TARGET_DIR/Release-iphonesimulator/lib$PROJECT_NAME.a" It can be seen that the script automates the execution of the same three simple actions:
- generates a library for the simulator
- generates a library for the device
- combines libraries and creates a binary file using the lipo command
Copy this script and add> Run Script to the form:
rice 10-4
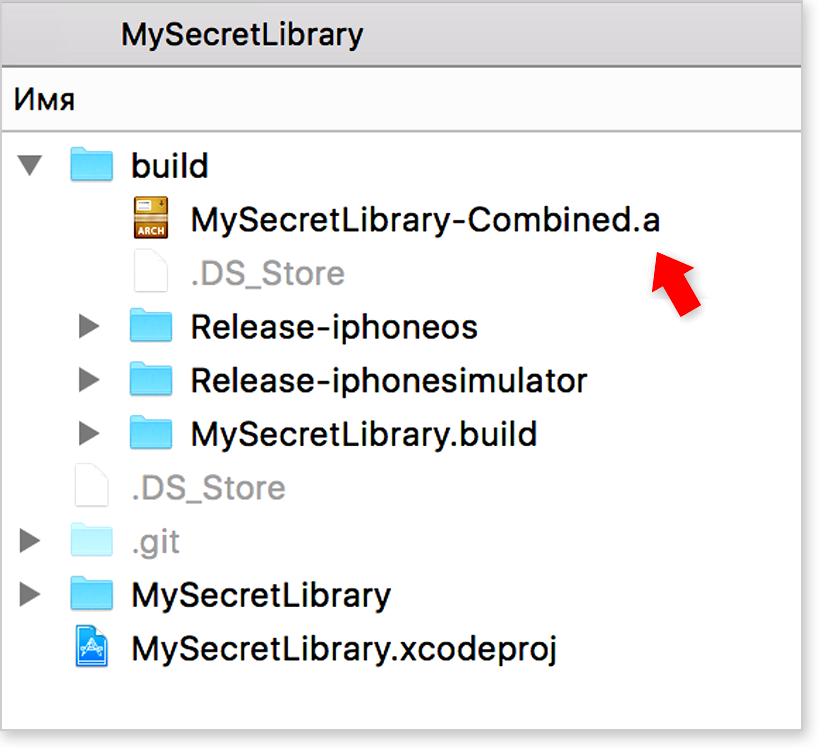
Set the aggregate MySecretLibrary target as the “active scheme”
rice 10-5
Press ⌘B to compile the library project.
As a result, the folder of your project (not in the Products! Folder) will appear in the folder where all generated files are located.
rice 10-6
That's all. As you can see, the issue is solved in just a few simple lines of code.
Outside the article were issues related to the elimination of duplication of related resources and updating the libraries already installed in the application. Recently, dependency management systems like CocoaPods have become very popular. The use of such systems is an ambiguous question. On the one hand, it is possible to avoid duplication of resources and maintain the current version of the library in ready-made applications. On the other hand, there is complete dependence on the repositories in which the libraries are stored and which belong to third parties and, besides, the possibility of the application crashing if the new version of the library is not fully compatible with the previous one.
We hope that the material was useful to you, the MSLibrary for iOS team
Other articles:
Capture and verify phone numbers using regular expressions, for iOS and not only ... Part 1
Capturing and verifying phone numbers using regular expressions, for iOS and not only ... Part 2
Implementing multiple selection of conditions using bitmasks, for iOS and not only ...
SIMPLE: remove unnecessary characters from a string using regular expressions for iOS and not only ...
Source: https://habr.com/ru/post/280286/
All Articles