Teigha for Architecture: First project
In the articles AutoCAD Architecture: First project and Introduction to ACA, I briefly talked about what AutoCAD Architecture (ACA) is, how it differs from the usual AutoCAD, what objects it implements and showed the simplest case of working with walls from .NET plug-in.
In this article I will talk about the Teigha library - an alternative for working with dwg files and ACA objects. We will write a small example that creates a house from ACA objects and saves it to the dwg file. Then, we will try to open this file in AutoCAD Architecture and check whether these files are compatible with the original AutoCAD.
')
To work with dwg and acad-objects, besides Avtokad and ObjectARX itself, there is another library: Teigha from the Open Design Alliance. If you want to work with the dwg format and AutoCAD objects programmatically, then the choice is, in fact, only between ObjectARX and Teigha. All third-party components and applications that can read and write dwg files are based on Teigha.
Teigha is a set of libraries that allows you to read, write, and manipulate objects of both regular AutoCAD and its ACA-type derivatives. This library also implements many auxiliary mechanisms for working with Avtokad objects and rendering devices for rendering the dwg base.
Below is the official information from the Open Design Alliance about the features of the library:
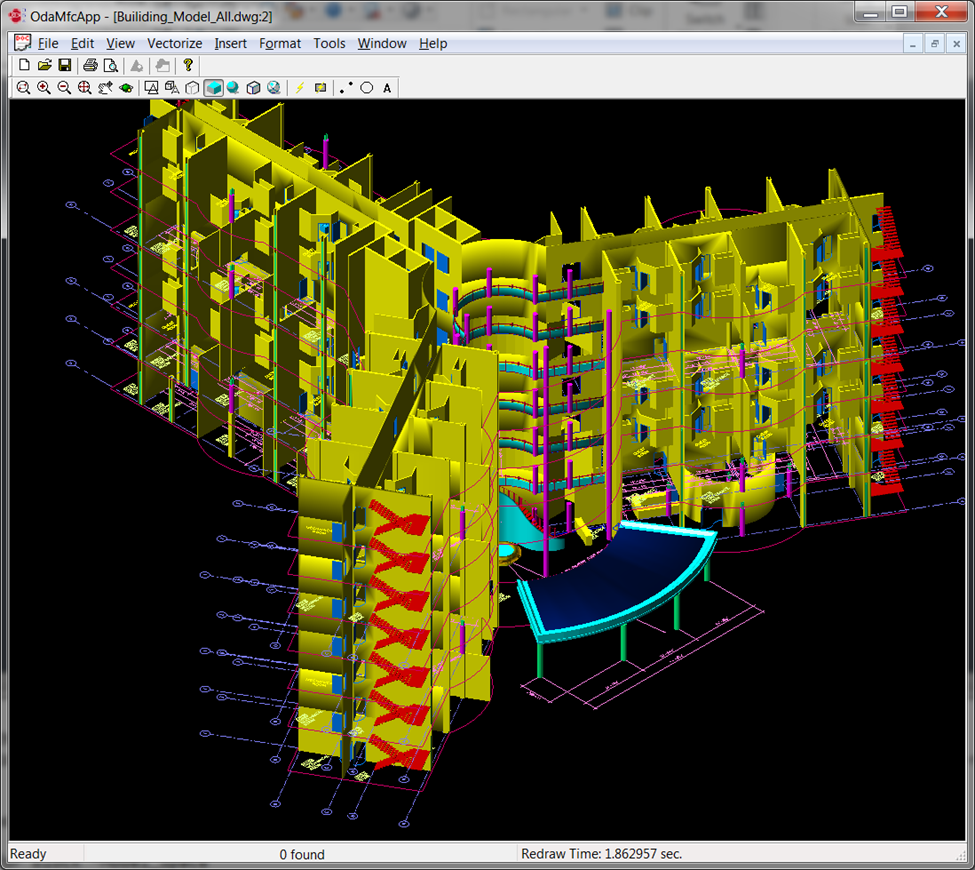
In general, "the library supports a lot of things." To begin with, we will try to load and draw some dwg drawing using a standard sample from the Teigha package:
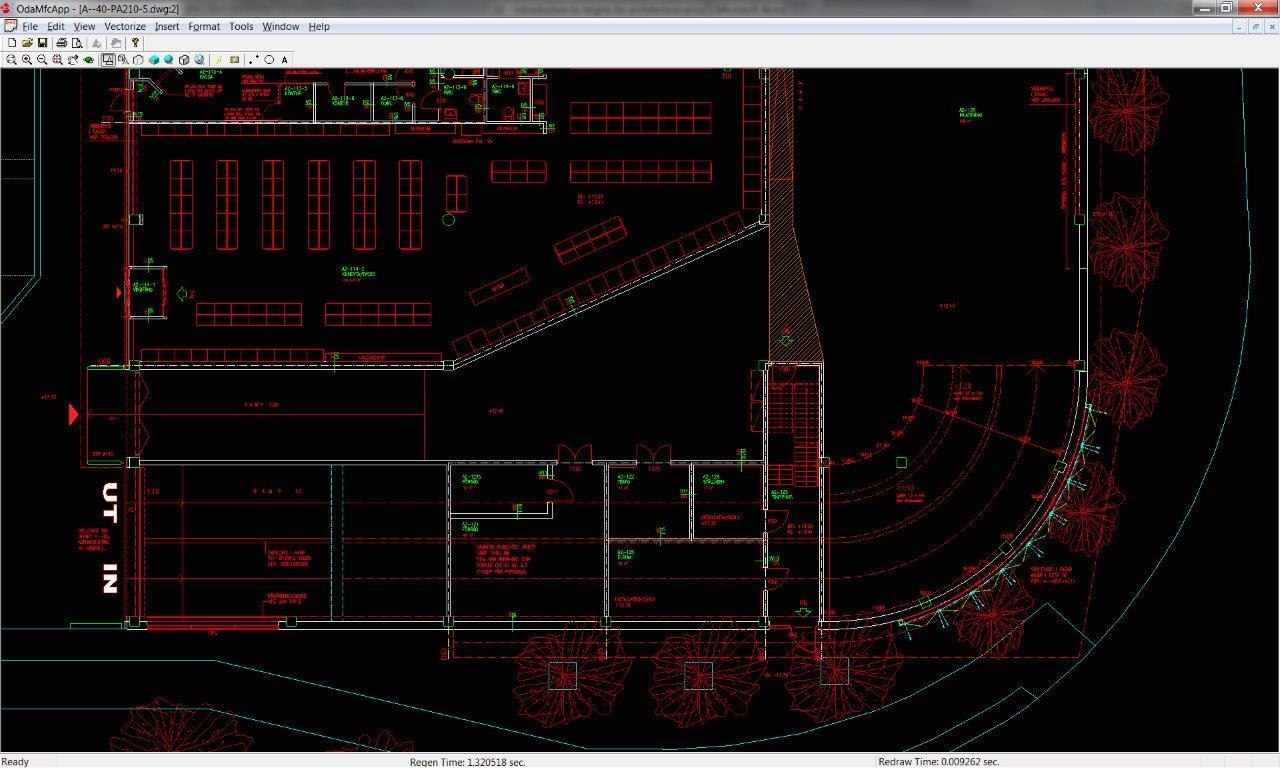
Ok, the dwg file was read and drawn. However, like the dwg file that I used for the title image for the article.
This standard sample is a windowed C ++ application and allows you to download, view and edit dwg files without AutoCAD. Another important feature: the Avtokad and Teigha APIs are almost identical, so you can easily rewrite the existing ObjectARX plugin to work with an application based on Teigha.
Most Avtokad analogs, such as BricsCAD, ZWCad, IntelliCAD, use Teigha for working with the dwg format and acad-objects.
We now turn to the architectural objects and work with them. To do this, briefly recall the main points:
AutoCAD Architecture operates with special high-level objects designed for architectural design: walls, doors, windows, roofs and other structural parts. Viewport-dependent objects, i.e. they can render themselves differently depending on the direction of the camera. Objects are assigned a style. If you change the style, then all objects of this style will change. Objects consist of components, each of which has its own visual settings: color, line type, material, scale (for example, a 3D door consists of a frame, a canvas, glass). For different display options, the object draws different geometry, so the number and settings of the components are different for different representations.
To work with architectural objects, besides ACA itself and its open API for creating plug-ins, you can use the Teigha for Architecture library from the Open Design Alliance.
TA is a C ++ class library in which all the basic ACA primitives are implemented, such as walls, windows, doors, roofs, beams, openings, and so on. The library allows you to read these objects from dwg formats of all versions, write (convert) to the latest version of dwg; The library renders all primitives for various representations and configurations. Since aca objects interact with each other, TA also implements auxiliary ACA classes and mechanisms — these are anchor, display manager, property sets, relation graph, and other binding.
In my opinion, there are more than enough common words. Now let's see what Teigha is physically like and try to write the first simple command. I will use the old VS 2005, but the libraries are multiplatform and the solution generator is included for studios up to 2015. Depending on the type of license, you may have access to either the full code of the entire library, or the built binaries and header files.
The set of TA libraries would be something like this:
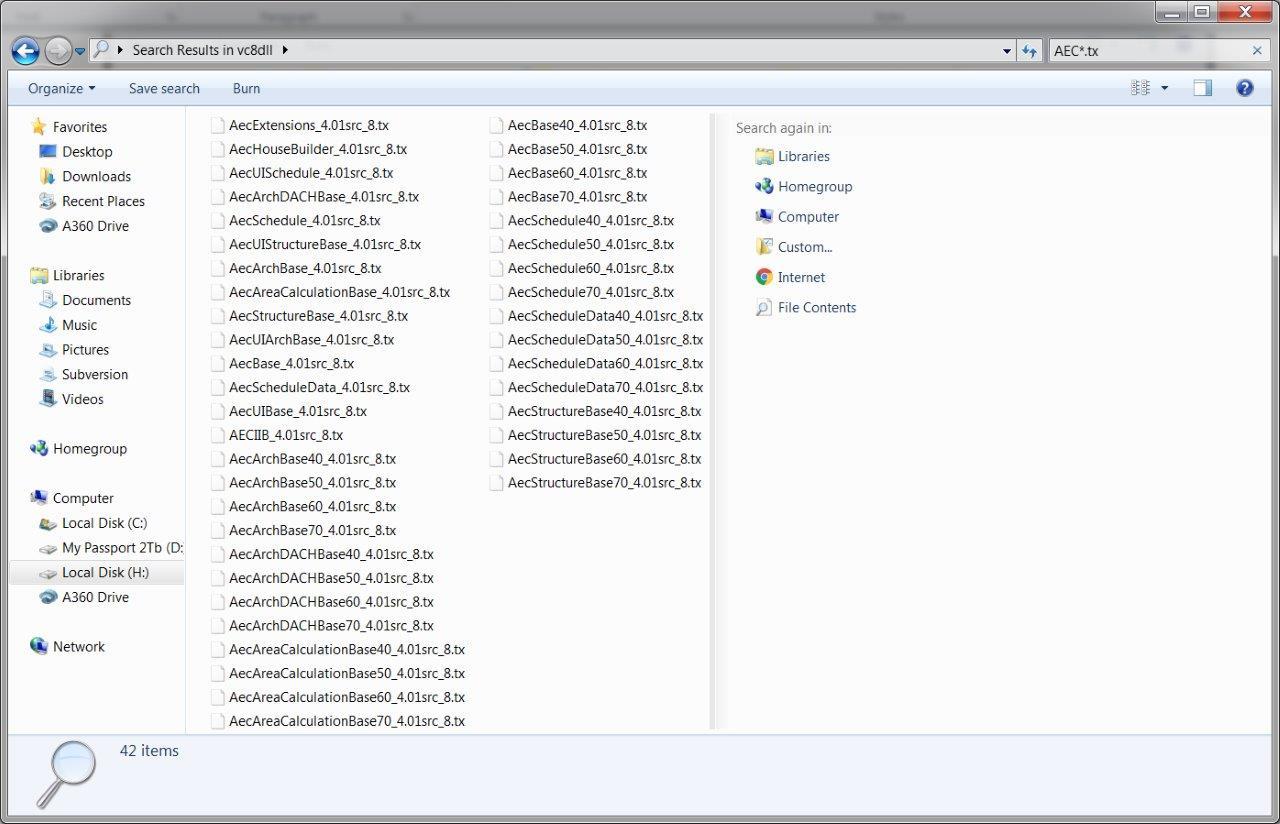
In fact, this is the usual Windows dll (you can knock and for other platforms: ios, linux, unix, etc.). Lib files go to them in a separate folder. In addition to the TA, Teigha Core libraries will be needed, as TA is an extension over Core-objects. Core implements the basic mechanisms and objects of an ordinary auto-cascade.
To initialize the library, we need a class that performs platform-specific file operations.
The kit already has ready-made extensions for Windows: ExSystemServices and ExHostAppServices; In this case, they will be enough for us.
Next, we initialize the library and graphics subsystem.
OdStaticRxObject adds addRef \ Release logic to the object; The library stores a link to the MyServices object and uses it for platform-specific operations.
Initializing TA libraries:
AecBase, AecArchBase and all the rest are tx modules (ie dll of the library) from the picture above. They are already linked using lib files, but this is not enough. It is necessary to initialize them as modules. What does it mean? At runtime, there is a dictionary of loaded classes in memory. This dictionary is used for the mechanism of castes of pointers between different types of TA objects and for creating instances of TA classes themselves through a centralized pseudo-constructors mechanism.
For example, when executing the command :: odrxDynamicLinker () -> loadApp (OD_T ("AecArchBase")), the AECArchBase :: initApp () function will be called inside the framework. Schematically, initApp () will register classes in the global dictionary that are implemented in this library by calling the rxInit () static function for each:
After that, the mechanism for creating objects will work and you can, for example, create a wall by calling AECDbWallPtr pWall = AECDbWall :: CreateAECObject (). Otherwise, an attempt to create a TA class object will throw an exception.
Create an empty dwg database by calling
This is a central object, it is an object database, which is stored and loaded from the dwg file. In it we will add all created architectural objects. Upon completion, we will save this database in a dwg file by calling
Next, we initialize the loaded libraries and display manager a little more.
The database creates an AEC dictionary with default settings for units for length, area, volume, angles, print settings and display representations implemented in these modules are registered. I will write a separate post about the display manager, display representations and related mechanisms.
This completes the initialization. If you skip some steps, the result may be different: either you will not create objects, or they will not be drawn (you will see a blank screen), or get some other glitches, depending on what step you missed.
At the moment, the full code here looks like this:
I added the zoom extents command so that when opening the created file we immediately saw the objects that added the symmetric deinitialization of the library. For simplicity, I removed the error checking and try \ catch constructs around the main actions.
Now the program will create an empty dwg file that can be opened and viewed by AutoCAD.
Adding walls to the drawing
To demonstrate the work with TA-classes, I want to create a house consisting of a ceiling-foundation, walls, windows, doors and roofs. Let's start with the walls.
First of all, let's add a wall to our drawing. To create the wall itself, you must first create a style for it. Let's write the add_wall_style function:
This function creates an AECDbWallStyle “wall style” object, sets some settings for it, and then accesses the display manager and changes colors for plan display representation (2d top view) and model display representation (3d view).
In this case, we set the yellow color for the wall in 3D view. It looks complicated, but there are reasons for this: this is how the display representations and display manager in ACA work. It is flexible and has many possibilities, but its logic is not immediately obvious and needs some study.
OdDbObjectId - runtime link
OdDbObjectId is the class with which base objects link to each other at run time. Inside, it stores a pointer to a real object in memory. Using OdDbObjectId :: openObject () you can get a pointer to the object with which the ObjectId is associated. The point is that while the object has not been accessed by this id, it may not be loaded into memory and the internal pointer OdDbObjectId may be NULL. When we specifically addressed this id for reading or writing, then the framework will create an instance of a real object and fill its fields with data from the database, and the internal pointer OdDbObjectId will receive the address of the created object. openObject () returns this pointer.
Such a mechanism allows partial loading of a large database (dwg file). In this case, OdDbObjectId will exist for each object, but only those objects that are explicitly addressed will be created in memory.
If you want the object reference to be kept between runs, then you need to use OdDbHandle.
For example, the add_wall_style function returned idWallStyle to us. In this case, the style was just explicitly created by calling AECDbWallStyle :: CreateAECObject () and idWallStyle stores inside a pointer to a real object in memory. To get write access to a style object, you need to perform an operation
openObject () will return a real pointer to the object and it will be possible to use it.
In the library, instead of the usual C ++ pointers, OdSmartPtr smartpoints are used
The destructor of such a smartpointer notifies the framework about closing the object, which may cause recalculation of related objects, sending alerts, etc.
Now add a wall call:
As you can see, add_wall does nothing special. It creates an AECDbWall object with a style that we created a bit earlier. The AECDbWall object is added to the model space of the database — a special dictionary that stores all the objects that are drawn when rendering the database (this is a simplification).
Next, the starting point, end point, and curvature are set on the wall. Those. the wall can be not only straight, but also convex.
If everything is done correctly, then we will have a dwg file with one yellow rectangular wall. In this case, I view the file with a sample from the Teigha delivery, but it will be drawn exactly the same in ACA.
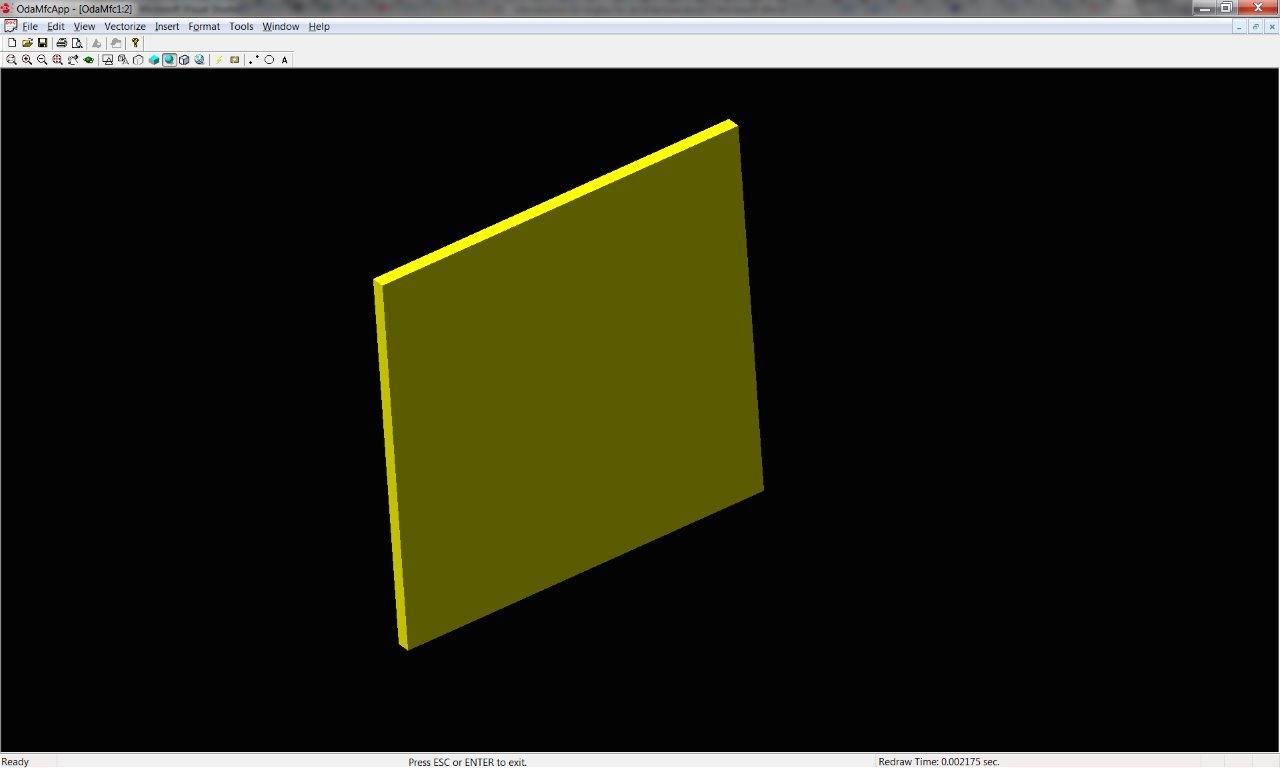
True, I manually turned the camera into a 3D view. By default you will have a top view.
Now, let's try to add as many as 4 walls, with one convex:
Received some rudiment of the future house:
As you can see, the walls were not simply drawn by separate objects, but between them a smooth transition was built automatically at the points of contact with each other. This is one of the automatic features of TA, called cleanup walls.
Add windows to drawing
Now add to our house window. With windows, the logic is similar to the doors: you need to create a style of windows that we want to add to the drawing, and then add window objects of this style.
As the code shows, an AECDbWindowStyle object is created and added to the database. Further, the style is set to some of the settings (although you can use the default), and then override the colors of several components for 2D and 3D representation. The components in this case are the physical parts of the window: glass, frame, sash.
Add a window to the first wall with the add_window function:
The add_window () function is similar to add_wall () with one difference: the anchor object is used here.
We create the AECDbWindow object and place it in the model space of the base. Then expose some settings to this particular instance of AECDbWindow.
After that we insert the window into the wall. A wall and a window are linked by a special object derived from AECDbAnchorEntToCurve. It contains padding along the x, y, z axes from the beginning of the wall coordinate system to the beginning of the window coordinate system. When you call AttachWallAnchor (), an instance of this object is created and placed in the database. The wall itself does not directly know whether windows are inserted into it or not. Creating an anchor affects another basic mechanism - the relation graph. Relation graph contains relationships between objects - who is attached to whom, who belongs to whom, who owns whom. When the wall is modified, the relation graph will receive a message stating that the AECDbWall object has changed, will pass through all dependencies and will cause the associated objects to be updated (in this case AECDbWindow). So, if we pushed the wall, the windows will move with it, because they will receive a notification from the relation graph. You can access this column and query dependencies for a particular object. The window, in principle, knows to whom it is attached, it stores the link to the created anchor.
Look what happened:
I specifically changed the color of the walls so that the window was better visible. In the code, your walls should be blue at once, I just selected colors as I wrote the article.
In TA there are a lot of predefined styles and window types, which are specified through enumerations:
We chose AECDefs :: ewtGlider and AECDefs :: esRectangular, but as you can see, there are many variations of the forms. Using other settings you can create a very complex type of window with an internal pattern on the glass and many doors. And it’s not necessary to draw all this manually or implement it programmatically, you just need to set a few settings for an existing object or style.
In general, all TA objects are complex and have a lot of settings. This gives quite ample opportunities right out of the box.
Add windows to all straight walls:

I did not begin to write the code, but each window can be managed separately: change the percentage of its opening, colors, and so on. And if you change their style, then this change will affect all of them at once.
Adding doors to a drawing
To complete the picture, add the door. For the door we will create a 2D profile for the canvas (a sash with a hole-window), then create a style with this profile, and then we will be able to create door objects of this style. But you can use default styles. Doors, like windows (and all other openings) are attached to the walls with an anchor.
And we add in main:
There is one new moment here: we open the wall for reading and take its length to calculate the indent.
As a result, we have a door inserted into a round wall:
Insert another window into a round wall:
As a result, we got a very leaky house without a roof and floor:
Adding a roof to a drawing
Let's write the function add_roof ()
The roof is created on the basis of a two-dimensional profile, the direction of the bypass of which is counterclockwise. A call to makeCCW () just converts the direction of the traversal, if it was the opposite. This is important, because the algorithm waits for the input of just such a profile and will not work otherwise.
Our profile coincides with the central line of the walls. Further, for each section of the profile, the slope of the roof slope is set, the number of faces to which the ramp will be presented, the rise of the ramp beginning in Z relative to the OXY plane (SetFaceHeightByIndex), and the overhang of the roof (overhang). SetSegmentCount () works only for segments that have a curvature. This value determines the accuracy of the approximation - how many straight line segments will be used to approximate the semicircular segment.
It turned out this roof:
There are a lot of variations of roof settings and you can create a roof of almost any shape - gable, multi-skid, tent, and so on. Each ramp is a separate RoofSlab object that can be edited manually.
Adding overlap to the drawing It
remains to add at least a small imitation of the floor / foundation. To do this, use the slab object (overlap). Let's write the add_slab function
In this case, we create a new style of overlap and add components to it. A component is a piece of overlap and contains such parameters as thickness, rise above OXY, name, material, index, etc. The overlap can contain several components that differ in their settings. For example, if they have a different indent from OXY, then one object-overlapping of such a style can draw all the floors and ceilings in a high-rise building.
The style settings apply to a specific object that stores the shape of a given overlap. In this case, we create a slab, and initialize its profile with the same outline as the bottom of the walls, with only a small indentation around the edges.
Next comes the work with the display manager to override the colors of the different overlapping components.
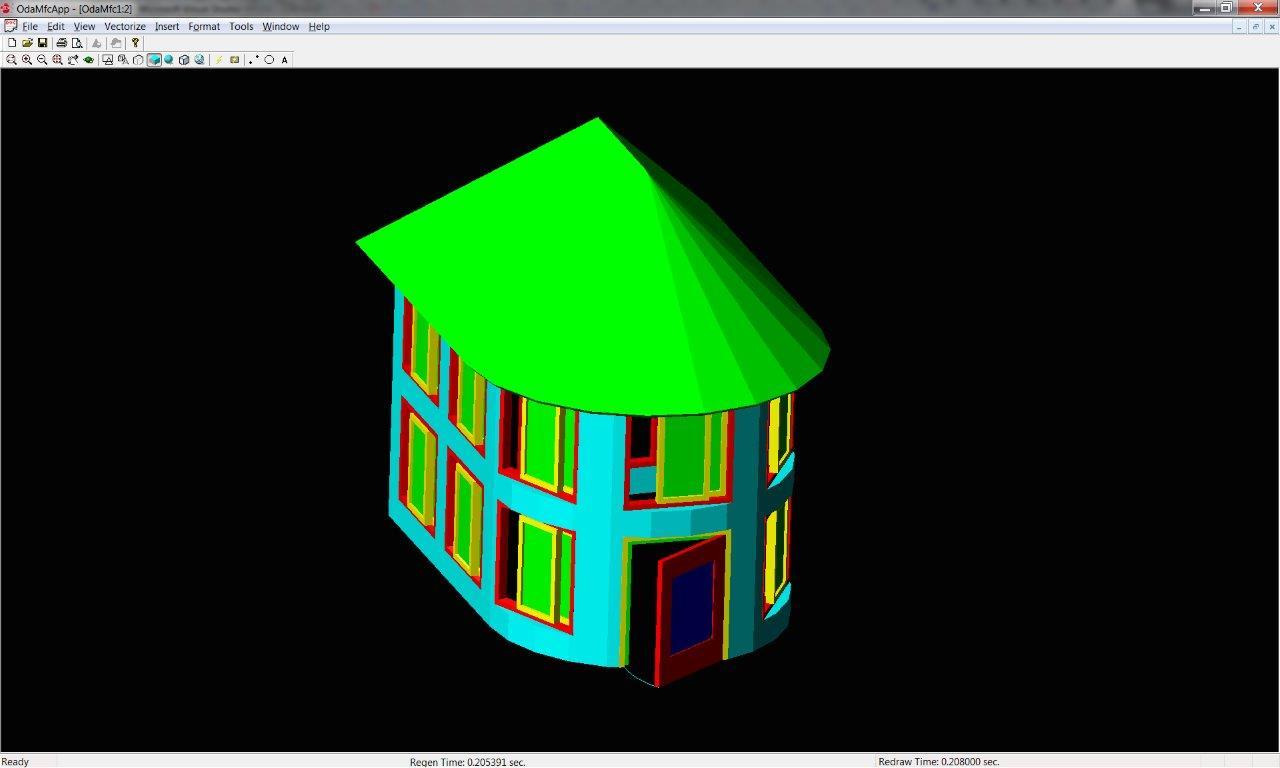
In the final, our house will look like this:

, dwg Autodesk ACA:
, Autocad Architecture. .
Teigha , , dwg .
, , – TA Teigha dwg .
In this article I will talk about the Teigha library - an alternative for working with dwg files and ACA objects. We will write a small example that creates a house from ACA objects and saves it to the dwg file. Then, we will try to open this file in AutoCAD Architecture and check whether these files are compatible with the original AutoCAD.
')
Alternative to AutoCAD and ObjectARX
To work with dwg and acad-objects, besides Avtokad and ObjectARX itself, there is another library: Teigha from the Open Design Alliance. If you want to work with the dwg format and AutoCAD objects programmatically, then the choice is, in fact, only between ObjectARX and Teigha. All third-party components and applications that can read and write dwg files are based on Teigha.
Teigha is a set of libraries that allows you to read, write, and manipulate objects of both regular AutoCAD and its ACA-type derivatives. This library also implements many auxiliary mechanisms for working with Avtokad objects and rendering devices for rendering the dwg base.
Below is the official information from the Open Design Alliance about the features of the library:
- Supported DWG, DXF, and BDXF file formats:
- Read support for files of version 2.5 through 2014.
- Write support for files of version 12 through 2014.
- Supported DGN file formats:
- Read support for V7 and V8 DGN (including V8 XM and V8I).
- Write support for V8 DGN.
- Convert from V7 to V8.
- Render drawing files using GDI, OpenGL, or DirectX with select entities.
- Recover and repair damaged .dwg files.
- Edit and manipulate CAD data programmatically, including:
- Explode an entity into a set of simpler entities.
- Apply a transformation to an entity.
- Modify arbitrary properties of database objects.
- Clone a database object.
- Many more.
- Export to SVG, PDF, DWF, BMP, STL, DAE (Collda).
- Import DWF / DAE / DGN files into a .dwg database.
- Support custom objects - you can create custom objects that are usable within any Teigha host application (compatible with .dwg files only).
- Support external files such as font files (TTF / SHX), linetype files (LIN / RSC), and hatch pattern files (PAT).
- Recompute dimension geometry from dimension settings.
- Support transactions and undo / redo capabilities for .dwg file data.
- If you’re on the go?
- Control memory allocation / deallocation.
- Support .dwg file “round-trip” data. For example, when you saved a 2007 datasheet
- Support ACIS / parasolid data internally, including rendering (for wireframe and shaded)
- Implement custom commands.
- Sample source code applications
- Integrate with third-party components.
In general, "the library supports a lot of things." To begin with, we will try to load and draw some dwg drawing using a standard sample from the Teigha package:
Ok, the dwg file was read and drawn. However, like the dwg file that I used for the title image for the article.
This standard sample is a windowed C ++ application and allows you to download, view and edit dwg files without AutoCAD. Another important feature: the Avtokad and Teigha APIs are almost identical, so you can easily rewrite the existing ObjectARX plugin to work with an application based on Teigha.
Most Avtokad analogs, such as BricsCAD, ZWCad, IntelliCAD, use Teigha for working with the dwg format and acad-objects.
Features of AutoCAD Architecture Objects
We now turn to the architectural objects and work with them. To do this, briefly recall the main points:
AutoCAD Architecture operates with special high-level objects designed for architectural design: walls, doors, windows, roofs and other structural parts. Viewport-dependent objects, i.e. they can render themselves differently depending on the direction of the camera. Objects are assigned a style. If you change the style, then all objects of this style will change. Objects consist of components, each of which has its own visual settings: color, line type, material, scale (for example, a 3D door consists of a frame, a canvas, glass). For different display options, the object draws different geometry, so the number and settings of the components are different for different representations.
Teigha for Architecture (TA) Library
To work with architectural objects, besides ACA itself and its open API for creating plug-ins, you can use the Teigha for Architecture library from the Open Design Alliance.
TA is a C ++ class library in which all the basic ACA primitives are implemented, such as walls, windows, doors, roofs, beams, openings, and so on. The library allows you to read these objects from dwg formats of all versions, write (convert) to the latest version of dwg; The library renders all primitives for various representations and configurations. Since aca objects interact with each other, TA also implements auxiliary ACA classes and mechanisms — these are anchor, display manager, property sets, relation graph, and other binding.
Getting started with the TA API
In my opinion, there are more than enough common words. Now let's see what Teigha is physically like and try to write the first simple command. I will use the old VS 2005, but the libraries are multiplatform and the solution generator is included for studios up to 2015. Depending on the type of license, you may have access to either the full code of the entire library, or the built binaries and header files.
The set of TA libraries would be something like this:
In fact, this is the usual Windows dll (you can knock and for other platforms: ios, linux, unix, etc.). Lib files go to them in a separate folder. In addition to the TA, Teigha Core libraries will be needed, as TA is an extension over Core-objects. Core implements the basic mechanisms and objects of an ordinary auto-cascade.
TA initialization
To initialize the library, we need a class that performs platform-specific file operations.
class MyServices : public ExSystemServices, public ExHostAppServices { protected: ODRX_USING_HEAP_OPERATORS(ExSystemServices); }; The kit already has ready-made extensions for Windows: ExSystemServices and ExHostAppServices; In this case, they will be enough for us.
Next, we initialize the library and graphics subsystem.
OdStaticRxObject<MyServices> svcs; odInitialize( &svcs ); odgsInitialize(); OdStaticRxObject adds addRef \ Release logic to the object; The library stores a link to the MyServices object and uses it for platform-specific operations.
Initializing TA libraries:
// Loading of all public Teigha Architecture DRX modules. // Note that not all calls are necessary for some of them depend on others // but here we list all of them. // // If a program uses TD doesn't modify or create binary files // it may not load any of DRX modules on start because they will be loaded automatically. // But if a program modifies or creates binary files then it is highly recommended // to load all DRX modules program uses. ::odrxDynamicLinker()->loadApp( OD_T("AecBase") ); ::odrxDynamicLinker()->loadApp( OD_T("AecArchBase") ); ::odrxDynamicLinker()->loadApp( OD_T("AecArchDACHBase") ); ::odrxDynamicLinker()->loadApp( OD_T("AecScheduleData") ); ::odrxDynamicLinker()->loadApp( OD_T("AecSchedule") ); ::odrxDynamicLinker()->loadApp( OD_T("AecStructureBase") ); AecBase, AecArchBase and all the rest are tx modules (ie dll of the library) from the picture above. They are already linked using lib files, but this is not enough. It is necessary to initialize them as modules. What does it mean? At runtime, there is a dictionary of loaded classes in memory. This dictionary is used for the mechanism of castes of pointers between different types of TA objects and for creating instances of TA classes themselves through a centralized pseudo-constructors mechanism.
For example, when executing the command :: odrxDynamicLinker () -> loadApp (OD_T ("AecArchBase")), the AECArchBase :: initApp () function will be called inside the framework. Schematically, initApp () will register classes in the global dictionary that are implemented in this library by calling the rxInit () static function for each:
… AECDbSpaceBoundary::rxInit(); AECDbStair::rxInit(); AECDbWall::rxInit(); AECDbZone::rxInit(); … After that, the mechanism for creating objects will work and you can, for example, create a wall by calling AECDbWallPtr pWall = AECDbWall :: CreateAECObject (). Otherwise, an attempt to create a TA class object will throw an exception.
Create an empty dwg database by calling
OdDbDatabasePtr pDatabase = svcs.createDatabase(); This is a central object, it is an object database, which is stored and loaded from the dwg file. In it we will add all created architectural objects. Upon completion, we will save this database in a dwg file by calling
OdWrFileBuf cBuffer( strFilename ); pDatabase->writeFile( &cBuffer, OdDb::kDwg, OdDb::kDHL_CURRENT ); Next, we initialize the loaded libraries and display manager a little more.
AECArchDACHBaseDatabase( pDatabase ).Init(); AECScheduleDatabase( pDatabase ).Init(); AECStructureBaseDatabase( pDatabase ).Init(); init_display_system( pDatabase ); The database creates an AEC dictionary with default settings for units for length, area, volume, angles, print settings and display representations implemented in these modules are registered. I will write a separate post about the display manager, display representations and related mechanisms.
This completes the initialization. If you skip some steps, the result may be different: either you will not create objects, or they will not be drawn (you will see a blank screen), or get some other glitches, depending on what step you missed.
At the moment, the full code here looks like this:
Program code
class MyServices : public ExSystemServices, public ExHostAppServices { protected: ODRX_USING_HEAP_OPERATORS(ExSystemServices); }; int wmain(int argc, wchar_t* argv[]) { // Initialize TD with system services. // And create single instance of hostapp services // for TD database creation. OdStaticRxObject<MyServices> svcs; odInitialize( &svcs ); odgsInitialize(); // Loading of all public Teigha Architecture DRX modules. // Note that not all calls are necessary for some of them depend on others // but here we list all of them. // // If a program uses TD doesn't modify or create binary files // it may not load any of DRX modules on start because they will be loaded automatically. // But if a program modifies or creates binary files then it is highly recommended // to load all DRX modules program uses. ::odrxDynamicLinker()->loadApp( OD_T("AecBase") ); ::odrxDynamicLinker()->loadApp( OD_T("AecArchBase") ); ::odrxDynamicLinker()->loadApp( OD_T("AecArchDACHBase") ); ::odrxDynamicLinker()->loadApp( OD_T("AecScheduleData") ); ::odrxDynamicLinker()->loadApp( OD_T("AecSchedule") ); ::odrxDynamicLinker()->loadApp( OD_T("AecStructureBase") ); // Create empty TD database. OdDbDatabasePtr pDatabase = svcs.createDatabase();; // Initialize database with default Teigha Architecture content. AECArchDACHBaseDatabase( pDatabase ).Init(); AECScheduleDatabase( pDatabase ).Init(); AECStructureBaseDatabase( pDatabase ).Init(); init_display_system( pDatabase ); // do something here with TA objects // Perform "zoom extents" on model space. { OdDbViewportTablePtr pVT = pDatabase->getViewportTableId().openObject( OdDb::kForRead ); OdDbViewportTableRecordPtr pV = pVT->getActiveViewportId().openObject( OdDb::kForWrite ); pV->zoomExtents(); } OdWrFileBuf cBuffer( "H:\\TA_test.dwg" ); pDatabase->writeFile( &cBuffer, OdDb::kDwg, OdDb::kDHL_CURRENT ); odgsUninitialize(); odUninitialize(); return 0; } I added the zoom extents command so that when opening the created file we immediately saw the objects that added the symmetric deinitialization of the library. For simplicity, I removed the error checking and try \ catch constructs around the main actions.
Now the program will create an empty dwg file that can be opened and viewed by AutoCAD.
Work with objects
Adding walls to the drawing
To demonstrate the work with TA-classes, I want to create a house consisting of a ceiling-foundation, walls, windows, doors and roofs. Let's start with the walls.
First of all, let's add a wall to our drawing. To create the wall itself, you must first create a style for it. Let's write the add_wall_style function:
Code add_wall_style
OdDbObjectId add_wall_style( OdDbDatabasePtr pDatabase ) { OdDbObjectId idResult = AECDbWallStyle::CreateAECObject( pDatabase, OD_T("Wall Style Created By Teigha(R) Architecture") ); AECDbWallStylePtr pWallStyle = idResult.openObject( OdDb::kForWrite ); pWallStyle->SetDescription( OD_T("Wall Style Description") ); pWallStyle->SetDictRecordDescription( OD_T("Dialog caption") ); pWallStyle->SetWallWidth( 4 ); pWallStyle->SetWallWidthUsed( true ); pWallStyle->SetBaseHeight( 110 ); pWallStyle->SetBaseHeightUsed( true ); pWallStyle->SetJustification( AECDefs::ewjLeft ); pWallStyle->SetJustificationUsed( true ); pWallStyle->SetAutomaticCleanups( true ); pWallStyle->SetAutomaticCleanupsUsed( true ); pWallStyle->SetCleanupRadius( 4 ); pWallStyle->SetCleanupRadiusUsed( true ); pWallStyle->SetFloorLineOffset( 3 ); pWallStyle->SetFloorLineOffsetUsed( false ); pWallStyle->SetRoofLineOffset( -3 ); pWallStyle->SetRoofLineOffsetUsed( false ); AECDisplayManager cDM( pDatabase ); AECDbDispPropsWallModelPtr pOverrideModel = AECDbDispPropsWallModel::cast( pWallStyle->OverrideDispProps( cDM.UpdateDisplayRepresentation( AECDbDispRepWallModel::desc() ) ).openObject( OdDb::kForWrite ) ); if ( !pOverrideModel.isNull() ) { pOverrideModel->SetIsDisplayOpeningEndcaps( false ); pOverrideModel->GetBoundaryCompByIndex( 0 )->SetColor( colorAt( 4 ) ); } AECDbDispPropsWallPtr pOverridePlan = AECDbDispPropsWall::cast( pWallStyle->OverrideDispProps( cDM.UpdateDisplayRepresentation( AECDbDispRepWallPlan::desc() ) ).openObject( OdDb::kForWrite ) ); if ( !pOverridePlan.isNull() ) { pOverridePlan->GetBoundaryCompByIndex( 0 )->SetColor( colorAt( 4 ) ); } return( pWallStyle->objectId() ); } This function creates an AECDbWallStyle “wall style” object, sets some settings for it, and then accesses the display manager and changes colors for plan display representation (2d top view) and model display representation (3d view).
AECDisplayManager cDM( pDatabase ); AECDbDispPropsWallModelPtr pOverrideModel = AECDbDispPropsWallModel::cast( pWallStyle->OverrideDispProps( cDM.UpdateDisplayRepresentation( AECDbDispRepWallModel::desc() ) ).openObject( OdDb::kForWrite ) ); if ( !pOverrideModel.isNull() ) { pOverrideModel->SetIsDisplayOpeningEndcaps( false ); pOverrideModel->GetBoundaryCompByIndex( 0 )->SetColor( colorAt( 2 ) ); } In this case, we set the yellow color for the wall in 3D view. It looks complicated, but there are reasons for this: this is how the display representations and display manager in ACA work. It is flexible and has many possibilities, but its logic is not immediately obvious and needs some study.
OdDbObjectId - runtime link
OdDbObjectId is the class with which base objects link to each other at run time. Inside, it stores a pointer to a real object in memory. Using OdDbObjectId :: openObject () you can get a pointer to the object with which the ObjectId is associated. The point is that while the object has not been accessed by this id, it may not be loaded into memory and the internal pointer OdDbObjectId may be NULL. When we specifically addressed this id for reading or writing, then the framework will create an instance of a real object and fill its fields with data from the database, and the internal pointer OdDbObjectId will receive the address of the created object. openObject () returns this pointer.
Such a mechanism allows partial loading of a large database (dwg file). In this case, OdDbObjectId will exist for each object, but only those objects that are explicitly addressed will be created in memory.
If you want the object reference to be kept between runs, then you need to use OdDbHandle.
For example, the add_wall_style function returned idWallStyle to us. In this case, the style was just explicitly created by calling AECDbWallStyle :: CreateAECObject () and idWallStyle stores inside a pointer to a real object in memory. To get write access to a style object, you need to perform an operation
AECDbWallStylePtr pWallStyle = idResult.openObject( OdDb::kForWrite ); openObject () will return a real pointer to the object and it will be possible to use it.
In the library, instead of the usual C ++ pointers, OdSmartPtr smartpoints are used
typedef OdSmartPtr<AECDbWallStyle> AECDbWallStylePtr The destructor of such a smartpointer notifies the framework about closing the object, which may cause recalculation of related objects, sending alerts, etc.
Now add a wall call:
OdDbObjectId idWall1 = add_wall( pDatabase, idWallStyle, OdGePoint2d( 0, 0 ), OdGePoint2d( 0, 110 ) ); Add_wall code
OdDbObjectId add_wall( OdDbDatabasePtr pDatabase, const OdDbObjectId& idStyle, const OdGePoint2d& ptStart, const OdGePoint2d& ptEnd, double dBulge = 0 ) { AECDbWallPtr pWall = AECDbWall::CreateAECObject( pDatabase->getModelSpaceId(), idStyle ); pWall->Set( ptStart, ptEnd, dBulge ); pWall->SetDescription( OD_T("A Wall") ); return( pWall->objectId() ); } As you can see, add_wall does nothing special. It creates an AECDbWall object with a style that we created a bit earlier. The AECDbWall object is added to the model space of the database — a special dictionary that stores all the objects that are drawn when rendering the database (this is a simplification).
Next, the starting point, end point, and curvature are set on the wall. Those. the wall can be not only straight, but also convex.
If everything is done correctly, then we will have a dwg file with one yellow rectangular wall. In this case, I view the file with a sample from the Teigha delivery, but it will be drawn exactly the same in ACA.
True, I manually turned the camera into a 3D view. By default you will have a top view.
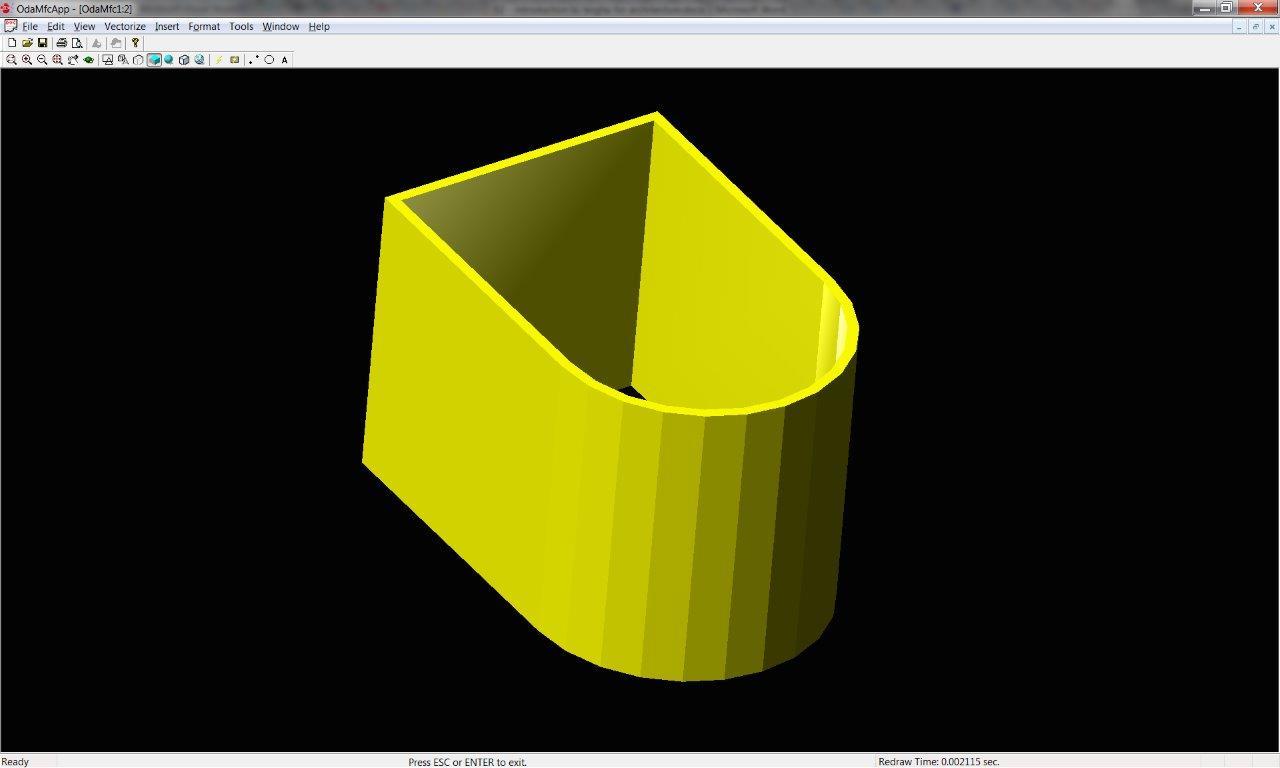
Now, let's try to add as many as 4 walls, with one convex:
OdDbObjectId idWall1 = add_wall( pDatabase, idWallStyle, OdGePoint2d( 0, 0 ), OdGePoint2d( 0, 110 ) ); OdDbObjectId idWall2 = add_wall( pDatabase, idWallStyle, OdGePoint2d( 0, 110 ), OdGePoint2d( 110, 110 ) ); OdDbObjectId idWall3 = add_wall( pDatabase, idWallStyle, OdGePoint2d( 110, 110 ), OdGePoint2d( 110, 0 ) ); OdDbObjectId idWall4 = add_wall( pDatabase, idWallStyle, OdGePoint2d( 110, 0 ), OdGePoint2d( 0, 0 ), -1 ); Received some rudiment of the future house:
As you can see, the walls were not simply drawn by separate objects, but between them a smooth transition was built automatically at the points of contact with each other. This is one of the automatic features of TA, called cleanup walls.
Full code for now
OdDbObjectId add_wall_style( OdDbDatabasePtr pDatabase ) { OdDbObjectId idResult = AECDbWallStyle::CreateAECObject( pDatabase, OD_T("Wall Style Created By Teigha(R) Architecture") ); AECDbWallStylePtr pWallStyle = idResult.openObject( OdDb::kForWrite ); pWallStyle->SetDescription( OD_T("Wall Style Description") ); pWallStyle->SetDictRecordDescription( OD_T("Dialog caption") ); pWallStyle->SetWallWidth( 4 ); pWallStyle->SetWallWidthUsed( true ); pWallStyle->SetBaseHeight( 110 ); pWallStyle->SetBaseHeightUsed( true ); pWallStyle->SetJustification( AECDefs::ewjLeft ); pWallStyle->SetJustificationUsed( true ); pWallStyle->SetAutomaticCleanups( true ); pWallStyle->SetAutomaticCleanupsUsed( true ); pWallStyle->SetCleanupRadius( 4 ); pWallStyle->SetCleanupRadiusUsed( true ); pWallStyle->SetFloorLineOffset( 3 ); pWallStyle->SetFloorLineOffsetUsed( false ); pWallStyle->SetRoofLineOffset( -3 ); pWallStyle->SetRoofLineOffsetUsed( false ); AECDisplayManager cDM( pDatabase ); AECDbDispPropsWallModelPtr pOverrideModel = AECDbDispPropsWallModel::cast( pWallStyle->OverrideDispProps( cDM.UpdateDisplayRepresentation( AECDbDispRepWallModel::desc() ) ).openObject( OdDb::kForWrite ) ); if ( !pOverrideModel.isNull() ) { pOverrideModel->SetIsDisplayOpeningEndcaps( false ); pOverrideModel->GetBoundaryCompByIndex( 0 )->SetColor( colorAt( 4 ) ); } AECDbDispPropsWallPtr pOverridePlan = AECDbDispPropsWall::cast( pWallStyle->OverrideDispProps( cDM.UpdateDisplayRepresentation( AECDbDispRepWallPlan::desc() ) ).openObject( OdDb::kForWrite ) ); if ( !pOverridePlan.isNull() ) { pOverridePlan->GetBoundaryCompByIndex( 0 )->SetColor( colorAt( 4 ) ); } return( pWallStyle->objectId() ); } OdDbObjectId add_wall( OdDbDatabasePtr pDatabase, const OdDbObjectId& idStyle, const OdGePoint2d& ptStart, const OdGePoint2d& ptEnd, double dBulge = 0 ) { AECDbWallPtr pWall = AECDbWall::CreateAECObject( pDatabase->getModelSpaceId(), idStyle ); pWall->Set( ptStart, ptEnd, dBulge ); pWall->SetDescription( OD_T("A Wall") ); return( pWall->objectId() ); } int wmain(int argc, wchar_t* argv[]) { // Initialize TD with system services. // And create single instance of hostapp services // for TD database creation. OdStaticRxObject<MyServices> svcs; odInitialize( &svcs ); odgsInitialize(); // Loading of all public Teigha Architecture DRX modules. // Note that not all calls are necessary for some of them depend on others // but here we list all of them. // // If a program uses TD doesn't modify or create binary files // it may not load any of DRX modules on start because they will be loaded automatically. // But if a program modifies or creates binary files then it is highly recommended // to load all DRX modules program uses. ::odrxDynamicLinker()->loadApp( OD_T("AecBase") ); ::odrxDynamicLinker()->loadApp( OD_T("AecArchBase") ); ::odrxDynamicLinker()->loadApp( OD_T("AecArchDACHBase") ); ::odrxDynamicLinker()->loadApp( OD_T("AecScheduleData") ); ::odrxDynamicLinker()->loadApp( OD_T("AecSchedule") ); ::odrxDynamicLinker()->loadApp( OD_T("AecStructureBase") ); // Create empty TD database. OdDbDatabasePtr pDatabase = svcs.createDatabase();; // Initialize database with default Teigha Architecture content. AECArchDACHBaseDatabase( pDatabase ).Init(); AECScheduleDatabase( pDatabase ).Init(); AECStructureBaseDatabase( pDatabase ).Init(); init_display_system( pDatabase ); OdDbObjectId idWallStyle = add_wall_style( pDatabase ); OdDbObjectId idWall1 = add_wall( pDatabase, idWallStyle, OdGePoint2d( 0, 0 ), OdGePoint2d( 0, 110 ) ); OdDbObjectId idWall2 = add_wall( pDatabase, idWallStyle, OdGePoint2d( 0, 110 ), OdGePoint2d( 110, 110 ) ); OdDbObjectId idWall3 = add_wall( pDatabase, idWallStyle, OdGePoint2d( 110, 110 ), OdGePoint2d( 110, 0 ) ); OdDbObjectId idWall4 = add_wall( pDatabase, idWallStyle, OdGePoint2d( 110, 0 ), OdGePoint2d( 0, 0 ), -1 ); // Perform "zoom extents" on model space. { OdDbViewportTablePtr pVT = pDatabase->getViewportTableId().openObject( OdDb::kForRead ); OdDbViewportTableRecordPtr pV = pVT->getActiveViewportId().openObject( OdDb::kForWrite ); pV->zoomExtents(); } OdWrFileBuf cBuffer( "H:\\TA_test.dwg" ); pDatabase->writeFile( &cBuffer, OdDb::kDwg, OdDb::kDHL_CURRENT ); odgsUninitialize(); odUninitialize(); return 0; } Add windows to drawing
Now add to our house window. With windows, the logic is similar to the doors: you need to create a style of windows that we want to add to the drawing, and then add window objects of this style.
OdDbObjectId idWindowStyle = add_window_style( pDatabase ); Add_window_style code
OdDbObjectId add_window_style( OdDbDatabasePtr pDatabase ) { OdDbObjectId idWStyle = AECDbWindowStyle::CreateAECObject( pDatabase, OD_T("Window Style Created By Teigha(R) Architecture") ); AECDbWindowStylePtr pWindowStyle = idWStyle.openObject( OdDb::kForWrite ); pWindowStyle->SetDescription( OD_T("Window Style Description") ); pWindowStyle->SetDictRecordDescription( OD_T("Dialog caption") ); pWindowStyle->SetAutoAdjustToWidthOfWall( true ); pWindowStyle->SetFrameWidth( 2 ); pWindowStyle->SetFrameDepth( 5 ); pWindowStyle->SetSashWidth( 2 ); pWindowStyle->SetSashDepth( 3 ); pWindowStyle->SetGlassThickness( 1 ); pWindowStyle->SetWindowType( AECDefs::ewtGlider ); pWindowStyle->SetWindowShape( AECDefs::esRectangular ); AECDisplayManager cDM( pDatabase ); AECDbDispPropsWindowPtr pOverrideModel = AECDbDispPropsWindow::cast( pWindowStyle->OverrideDispProps( cDM.UpdateDisplayRepresentation( AECDbDispRepWindowModel::desc() ) ).openObject( OdDb::kForWrite ) ); if ( !pOverrideModel.isNull() ) { pOverrideModel->GetFrameComp()->SetColor( colorAt( 1 ) ); pOverrideModel->GetSashComp()->SetColor( colorAt( 2 ) ); pOverrideModel->GetGlassComp()->SetColor( colorAt( 3 ) ); } AECDbDispPropsWindowPtr pOverridePlan = AECDbDispPropsWindow::cast( pWindowStyle->OverrideDispProps( cDM.UpdateDisplayRepresentation( AECDbDispRepWindowPlan::desc() ) ).openObject( OdDb::kForWrite ) ); if ( !pOverridePlan.isNull() ) { pOverridePlan->GetFrameComp()->SetColor( colorAt( 1 ) ); pOverridePlan->GetSashComp()->SetColor( colorAt( 2 ) ); pOverridePlan->GetGlassComp()->SetColor( colorAt( 3 ) ); } return( pWindowStyle->objectId() ); } As the code shows, an AECDbWindowStyle object is created and added to the database. Further, the style is set to some of the settings (although you can use the default), and then override the colors of several components for 2D and 3D representation. The components in this case are the physical parts of the window: glass, frame, sash.
Add a window to the first wall with the add_window function:
OdDbObjectId idWindow01 = add_window( pDatabase, idWindowStyle, idWall1, 10, 10 ); Add_window function code
// Inserts a window into a database using the specified window style. // If idWall parameter is not null it also attaches the window to the wall. // Returns Object ID of newly created window. OdDbObjectId add_window( OdDbDatabasePtr pDatabase, const OdDbObjectId& idStyle, const OdDbObjectId& idWall, double dOffsetAlongX, double dOffsetAlongZ ) { AECDbWindowPtr pWindow = AECDbWindow::CreateAECObject( pDatabase->getModelSpaceId(), idStyle ); pWindow->SetRise( 10 ); pWindow->SetWidth( 40 ); pWindow->SetHeight( 40 ); pWindow->SetOpenPercent( 60 ); pWindow->SetMeasureTo( AECDefs::eomtOutsideFrame ); pWindow->SetLeaf( 10 ); if ( !idWall.isNull() ) { pWindow->AttachWallAnchor( idWall ); AECDbAnchorEntToCurvePtr pAnchor = pWindow->GetAnchor().openObject( OdDb::kForWrite ); pAnchor->GetXParams()->SetOffset( dOffsetAlongX ); pAnchor->GetZParams()->SetOffset( dOffsetAlongZ ); } return( pWindow->objectId() ); } The add_window () function is similar to add_wall () with one difference: the anchor object is used here.
We create the AECDbWindow object and place it in the model space of the base. Then expose some settings to this particular instance of AECDbWindow.
After that we insert the window into the wall. A wall and a window are linked by a special object derived from AECDbAnchorEntToCurve. It contains padding along the x, y, z axes from the beginning of the wall coordinate system to the beginning of the window coordinate system. When you call AttachWallAnchor (), an instance of this object is created and placed in the database. The wall itself does not directly know whether windows are inserted into it or not. Creating an anchor affects another basic mechanism - the relation graph. Relation graph contains relationships between objects - who is attached to whom, who belongs to whom, who owns whom. When the wall is modified, the relation graph will receive a message stating that the AECDbWall object has changed, will pass through all dependencies and will cause the associated objects to be updated (in this case AECDbWindow). So, if we pushed the wall, the windows will move with it, because they will receive a notification from the relation graph. You can access this column and query dependencies for a particular object. The window, in principle, knows to whom it is attached, it stores the link to the created anchor.
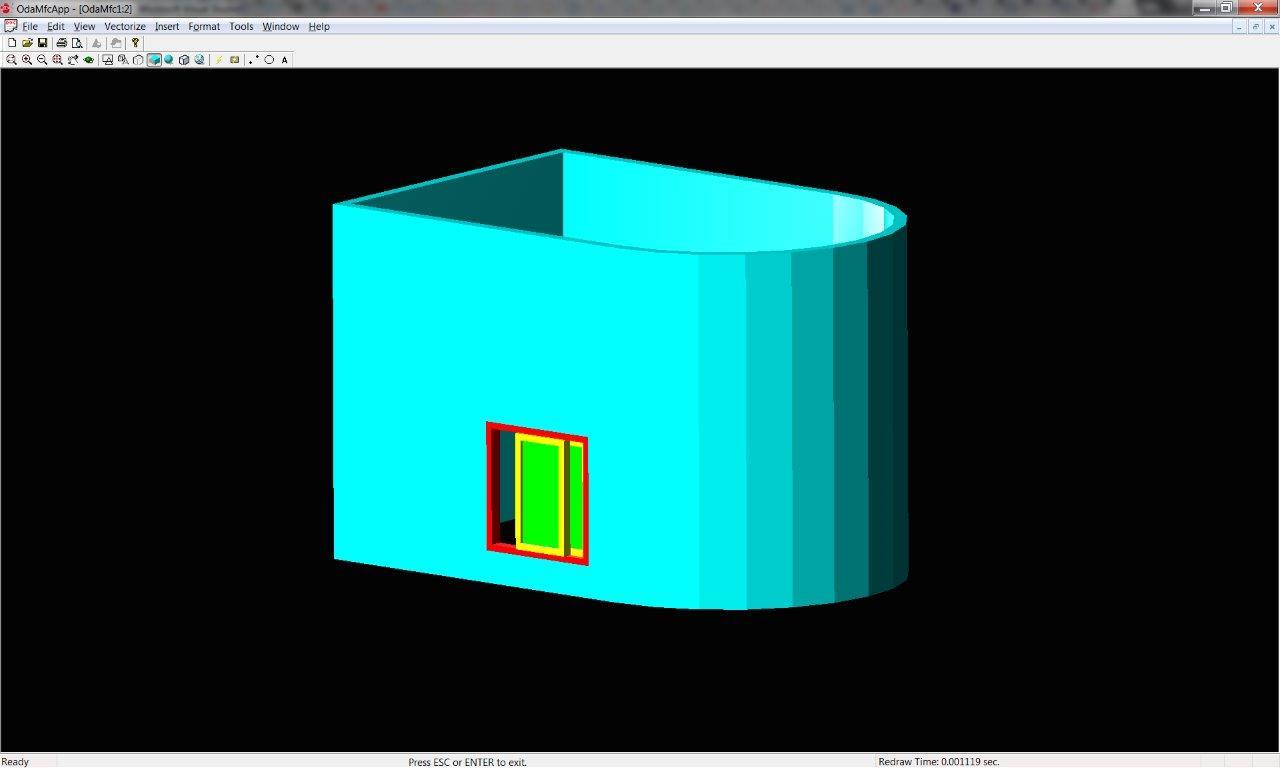
Look what happened:
I specifically changed the color of the walls so that the window was better visible. In the code, your walls should be blue at once, I just selected colors as I wrote the article.
In TA there are a lot of predefined styles and window types, which are specified through enumerations:
enum WindowType { ewtPicture = 1, ewtSingleHung = 2, ewtDoubleHung = 3, ewtAwningTransom = 4, ewtDoubleCasement = 5, ewtGlider = 6, ewtHopperTransom = 7, ewtPassThrough = 8, ewtSingleCasement = 9, ewtSingleHopper = 10, ewtSingleAwning = 11, ewtVerticalPivot = 12, ewtHorizontalPivot = 13, ewtUnevenSingleHung = 14, ewtUnevenDoubleHung = 15 }; enum Shape { esRectangular = 0, esRound = 1, esHalfRound = 2, esQuarterRound = 3, esOval = 4, esArch = 5, esTrapezoid = 6, esGothic = 7, esIsoscelesTriangle = 8, esRightTriangle = 9, esPeakPentagon = 10, esOctagon = 11, esHexagon = 12, esCustom = 13 }; We chose AECDefs :: ewtGlider and AECDefs :: esRectangular, but as you can see, there are many variations of the forms. Using other settings you can create a very complex type of window with an internal pattern on the glass and many doors. And it’s not necessary to draw all this manually or implement it programmatically, you just need to set a few settings for an existing object or style.
In general, all TA objects are complex and have a lot of settings. This gives quite ample opportunities right out of the box.
Add windows to all straight walls:
OdDbObjectId idWindow01 = add_window( pDatabase, idWindowStyle, idWall1, 10, 10 ); OdDbObjectId idWindow02 = add_window( pDatabase, idWindowStyle, idWall1, 60, 10 ); OdDbObjectId idWindow03 = add_window( pDatabase, idWindowStyle, idWall1, 10, 60 ); OdDbObjectId idWindow04 = add_window( pDatabase, idWindowStyle, idWall1, 60, 60 ); OdDbObjectId idWindow05 = add_window( pDatabase, idWindowStyle, idWall2, 10, 10 ); OdDbObjectId idWindow06 = add_window( pDatabase, idWindowStyle, idWall2, 60, 10 ); OdDbObjectId idWindow07 = add_window( pDatabase, idWindowStyle, idWall2, 10, 60 ); OdDbObjectId idWindow08 = add_window( pDatabase, idWindowStyle, idWall2, 60, 60 ); OdDbObjectId idWindow09 = add_window( pDatabase, idWindowStyle, idWall3, 10, 10 ); OdDbObjectId idWindow10 = add_window( pDatabase, idWindowStyle, idWall3, 60, 10 ); OdDbObjectId idWindow11 = add_window( pDatabase, idWindowStyle, idWall3, 10, 60 ); OdDbObjectId idWindow12 = add_window( pDatabase, idWindowStyle, idWall3, 60, 60 ); I did not begin to write the code, but each window can be managed separately: change the percentage of its opening, colors, and so on. And if you change their style, then this change will affect all of them at once.
Adding doors to a drawing
To complete the picture, add the door. For the door we will create a 2D profile for the canvas (a sash with a hole-window), then create a style with this profile, and then we will be able to create door objects of this style. But you can use default styles. Doors, like windows (and all other openings) are attached to the walls with an anchor.
Code add_profile_def, add_door_style, add_door
// Inserts profile definition into a database. // Returns Object ID of newly created profile definition. OdDbObjectId add_profile_def( OdDbDatabasePtr pDatabase ) { OdDbObjectId idProfDef = AECDbProfileDef::CreateAECObject( pDatabase, OD_T("Profile Definition Created By Teigha(R) Architecture") ); AECDbProfileDefPtr pProfileDefinition = idProfDef.openObject( OdDb::kForWrite ); AECGe::Profile2D cProfile; cProfile.resize( 2 ); cProfile[ 0 ].appendVertex( OdGePoint2d( 0, 0 ) ); cProfile[ 0 ].appendVertex( OdGePoint2d( 1, 0 ) ); cProfile[ 0 ].appendVertex( OdGePoint2d( 1, 1 ) ); cProfile[ 0 ].appendVertex( OdGePoint2d( 0, 1 ) ); cProfile[ 0 ].setClosed(); // Forces the contour to be counter-clockwise. // So if the contour is already ccw this call is not needed. cProfile[ 0 ].makeCCW(); cProfile[ 1 ].appendVertex( OdGePoint2d( 0.2, 0.2 ) ); cProfile[ 1 ].appendVertex( OdGePoint2d( 0.2, 0.8 ) ); cProfile[ 1 ].appendVertex( OdGePoint2d( 0.8, 0.8 ) ); cProfile[ 1 ].appendVertex( OdGePoint2d( 0.8, 0.2 ) ); cProfile[ 1 ].setClosed(); cProfile[ 1 ].makeCCW( false ); pProfileDefinition->GetProfile()->Init( cProfile ); return( pProfileDefinition->objectId() ); } // Inserts a door style into a database. // Returns Object ID of newly created door style. OdDbObjectId add_door_style( OdDbDatabasePtr pDatabase, const OdDbObjectId& idProfile ) { OdDbObjectId idDoorStyle = AECDbDoorStyle::CreateAECObject( pDatabase, OD_T("Door Style Created By Teigha(R) Architecture") ); AECDbDoorStylePtr pDoorStyle = idDoorStyle.openObject( OdDb::kForWrite ); pDoorStyle->SetDescription( OD_T("Door Style Description") ); pDoorStyle->SetDictRecordDescription( OD_T("Dialog caption") ); pDoorStyle->SetAutoAdjustToWidthOfWall( true ); pDoorStyle->SetFrameWidth( 2 ); pDoorStyle->SetFrameDepth( 5 ); pDoorStyle->SetStopWidth( 2 ); pDoorStyle->SetStopDepth( 3 ); pDoorStyle->SetShapeAndType( AECDefs::esCustom, AECDefs::edtSingle ); pDoorStyle->SetProfile( idProfile ); pDoorStyle->SetGlassThickness( 1 ); AECDisplayManager cDM( pDatabase ); AECDbDispPropsDoorPtr pOverrideModel = AECDbDispPropsDoor::cast( pDoorStyle->OverrideDispProps( cDM.UpdateDisplayRepresentation( AECDbDispRepDoorModel::desc() ) ).openObject( OdDb::kForWrite ) ); if ( !pOverrideModel.isNull() ) { pOverrideModel->GetPanelComp()->SetColor( colorAt( 1 ) ); pOverrideModel->GetFrameComp()->SetColor( colorAt( 2 ) ); pOverrideModel->GetStopComp()->SetColor( colorAt( 3 ) ); pOverrideModel->GetSwingComp()->SetColor( colorAt( 4 ) ); pOverrideModel->GetGlassComp()->SetColor( colorAt( 5 ) ); } AECDbDispPropsDoorPtr pOverridePlan = AECDbDispPropsDoor::cast( pDoorStyle->OverrideDispProps( cDM.UpdateDisplayRepresentation( AECDbDispRepDoorPlan::desc() ) ).openObject( OdDb::kForWrite ) ); if ( !pOverridePlan.isNull() ) { pOverridePlan->GetPanelComp()->SetColor( colorAt( 1 ) ); pOverridePlan->GetFrameComp()->SetColor( colorAt( 2 ) ); pOverridePlan->GetStopComp()->SetColor( colorAt( 3 ) ); pOverridePlan->GetSwingComp()->SetColor( colorAt( 4 ) ); pOverridePlan->GetDirectionComp()->SetColor( colorAt( 5 ) ); } return( pDoorStyle->objectId() ); } // Inserts a door into a database using the specified door style. // If idWall parameter is not null it also attaches the door to the wall. // Returns Object ID of newly created door. OdDbObjectId add_door( OdDbDatabasePtr pDatabase, const OdDbObjectId& idStyle, const OdDbObjectId& idWall, double dOffsetAlongX, double dOffsetAlongZ ) { AECDbDoorPtr pDoor = AECDbDoor::CreateAECObject( pDatabase->getModelSpaceId(), idStyle ); pDoor->SetRise( 10 ); pDoor->SetWidth( 40 ); pDoor->SetHeight( 50 ); pDoor->SetOpenPercent( 20 ); pDoor->SetMeasureTo( AECDefs::eomtOutsideFrame ); pDoor->SetLeaf( 10 ); if ( !idWall.isNull() ) { pDoor->AttachWallAnchor( idWall ); AECDbAnchorEntToCurvePtr pAnchor = pDoor->GetAnchor().openObject( OdDb::kForWrite ); pAnchor->GetXParams()->SetOffset( dOffsetAlongX ); pAnchor->GetZParams()->SetOffset( dOffsetAlongZ ); } return( pDoor->objectId() ); } And we add in main:
AECDbWallPtr pWall = idWall4.openObject( OdDb::kForRead ); double dLength = pWall->GetLength(); double dOWidth = 40; double dL1 = 10; double dL3 = dLength - dOWidth - 10; double dL2 = dL1 + dOWidth + (dL3 - (dL1 + 2 * dOWidth)) / 2; OdDbObjectId idDoor = add_door ( pDatabase, idDoorStyle, idWall4, dL2, 0 ); There is one new moment here: we open the wall for reading and take its length to calculate the indent.
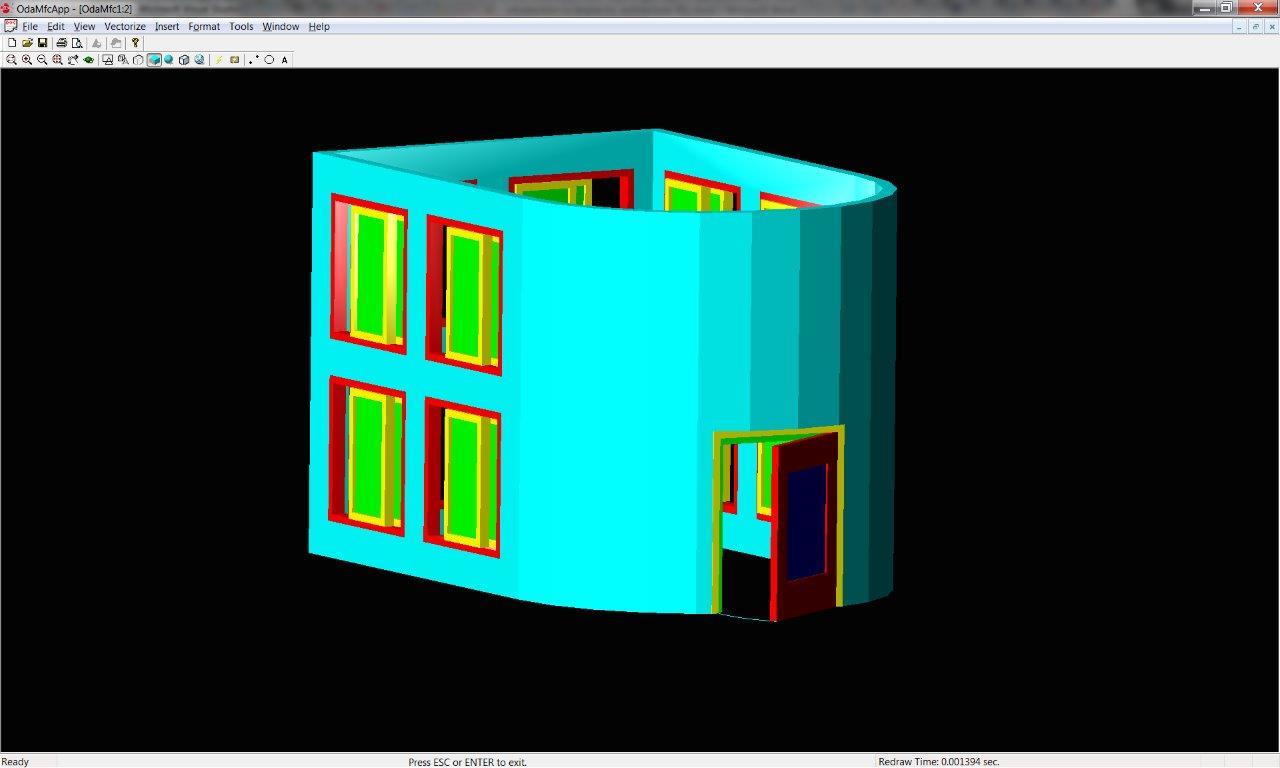
As a result, we have a door inserted into a round wall:
Insert another window into a round wall:
OdDbObjectId idWindow13 = add_window ( pDatabase, idWindowStyle, idWall4, dL1, 10 ); OdDbObjectId idWindow14 = add_window ( pDatabase, idWindowStyle, idWall4, dL3, 10 ); OdDbObjectId idWindow15 = add_window ( pDatabase, idWindowStyle, idWall4, dL1, 60 ); OdDbObjectId idWindow16 = add_window ( pDatabase, idWindowStyle, idWall4, dL2, 60 ); OdDbObjectId idOpening = add_window ( pDatabase, idWindowStyle, idWall4, dL3, 60 ); As a result, we got a very leaky house without a roof and floor:
Adding a roof to a drawing
Let's write the function add_roof ()
Roof function code
void add_roof( OdDbDatabasePtr pDatabase ) { AECGe::Profile2D cProfile; cProfile.resize( 1 ); cProfile.front().appendVertex( OdGePoint2d( 0, 0 ) ); cProfile.front().appendVertex( OdGePoint2d( 0, 110 ) ); cProfile.front().appendVertex( OdGePoint2d( 110, 110 ) ); cProfile.front().appendVertex( OdGePoint2d( 110, 0 ), -1 ); cProfile.front().setClosed(); cProfile.front().makeCCW(); AECDbRoofPtr pRoof = AECDbRoof::CreateAECObject( pDatabase->getModelSpaceId() ); // Initialize roof profile. // By default all edges of Roof Profile have single slope of 45 degrees. pRoof->GetProfile()->Init( cProfile ); pRoof->SetThickness( 2 ); //// Manually modify Roof Segments. AECGeRingSubPtr pRoofLoop = pRoof->GetProfile()->GetRingByIndex( 0 ); if ( !pRoofLoop.isNull() ) { OdUInt32 i, iSize = pRoofLoop->GetSegmentCount(); for ( i = 0; i < iSize; i++ ) { AECGeRoofSegmentSubPtr pSeg = pRoofLoop->GetSegments()->GetAt( i ); pSeg->SetFaceCount(1); pSeg->SetFaceHeightByIndex(0, 110); pSeg->SetBaseHeight(0); pSeg->SetOverhang(10.0); pSeg->SetFaceSlopeByIndex(0, OdaPI4); pSeg->SetSegmentCount(10); } } pRoof->setColorIndex( 3 ); } The roof is created on the basis of a two-dimensional profile, the direction of the bypass of which is counterclockwise. A call to makeCCW () just converts the direction of the traversal, if it was the opposite. This is important, because the algorithm waits for the input of just such a profile and will not work otherwise.
Our profile coincides with the central line of the walls. Further, for each section of the profile, the slope of the roof slope is set, the number of faces to which the ramp will be presented, the rise of the ramp beginning in Z relative to the OXY plane (SetFaceHeightByIndex), and the overhang of the roof (overhang). SetSegmentCount () works only for segments that have a curvature. This value determines the accuracy of the approximation - how many straight line segments will be used to approximate the semicircular segment.
It turned out this roof:
There are a lot of variations of roof settings and you can create a roof of almost any shape - gable, multi-skid, tent, and so on. Each ramp is a separate RoofSlab object that can be edited manually.
Adding overlap to the drawing It
remains to add at least a small imitation of the floor / foundation. To do this, use the slab object (overlap). Let's write the add_slab function
Function code add_slab
void add_slab( OdDbDatabasePtr pDatabase ) { OdDbObjectId idStyle = AECDbSlabStyle::GetAECObject( pDatabase, OD_T("Slab Style") ); if ( idStyle.isNull() ) { idStyle = AECDbSlabStyle::CreateAECObject( pDatabase, OD_T("Slab Style") ); } AECDbSlabStylePtr pStyle = idStyle.openObject( OdDb::kForWrite ); if ( !pStyle.isNull() ) { pStyle->GetComponents()->Clear(); AECSlabStyleCompPtr pCmp = AECSlabStyleComp::createObject(); pCmp->SetName( OD_T("Base") ); pCmp->GetPosition()->GetThickness()->SetUseBaseValue( false ); pCmp->GetPosition()->GetThickness()->SetBaseValue( 6 ); pCmp->GetPosition()->GetThicknessOffset()->SetUseBaseValue( false ); pCmp->GetPosition()->GetThicknessOffset()->SetBaseValue( - 6 ); pStyle->GetComponents()->Insert( pCmp ); } AECDbSlabPtr pSlab = AECDbSlab::CreateAECObject( pDatabase->getModelSpaceId(), idStyle ); { AECGe::Profile2D cBase; cBase.resize( 1 ); cBase.front().appendVertex( OdGePoint2d( -5, -5 ), 1 ); cBase.front().appendVertex( OdGePoint2d( 115, -5 ) ); cBase.front().appendVertex( OdGePoint2d( 115, 115 ) ); cBase.front().appendVertex( OdGePoint2d( -5, 115 ) ); cBase.front().setClosed(); cBase.front().makeCCW(); pSlab->GetSlabFace()->Init( cBase ); } pSlab->SetThickness( 5 ); pSlab->SetVerticalOffset( 0 ); pSlab->SetHorizontalOffset( 0 ); pSlab->SetPivotPoint( OdGePoint3d::kOrigin ); AECDisplayManager cDM( pDatabase ); AECDbDispPropsSlabPtr pOverrideModel = AECDbDispPropsSlab::cast( pSlab->OverrideDispProps( cDM.UpdateDisplayRepresentation( AECDbDispRepSlabModel::desc() ) ).openObject( OdDb::kForWrite ) ); if ( !pOverrideModel.isNull() ) { pOverrideModel->GetBoundaryCompByIndex( 0 )->SetColor( colorAt( 1 ) ); pOverrideModel->GetBaselineComp()->SetColor( colorAt( 4 ) ); pOverrideModel->GetPivotPointComp()->SetColor( colorAt( 5 ) ); pOverrideModel->GetFasciaComp()->SetColor( colorAt( 6 ) ); pOverrideModel->GetSoffitComp()->SetColor( colorAt( 7 ) ); pOverrideModel->GetShrinkWrapBodyComp()->SetColor( colorAt( 8 ) ); } AECDbDispPropsSlabPlanPtr pOverridePlan = AECDbDispPropsSlabPlan::cast( pSlab->OverrideDispProps( cDM.UpdateDisplayRepresentation( AECDbDispRepSlabPlan::desc() ) ).openObject( OdDb::kForWrite ) ); if ( !pOverridePlan.isNull() ) { pOverridePlan->SetIsOverrideCutPlane( false ); pOverridePlan->GetHatchComp()->SetColor( colorAt( 1 ) ); pOverridePlan->GetBelowCutPlaneBodyComp()->SetColor( colorAt( 2 ) ); pOverridePlan->GetAboveCutPlaneBodyComp()->SetColor( colorAt( 3 ) ); pOverridePlan->GetBelowCutPlaneOutlineComp()->SetColor( colorAt( 4 ) ); pOverridePlan->GetAboveCutPlaneOutlineComp()->SetColor( colorAt( 5 ) ); } } In this case, we create a new style of overlap and add components to it. A component is a piece of overlap and contains such parameters as thickness, rise above OXY, name, material, index, etc. The overlap can contain several components that differ in their settings. For example, if they have a different indent from OXY, then one object-overlapping of such a style can draw all the floors and ceilings in a high-rise building.
The style settings apply to a specific object that stores the shape of a given overlap. In this case, we create a slab, and initialize its profile with the same outline as the bottom of the walls, with only a small indentation around the edges.
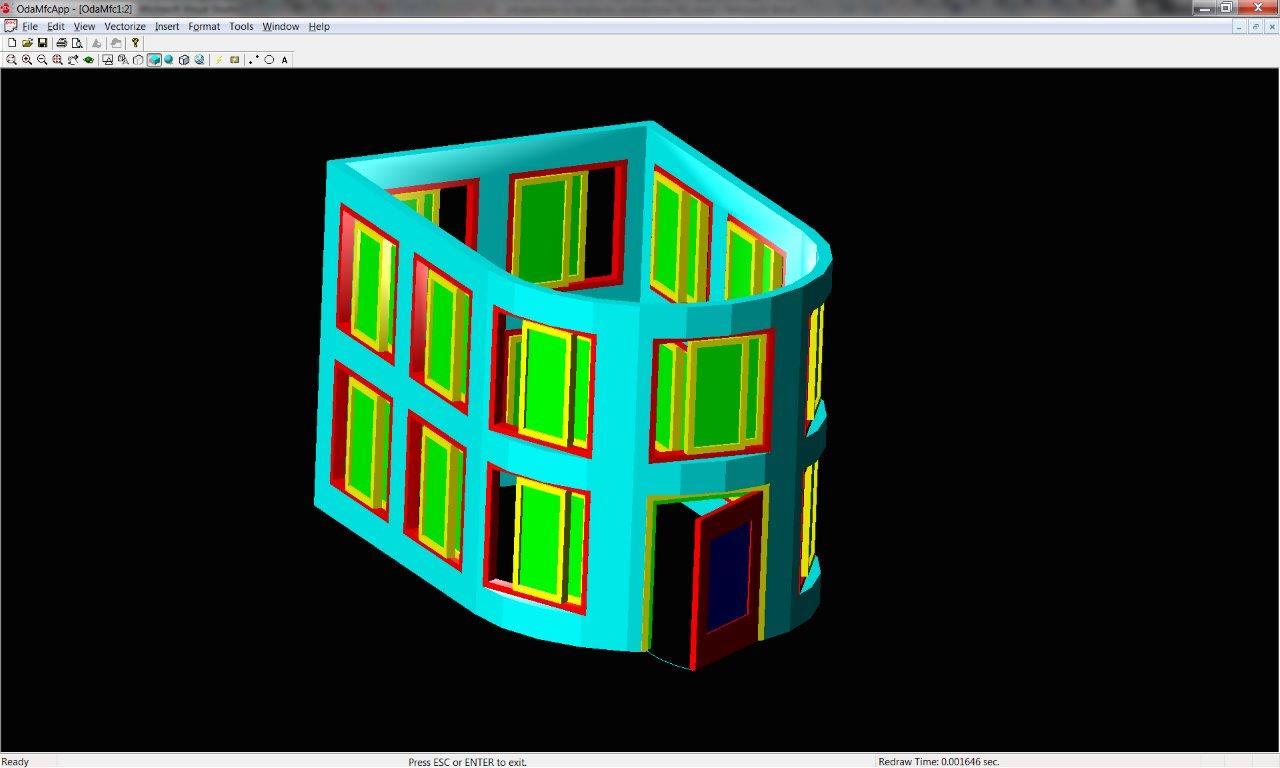
Next comes the work with the display manager to override the colors of the different overlapping components.
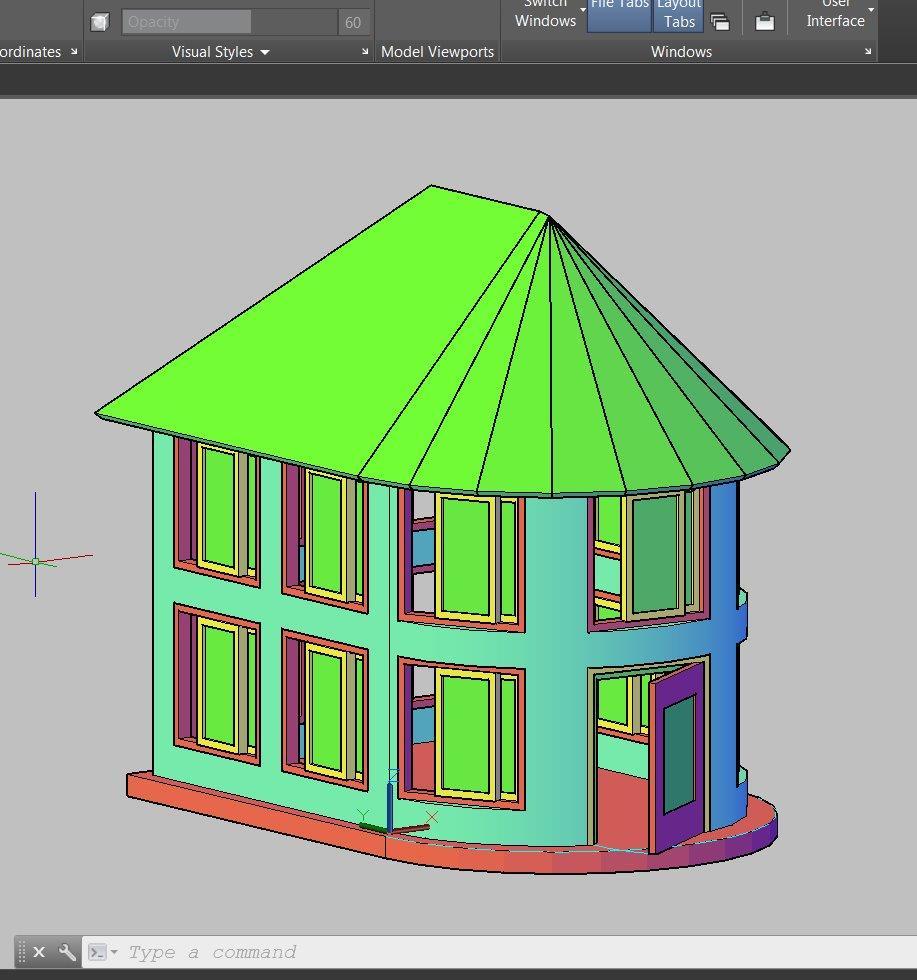
In the final, our house will look like this:
, dwg Autodesk ACA:
, Autocad Architecture. .
Full code
OdDbObjectId add_wall_style( OdDbDatabasePtr pDatabase ) { OdDbObjectId idResult = AECDbWallStyle::CreateAECObject( pDatabase, OD_T("Wall Style Created By Teigha(R) Architecture") ); AECDbWallStylePtr pWallStyle = idResult.openObject( OdDb::kForWrite ); pWallStyle->SetDescription( OD_T("Wall Style Description") ); pWallStyle->SetDictRecordDescription( OD_T("Dialog caption") ); pWallStyle->SetWallWidth( 4 ); pWallStyle->SetWallWidthUsed( true ); pWallStyle->SetBaseHeight( 110 ); pWallStyle->SetBaseHeightUsed( true ); pWallStyle->SetJustification( AECDefs::ewjLeft ); pWallStyle->SetJustificationUsed( true ); pWallStyle->SetAutomaticCleanups( true ); pWallStyle->SetAutomaticCleanupsUsed( true ); pWallStyle->SetCleanupRadius( 4 ); pWallStyle->SetCleanupRadiusUsed( true ); pWallStyle->SetFloorLineOffset( 3 ); pWallStyle->SetFloorLineOffsetUsed( false ); pWallStyle->SetRoofLineOffset( -3 ); pWallStyle->SetRoofLineOffsetUsed( false ); AECDisplayManager cDM( pDatabase ); AECDbDispPropsWallModelPtr pOverrideModel = AECDbDispPropsWallModel::cast( pWallStyle->OverrideDispProps( cDM.UpdateDisplayRepresentation( AECDbDispRepWallModel::desc() ) ).openObject( OdDb::kForWrite ) ); if ( !pOverrideModel.isNull() ) { pOverrideModel->SetIsDisplayOpeningEndcaps( false ); pOverrideModel->GetBoundaryCompByIndex( 0 )->SetColor( colorAt( 4 ) ); } AECDbDispPropsWallPtr pOverridePlan = AECDbDispPropsWall::cast( pWallStyle->OverrideDispProps( cDM.UpdateDisplayRepresentation( AECDbDispRepWallPlan::desc() ) ).openObject( OdDb::kForWrite ) ); if ( !pOverridePlan.isNull() ) { pOverridePlan->GetBoundaryCompByIndex( 0 )->SetColor( colorAt( 4 ) ); } return( pWallStyle->objectId() ); } OdDbObjectId add_wall( OdDbDatabasePtr pDatabase, const OdDbObjectId& idStyle, const OdGePoint2d& ptStart, const OdGePoint2d& ptEnd, double dBulge = 0 ) { AECDbWallPtr pWall = AECDbWall::CreateAECObject( pDatabase->getModelSpaceId(), idStyle ); pWall->Set( ptStart, ptEnd, dBulge ); pWall->SetDescription( OD_T("A Wall") ); /*AECGe::Contour2D cContour; cContour.appendVertex( OdGePoint2d( 0, pWall->GetHeight() ) ); cContour.appendVertex( OdGePoint2d( pWall->GetLength() / 2, pWall->GetHeight() * 1.5 ) ); cContour.appendVertex( OdGePoint2d( pWall->GetLength(), pWall->GetHeight() ) ); AECWallCutLineSubPtr pTop = pWall->CreateTopCutLine(); pTop->SetRawCutLine( cContour );*/ return( pWall->objectId() ); } OdDbObjectId add_window_style( OdDbDatabasePtr pDatabase ) { OdDbObjectId idWStyle = AECDbWindowStyle::CreateAECObject( pDatabase, OD_T("Window Style Created By Teigha(R) Architecture") ); AECDbWindowStylePtr pWindowStyle = idWStyle.openObject( OdDb::kForWrite ); pWindowStyle->SetDescription( OD_T("Window Style Description") ); pWindowStyle->SetDictRecordDescription( OD_T("Dialog caption") ); pWindowStyle->SetAutoAdjustToWidthOfWall( true ); pWindowStyle->SetFrameWidth( 2 ); pWindowStyle->SetFrameDepth( 5 ); pWindowStyle->SetSashWidth( 2 ); pWindowStyle->SetSashDepth( 3 ); pWindowStyle->SetGlassThickness( 1 ); pWindowStyle->SetWindowType( AECDefs::ewtGlider ); pWindowStyle->SetWindowShape( AECDefs::esRectangular ); AECDisplayManager cDM( pDatabase ); AECDbDispPropsWindowPtr pOverrideModel = AECDbDispPropsWindow::cast( pWindowStyle->OverrideDispProps( cDM.UpdateDisplayRepresentation( AECDbDispRepWindowModel::desc() ) ).openObject( OdDb::kForWrite ) ); if ( !pOverrideModel.isNull() ) { pOverrideModel->GetFrameComp()->SetColor( colorAt( 1 ) ); pOverrideModel->GetSashComp()->SetColor( colorAt( 2 ) ); pOverrideModel->GetGlassComp()->SetColor( colorAt( 3 ) ); } AECDbDispPropsWindowPtr pOverridePlan = AECDbDispPropsWindow::cast( pWindowStyle->OverrideDispProps( cDM.UpdateDisplayRepresentation( AECDbDispRepWindowPlan::desc() ) ).openObject( OdDb::kForWrite ) ); if ( !pOverridePlan.isNull() ) { pOverridePlan->GetFrameComp()->SetColor( colorAt( 1 ) ); pOverridePlan->GetSashComp()->SetColor( colorAt( 2 ) ); pOverridePlan->GetGlassComp()->SetColor( colorAt( 3 ) ); } return( pWindowStyle->objectId() ); } // Inserts a window into a database using the specified window style. // If idWall parameter is not null it also attaches the window to the wall. // Returns Object ID of newly created window. OdDbObjectId add_window( OdDbDatabasePtr pDatabase, const OdDbObjectId& idStyle, const OdDbObjectId& idWall, double dOffsetAlongX, double dOffsetAlongZ ) { AECDbWindowPtr pWindow = AECDbWindow::CreateAECObject( pDatabase->getModelSpaceId(), idStyle ); pWindow->SetRise( 10 ); pWindow->SetWidth( 40 ); pWindow->SetHeight( 40 ); pWindow->SetOpenPercent( 60 ); pWindow->SetMeasureTo( AECDefs::eomtOutsideFrame ); pWindow->SetLeaf( 10 ); if ( !idWall.isNull() ) { pWindow->AttachWallAnchor( idWall ); AECDbAnchorEntToCurvePtr pAnchor = pWindow->GetAnchor().openObject( OdDb::kForWrite ); pAnchor->GetXParams()->SetOffset( dOffsetAlongX ); pAnchor->GetZParams()->SetOffset( dOffsetAlongZ ); } return( pWindow->objectId() ); } // Inserts profile definition into a database. // Returns Object ID of newly created profile definition. OdDbObjectId add_profile_def( OdDbDatabasePtr pDatabase ) { OdDbObjectId idProfDef = AECDbProfileDef::CreateAECObject( pDatabase, OD_T("Profile Definition Created By Teigha(R) Architecture") ); AECDbProfileDefPtr pProfileDefinition = idProfDef.openObject( OdDb::kForWrite ); AECGe::Profile2D cProfile; cProfile.resize( 2 ); cProfile[ 0 ].appendVertex( OdGePoint2d( 0, 0 ) ); cProfile[ 0 ].appendVertex( OdGePoint2d( 1, 0 ) ); cProfile[ 0 ].appendVertex( OdGePoint2d( 1, 1 ) ); cProfile[ 0 ].appendVertex( OdGePoint2d( 0, 1 ) ); cProfile[ 0 ].setClosed(); // Forces the contour to be counter-clockwise. // So if the contour is already ccw this call is not needed. cProfile[ 0 ].makeCCW(); cProfile[ 1 ].appendVertex( OdGePoint2d( 0.2, 0.2 ) ); cProfile[ 1 ].appendVertex( OdGePoint2d( 0.2, 0.8 ) ); cProfile[ 1 ].appendVertex( OdGePoint2d( 0.8, 0.8 ) ); cProfile[ 1 ].appendVertex( OdGePoint2d( 0.8, 0.2 ) ); cProfile[ 1 ].setClosed(); cProfile[ 1 ].makeCCW( false ); pProfileDefinition->GetProfile()->Init( cProfile ); return( pProfileDefinition->objectId() ); } // Inserts a door style into a database. // Returns Object ID of newly created door style. OdDbObjectId add_door_style( OdDbDatabasePtr pDatabase, const OdDbObjectId& idProfile ) { OdDbObjectId idDoorStyle = AECDbDoorStyle::CreateAECObject( pDatabase, OD_T("Door Style Created By Teigha(R) Architecture") ); AECDbDoorStylePtr pDoorStyle = idDoorStyle.openObject( OdDb::kForWrite ); pDoorStyle->SetDescription( OD_T("Door Style Description") ); pDoorStyle->SetDictRecordDescription( OD_T("Dialog caption") ); pDoorStyle->SetAutoAdjustToWidthOfWall( true ); pDoorStyle->SetFrameWidth( 2 ); pDoorStyle->SetFrameDepth( 5 ); pDoorStyle->SetStopWidth( 2 ); pDoorStyle->SetStopDepth( 3 ); pDoorStyle->SetShapeAndType( AECDefs::esCustom, AECDefs::edtSingle ); pDoorStyle->SetProfile( idProfile ); pDoorStyle->SetGlassThickness( 1 ); AECDisplayManager cDM( pDatabase ); AECDbDispPropsDoorPtr pOverrideModel = AECDbDispPropsDoor::cast( pDoorStyle->OverrideDispProps( cDM.UpdateDisplayRepresentation( AECDbDispRepDoorModel::desc() ) ).openObject( OdDb::kForWrite ) ); if ( !pOverrideModel.isNull() ) { pOverrideModel->GetPanelComp()->SetColor( colorAt( 1 ) ); pOverrideModel->GetFrameComp()->SetColor( colorAt( 2 ) ); pOverrideModel->GetStopComp()->SetColor( colorAt( 3 ) ); pOverrideModel->GetSwingComp()->SetColor( colorAt( 4 ) ); pOverrideModel->GetGlassComp()->SetColor( colorAt( 5 ) ); } AECDbDispPropsDoorPtr pOverridePlan = AECDbDispPropsDoor::cast( pDoorStyle->OverrideDispProps( cDM.UpdateDisplayRepresentation( AECDbDispRepDoorPlan::desc() ) ).openObject( OdDb::kForWrite ) ); if ( !pOverridePlan.isNull() ) { pOverridePlan->GetPanelComp()->SetColor( colorAt( 1 ) ); pOverridePlan->GetFrameComp()->SetColor( colorAt( 2 ) ); pOverridePlan->GetStopComp()->SetColor( colorAt( 3 ) ); pOverridePlan->GetSwingComp()->SetColor( colorAt( 4 ) ); pOverridePlan->GetDirectionComp()->SetColor( colorAt( 5 ) ); } return( pDoorStyle->objectId() ); } // Inserts a door into a database using the specified door style. // If idWall parameter is not null it also attaches the door to the wall. // Returns Object ID of newly created door. OdDbObjectId add_door( OdDbDatabasePtr pDatabase, const OdDbObjectId& idStyle, const OdDbObjectId& idWall, double dOffsetAlongX, double dOffsetAlongZ ) { AECDbDoorPtr pDoor = AECDbDoor::CreateAECObject( pDatabase->getModelSpaceId(), idStyle ); pDoor->SetRise( 10 ); pDoor->SetWidth( 40 ); pDoor->SetHeight( 50 ); pDoor->SetOpenPercent( 20 ); pDoor->SetMeasureTo( AECDefs::eomtOutsideFrame ); pDoor->SetLeaf( 10 ); if ( !idWall.isNull() ) { pDoor->AttachWallAnchor( idWall ); AECDbAnchorEntToCurvePtr pAnchor = pDoor->GetAnchor().openObject( OdDb::kForWrite ); pAnchor->GetXParams()->SetOffset( dOffsetAlongX ); pAnchor->GetZParams()->SetOffset( dOffsetAlongZ ); } return( pDoor->objectId() ); } void add_roof( OdDbDatabasePtr pDatabase ) { AECGe::Profile2D cProfile; cProfile.resize( 1 ); cProfile.front().appendVertex( OdGePoint2d( 0, 0 ) ); cProfile.front().appendVertex( OdGePoint2d( 0, 110 ) ); cProfile.front().appendVertex( OdGePoint2d( 110, 110 ) ); cProfile.front().appendVertex( OdGePoint2d( 110, 0 ), -1 ); cProfile.front().setClosed(); cProfile.front().makeCCW(); AECDbRoofPtr pRoof = AECDbRoof::CreateAECObject( pDatabase->getModelSpaceId() ); // Initialize roof profile. // By default all edges of Roof Profile have single slope of 45 degrees. pRoof->GetProfile()->Init( cProfile ); pRoof->SetThickness( 2 ); //// Manually modify Roof Segments. AECGeRingSubPtr pRoofLoop = pRoof->GetProfile()->GetRingByIndex( 0 ); if ( !pRoofLoop.isNull() ) { OdUInt32 i, iSize = pRoofLoop->GetSegmentCount(); for ( i = 0; i < iSize; i++ ) { AECGeRoofSegmentSubPtr pSeg = pRoofLoop->GetSegments()->GetAt( i ); pSeg->SetFaceCount(1); pSeg->SetFaceHeightByIndex(0, 110); pSeg->SetBaseHeight(0); pSeg->SetOverhang(10.0); pSeg->SetFaceSlopeByIndex(0, OdaPI4); pSeg->SetSegmentCount(10); } } pRoof->setColorIndex( 3 ); } void add_slab( OdDbDatabasePtr pDatabase ) { OdDbObjectId idStyle = AECDbSlabStyle::GetAECObject( pDatabase, OD_T("Slab Style") ); if ( idStyle.isNull() ) { idStyle = AECDbSlabStyle::CreateAECObject( pDatabase, OD_T("Slab Style") ); } AECDbSlabStylePtr pStyle = idStyle.openObject( OdDb::kForWrite ); if ( !pStyle.isNull() ) { pStyle->GetComponents()->Clear(); AECSlabStyleCompPtr pCmp = AECSlabStyleComp::createObject(); pCmp->SetName( OD_T("Base") ); pCmp->GetPosition()->GetThickness()->SetUseBaseValue( false ); pCmp->GetPosition()->GetThickness()->SetBaseValue( 6 ); pCmp->GetPosition()->GetThicknessOffset()->SetUseBaseValue( false ); pCmp->GetPosition()->GetThicknessOffset()->SetBaseValue( - 6 ); pStyle->GetComponents()->Insert( pCmp ); } AECDbSlabPtr pSlab = AECDbSlab::CreateAECObject( pDatabase->getModelSpaceId(), idStyle ); { AECGe::Profile2D cBase; cBase.resize( 1 ); cBase.front().appendVertex( OdGePoint2d( -5, -5 ), 1 ); cBase.front().appendVertex( OdGePoint2d( 115, -5 ) ); cBase.front().appendVertex( OdGePoint2d( 115, 115 ) ); cBase.front().appendVertex( OdGePoint2d( -5, 115 ) ); cBase.front().setClosed(); cBase.front().makeCCW(); pSlab->GetSlabFace()->Init( cBase ); } pSlab->SetThickness( 5 ); pSlab->SetVerticalOffset( 0 ); pSlab->SetHorizontalOffset( 0 ); pSlab->SetPivotPoint( OdGePoint3d::kOrigin ); AECDisplayManager cDM( pDatabase ); AECDbDispPropsSlabPtr pOverrideModel = AECDbDispPropsSlab::cast( pSlab->OverrideDispProps( cDM.UpdateDisplayRepresentation( AECDbDispRepSlabModel::desc() ) ).openObject( OdDb::kForWrite ) ); if ( !pOverrideModel.isNull() ) { pOverrideModel->GetBoundaryCompByIndex( 0 )->SetColor( colorAt( 1 ) ); pOverrideModel->GetBaselineComp()->SetColor( colorAt( 4 ) ); pOverrideModel->GetPivotPointComp()->SetColor( colorAt( 5 ) ); pOverrideModel->GetFasciaComp()->SetColor( colorAt( 6 ) ); pOverrideModel->GetSoffitComp()->SetColor( colorAt( 7 ) ); pOverrideModel->GetShrinkWrapBodyComp()->SetColor( colorAt( 8 ) ); } AECDbDispPropsSlabPlanPtr pOverridePlan = AECDbDispPropsSlabPlan::cast( pSlab->OverrideDispProps( cDM.UpdateDisplayRepresentation( AECDbDispRepSlabPlan::desc() ) ).openObject( OdDb::kForWrite ) ); if ( !pOverridePlan.isNull() ) { pOverridePlan->SetIsOverrideCutPlane( false ); pOverridePlan->GetHatchComp()->SetColor( colorAt( 1 ) ); pOverridePlan->GetBelowCutPlaneBodyComp()->SetColor( colorAt( 2 ) ); pOverridePlan->GetAboveCutPlaneBodyComp()->SetColor( colorAt( 3 ) ); pOverridePlan->GetBelowCutPlaneOutlineComp()->SetColor( colorAt( 4 ) ); pOverridePlan->GetAboveCutPlaneOutlineComp()->SetColor( colorAt( 5 ) ); } } class MyServices : public ExSystemServices, public ExHostAppServices { protected: ODRX_USING_HEAP_OPERATORS(ExSystemServices); }; int wmain(int argc, wchar_t* argv[]) { // Initialize TD with system services. // And create single instance of hostapp services // for TD database creation. OdStaticRxObject<MyServices> svcs; odInitialize( &svcs ); odgsInitialize(); // Loading of all public Teigha Architecture DRX modules. // Note that not all calls are necessary for some of them depend on others // but here we list all of them. // // If a program uses TD doesn't modify or create binary files // it may not load any of DRX modules on start because they will be loaded automatically. // But if a program modifies or creates binary files then it is highly recommended // to load all DRX modules program uses. ::odrxDynamicLinker()->loadApp( OD_T("AecBase") ); ::odrxDynamicLinker()->loadApp( OD_T("AecArchBase") ); ::odrxDynamicLinker()->loadApp( OD_T("AecArchDACHBase") ); ::odrxDynamicLinker()->loadApp( OD_T("AecScheduleData") ); ::odrxDynamicLinker()->loadApp( OD_T("AecSchedule") ); ::odrxDynamicLinker()->loadApp( OD_T("AecStructureBase") ); // Create empty TD database. OdDbDatabasePtr pDatabase = svcs.createDatabase();; // Initialize database with default Teigha Architecture content. AECArchDACHBaseDatabase( pDatabase ).Init(); AECScheduleDatabase( pDatabase ).Init(); AECStructureBaseDatabase( pDatabase ).Init(); init_display_system( pDatabase ); OdDbObjectId idWallStyle = add_wall_style( pDatabase ); OdDbObjectId idWall1 = add_wall( pDatabase, idWallStyle, OdGePoint2d( 0, 0 ), OdGePoint2d( 0, 110 ) ); OdDbObjectId idWall2 = add_wall( pDatabase, idWallStyle, OdGePoint2d( 0, 110 ), OdGePoint2d( 110, 110 ) ); OdDbObjectId idWall3 = add_wall( pDatabase, idWallStyle, OdGePoint2d( 110, 110 ), OdGePoint2d( 110, 0 ) ); OdDbObjectId idWall4 = add_wall( pDatabase, idWallStyle, OdGePoint2d( 110, 0 ), OdGePoint2d( 0, 0 ), -1 ); AECDbWallPtr ptWall = AECDbWall::cast( idWall1.openObject( OdDb::kForRead ) ); OdDbObjectId idWindowStyle = add_window_style( pDatabase ); OdDbObjectId idWindow01 = add_window( pDatabase, idWindowStyle, idWall1, 10, 10 ); OdDbObjectId idWindow02 = add_window( pDatabase, idWindowStyle, idWall1, 60, 10 ); OdDbObjectId idWindow03 = add_window( pDatabase, idWindowStyle, idWall1, 10, 60 ); OdDbObjectId idWindow04 = add_window( pDatabase, idWindowStyle, idWall1, 60, 60 ); OdDbObjectId idWindow05 = add_window( pDatabase, idWindowStyle, idWall2, 10, 10 ); OdDbObjectId idWindow06 = add_window( pDatabase, idWindowStyle, idWall2, 60, 10 ); OdDbObjectId idWindow07 = add_window( pDatabase, idWindowStyle, idWall2, 10, 60 ); OdDbObjectId idWindow08 = add_window( pDatabase, idWindowStyle, idWall2, 60, 60 ); OdDbObjectId idWindow09 = add_window( pDatabase, idWindowStyle, idWall3, 10, 10 ); OdDbObjectId idWindow10 = add_window( pDatabase, idWindowStyle, idWall3, 60, 10 ); OdDbObjectId idWindow11 = add_window( pDatabase, idWindowStyle, idWall3, 10, 60 ); OdDbObjectId idWindow12 = add_window( pDatabase, idWindowStyle, idWall3, 60, 60 ); OdDbObjectId idProfile = add_profile_def( pDatabase ); OdDbObjectId idDoorStyle = add_door_style( pDatabase, idProfile ); AECDbWallPtr pWall = idWall4.openObject( OdDb::kForRead ); double dLength = pWall->GetLength(); double dOWidth = 40; double dL1 = 10; double dL3 = dLength - dOWidth - 10; double dL2 = dL1 + dOWidth + (dL3 - (dL1 + 2 * dOWidth)) / 2; OdDbObjectId idDoor = add_door ( pDatabase, idDoorStyle, idWall4, dL2, 0 ); OdDbObjectId idWindow13 = add_window ( pDatabase, idWindowStyle, idWall4, dL1, 10 ); OdDbObjectId idWindow14 = add_window ( pDatabase, idWindowStyle, idWall4, dL3, 10 ); OdDbObjectId idWindow15 = add_window ( pDatabase, idWindowStyle, idWall4, dL1, 60 ); OdDbObjectId idWindow16 = add_window ( pDatabase, idWindowStyle, idWall4, dL2, 60 ); OdDbObjectId idOpening = add_window ( pDatabase, idWindowStyle, idWall4, dL3, 60 ); add_roof(pDatabase); add_slab(pDatabase); // Perform "zoom extents" on model space. { OdDbViewportTablePtr pVT = pDatabase->getViewportTableId().openObject( OdDb::kForRead ); OdDbViewportTableRecordPtr pV = pVT->getActiveViewportId().openObject( OdDb::kForWrite ); pV->zoomExtents(); } OdWrFileBuf cBuffer( "H:\\TA_test.dwg" ); pDatabase->writeFile( &cBuffer, OdDb::kDwg, OdDb::kDHL_CURRENT ); odgsUninitialize(); odUninitialize(); return 0; } Total
Teigha , , dwg .
, , – TA Teigha dwg .
Source: https://habr.com/ru/post/280284/
All Articles