Crumbled Tiger, Hidden Canyon
Jeff Lester worked on creating visual effects for the game Far Cry 4. We publish a translation of the material, in which Jeff tells in detail how a tiger can be made to disappear.
In the world of Shangri-La from Far Cry 4, many things turn into dust. For example, my friend Tiger.
Or, as Max Scovill joked in his video , “cocaine is poured from a tiger”. I think it is better not to watch this video at work: personally, I could not help laughter.
')
I did not participate in the creation of “powder” visual effects, a team of experts worked on this: Trisha Penman, Craig Alguire and John Lee. In Shangri-La, a lot of special effects, and, I must say, the guys tried their best.
My task was to make the tiger's body gradually dissolve into the air. The whole process lasts only a couple of seconds, so that one could not particularly bother.
Prototype
First of all, I sketched a prototype in Unity3D, using resources from the Modo library:

I drew a black and white mask for the alpha channel and processed it using the threshold method (by analogy with the Isohelium adjustment layer in Photoshop). The edges of the alpha channel are slightly blurred: in this zone, I added a repeating fiery texture. I will not go into details, because this technique is as old as the world, and on the Internet you can find a lot of training materials about its use in Unity / UE4. As it turned out, a similar technique is used in the game to create the effect of burning posters, so I decided to borrow it, so as not to delve into the shaders myself.
And here canyons?
For map detail, I used the World Machine tool. In the end, I had to make about thirty black and white cards for the effect of dispersion on different objects.
The working process
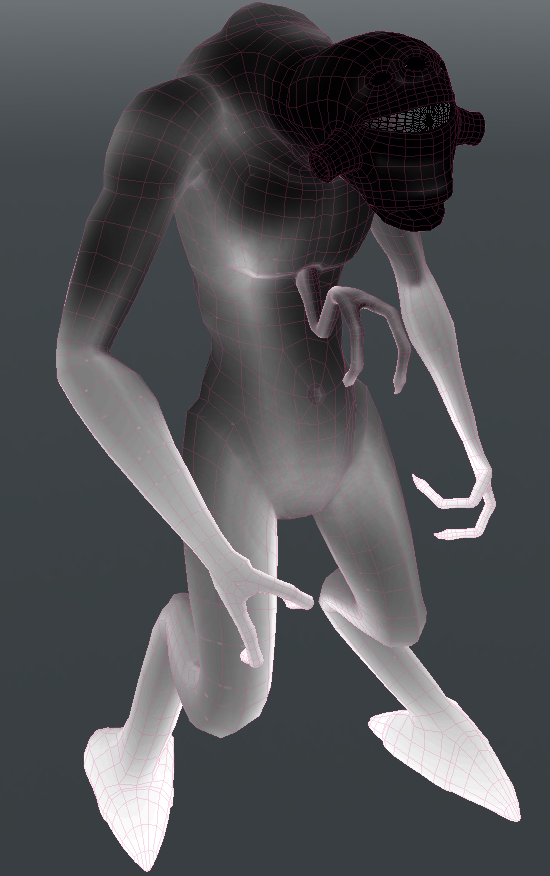
As an example, I’ll take a vorigont model from Half-Life. I have long been going to bring it to mind, but all the time I save it for later, and so there will be at least some benefit from it. First, for most assets, I made a rough sketch of a black and white mask in Modo:
Then I exported it to World Machine as an elevation map and added erosion:

I transferred the finished flow map back to Photoshop and superimposed it on top of the original black and white mask, adding the Noise effect. After a quick setup in UE4, this is what happened:
Not a work of art, but for ten minutes of work it is very even nothing. Drawing a mask on important objects may take longer, but the final effect lasts only a couple of dozen frames, so most can be left as is.
Improvement and automation
In my opinion, it is much more convenient to generate a mask in Houdini than to draw it manually.
• Set the color of the vertices with which the scattering should begin.
• Use solver to distribute the values of vertices in each frame (or in texture space).
• Diversify the transition based on normals and surface smoothness (as an option).
• At the same time, erosion or other similar effect can be made.
However, such a simple effect does not need to spend too much time. You can try to add some volume effect inside the objects (although it is better to consult a graphic programmer here).
Other examples
I did the same for almost all of the characters, except for a few (CAUTION: SPOILER!) , Including the giant eagle boss, which, as I recall, Niels Meyer and Steve Fabok did. Apart from my buddy Tigers, here are some more examples:
Bell chain

If you look closely, you will notice that the links of the chain disappear one after the other. It was not easy to do this: the material used did not support 2 UV channels, and all links were turned to the same place in the texture (which is absolutely logical). Fortunately, the material allowed us to change the tiling mask by UV coordinates with respect to other textures. Thus, we have made a stack of UV shells of links in the UV space:
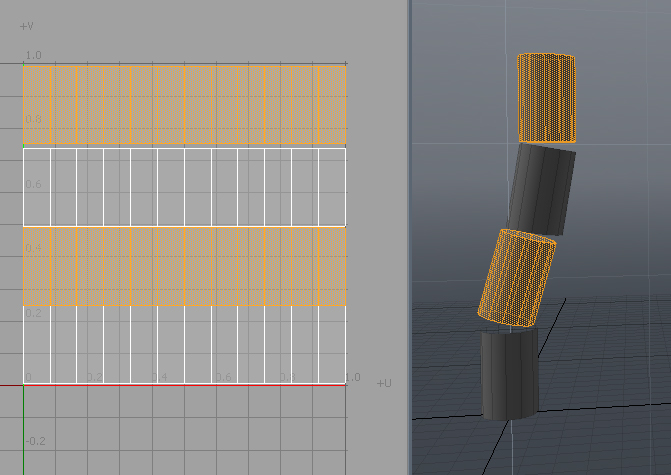
So, the mask dissipates as the value of V goes from zero to one. If we had 15 links, we would need to divide this process into 15 steps for all maps (Diffuse, Normal, Roughness), leaving a single repetition of the mask texture. Edwin Chan was responsible for creating assets for the chain, and I could ask him to set everything up manually in 3ds Max. But I often tugged him about tuning the prayer wheels, and that would be too much. The bell chain had 3-4 configurations, with several levels of detail for different platforms each. Therefore, I wrote MAXScript to pack all the UV coordinates in a valid range. For such a quick effect, I did a lot of work, but it was worth it.
Precious stones for onions
Although these stones did not come out exactly as planned, I was pleased with the result. The emitting material did not support the Threshold parameter for the alpha channel. Therefore, there were 2 layers in the mesh: luminous and non-luminous. Interestingly, the non-luminous layer just disappears, and as it scatters on the surface, a glow appears. A little confusing, but the result is obvious.
In the world of Shangri-La from Far Cry 4, many things turn into dust. For example, my friend Tiger.
Or, as Max Scovill joked in his video , “cocaine is poured from a tiger”. I think it is better not to watch this video at work: personally, I could not help laughter.
')
I did not participate in the creation of “powder” visual effects, a team of experts worked on this: Trisha Penman, Craig Alguire and John Lee. In Shangri-La, a lot of special effects, and, I must say, the guys tried their best.
My task was to make the tiger's body gradually dissolve into the air. The whole process lasts only a couple of seconds, so that one could not particularly bother.
Prototype
First of all, I sketched a prototype in Unity3D, using resources from the Modo library:
I drew a black and white mask for the alpha channel and processed it using the threshold method (by analogy with the Isohelium adjustment layer in Photoshop). The edges of the alpha channel are slightly blurred: in this zone, I added a repeating fiery texture. I will not go into details, because this technique is as old as the world, and on the Internet you can find a lot of training materials about its use in Unity / UE4. As it turned out, a similar technique is used in the game to create the effect of burning posters, so I decided to borrow it, so as not to delve into the shaders myself.
And here canyons?
For map detail, I used the World Machine tool. In the end, I had to make about thirty black and white cards for the effect of dispersion on different objects.
The working process
As an example, I’ll take a vorigont model from Half-Life. I have long been going to bring it to mind, but all the time I save it for later, and so there will be at least some benefit from it. First, for most assets, I made a rough sketch of a black and white mask in Modo:
Then I exported it to World Machine as an elevation map and added erosion:
I transferred the finished flow map back to Photoshop and superimposed it on top of the original black and white mask, adding the Noise effect. After a quick setup in UE4, this is what happened:
Not a work of art, but for ten minutes of work it is very even nothing. Drawing a mask on important objects may take longer, but the final effect lasts only a couple of dozen frames, so most can be left as is.
Improvement and automation
In my opinion, it is much more convenient to generate a mask in Houdini than to draw it manually.
• Set the color of the vertices with which the scattering should begin.
• Use solver to distribute the values of vertices in each frame (or in texture space).
• Diversify the transition based on normals and surface smoothness (as an option).
• At the same time, erosion or other similar effect can be made.
However, such a simple effect does not need to spend too much time. You can try to add some volume effect inside the objects (although it is better to consult a graphic programmer here).
Other examples
I did the same for almost all of the characters, except for a few (CAUTION: SPOILER!) , Including the giant eagle boss, which, as I recall, Niels Meyer and Steve Fabok did. Apart from my buddy Tigers, here are some more examples:
Bell chain
If you look closely, you will notice that the links of the chain disappear one after the other. It was not easy to do this: the material used did not support 2 UV channels, and all links were turned to the same place in the texture (which is absolutely logical). Fortunately, the material allowed us to change the tiling mask by UV coordinates with respect to other textures. Thus, we have made a stack of UV shells of links in the UV space:
So, the mask dissipates as the value of V goes from zero to one. If we had 15 links, we would need to divide this process into 15 steps for all maps (Diffuse, Normal, Roughness), leaving a single repetition of the mask texture. Edwin Chan was responsible for creating assets for the chain, and I could ask him to set everything up manually in 3ds Max. But I often tugged him about tuning the prayer wheels, and that would be too much. The bell chain had 3-4 configurations, with several levels of detail for different platforms each. Therefore, I wrote MAXScript to pack all the UV coordinates in a valid range. For such a quick effect, I did a lot of work, but it was worth it.
Precious stones for onions
Although these stones did not come out exactly as planned, I was pleased with the result. The emitting material did not support the Threshold parameter for the alpha channel. Therefore, there were 2 layers in the mesh: luminous and non-luminous. Interestingly, the non-luminous layer just disappears, and as it scatters on the surface, a glow appears. A little confusing, but the result is obvious.
Source: https://habr.com/ru/post/280177/
All Articles