Configuring Xamarin Studio to fully work with the code
When meeting with Xamarin, developers are usually primarily confused by Xamarin Studio, which sometimes has to be used for one reason or another.
Also, the price of the Business edition ($ 1 per year) and Indie ($ 25 per month) can be a serious argument to use Xamarin Studio on an ongoing basis not only iOS, but also Android developers (hopefully, after buying Microsoft will make adequate prices on these licenses).
IDE Xamarin Studio (XS) actually knows how much more than it might seem at the beginning with the default settings. How to set up and squeeze more from Xamarin Studio, will be discussed further
')
Below we consider the following settings:
Environment / Language
Environment / Key Bindings (Hotkeys)
Text Editor / General -> Enable Code Folding
Text Editor / Markers and Rules (Markers and Lines)
Text Editor / Behavior (Options)
Text Editor / Code completion (AutoComplete Code)
Text Editor / Syntax Highlighting
Text Editor / Source Analyzes
Source Code / Code Formatting / C # source code
and opportunities that often go unnoticed by newbies:
Refactoring (Alt + Enter)
Smart search
Plugins
Access to settings on MacOS (Xamarin Studio -> Preferences) and Windows (Tools -> Options) are different, but in general the settings themselves are the same (except for the hotkey settings).
For regular MacOS users, it may seem unusual that all changed settings are not saved immediately after the change. You must click "OK" to apply the changes.

Personally, I find it more convenient to use the English-language interface, and I recommend using only this localization, even if you are experiencing some difficulties, but it is still more convenient for some developers to use the Russian-language interface.
Hotkeys can significantly increase developer productivity. For the first time, it makes sense to keep on hand the most popular hot key combinations: for MacOS ( www.syntaxismyui.com/wp-content/uploads/2014/09/Xamarin-Studio-Keyboard-Shortcuts.pdf ) and for Windows ( developer.telerik .com / announcements / xamarin-studio-cheat-sheet-free-pdf-download )
Also in the Windows version, the option of pre-installed schemes is available, and you can select the Visual Studio scheme. Next will be referred to hotkeys for XS with default settings.

This option provides the ability to collapse such pieces of code as the method body, regions, etc. Convenient to use with keyboard shortcuts:
Collapse / expand all:
(MacOS) Alt + Shift + Cmd + Arrow Right
(Windows) Ctrl + Shift + A
Collapse / expand current code:
(MacOS) Alt + Cmd + Left Arrow
(Windows) Ctrl + Shift + M
The most interesting options in the list are:

In the end, I for myself preferred the following settings for this menu item:
Go

I personally prefer not to use this opportunity, however many colleagues include this option and are quite pleased with its behavior.
Unfortunately, Xamarin Studio does not have a full dark theme, but here you can choose a dark theme for the main code window. (Personally, I prefer to use the light theme and usually put the scheme VIsual Studio).
A bit of the Resharper plugin in Xamarin Studio. Analyze the code on the fly as Resharper does. It may help to save you a lot of time for future debugging of the code for any minor bugs / typos, etc. In my opinion, the option should be enabled by default.

This completes the review of settings, now let's look at a couple of unobvious moments for new users using IDE Xamarin Studio.
Unfortunately, Resharper is not available for Xamarin Studio, and there are high hopes for JetBrains IDE Rider. However, a little Resharper (and, moreover, completely free), we have the opportunity to receive.
Opportunities XS is noticeably poorer, and those that are, work worse than in Resharper.
Alt + Enter for code refactoring is unlikely to require submission to users of JetBrains products. In XS, support for this shortcut is present, but its behavior may surprise:
Consider the example of Alt + Enter on the newly typed and unrecognized word:
Unfortunately, the full list appears if the cursor is inside a word. So, for example, additional refactoring options will appear if, after typing, press, for example, the left arrow to get inside the word, and then press Alt + Enter.

This behavior occurs in many places, including code generation.
Cmd + I (Alt + Insert for Windows).
Some support for code generation is also present, but its behavior is also not entirely obvious. So, for example, by typing a new class and pressing the Cmd + I combination (or Alt + Insert on Windows), you will get a complete list of features only if you have at least one method or field:
I do not fully understand the logic of the implementation of this functionality (for example, why can't a constructor be added to the newly created and, accordingly, empty class?)
Another great feature of Xamarin Studio, which novices do not notice for a very long time, is a smart search for characters in the code (the search box in the upper right corner).
The first time you use this feature (especially if you get focus through hotkeys), you may have a bug: the field receives focus, but nothing is printed in it. The bug does not always manifest itself and may require restarting XS in order for this functionality to work.
To go to this window in XS, the following shortcuts are preset:
Focus in the search box:
Cmd +. for macOS
Ctrl + for Windows
Search by type only:
Shift + Cmd + T (MacOS)
Ctrl + Shift + T (Windows)
Search by file name:
Shift + Cmd + D (MacOS)
Alt + Shift + O (Windows)
For example, if you have a MapReaderViewModel class, then you can search for this class by several parameters, for example:
By abbreviation: MRVM
As part of the names: MapModel
Partially abbreviated, etc .: RM

If you are still using the good old Ctrl + F, then I highly recommend to quickly master this wonderful opportunity, which can save you a lot of time when navigating through the code.
The list of the most frequently used keyboard shortcuts can be found at the links in clause 2, but I would like to separately mention this pair of keyboard shortcuts, which is very often useful when coding:
Cmd + D (F12 for Windows). Transition to definition.
Shfit + Cmd + R (Shfit + F12 for Windows). Search all links.
The set of plug-ins for Xamarin Studio is much smaller compared to the set of plug-ins for Visual Studio. Nevertheless, quite interesting plug-ins come across in this collection, for example, the JSON Copy plugin, which allows you to generate a C # class with ready-made attributes:
For example, after installing this plugin, copying the following Json type to the clipboard:
{"Menu": {"id": "file", "value": "File", "popup": {"menuitem": [{"value": "New", "onclick": "CreateNewDoc ()" }, {"Value": "Open", "onclick": "OpenDoc ()"}, {"value": "Close", "onclick": "CloseDoc ()"}]}}}
We can generate the corresponding C # classes for deserialization directly in Xamarin Studio via the menu:
Edit -> Patse JSON as classes
As a result, we get the following code:
It remains only to connect the library Json.NET (Nuget package Newtonsoft.Json), if it was not connected before. This wonderful plugin can save you a huge amount of time when developing a client for any service.
By default, objects are generated with the internal modifier. You can change the modifier to public in Preferences -> Other / Json Copy
This completes the overview of the basic settings. If you have already used Xamarin Studio before, I suggest sharing in the comments not mentioned settings that make life easier for you personally.
I also plan to publish a series of articles and I will be glad to know which topic is most interesting for you.
Also, the price of the Business edition ($ 1 per year) and Indie ($ 25 per month) can be a serious argument to use Xamarin Studio on an ongoing basis not only iOS, but also Android developers (hopefully, after buying Microsoft will make adequate prices on these licenses).
IDE Xamarin Studio (XS) actually knows how much more than it might seem at the beginning with the default settings. How to set up and squeeze more from Xamarin Studio, will be discussed further
')
Below we consider the following settings:
Environment / Language
Environment / Key Bindings (Hotkeys)
Text Editor / General -> Enable Code Folding
Text Editor / Markers and Rules (Markers and Lines)
Text Editor / Behavior (Options)
Text Editor / Code completion (AutoComplete Code)
Text Editor / Syntax Highlighting
Text Editor / Source Analyzes
Source Code / Code Formatting / C # source code
and opportunities that often go unnoticed by newbies:
Refactoring (Alt + Enter)
Smart search
Plugins
Access to settings on MacOS (Xamarin Studio -> Preferences) and Windows (Tools -> Options) are different, but in general the settings themselves are the same (except for the hotkey settings).
For regular MacOS users, it may seem unusual that all changed settings are not saved immediately after the change. You must click "OK" to apply the changes.
Language (Environment / Language)
Personally, I find it more convenient to use the English-language interface, and I recommend using only this localization, even if you are experiencing some difficulties, but it is still more convenient for some developers to use the Russian-language interface.
Hot Keys (Environment / Key Bindings)
Hotkeys can significantly increase developer productivity. For the first time, it makes sense to keep on hand the most popular hot key combinations: for MacOS ( www.syntaxismyui.com/wp-content/uploads/2014/09/Xamarin-Studio-Keyboard-Shortcuts.pdf ) and for Windows ( developer.telerik .com / announcements / xamarin-studio-cheat-sheet-free-pdf-download )
Also in the Windows version, the option of pre-installed schemes is available, and you can select the Visual Studio scheme. Next will be referred to hotkeys for XS with default settings.
Code folding (Text Editor / General -> Enable Code Folding)
This option provides the ability to collapse such pieces of code as the method body, regions, etc. Convenient to use with keyboard shortcuts:
Collapse / expand all:
(MacOS) Alt + Shift + Cmd + Arrow Right
(Windows) Ctrl + Shift + A
Collapse / expand current code:
(MacOS) Alt + Cmd + Left Arrow
(Windows) Ctrl + Shift + M
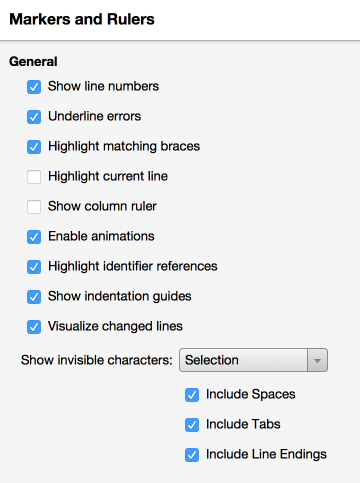
Markers and lines (Text Editor / Markers and Rules)
The most interesting options in the list are:
Show line numbers
(show line numbers)Highlight matching braces
(highlight the corresponding opening / closing brackets)Highlight identifier references
(highlight links) - it is very convenient to immediately see where the variable is used:Show invisible character
(Display invisible characters)In the end, I for myself preferred the following settings for this menu item:
Text Editor / Behavior (Options)
Go
Insert matching brace
- automatically adds a closing bracket when typing an opening bracket. This option also changes the behavior for the selected text when typing the opening bracket. Instead of replacing text, the entire selected text is wrapped with opening and closing parentheses. In this case, the selection is removed with the cursor at the end of the text behind the closing bracket.Text Editor / Code completion (AutoComplete Code)
Show completion list after a character is typed
- option, fortunately, is enabled by default, but it makes sense to double-check.Show import items
- in contrast to the previous paragraph, it shows not only possible options of autocomplete, but also options that can be imported. For example, if you type Math, we will get a bunch of hints along with their namespaces that can be connected:I personally prefer not to use this opportunity, however many colleagues include this option and are quite pleased with its behavior.
Automatically insert parentheses after completion
- By default, when choosing a method from the proposed list of code completion options, only the method name is printed. The option includes the addition of an opening bracket or an opening and closing bracket along with a semicolon.Text Editor / Syntax Highlighting
- Syntax highlighting.Unfortunately, Xamarin Studio does not have a full dark theme, but here you can choose a dark theme for the main code window. (Personally, I prefer to use the light theme and usually put the scheme VIsual Studio).
Text Editor / Source Analyzes
- Code analysisA bit of the Resharper plugin in Xamarin Studio. Analyze the code on the fly as Resharper does. It may help to save you a lot of time for future debugging of the code for any minor bugs / typos, etc. In my opinion, the option should be enabled by default.
Source Code / Code Formatting / C # source code
Policy
- by default, the formatting style of the code is different from Visual Studio and is somewhat more like Java style than C #. I recommend setting the "Visual Studio" scheme in order to get the most familiar code style in the C # world. Nevertheless, most likely in the C # Format tab you will have to finish these settings if you want to reduce the amount of manual work to get the overall code style.Convert tabs to sapces
- Another option that is disabled by default and can add trouble when using a version control system when part of the code is written in Visual Studio, where spaces are used instead of tabs by default.This completes the review of settings, now let's look at a couple of unobvious moments for new users using IDE Xamarin Studio.
Refactoring and code generation:
Unfortunately, Resharper is not available for Xamarin Studio, and there are high hopes for JetBrains IDE Rider. However, a little Resharper (and, moreover, completely free), we have the opportunity to receive.
Opportunities XS is noticeably poorer, and those that are, work worse than in Resharper.
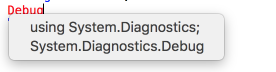
Alt + Enter for code refactoring is unlikely to require submission to users of JetBrains products. In XS, support for this shortcut is present, but its behavior may surprise:
Consider the example of Alt + Enter on the newly typed and unrecognized word:
Unfortunately, the full list appears if the cursor is inside a word. So, for example, additional refactoring options will appear if, after typing, press, for example, the left arrow to get inside the word, and then press Alt + Enter.
This behavior occurs in many places, including code generation.
Code Generation
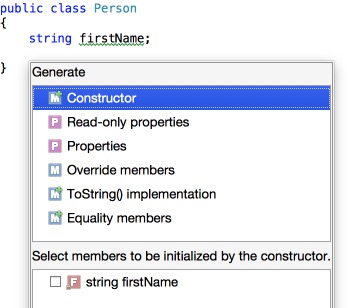
Cmd + I (Alt + Insert for Windows).
Some support for code generation is also present, but its behavior is also not entirely obvious. So, for example, by typing a new class and pressing the Cmd + I combination (or Alt + Insert on Windows), you will get a complete list of features only if you have at least one method or field:
I do not fully understand the logic of the implementation of this functionality (for example, why can't a constructor be added to the newly created and, accordingly, empty class?)
Search and navigation
Another great feature of Xamarin Studio, which novices do not notice for a very long time, is a smart search for characters in the code (the search box in the upper right corner).
The first time you use this feature (especially if you get focus through hotkeys), you may have a bug: the field receives focus, but nothing is printed in it. The bug does not always manifest itself and may require restarting XS in order for this functionality to work.
To go to this window in XS, the following shortcuts are preset:
Focus in the search box:
Cmd +. for macOS
Ctrl + for Windows
Search by type only:
Shift + Cmd + T (MacOS)
Ctrl + Shift + T (Windows)
Search by file name:
Shift + Cmd + D (MacOS)
Alt + Shift + O (Windows)
For example, if you have a MapReaderViewModel class, then you can search for this class by several parameters, for example:
By abbreviation: MRVM
As part of the names: MapModel
Partially abbreviated, etc .: RM
If you are still using the good old Ctrl + F, then I highly recommend to quickly master this wonderful opportunity, which can save you a lot of time when navigating through the code.
Once again about hotkeys
The list of the most frequently used keyboard shortcuts can be found at the links in clause 2, but I would like to separately mention this pair of keyboard shortcuts, which is very often useful when coding:
Cmd + D (F12 for Windows). Transition to definition.
Shfit + Cmd + R (Shfit + F12 for Windows). Search all links.
Plugins: (Xamarin Studio -> Add-in Manager)
The set of plug-ins for Xamarin Studio is much smaller compared to the set of plug-ins for Visual Studio. Nevertheless, quite interesting plug-ins come across in this collection, for example, the JSON Copy plugin, which allows you to generate a C # class with ready-made attributes:
For example, after installing this plugin, copying the following Json type to the clipboard:
{"Menu": {"id": "file", "value": "File", "popup": {"menuitem": [{"value": "New", "onclick": "CreateNewDoc ()" }, {"Value": "Open", "onclick": "OpenDoc ()"}, {"value": "Close", "onclick": "CloseDoc ()"}]}}}
We can generate the corresponding C # classes for deserialization directly in Xamarin Studio via the menu:
Edit -> Patse JSON as classes
As a result, we get the following code:
public class Menuitem { [JsonProperty("value")] public string Value { get; set; } [JsonProperty("onclick")] public string Onclick { get; set; } } public class Popup { [JsonProperty("menuitem")] public IList<Menuitem> Menuitem { get; set; } } public class Menu { [JsonProperty("id")] public string Id { get; set; } [JsonProperty("value")] public string Value { get; set; } [JsonProperty("popup")] public Popup Popup { get; set; } } public class RootObject { [JsonProperty("menu")] public Menu Menu { get; set; } } It remains only to connect the library Json.NET (Nuget package Newtonsoft.Json), if it was not connected before. This wonderful plugin can save you a huge amount of time when developing a client for any service.
By default, objects are generated with the internal modifier. You can change the modifier to public in Preferences -> Other / Json Copy
This completes the overview of the basic settings. If you have already used Xamarin Studio before, I suggest sharing in the comments not mentioned settings that make life easier for you personally.
I also plan to publish a series of articles and I will be glad to know which topic is most interesting for you.
Source: https://habr.com/ru/post/279955/
All Articles