Unity and Helpers for the editor
In this article I will describe several useful features and implementations that helped me in the development. Unity already has many methods to not only “debug logs”, but also to expand, to finish the necessary data in the editor window. If you are new to Unity or you want to refresh your knowledge - “We need to take!”.
Debug logs.
The Debug class allows you to display text, errors, draw lines, pause the editor, and so on.
Consider an example.
The method will be called when the enemy is in sight of the weapon. In it, the mesh of the weapon will turn in his direction, draw a line to it. As soon as this happens, the editor will pause.
Show code snippet
// void LookOnEnemy() { meshPoint.LookAt(_currentEnemy.myTransform.position); // Debug.Log("Look on" + _currentEnemy.name, gameObject); // Debug.DrawLine(myTransform.position, _currentEnemy.myTransform.position); // Debug.Break(); // } ')

Gizmos
Gizmos are used for visual debugging.
Consider an example.
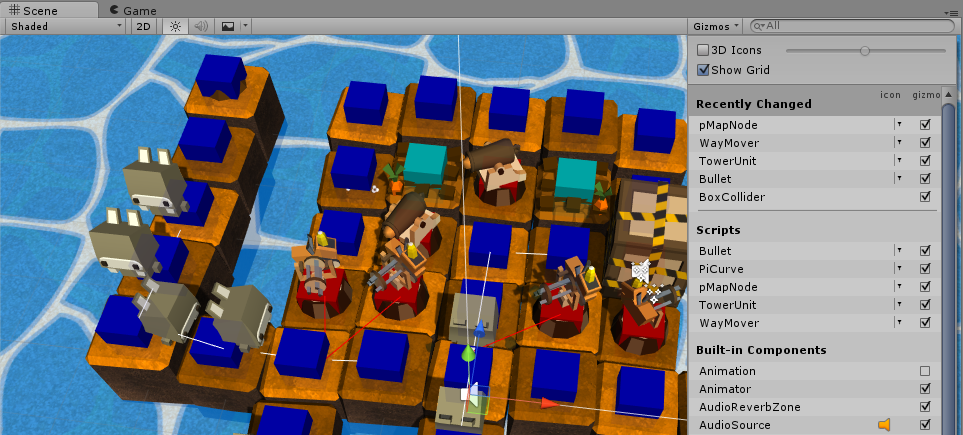
Blocks that are passable for the enemy are painted with blue cubes, impassable - red (occupied by an obstacle) or gray (no way), finish - blue. If an earth element is selected (with the mouse in the editor), then its neighbors are highlighted in green (in this case, the diagonal cells are not considered as neighbors, the neighbors system is used to search for a path).
Show code snippet
void OnDrawGizmos() { Gizmos.color = (walkable)? Color.blue: Color.red; if (rcost == 0) // Gizmos.color = Color.cyan; if (walkable && rcost < 0) // , Gizmos.color = Color.gray; for (int i = 0; i < Selection.gameObjects.Length; i++) { if (Selection.gameObjects[i] == gameObject) // { Gizmos.color = Color.green; drawLinks = true; } else drawLinks = false; } Gizmos.DrawCube(transform.position, Vector3.one * 0.5f); // if (drawLinks && Neighbors != null && Neighbors.Count > 0) // for (int i = 0; i < Neighbors.Count; ++i) if (Neighbors[i] != null) { Gizmos.DrawLine(transform.position, Neighbors[i].transform.position); Gizmos.DrawCube(Neighbors[i].transform.position, Vector3.one * 0.6f); } } 
Please note that Gizmos can be turned on and off separately for each type of component in the Scene window (top right) - shown deployed in the first picture.
Handles.
Handles are used to display and manipulate objects in the scene window.
Here is a step-by-step example of a small editor for plotting curves: http://catlikecoding.com/unity/tutorials/curves-and-splines/
If OnSceneGUI does not work for you in the BezierSplineInspector class, then use the implementation through SceneView.onSceneGUIDelegate.
Show code snippet
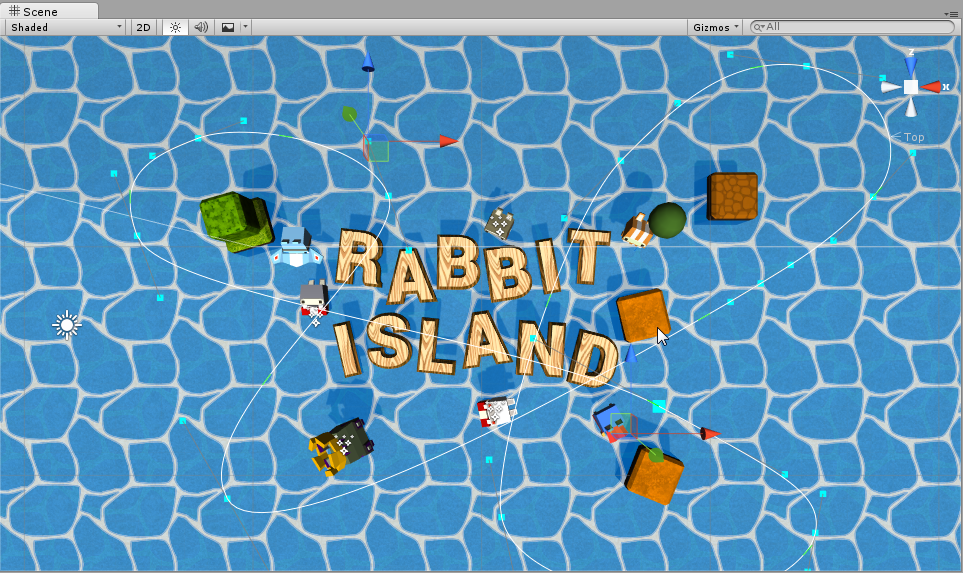
void OnEnable() { SceneView.onSceneGUIDelegate += SceneUpdate; } void OnDisable() { SceneView.onSceneGUIDelegate -= SceneUpdate; } void SceneUpdate(SceneView sceneView) { ... Handles.color = Color.white; Handles.DrawBezier(p0, p1, c0, c1, Color.white, null, 2f); ... } Thanks to this expansion, rabbits fly around cyclical curves. And all this is beautifully configured in the editor.
Attributes.
Attributes will help you in completely different situations: decorating the inspector, organizing menus, working at runtime, processing components. They are getting bigger with every new version of Unity. Attributes can be written independently, here are some interesting examples: https://github.com/Thundernerd
I will give an example of a script that moves the vertices of the mesh, creating a simple imitation of the waves. Here are visual assistants that limit the values of some variables (Range), and show tooltips. You can also configure the context menu for the property (ContextMenuItem).
Show code snippet
using UnityEngine; using System.Collections; public class SinWater : MonoBehaviour { [Header(" ")] public Vector2 range = new Vector2(0.1f, 1); [Tooltip(" ")] [ContextMenuItem("Reset", "resetTheValue")] public float speed = 1f; [Tooltip(" ")] public float maxY = 0.5f; [Range(0.1f, 1f)] public float offXMax = 0.1f; [Range(0.1f, 1f)] public float offYMax = 0.1f; [Range(0.1f, 1f)] public float offXSpeed = 0.1f; [Range(0.1f, 1f)] public float offYSpeed = 0.1f; private Mesh mesh; private Material mat; void Start() { mesh = GetComponent<MeshFilter>().mesh; mat = GetComponent<Renderer>().material; } void Update() { Vector3[] vertices = mesh.vertices; int i = 0; while (i < vertices.Length) { vertices[i].y = Mathf.Sin(Time.time * speed) * maxY; if (i % 2 == 0) vertices[i].y *= -1; i++; } mesh.vertices = vertices; Vector2 off = mat.GetTextureOffset("_MainTex"); off.x = Mathf.Sin(Time.time * offXSpeed)* offXMax; off.y = Mathf.Sin(Time.time * offYSpeed)* offYMax; mat.SetTextureOffset("_MainTex", off); } void resetTheValue() { speed = 1f; } } 
Another technique I use is often related to ContextMenu and laziness. Suppose you built a UI with 30 achievements, they are displayed and scrolled as you planned. You need to fill the lists in the class with links to them. You need to drag the name 30 times, 30 times the descriptions, and so on. You can automate this process.
Show code snippet
[ContextMenu("AutoFill")] public void Fiil() { for (int i = 0; i < 30; ++i) { GameObject go = GameObject.Find("a" + i.ToString("#00")); achivs[i].image = go.transform.FindChild("aImage").GetComponent<Image>(); achivs[i].name = go.transform.FindChild("aName").GetComponent<Text>(); achivs[i].desription = go.transform.FindChild("aDescription").GetComponent<Text>(); } } 
Own level editor
If your game involves structured, homogeneous levels in large numbers (in my example this is Tower Defense). That huge heap of time you can save your own level editor.
His main task, I think, is to show only the necessary information, multiple actions on pressing a single button in the inspector, hints, reading / loading into additional files.
I will not give the complete file of the editor, but give only a general structure for understanding. The essence is simple - we draw in the inspector, sliders and buttons, if you need to catch keystrokes, use SceneView.onSceneGUIDelegate. A video will show the full functionality, specifically for my case.
Show code snippet
[CustomEditor(typeof(LevelEditor))] public class LevelEditorEditor : Editor { LevelEditor my; void OnEnable() { SceneView.onSceneGUIDelegate = WhenUpdate; } void WhenUpdate(SceneView sceneview) { Event e = Event.current; if (e.isKey && e.character == 'a') // – ChangeLand(e.mousePosition); … } public override void OnInspectorGUI() { DrawDefaultInspector(); my = (LevelEditor)target; if (my == null) return; … DrawMoney(); … } void DrawMoney() { GUILayout.Space(10); GUILayout.BeginVertical("box"); my.btMoney = EditorGUILayout.Foldout(my.btMoney, "Money"); if (my.btMoney) { my.level.gold = EditorGUILayout.IntSlider("Start Money Bank:", my.level.gold, 0, 1000); my.level.goldStart = EditorGUILayout.IntSlider("Coins Start:", my.level.goldStart, 0, 1000); my.level.goldMax = EditorGUILayout.IntSlider("Coins Max:", my.level.goldMax, 0, 40); my.level.goldMinTime = EditorGUILayout.Slider("Coins Min Time:", my.level.goldMinTime, 0, 100f); my.level.goldMaxTime = EditorGUILayout.Slider("Coins Max Time:", my.level.goldMaxTime, 0, 100f); } GUILayout.EndVertical(); } } Source: https://habr.com/ru/post/279929/
All Articles