Building Android applications step by step, part three

In the first and second parts of the article, we created an application for working with Github, implemented Dagger 2 and covered the unit code with tests. In the final part, we will write integration and functional tests, consider the TDD technique and write with its application a new functionality, as well as tell you what to read next.
Full content
Introduction
In the first part of the article, we in two stages created a simple application for working with github. The architecture of the application was divided into two parts: simple and complex. In the second part, we implemented Dagger 2 and covered the unit code with tests using Robolectric, Mockito, MockWebServer and JaCoCo.
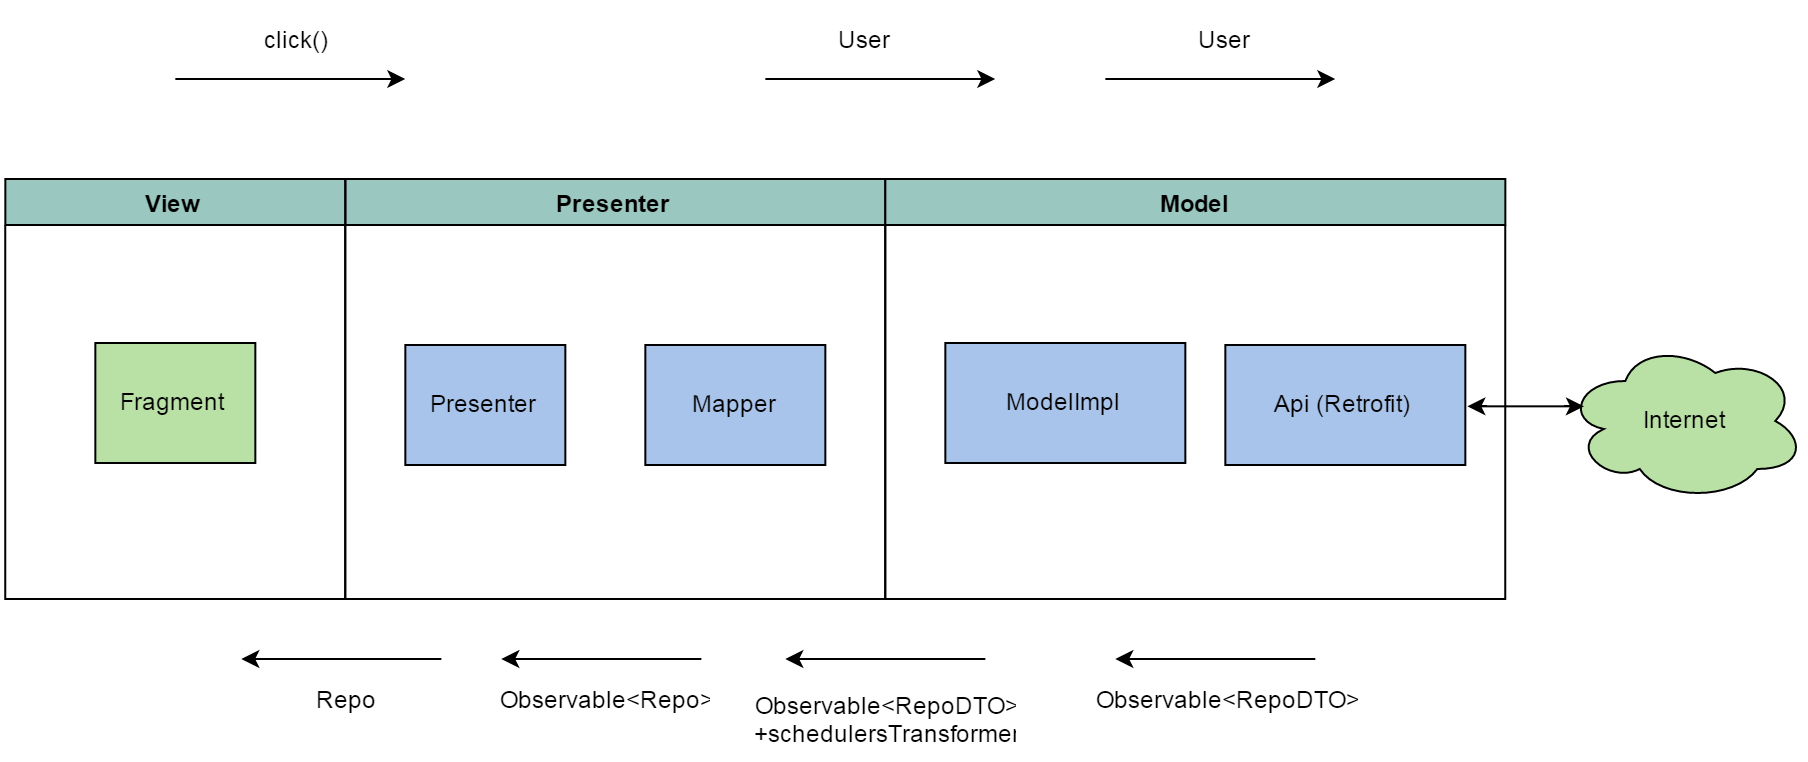
Conditional application scheme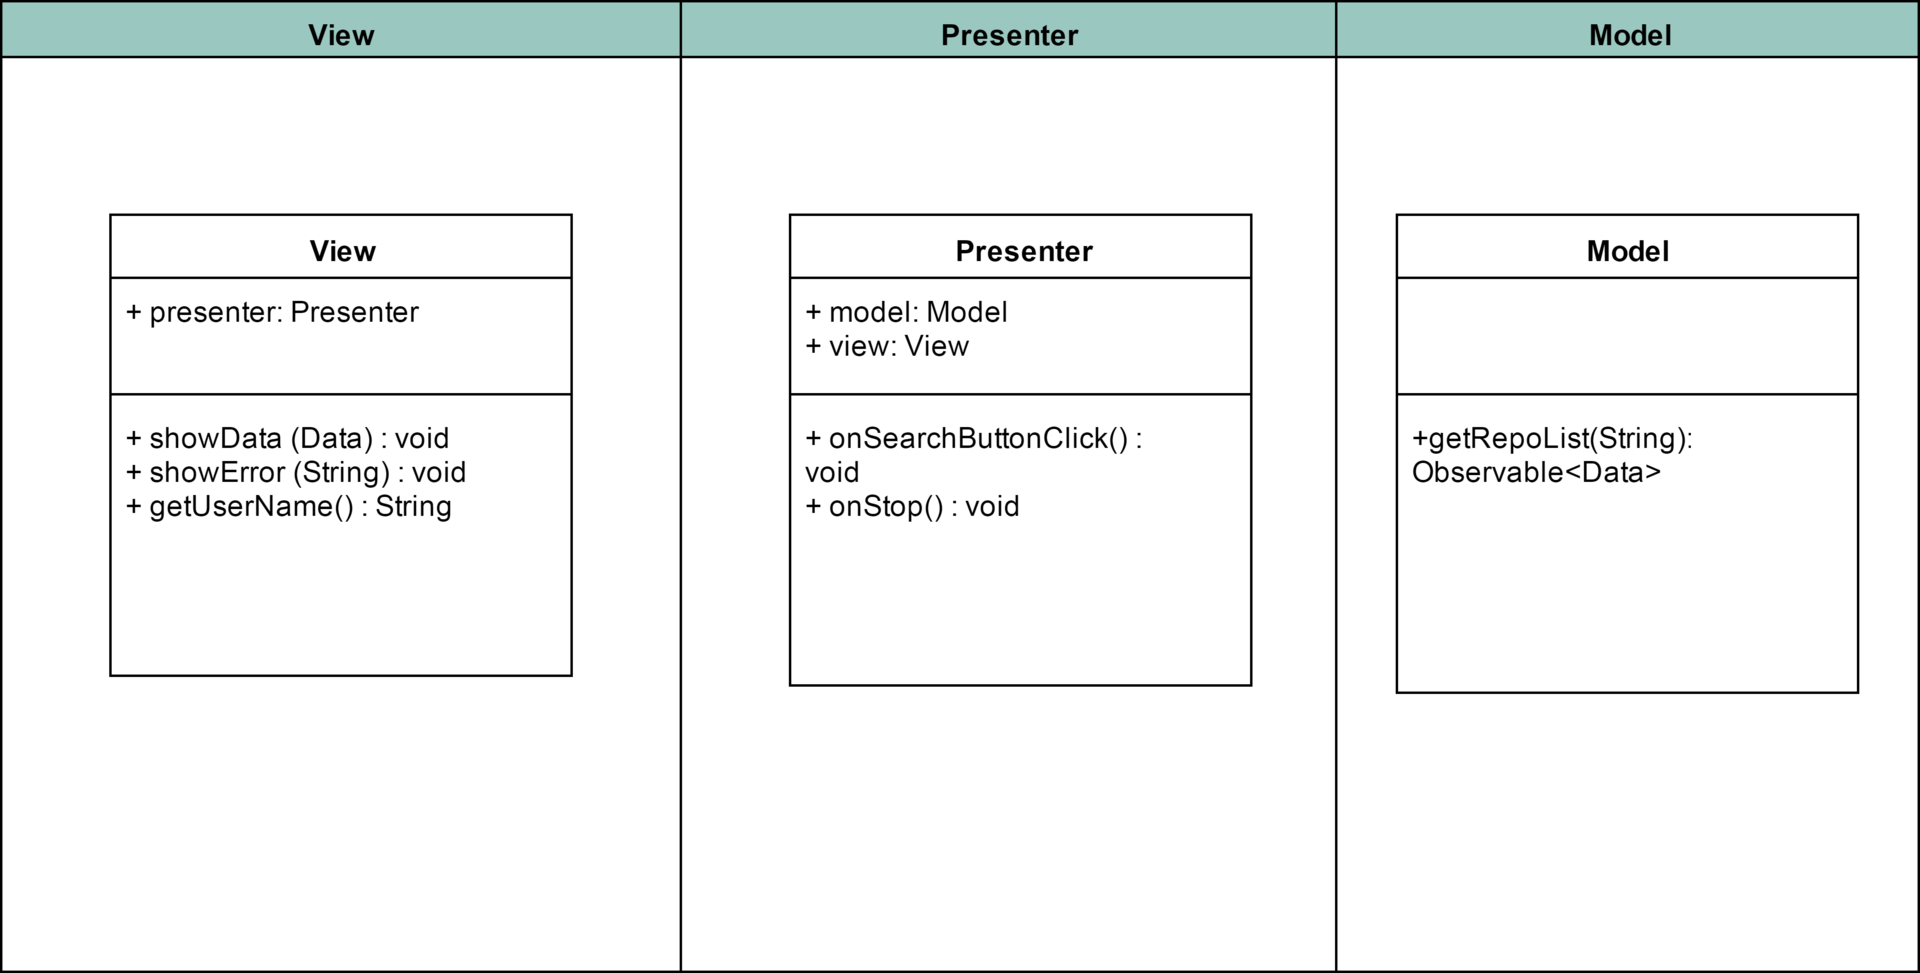
Class diagram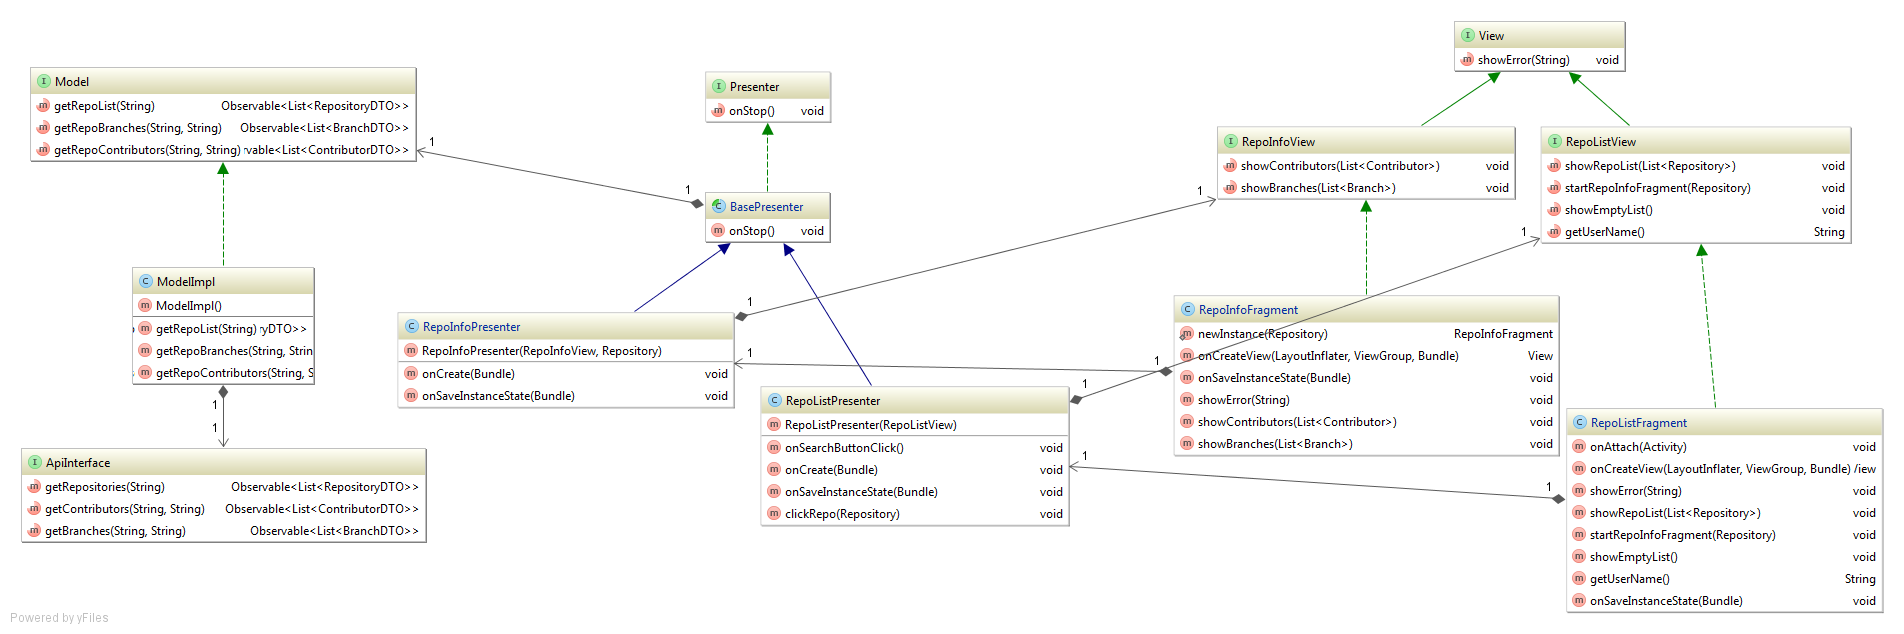
Test coverage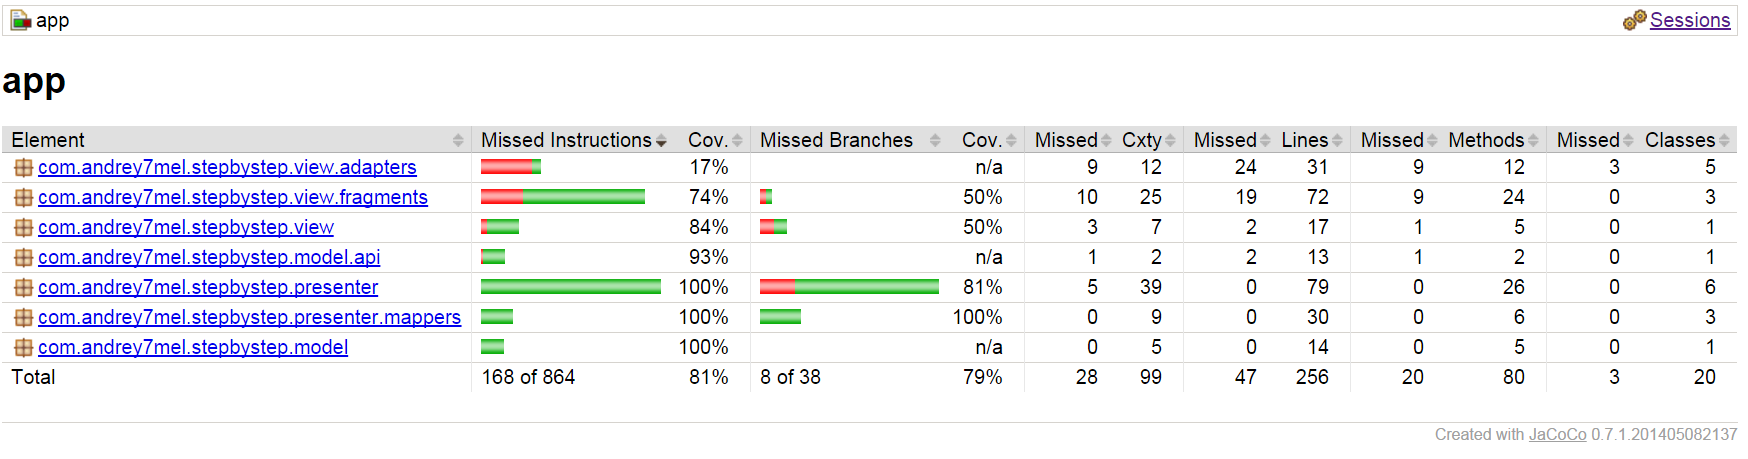
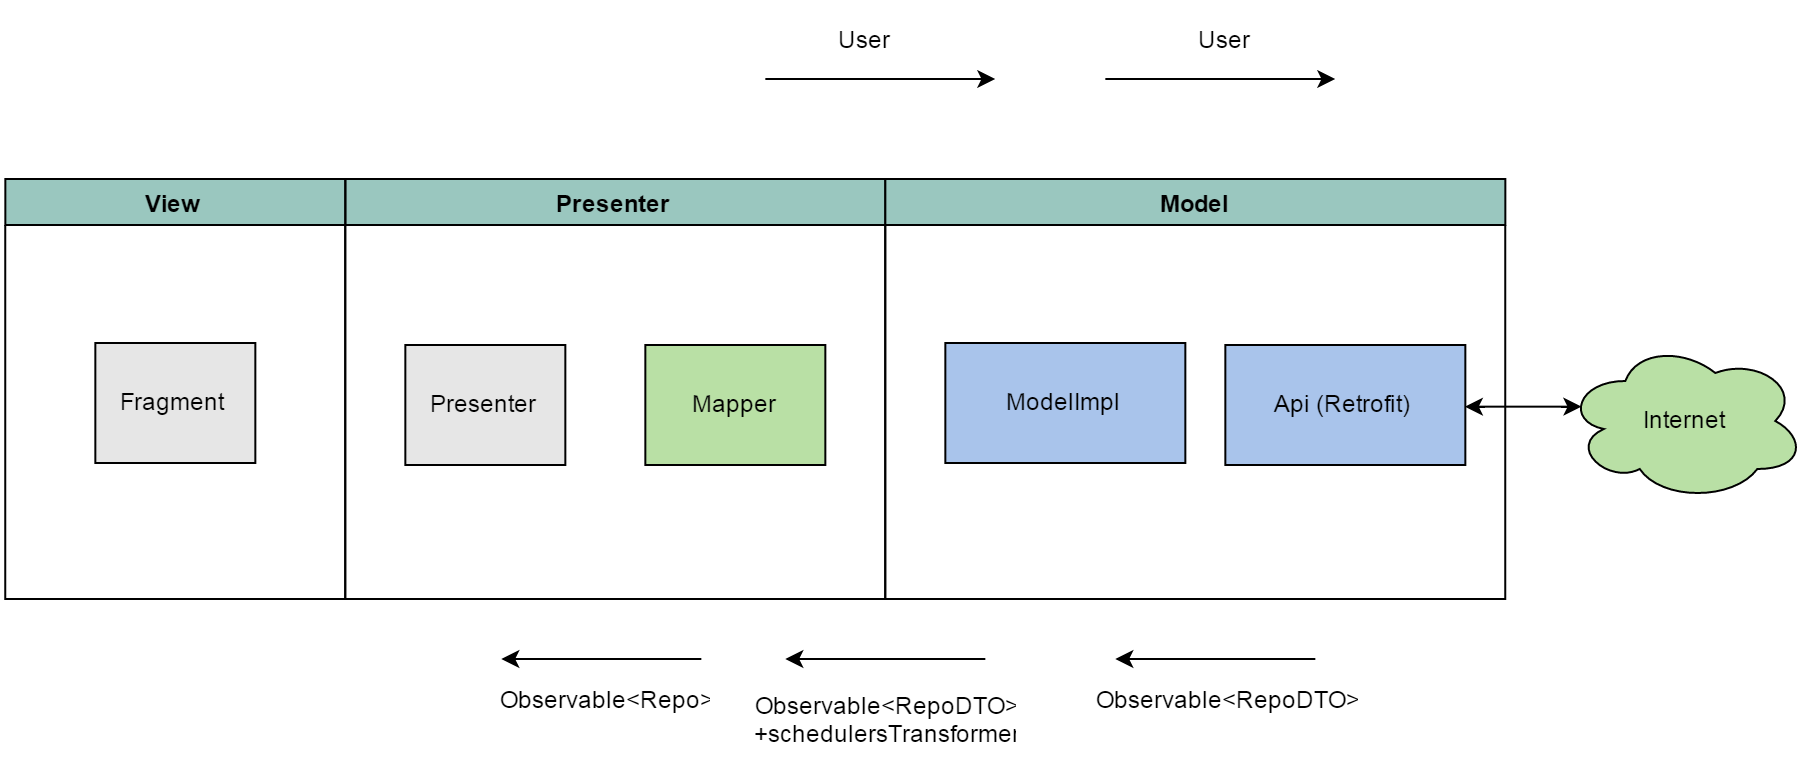
Component Interaction Scheme
All sources can be found on Github.
')
Step 5. Integration Testing
Integration testing (Integration testing) - one of the phases of software testing, in which individual software modules are combined and tested in a group.
There are 3 approaches to integration testing:
Bottom Up Integration
All low-level modules, procedures, or functions are aggregated and then tested. After that, the next level of modules is collected for integration testing. This approach is considered useful if all or practically all modules of the developed level are ready. Also, this approach helps to determine the level of readiness of the application by the results of testing.
Top Down Integration
First, all high-level modules are tested, and low-level ones are gradually added one by one. All modules of the lower level are simulated with plugs with similar functionality, then as they become ready, they are replaced with real active components. So we are testing from top to bottom.
Big Bang ("Big Bang" Integration)
All or almost all developed modules come together as a complete system or its main part, and then integration testing is carried out. This approach is very good for saving time.
Since we have all the modules ready, we will use the bottom-up approach.
Iterative approach
We will use an iterative approach, that is, we will connect the modules one by one, bottom to top. First we check the bundle api + model, then api + model + mapper + presenter, then the general bundle api + model mapper + presenter + view
Negative and positive scenario
For integration tests, we need to consider 2 response scripts from the server: a normal response and an error. Depending on this, the behavior of the components changes. Before each test, we can configure the response from the server (MockWebServer) and check the results.
Scheme of the integration test (api + model):
An example of an integration test (api + model), we check the interaction of the Retrfofit module and ModelImpl:
Integration test sample
@Test public void testGetRepoList() { TestSubscriber<List<RepositoryDTO>> testSubscriber = new TestSubscriber<>(); model.getRepoList(TestConst.TEST_OWNER).subscribe(testSubscriber); testSubscriber.assertNoErrors(); testSubscriber.assertValueCount(1); List<RepositoryDTO> actual = testSubscriber.getOnNextEvents().get(0); assertEquals(7, actual.size()); assertEquals("Android-Rate", actual.get(0).getName()); assertEquals("andrey7mel/Android-Rate", actual.get(0).getFullName()); assertEquals(26314692, actual.get(0).getId()); } Scheme of the integration test (api + model + mapper + presenter):
An example of an integration test (api + model + mapper + presenter)
@Test public void testLoadData() { repoInfoPresenter.onCreateView(null); repoInfoPresenter.onStop(); verify(mockView).showBranches(branchList); verify(mockView).showContributors(contributorList); } @Test public void testLoadDataWithError() { setErrorAnswerWebServer(); repoInfoPresenter.onCreateView(null); repoInfoPresenter.onStop(); verify(mockView, times(2)).showError(TestConst.ERROR_RESPONSE_500); } As a result, we get a complete check of the interaction of all modules with each other, from the bottom up. If somewhere modules will interact incorrectly, we will quickly see it through tests.
Step 6. Functional testing
Functional testing is the testing of software in order to verify the feasibility of functional requirements, that is, the ability of the software in certain conditions to solve the tasks needed by users. Functional requirements determine what exactly the software does, what tasks it solves.
As part of our Android application, we will check the operation of the application from the user's point of view. First, let's create a custom application map:
Application Map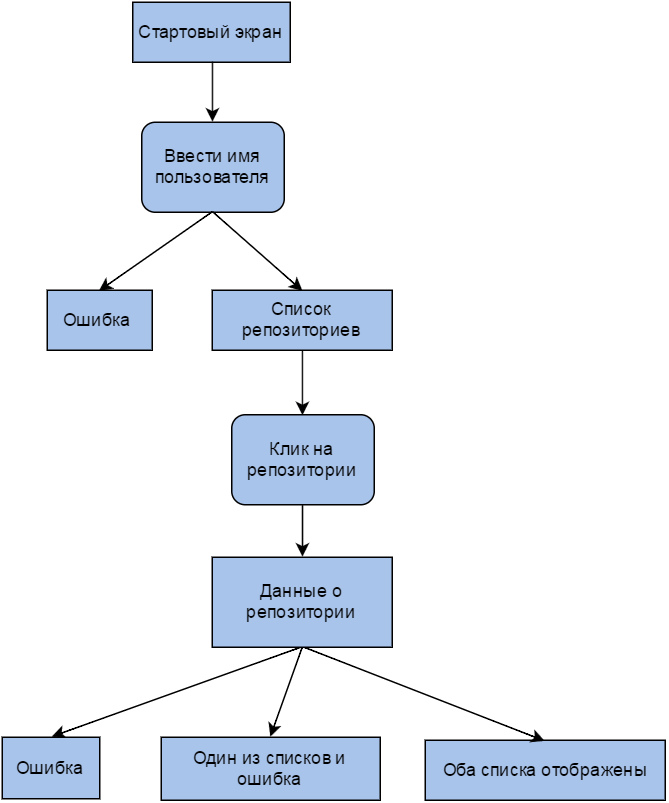
We make the necessary test cases:
- Open the application, check the visibility of all elements.
- Enter test user, click Search
- Data received - get a list of repositories, check data mapping
- Data not received - check error display.
- Go to the second screen, check the correctness of the display of the user name and the name of the repository.
- Get lists of brunches and distributors, check data mapping
- Which of the lists is not received (two tests), check the display of the received list, the error display
- Both lists are not received, check the error display
For testing, we will use Espresso. As well as for other tests, we isolate the application from the Internet using mocks and json files prepared in advance. Dagger 2 and component substitution will help us in this:
MockTestRunner and TestApp Code
public class MockTestRunner extends AndroidJUnitRunner { @Override public Application newApplication( ClassLoader cl, String className, Context context) throws InstantiationException, IllegalAccessException, ClassNotFoundException { return super.newApplication( cl, TestApp.class.getName(), context); } } public class TestApp extends App { @Override protected TestComponent buildComponent() { return DaggerTestComponent.builder().build(); } } Sample Espresso Tests
@Test public void testGetUserRepo() { apiConfig.setCorrectAnswer(); onView(withId(R.id.edit_text)).perform(clearText()); onView(withId(R.id.edit_text)).perform(typeText(TestConst.TEST_OWNER)); onView(withId(R.id.button_search)).perform(click()); onView(withId(R.id.recycler_view)).check(EspressoTools.hasItemsCount(7)); onView(withId(R.id.recycler_view)).check(EspressoTools.hasViewWithTextAtPosition(0, "Android-Rate")); onView(withId(R.id.recycler_view)).check(EspressoTools.hasViewWithTextAtPosition(1, "android-simple-architecture")); onView(withId(R.id.recycler_view)).check(EspressoTools.hasViewWithTextAtPosition(2, TestConst.TEST_REPO)); } @Test public void testGetUserRepoError() { apiConfig.setErrorAnswer(); onView(withId(R.id.edit_text)).perform(clearText()); onView(withId(R.id.edit_text)).perform(typeText(TestConst.TEST_OWNER)); onView(withId(R.id.button_search)).perform(click()); onView(allOf(withId(android.support.design.R.id.snackbar_text), withText(TestConst.TEST_ERROR))) .check(matches(isDisplayed())); onView(withId(R.id.recycler_view)).check(EspressoTools.hasItemsCount(0)); } Similarly, we write the rest of the tests for test cases.
Having finished working with Espresso, we will completely cover the application with modular, integration and functional tests.
Step 7. TDD
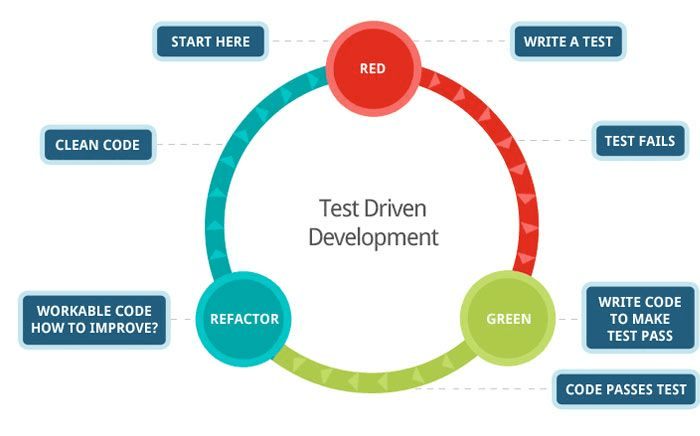
Development through testing (Test-driven development) is a software development technique that defines development through writing tests.
In essence, you need to perform three simple repeating steps:
- Write a test for the new functionality that needs to be added;
- Write the code that will pass the test;
- To refactor new and old code.
If the TDD abbreviation is not familiar to you, we recommend reading the article from our colleagues from the iOS department or the article from the TDD hub .
There are 3 laws TDD:
- Production code is not written before there is an idle test for it;
- No more unit test code is written than enough for its error.
- No more production code is written than enough to pass the current non-working test.
For example, create a progress bar that will show downloads from the Internet. It should appear when data loading occurs and disappear when data is loaded or an error has occurred. All development will be conducted on TDD.
The development of this functionality will affect presenters and fragments, mappers and the date layer remain unchanged.
Presenters
Let's start with a list of repositories. First of all, let's add interfaces:
public interface RepoListView extends View { void showRepoList(List<Repository> list); void showEmptyList(); String getUserName(); void startRepoInfoFragment(Repository repository); //New void showLoading(); void hideLoading(); } First stage.
First, we write a test that verifies that in the case of normal loading, the showLoading method was called on the fragment:
@Test public void testShowLoading() { repoListPresenter.onSearchButtonClick(); verify(mockView).showLoading(); } As soon as we receive a non-working test, we write the code that will pass it:
public void onSearchButtonClick() { String name = view.getUserName(); if (TextUtils.isEmpty(name)) return; view.showLoading(); // --- some code --- } There is nothing to refactor.
This is where the first iteration of TDD development is over. We got a new functionality and test for it.
Second phase.
Let's write a test that verifies that after the normal loading, the fragment's hideLoading method was called:
@Test public void testHideLoading() { repoListPresenter.onSearchButtonClick(); verify(mockView).hideLoading(); } We write the code that will pass the test:
//-- view.showLoading(); Subscription subscription = model.getRepoList(name) .map(repoListMapper) .subscribe(new Observer<List<Repository>>() { @Override public void onCompleted() { view.hideLoading(); } @Override public void onError(Throwable e) { view.showError(e.getMessage()); } @Override public void onNext(List<Repository> list) { if (list != null && !list.isEmpty()) { repoList = list; view.showRepoList(list); } else { view.showEmptyList(); } } }); Refactoring is not required.
The third and fourth stages.
Now we will write tests that verify that when an error occurred, the necessary methods were correctly called.
Error handling tests
@Test public void testShowLoadingOnError() { doAnswer(invocation -> Observable.error(new Throwable(TestConst.TEST_ERROR))) .when(model) .getRepoList(TestConst.TEST_OWNER); repoListPresenter.onSearchButtonClick(); verify(mockView).showLoading(); } @Test public void testHideLoadingOnError() { doAnswer(invocation -> Observable.error(new Throwable(TestConst.TEST_ERROR))) .when(model) .getRepoList(TestConst.TEST_OWNER); repoListPresenter.onSearchButtonClick(); verify(mockView).hideLoading(); } Error handling code
//-- @Override public void onError(Throwable e) { view.showError(e.getMessage()); view.hideLoading(); } //-- Refactoring is not required. Work with Repo List Presenter is completed, now we will go to Repo Info Presenter.
Repo Info Presenter
Similar to the previous step, we write tests and code for correct data loading.
Tests for correct data loading
@Test public void testShowLoading() { repoInfoPresenter.onCreateView(null); verify(mockView).showLoading(); } @Test public void testHideLoading() { repoInfoPresenter.onCreateView(null); verify(mockView).hideLoading(); } Code for correct data loading
public void loadData() { String owner = repository.getOwnerName(); String name = repository.getRepoName(); view.showLoading(); Subscription subscriptionBranches = model.getRepoBranches(owner, name) .map(branchesMapper) .subscribe(new Observer<List<Branch>>() { @Override public void onCompleted() { hideInfoLoadingState(); } @Override public void onError(Throwable e) { view.showError(e.getMessage()); } @Override public void onNext(List<Branch> list) { branchList = list; view.showBranches(list); } }); addSubscription(subscriptionBranches); Subscription subscriptionContributors = model.getRepoContributors(owner, name) .map(contributorsMapper) .subscribe(new Observer<List<Contributor>>() { @Override public void onCompleted() { hideInfoLoadingState(); } @Override public void onError(Throwable e) { view.showError(e.getMessage()); } @Override public void onNext(List<Contributor> list) { contributorList = list; view.showContributors(list); } }); addSubscription(subscriptionContributors); } protected void hideInfoLoadingState() { countCompletedSubscription++; if (countCompletedSubscription == COUNT_SUBSCRIPTION) { view.hideLoading(); countCompletedSubscription = 0; } } Refactoring.
As you can see, the same code is used for two presenters (show and hide the download indicator, show an error). You need to bring it to the common base class BasePresenter. We take out the showLoadingState () hideLoadingState () and showError (Throwable e) methods in BasePresenter
BasePresenter Code
protected abstract View getView(); protected void showLoadingState() { getView().showLoadingState(); } protected void hideLoadingState() { getView().hideLoadingState(); } protected void showError(Throwable e) { getView().showError(e.getMessage()); } Refactor RepoInfoPresenter and verify that all tests pass. Do not forget to refactor RepoListPresenter to work with the base class.
Next, we write the tests first, and then the code for handling errors at boot time (for RepoInfoPresenter).
Error Handling Tests
@Test public void testShowLoadingOnError() { doAnswer(invocation -> Observable.error(new Throwable(TestConst.TEST_ERROR))) .when(model) .getRepoContributors(TestConst.TEST_OWNER, TestConst.TEST_REPO); doAnswer(invocation -> Observable.error(new Throwable(TestConst.TEST_ERROR))) .when(model) .getRepoBranches(TestConst.TEST_OWNER, TestConst.TEST_REPO); repoInfoPresenter.onCreateView(null); verify(mockView).showLoading(); } @Test public void testHideLoadingOnError() { doAnswer(invocation -> Observable.error(new Throwable(TestConst.TEST_ERROR))) .when(model) .getRepoContributors(TestConst.TEST_OWNER, TestConst.TEST_REPO); doAnswer(invocation -> Observable.error(new Throwable(TestConst.TEST_ERROR))) .when(model) .getRepoBranches(TestConst.TEST_OWNER, TestConst.TEST_REPO); repoInfoPresenter.onCreateView(null); verify(mockView).hideLoading(); } @Test public void testShowLoadingOnErrorBranches() { doAnswer(invocation -> Observable.error(new Throwable(TestConst.TEST_ERROR))) .when(model) .getRepoBranches(TestConst.TEST_OWNER, TestConst.TEST_REPO); repoInfoPresenter.onCreateView(null); verify(mockView).showLoading(); } @Test public void testHideLoadingOnErrorBranches() { doAnswer(invocation -> Observable.error(new Throwable(TestConst.TEST_ERROR))) .when(model) .getRepoBranches(TestConst.TEST_OWNER, TestConst.TEST_REPO); repoInfoPresenter.onCreateView(null); verify(mockView).hideLoading(); } Error handling code at boot time
showLoadingState(); Subscription subscriptionBranches = model.getRepoBranches(owner, name) .map(branchesMapper) .subscribe(new Observer<List<Branch>>() { @Override public void onCompleted() { hideInfoLoadingState(); } @Override public void onError(Throwable e) { hideInfoLoadingState(); showError(e); } @Override public void onNext(List<Branch> list) { branchList = list; view.showBranches(list); } }); addSubscription(subscriptionBranches); Subscription subscriptionContributors = model.getRepoContributors(owner, name) .map(contributorsMapper) .subscribe(new Observer<List<Contributor>>() { @Override public void onCompleted() { hideInfoLoadingState(); } @Override public void onError(Throwable e) { hideInfoLoadingState(); showError(e); } @Override public void onNext(List<Contributor> list) { contributorList = list; view.showContributors(list); } }); At the development of presenters completed. Go to the fragments.
Fragments
The progress bar, as a common element, will lie in the activity, the fragments will call the showProgressBar () and hideProgressBar () methods on the activity, which will show or hide the progress bar. To work with activity, use the ActivityCallback interface. From the experience of presenters, we can immediately guess that we will need a common base class - BaseFragment. It will contain the logic of interaction with the activity.
First, we write tests, and then the code, for the interaction of the basic fragment with the activity:
Base Fragment Tests
@Test public void testAttachActivityCallback() throws Exception { assertNotNull(baseFragment.activityCallback); } @Test public void testShowLoadingState() throws Exception { baseFragment.showLoading(); verify(activity).showProgressBar(); } @Test public void testHideLoadingState() throws Exception { baseFragment.hideLoading(); verify(activity).hideProgressBar(); } Base Fragment Code
@Override public void onAttach(Activity activity) { super.onAttach(activity); try { activityCallback = (ActivityCallback) activity; } catch (ClassCastException e) { throw new ClassCastException(activity.toString() + " must implement activityCallback"); } } @Override public void showLoading() { activityCallback.showProgressBar(); } @Override public void hideLoading() { activityCallback.hideProgressBar(); } Refactoring is not required, go to activity.
Acitivity
The final step is to implement the Activity interface. We will change the visibility (setVisibility) of the progressBar depending on the command. In tests, you need to check that progressBar is found and the work of the showProgressBar and hideProgressBar methods.
First we write the tests:
Activity Tests
@Test public void testHaveProgressBar() throws Exception { assertNotNull(progressBar); } @Test public void testShowProgressBar() throws Exception { mainActivity.showProgressBar(); verify(progressBar).setVisibility(View.VISIBLE); } @Test public void testHideProgressBar() throws Exception { mainActivity.hideProgressBar(); verify(progressBar).setVisibility(View.INVISIBLE); } Then we write the code:
Activity code
@Bind(R.id.toolbar_progress_bar) protected ProgressBar progressBar; //---- some code ---- @Override public void showProgressBar() { progressBar.setVisibility(View.VISIBLE); } @Override public void hideProgressBar() { progressBar.setVisibility(View.INVISIBLE); } Everything is rather trivial, refactoring is not required.
This concludes the development of the progress bar using TDD technology.
Step 8. What's next?
After examining TDD and developing a load map, we’ll finish the development of the application. For further development I recommend reading the following articles:
Android Clean Architecture
Android Clean Architecture is a famous article from Fernando Cejas, based on Uncle Bob's Clean Architecture . It discusses the interaction between 3 layers Presentation Layer, Domain Layer and Data Layer. There is a transfer to habrahabr.
VIPER
VIPER (View, Interactor, Presenter, Entity and Routing) is becoming more and more popular, you can get acquainted with it in the article Android VIPER on jet propulsion from VikkoS . The basic principles of VIPER are covered in articles and reports of our colleagues from the iOS department.
Mosby
Mosby is a popular library for creating MVP applications. It contains all the main interfaces and base classes. Website: http://hannesdorfmann.com/mosby/ Github: https://github.com/sockeqwe/mosby
Android Application Architecture
A good article about the architecture of the Ribot team - Android Application Architecture . We consider the migration from AsyncTask to RxJava. Most recently there was a transfer to habrahabr.
Android Development Culture Document
Android Development Culture Document #qualitymatters by Artem_zin . Excellent article and demo project from Artem Zinnatullin. The article discusses 8 principles for the development of android applications, all supported by an example on Github.
Conclusion
In this series of articles we went through all the stages of application development. We started with a simple MVP-based architecture, complicating it as we add new features. We used modern libraries: RxJava and RxAndroid for reactive programming and getting rid of callbacks, Retrofit for convenient work with the network, Butterknife for quick and easy search of the view. Dagger 2 managed all dependencies and provided us with invaluable support when writing tests. We wrote the tests ourselves using jUnit, Robolectric, Mockito and MockWebServer. And Espresso saved our testers from the pain of regression testing.
We completely covered our project with tests. Unit tests check each component in isolation, integration tests check their overall interaction, and functional tests look at all this from the user’s side. With the further change of the program, we can not be afraid (well, or almost not to be afraid) that we will break some components, and that something will fall off, and the bugs will crawl into the release. Thanks to TDD, most of our code will be covered with tests (there is no test, there is no code). There will be no problem of partial coverage or “the code was written, but there was no time left for tests”.
All project code is available on Github (https://github.com/andrey7mel/android-step-by-step)
I hope you enjoyed this series of articles and it turned out to be useful, thank you for your attention!
Source: https://habr.com/ru/post/279799/
All Articles