Processing “video 360”, image cleaning: algorithm and its implementation in C #
Recently, due to the growing trend of virtual reality, shooting / editing / processing video in the “360 video” format has become increasingly relevant.
In this article, I want to talk about one experiment on the processing of "video 360", which well illustrates some of the features of this format. Looking ahead, I will say that the experiment required the implementation of a simple algorithm and, of course, it did not go without writing a program.
As part of the ITMO University Video360Production.com project, we not only shoot 360 video, but also solve a whole bunch of related tasks - specialized processing of panoramic video, development of interactive applications for virtual reality helmets and much more.
')
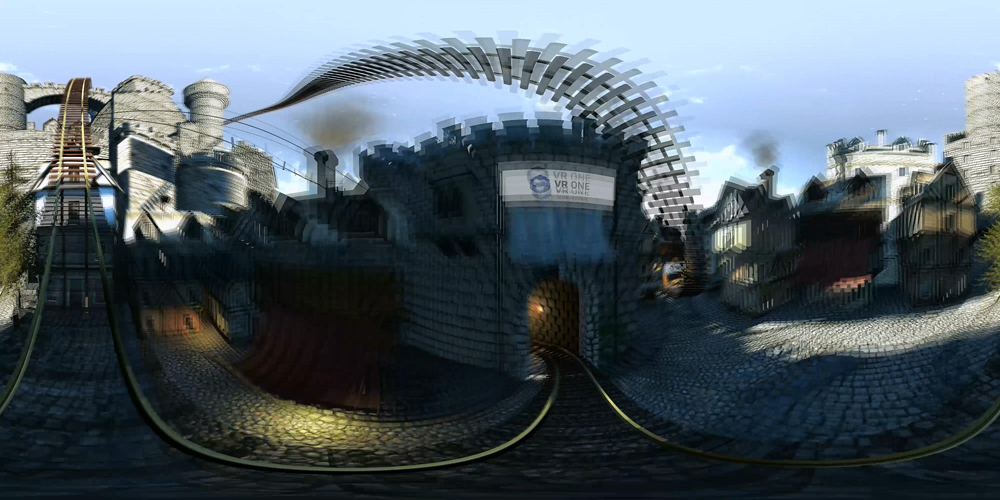
“Video 360” (panoramic video) is created in a special way - several video cameras look “in all directions”, then the streams are synchronized and stitched into one continuous picture. One of the standards for panoramic video is a spherical sweep - a 360 * 360 stitched sphere is rotated into a frame with a 2: 1 aspect ratio (equidistant sweep), which allows you to encode a panoramic video in the usual H.264 and store it in a very watchable form.
When viewing “video 360”, you can turn it with a mouse or a finger (on a smartphone, tablet), panoramic video supports YouTube and Facebook. It looks especially impressive in virtual reality headsets - Oculus Rift , Samsung Gear VR , Google Cardboard, etc.
This is, for example, the Bravo group’s concert in the “360 video” format:
Panoramic video can be not only captured with a video camera, but also obtained from 3D engines, such as the trailer “WARCRAFT: SKIES OF AZEROTH”:
One of the typical tasks of video processing is image replacement - there are appropriate tools in video editing programs that allow you to replace a static image or even a dynamic one. In the latter case, key tracking is used, which allows qualitatively and in (semi-) automatic mode to replace the specified image fragment with some other one.
And what about the “360 video”? Practice shows that things are not so simple ...
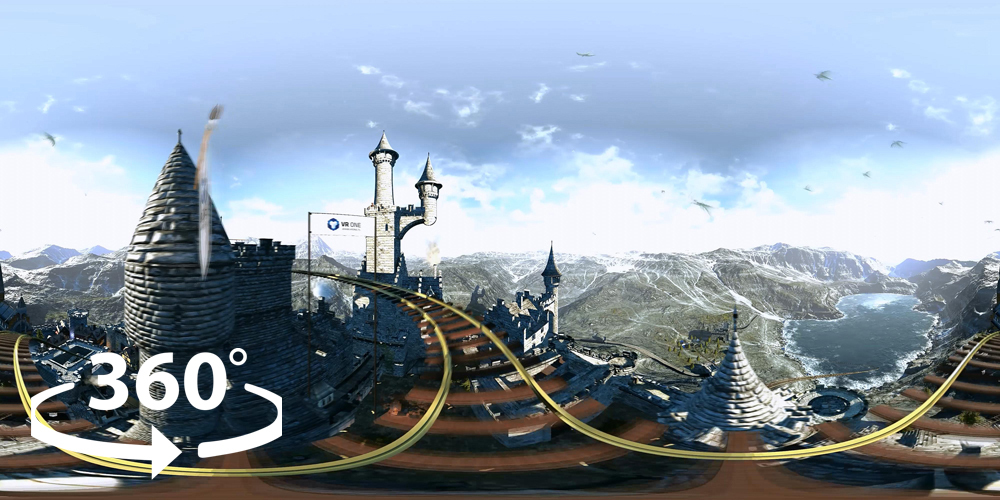
As an experiment, I took this video compiled from UnrealEngine into a panoramic video format and set the task, at first glance, uncomplicated - to clear all the banners hanging above the “path” the cart goes.
By the way, this video is well known to everyone who dealt with the Oculus Rift and attractions:
The task was not easy.
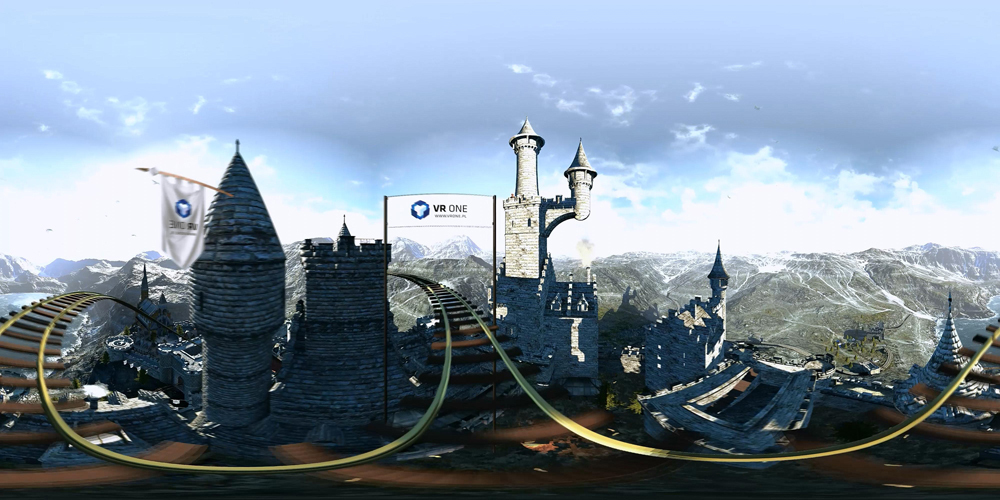
What difficulties arise when trying to track images in the "video 360"? In addition to the difficulties of a specific example (fast movement of a trolley, complex texture of objects) there is a characteristic feature of an equidistant sweep - atypical image distortion - “bending” and stretching as it approaches the bottom / top of the frame. It is understandable - the upper / lower part of the frame, strictly speaking, correspond to the poles of the sphere, stretched across the width of the frame.
Here's what it looks like:

From a distance, the inscription is almost rectangular, but as it approaches it starts to wrap up:


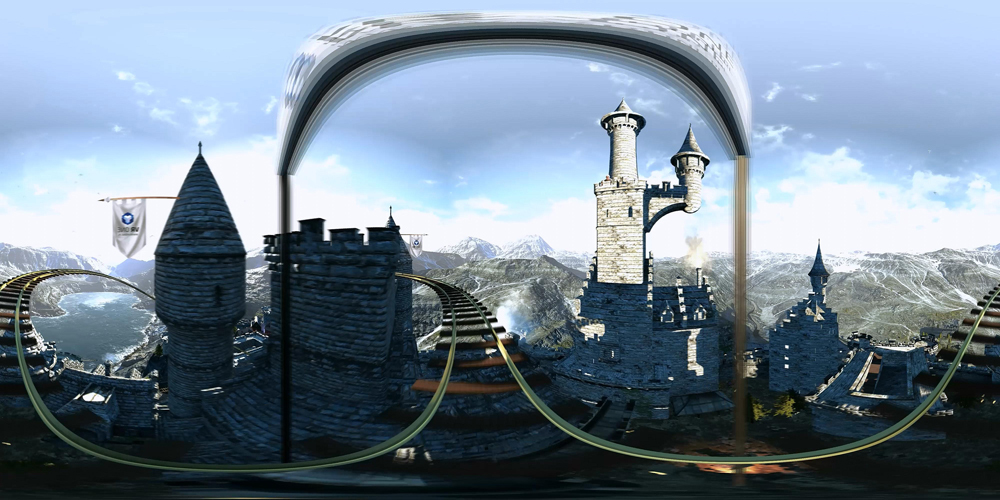
When the trolley is at the banner itself, a complete disgrace begins:
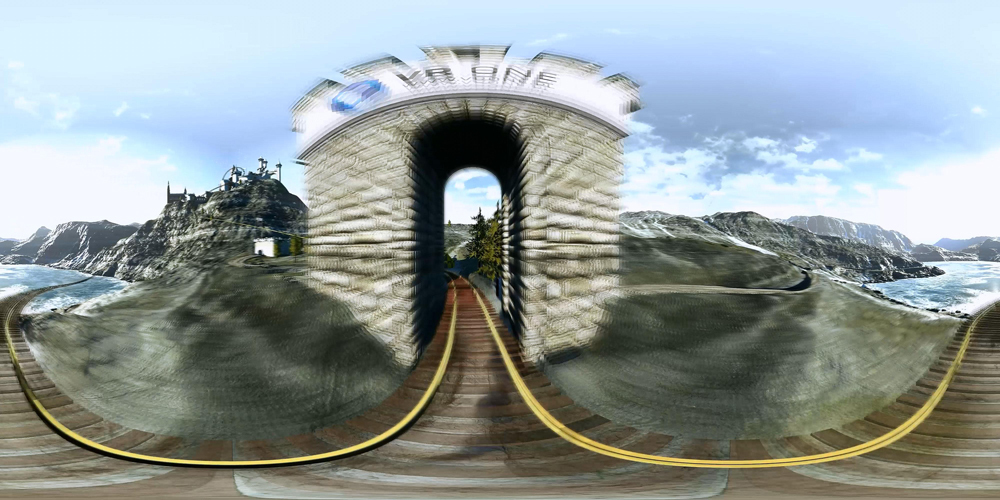
Of the attendant difficulties - high speed of movement in some areas, because of which the image of the banner is very blurry:
Using standard tracking tools (for example, in After Affects) for these banners does not give a good result - there are a lot of keys, they are unstable, it is difficult to capture an image. Because of this, the insertion of a white background (or rather, the background color of the banner, it is not perfectly white) is inaccurate, in some cases, completely past. Manually edit 7-15 keys on each frame is a hellish task. In fact, it is a frame-by-frame restoration of the roller
In this regard, the idea arose to optimize this process. Indeed, if you look at the problem through the eyes of a programmer, banners should be recognized well and it’s quite realistic to come up with a simple algorithm that would allow them to be “cleaned”. It is also quite obvious that the program is easier to do in an interactive style, either to indicate the starting point for the algorithm or to indicate the area to search for.
So, after some experiments, the following sequence of actions was obtained:
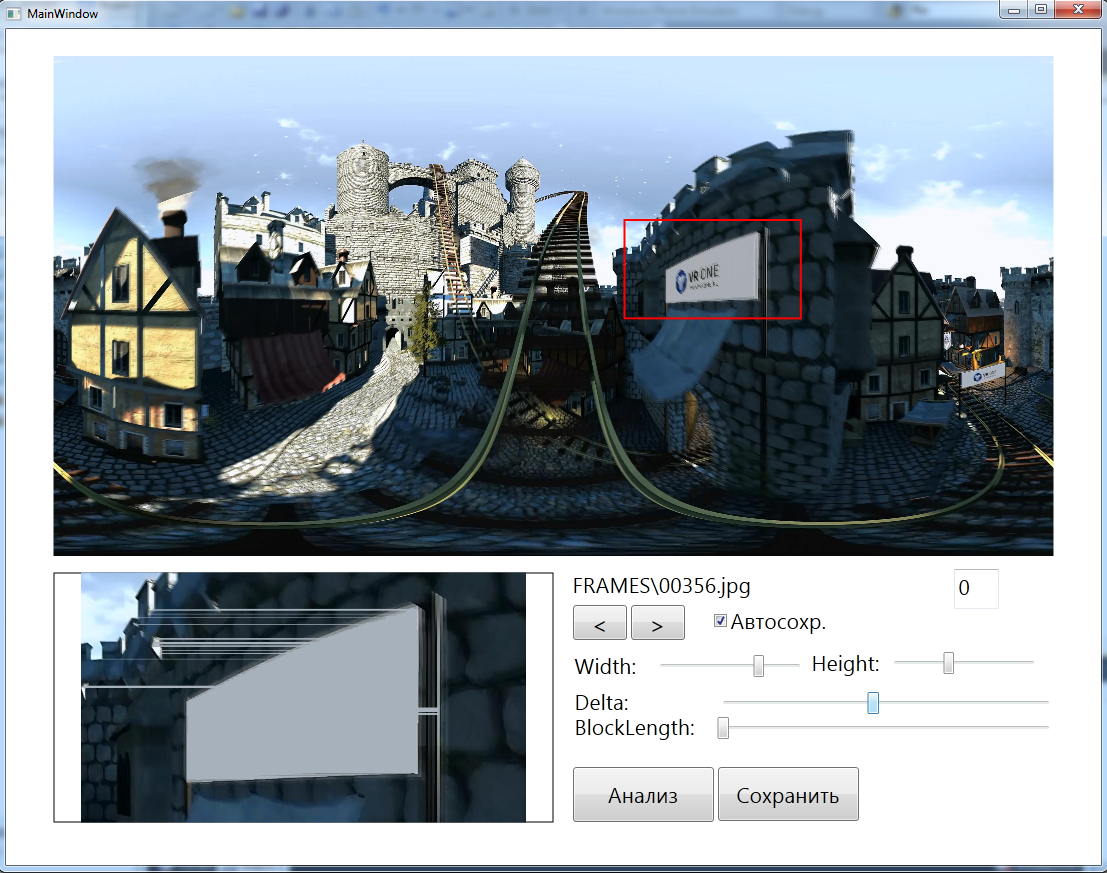
Appearance:
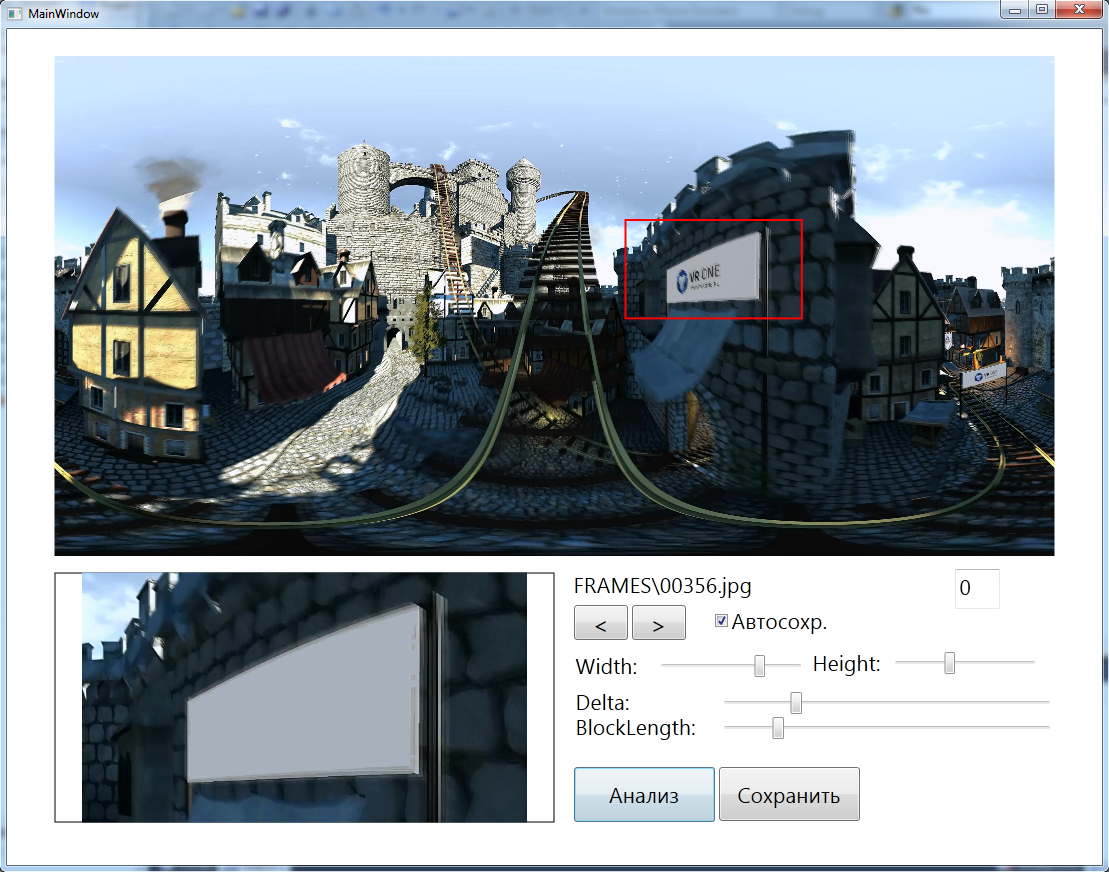
The program contains the following elements:
1. At the top - the current frame is displayed. On it, with the help of the red frame, you can designate the workspace - where the algorithm will perform a banner search.
2. Bottom left - an enlarged view of the workspace. The algorithm starts working automatically and immediately shows the result (cleared banner).
The dimensions of the frame can be changed, which allows you to zoom and work even with very fine details:
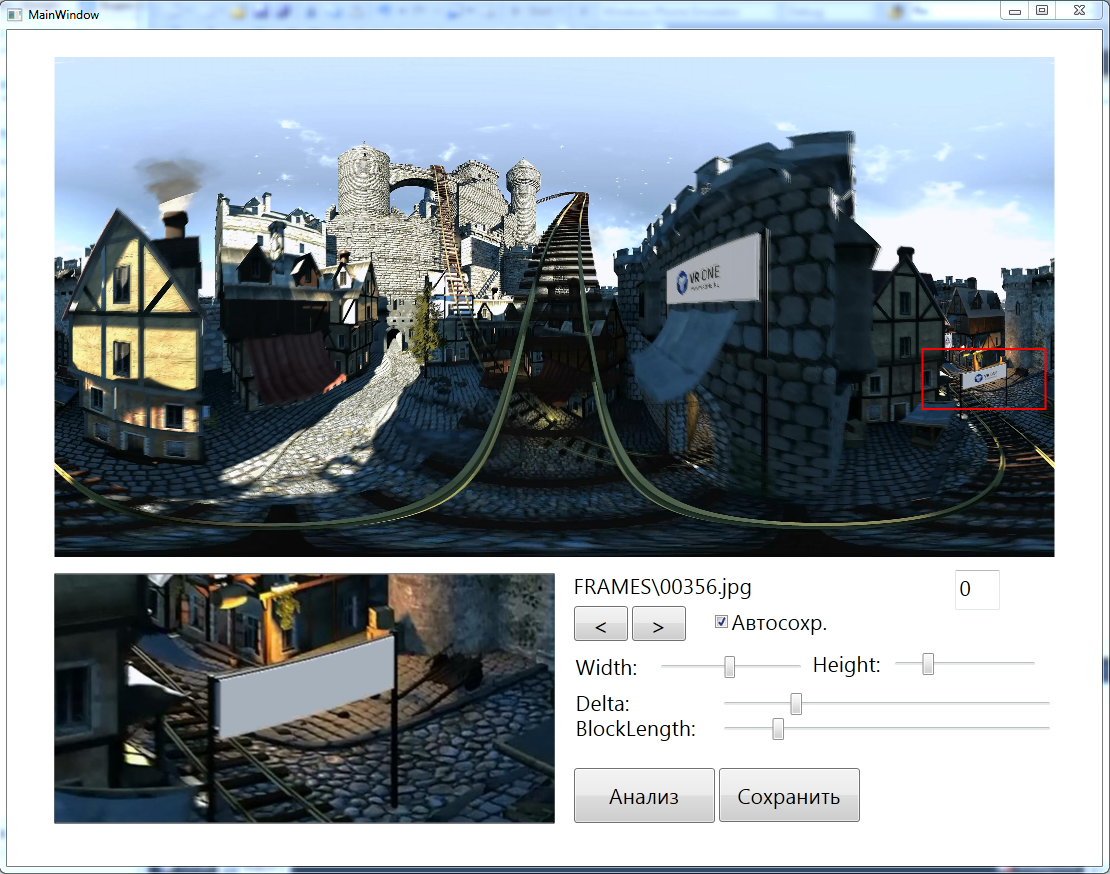
3. The right part is the settings panel containing the file name, frame number, arrows to go to the next / previous one, the option “autosave on going to the next”.
Width and Height - allow you to adjust the width / height of the red frame
Delta, BlockLength - parameters of the algorithm.
The algorithm works as follows:
1. In the area specified by the frame, it starts searching for points that differ from the specified “background” color of the banner by no more than Delta. Delta can be changed, thereby narrowing or expanding the number of colors.
2. Then a line-by-line analysis is performed and only those points that form continuous groups with a length of BlockLength remain, with two lines in each line - initial and final (marked in red):

Thus, the border of the banner of the desired thickness of BlockLength is formed, “from the inside” along the background points.
3. Blocks are connected by straight lines with a background color (banner fill, marked in yellow):
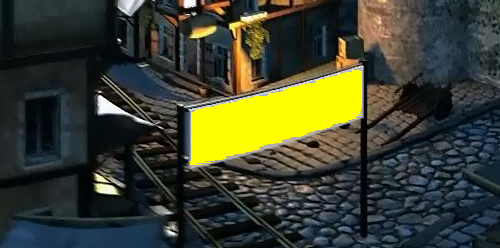
4. Voila!
With the correct setting of the default values for Delta and BlockLength, the algorithm works just fine! Often, you can flip through the frames one after the other without any additional actions, sometimes just pushing the frame after the banner moves across the frame. Sometimes, parameters can be clarified.
By the way, if they are set incorrectly - i.e. choose too much color variation or too small border length, then extra points will start to catch on:
With this program, I processed all the banners in the video in about 1.5-2 hours.
Of course, this task is very private. However, her example clearly shows the characteristic features of the “video 360” - image distortion, which makes it impossible to use standard video processing tools.
Most likely, plug-ins will appear rather soon, which will take into account the equidistant projection of the panoramic video (by the way, there are other projections ...) and right in your own After Effects successfully cope with this and other tasks.
For now ... it is necessary to invent. I hope this article will be useful to someone and will help reduce time / effort in solving their own problems.
In this article, I want to talk about one experiment on the processing of "video 360", which well illustrates some of the features of this format. Looking ahead, I will say that the experiment required the implementation of a simple algorithm and, of course, it did not go without writing a program.
What is a "video 360"?
As part of the ITMO University Video360Production.com project, we not only shoot 360 video, but also solve a whole bunch of related tasks - specialized processing of panoramic video, development of interactive applications for virtual reality helmets and much more.
')
“Video 360” (panoramic video) is created in a special way - several video cameras look “in all directions”, then the streams are synchronized and stitched into one continuous picture. One of the standards for panoramic video is a spherical sweep - a 360 * 360 stitched sphere is rotated into a frame with a 2: 1 aspect ratio (equidistant sweep), which allows you to encode a panoramic video in the usual H.264 and store it in a very watchable form.
When viewing “video 360”, you can turn it with a mouse or a finger (on a smartphone, tablet), panoramic video supports YouTube and Facebook. It looks especially impressive in virtual reality headsets - Oculus Rift , Samsung Gear VR , Google Cardboard, etc.
This is, for example, the Bravo group’s concert in the “360 video” format:
Panoramic video can be not only captured with a video camera, but also obtained from 3D engines, such as the trailer “WARCRAFT: SKIES OF AZEROTH”:
Formulation of the problem
One of the typical tasks of video processing is image replacement - there are appropriate tools in video editing programs that allow you to replace a static image or even a dynamic one. In the latter case, key tracking is used, which allows qualitatively and in (semi-) automatic mode to replace the specified image fragment with some other one.
And what about the “360 video”? Practice shows that things are not so simple ...
As an experiment, I took this video compiled from UnrealEngine into a panoramic video format and set the task, at first glance, uncomplicated - to clear all the banners hanging above the “path” the cart goes.
By the way, this video is well known to everyone who dealt with the Oculus Rift and attractions:
The task was not easy.
What difficulties arise when trying to track images in the "video 360"? In addition to the difficulties of a specific example (fast movement of a trolley, complex texture of objects) there is a characteristic feature of an equidistant sweep - atypical image distortion - “bending” and stretching as it approaches the bottom / top of the frame. It is understandable - the upper / lower part of the frame, strictly speaking, correspond to the poles of the sphere, stretched across the width of the frame.
Here's what it looks like:
From a distance, the inscription is almost rectangular, but as it approaches it starts to wrap up:
When the trolley is at the banner itself, a complete disgrace begins:
Of the attendant difficulties - high speed of movement in some areas, because of which the image of the banner is very blurry:
Algorithm
Using standard tracking tools (for example, in After Affects) for these banners does not give a good result - there are a lot of keys, they are unstable, it is difficult to capture an image. Because of this, the insertion of a white background (or rather, the background color of the banner, it is not perfectly white) is inaccurate, in some cases, completely past. Manually edit 7-15 keys on each frame is a hellish task. In fact, it is a frame-by-frame restoration of the roller
In this regard, the idea arose to optimize this process. Indeed, if you look at the problem through the eyes of a programmer, banners should be recognized well and it’s quite realistic to come up with a simple algorithm that would allow them to be “cleaned”. It is also quite obvious that the program is easier to do in an interactive style, either to indicate the starting point for the algorithm or to indicate the area to search for.
So, after some experiments, the following sequence of actions was obtained:
- We translate the video into a "pack" of images, in accordance with the frame rate. For this video, it turned out 1451 JPG frame with a resolution of 4000 * 2000.
- Next, we write an interactive program in C # / WPF, which loads the next frame of the original video, performs a banner search in the specified area, highlights its borders and paints the inside with the specified color. In case of an error, the user should have the opportunity to correct the program - by changing the borders of the working area, as well as the algorithm parameters (the desired color, the size of the desired area, etc.). In addition, the program should be able to ZOOM to work with fine details of the image.
- If all is well, the user saves the processed frame and proceeds to the next.
- From the frame is going to the final video.
Program
Appearance:
The program contains the following elements:
1. At the top - the current frame is displayed. On it, with the help of the red frame, you can designate the workspace - where the algorithm will perform a banner search.
2. Bottom left - an enlarged view of the workspace. The algorithm starts working automatically and immediately shows the result (cleared banner).
The dimensions of the frame can be changed, which allows you to zoom and work even with very fine details:
3. The right part is the settings panel containing the file name, frame number, arrows to go to the next / previous one, the option “autosave on going to the next”.
Width and Height - allow you to adjust the width / height of the red frame
Delta, BlockLength - parameters of the algorithm.
The algorithm works as follows:
1. In the area specified by the frame, it starts searching for points that differ from the specified “background” color of the banner by no more than Delta. Delta can be changed, thereby narrowing or expanding the number of colors.
2. Then a line-by-line analysis is performed and only those points that form continuous groups with a length of BlockLength remain, with two lines in each line - initial and final (marked in red):
Thus, the border of the banner of the desired thickness of BlockLength is formed, “from the inside” along the background points.
3. Blocks are connected by straight lines with a background color (banner fill, marked in yellow):
4. Voila!
With the correct setting of the default values for Delta and BlockLength, the algorithm works just fine! Often, you can flip through the frames one after the other without any additional actions, sometimes just pushing the frame after the banner moves across the frame. Sometimes, parameters can be clarified.
By the way, if they are set incorrectly - i.e. choose too much color variation or too small border length, then extra points will start to catch on:
With this program, I processed all the banners in the video in about 1.5-2 hours.
findings
Of course, this task is very private. However, her example clearly shows the characteristic features of the “video 360” - image distortion, which makes it impossible to use standard video processing tools.
Most likely, plug-ins will appear rather soon, which will take into account the equidistant projection of the panoramic video (by the way, there are other projections ...) and right in your own After Effects successfully cope with this and other tasks.
For now ... it is necessary to invent. I hope this article will be useful to someone and will help reduce time / effort in solving their own problems.
Source: https://habr.com/ru/post/279739/
All Articles