Our experience of using photogrammetry in the development of a computer game (Part 1)
This article will discuss photogrammetry and its use in creating content for a three-dimensional computer game in the Half-Life universe, which we have been developing for more than a year.
Introduction
First, a little theory for those who have come across this term for the first time. Photogrammetry is a scientific and technical discipline that determines the shape, size, position and other characteristics of objects from their photographic images. There are two main areas in photogrammetry: the creation of maps and plans of the Earth (and other space objects) from photographs (phototopography), and the solution of applied problems in architecture, construction, medicine, criminology, etc. (ground, applied photogrammetry).
')
In the case of 3D graphics, this term usually implies the process of obtaining a three-dimensional model of the object and information about the color of the diffuse reflection from it (or simply about the color of the object) on the basis of many photographs of this object taken from different angles. As a rule, the process itself is carried out automatically in several stages with the help of special programs, but the final quality largely depends on how skillfully the original photos were taken.
Why did we decide to use photogrammetry?
If only because it is interesting. Plus, we have already conducted several experiments on photogrammetry of various subjects and even gained little experience, but we wanted to unleash the full potential of this technology for creating content.
We will tell about the main reason in more detail. The action of the game “Lost Story: The Last Days of Earth” will unfold over a vast territory, the player will have to overcome dozens of kilometers, and from the very beginning it became clear to us that open spaces and natural locations will take at least half of this journey.
The appearance of natural locations consists of several main components: the texture of the sky above your head, the texture of the earth under your feet and the models of animate and inanimate nature that surround you. We faced a problem - how to implement all these components by a small team and at the same time get the best quality environment at the output? About the sky, we will talk separately in the following diaries, but now we will focus on the other components.
So, we began to sort out the options. The creation of ordinary low-poly models and the use of photo-textures - quickly, but the result is very low quality, especially in natural objects. Creating a high-poly model by hand for each stump, stone and tree trunk - qualitatively, but incredibly long for a small team - these are dozens of models that have to be painstakingly done manually.
As a result, we decided to experiment - to use photogrammetry in order to create several natural textures and models from beginning to end and find out all the pitfalls of this method. In addition, check whether he really allows you to create content of the highest level, using a minimum of command resources.
Shooting on location
We began our shooting with a few test forays into the nearby forest parks. We tried to choose cloudy days to get suitable diffused lighting. Of course, it is impossible to completely get rid of shadows in kind and a small shading of the object on the border with the ground is permissible.
But what really should be avoided when shooting for photogrammetry is strong variations of bright and dark areas on the surface of the subject. This variation is obtained in clear and sunny weather and clear shadows, and ultimately leads to the fact that all the shadows and highlights appear on the texture in the game, and the subject will be almost impossible to fit into the scene with a different lighting.
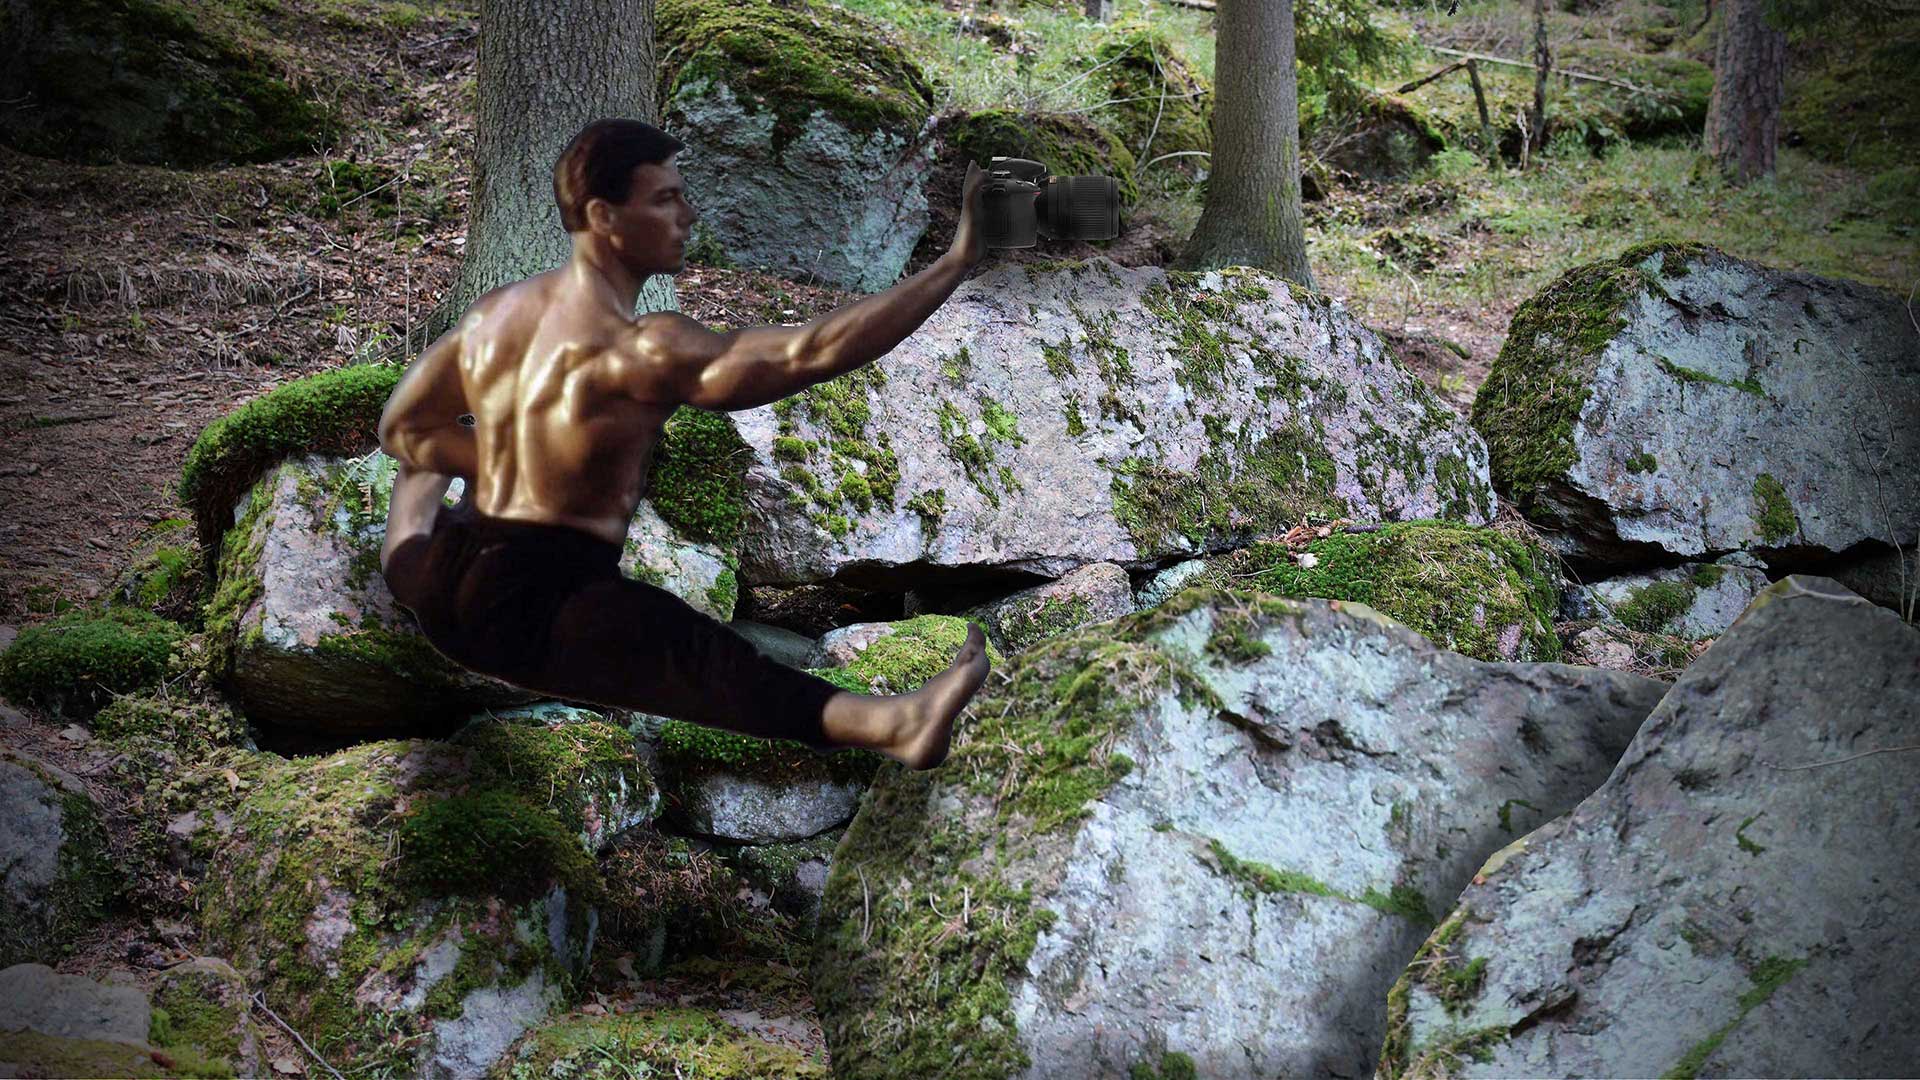
In general, shooting on location does not cause any particular difficulties, and one person can capture 4-5 objects in one working day, and if you work in a pair, you can have more than 10, which is quite impressive. In addition to dependence on the weather, there was only one more unpleasant moment - in order to find interesting objects you sometimes climb into the thicket of the forest. There, as a rule, it is impossible to work even with monopods and you have to work wonders of acrobatics and stretching.
After several of our raids, we now know exactly how the famous action movie actor 90x trained in the photo above.
Shooting in the "studio"
On the shooting in the "studio" we thought, when it became clear that the stones shot on location, is not too convenient to use to create levels. The fact is that most of the boulders sit deep in the ground and in the final model one of the six sides will be completely absent. Because of this, it is difficult to work with such boulders when creating a location. The “hole” at the base of such a stone limits the angles of rotation, which in turn prevents the use of copies of models close to each other - it is very noticeable that this is the same model. For all these reasons, it was decided to collect several small stones with an interesting texture and shoot them in the “studio”.
Why do I write “studio” in quotes? Yes, because the shooting was done at home, where we created an improvised “studio” from scrap materials! For high-quality shooting you need a lot of light, which of course is not enough in an ordinary apartment, so you had to go shopping. After visiting a couple of photo shops and putting a mean male tear on the price tags of professional lighting equipment, we did not lose heart and decided to act differently.
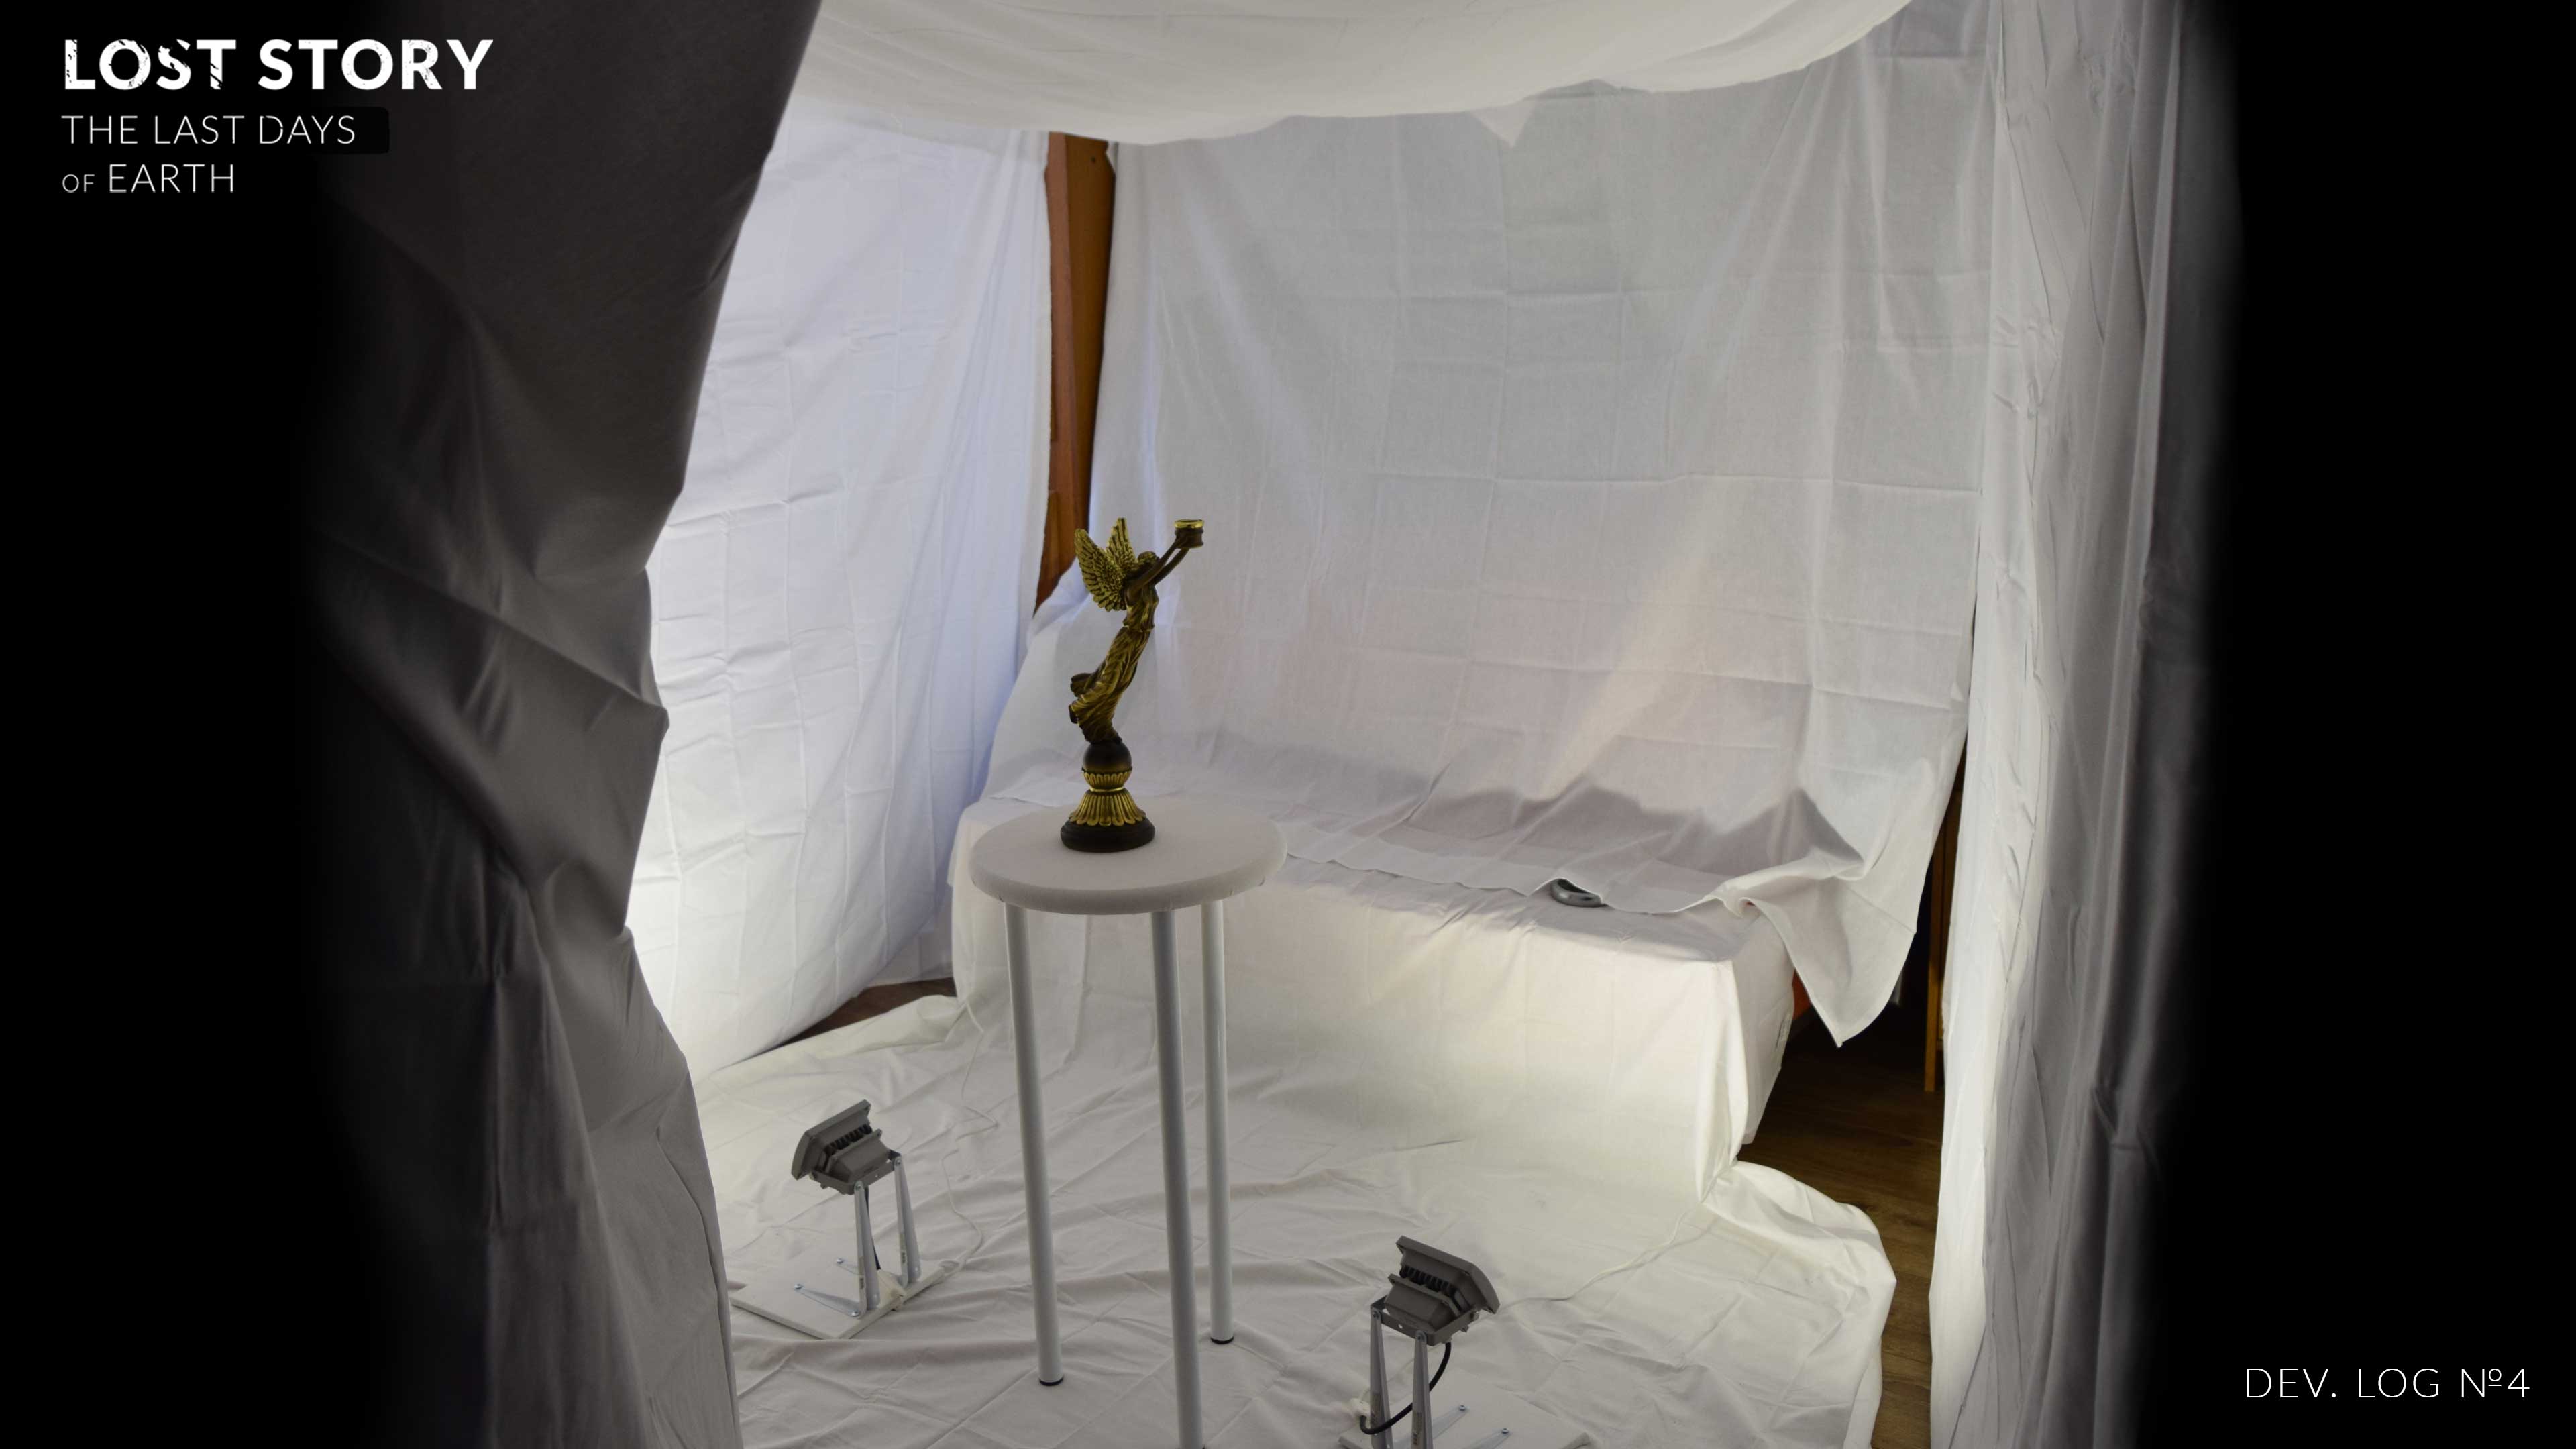
After a couple of days and several trips to the construction stores, the “studio” was ready. With the help of our crazy hands: six white sheets turned into Aladdin's tent - he is a soft box to scatter light; plugs for the socket, convenient switches and supports were added to the powerful street lamps; from three metal legs, a small tabletop and fabric turned out to be a comfortable stand.
Well, the final touch was a homemade pedestal with “famous” fifteen-centimeter self-tapping screws, which allows you to get uniform diffused lighting, shoot the object from all sides and, as a result, get a completely closed model without holes.
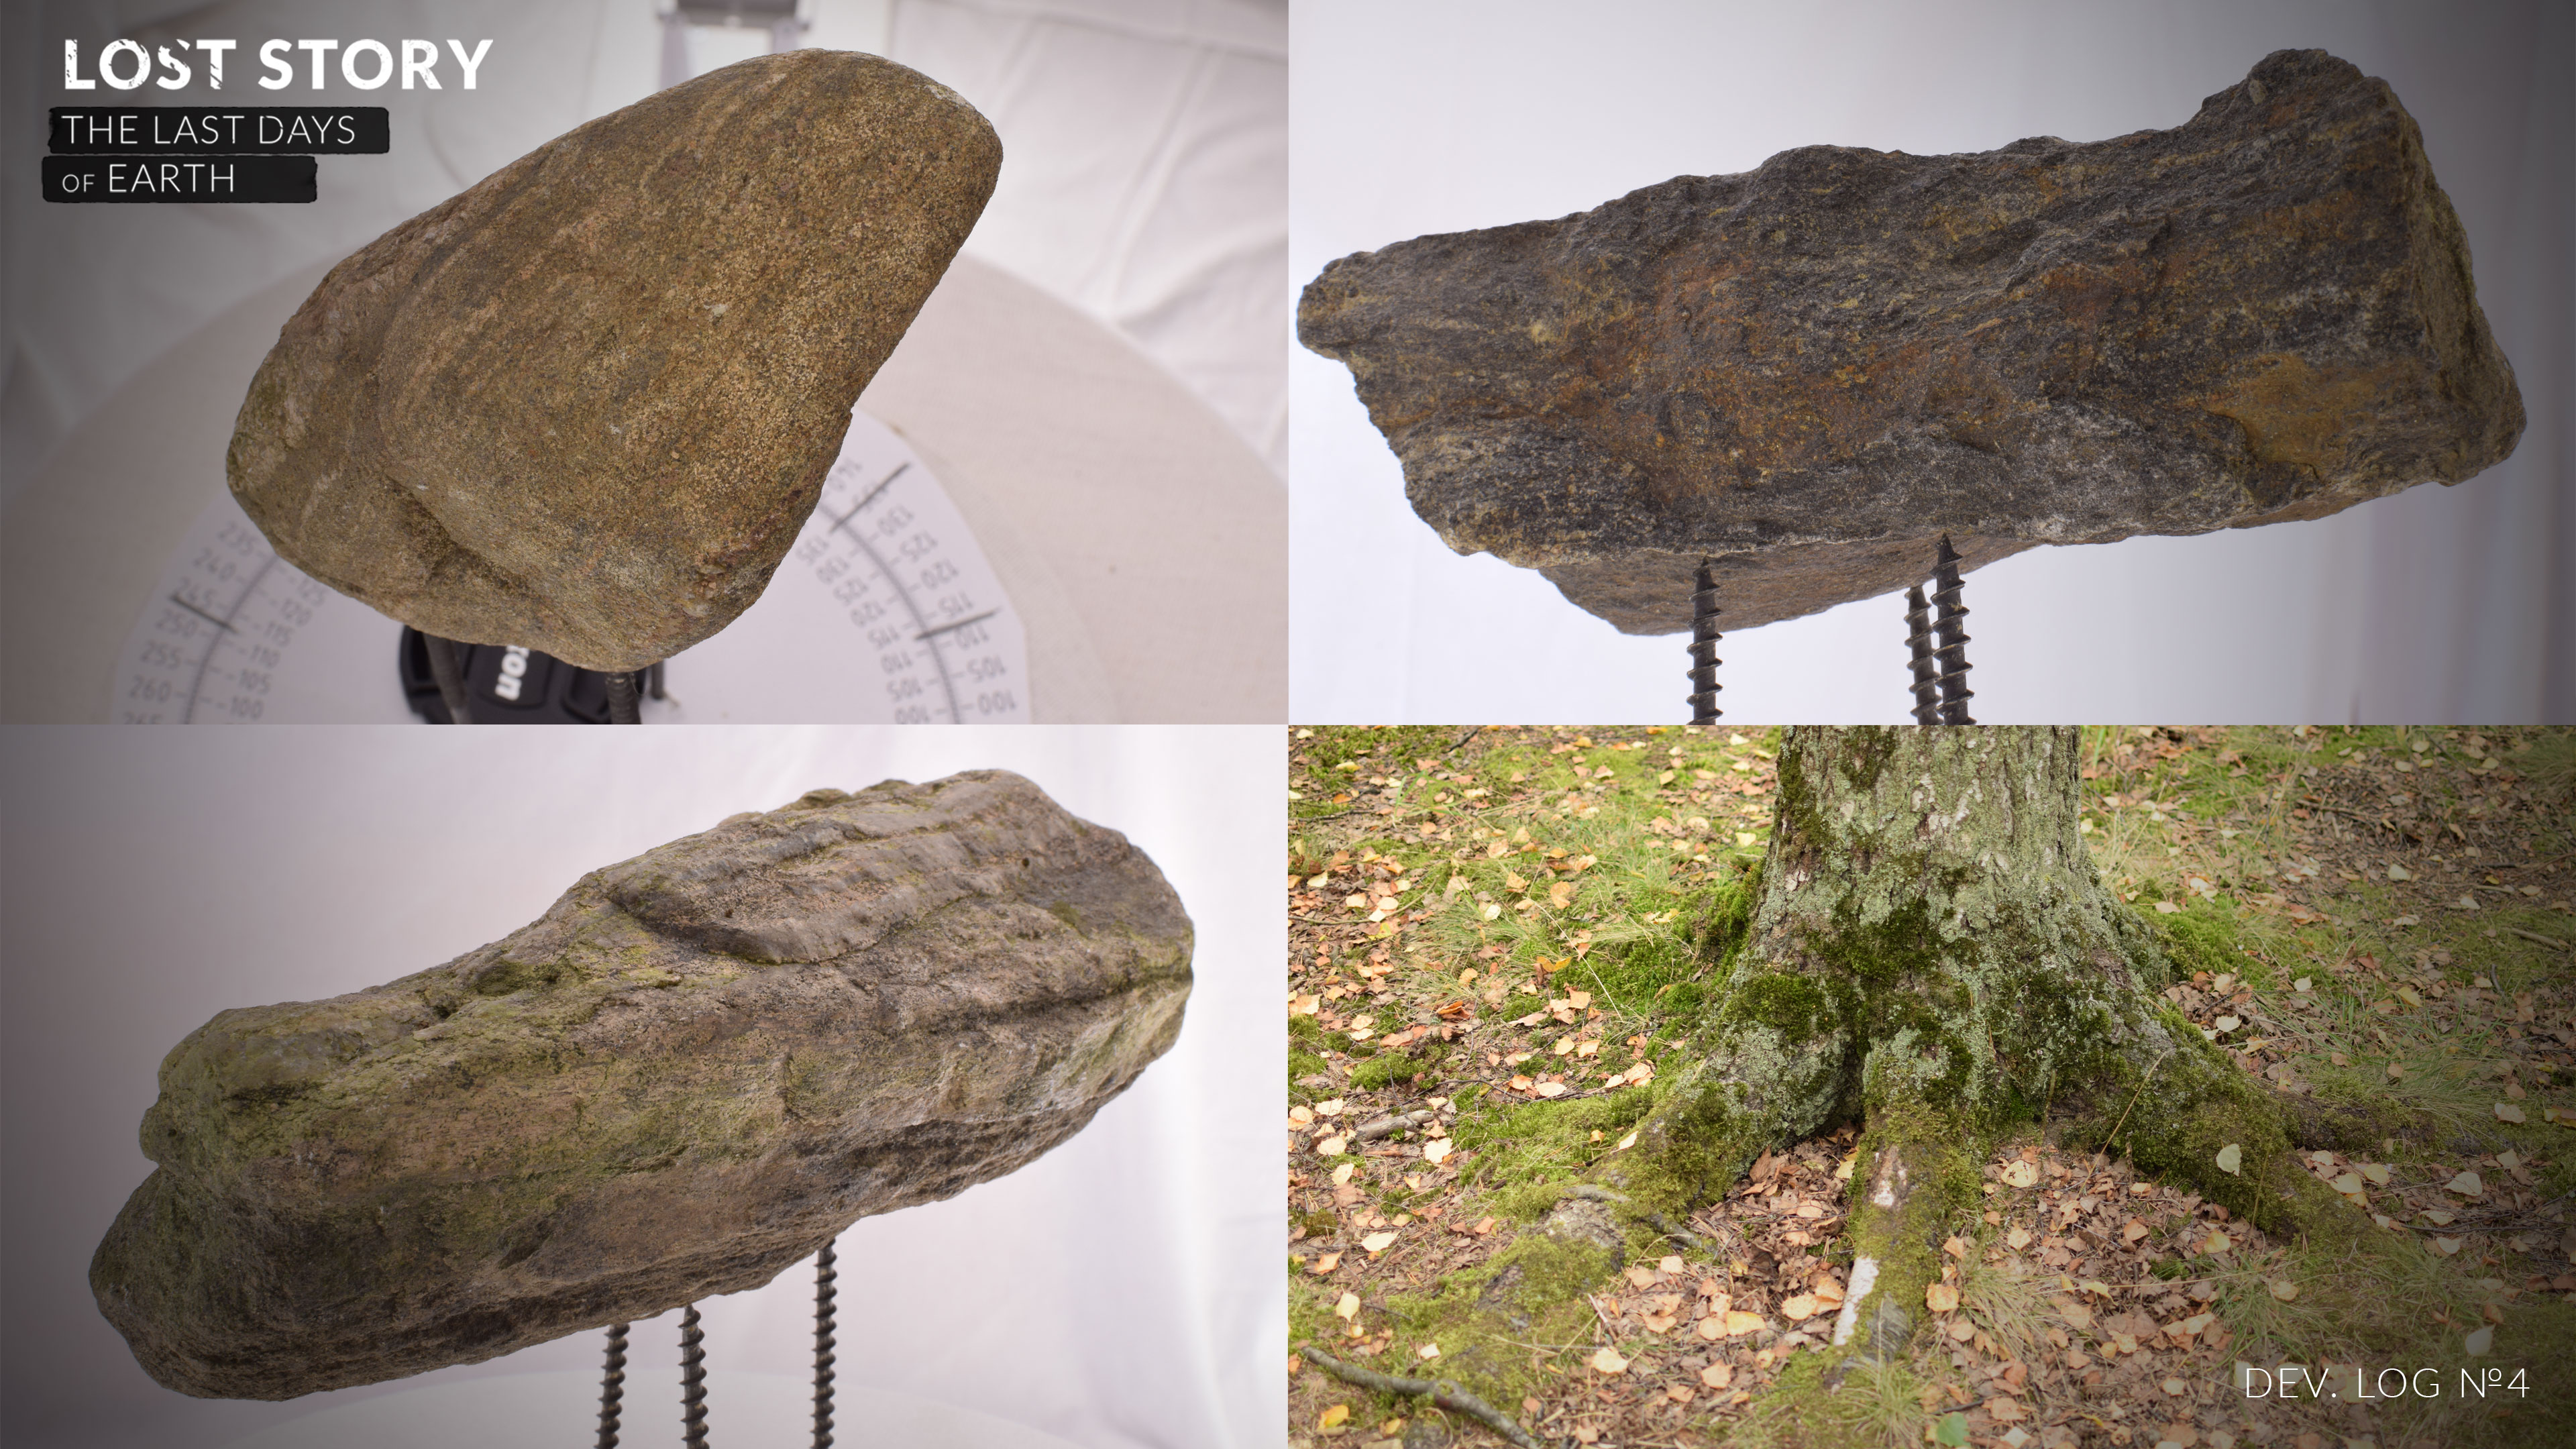
Shooting in the "studio" go slower, because the light is much smaller than outside and you have to use a tripod. Nevertheless, in one working day you can shoot 3-4 objects. The main difficulty is the monotony of the process, but we did manage and shot a dozen stones, as well as several other items.
Photo processing
The next step after the shooting is photogrammetry itself. We additionally process all photos before loading into the program for photogrammetry, trying to remove the remnants of shadows and highlights. The process itself takes place in several stages, each of which requires a special adjustment, which can take sufficient time if you have little experience or if the original photos are of poor quality. We already had a little experience, so the whole process of processing one object took about 2 hours on a regular gaming computer of last year’s assembly.
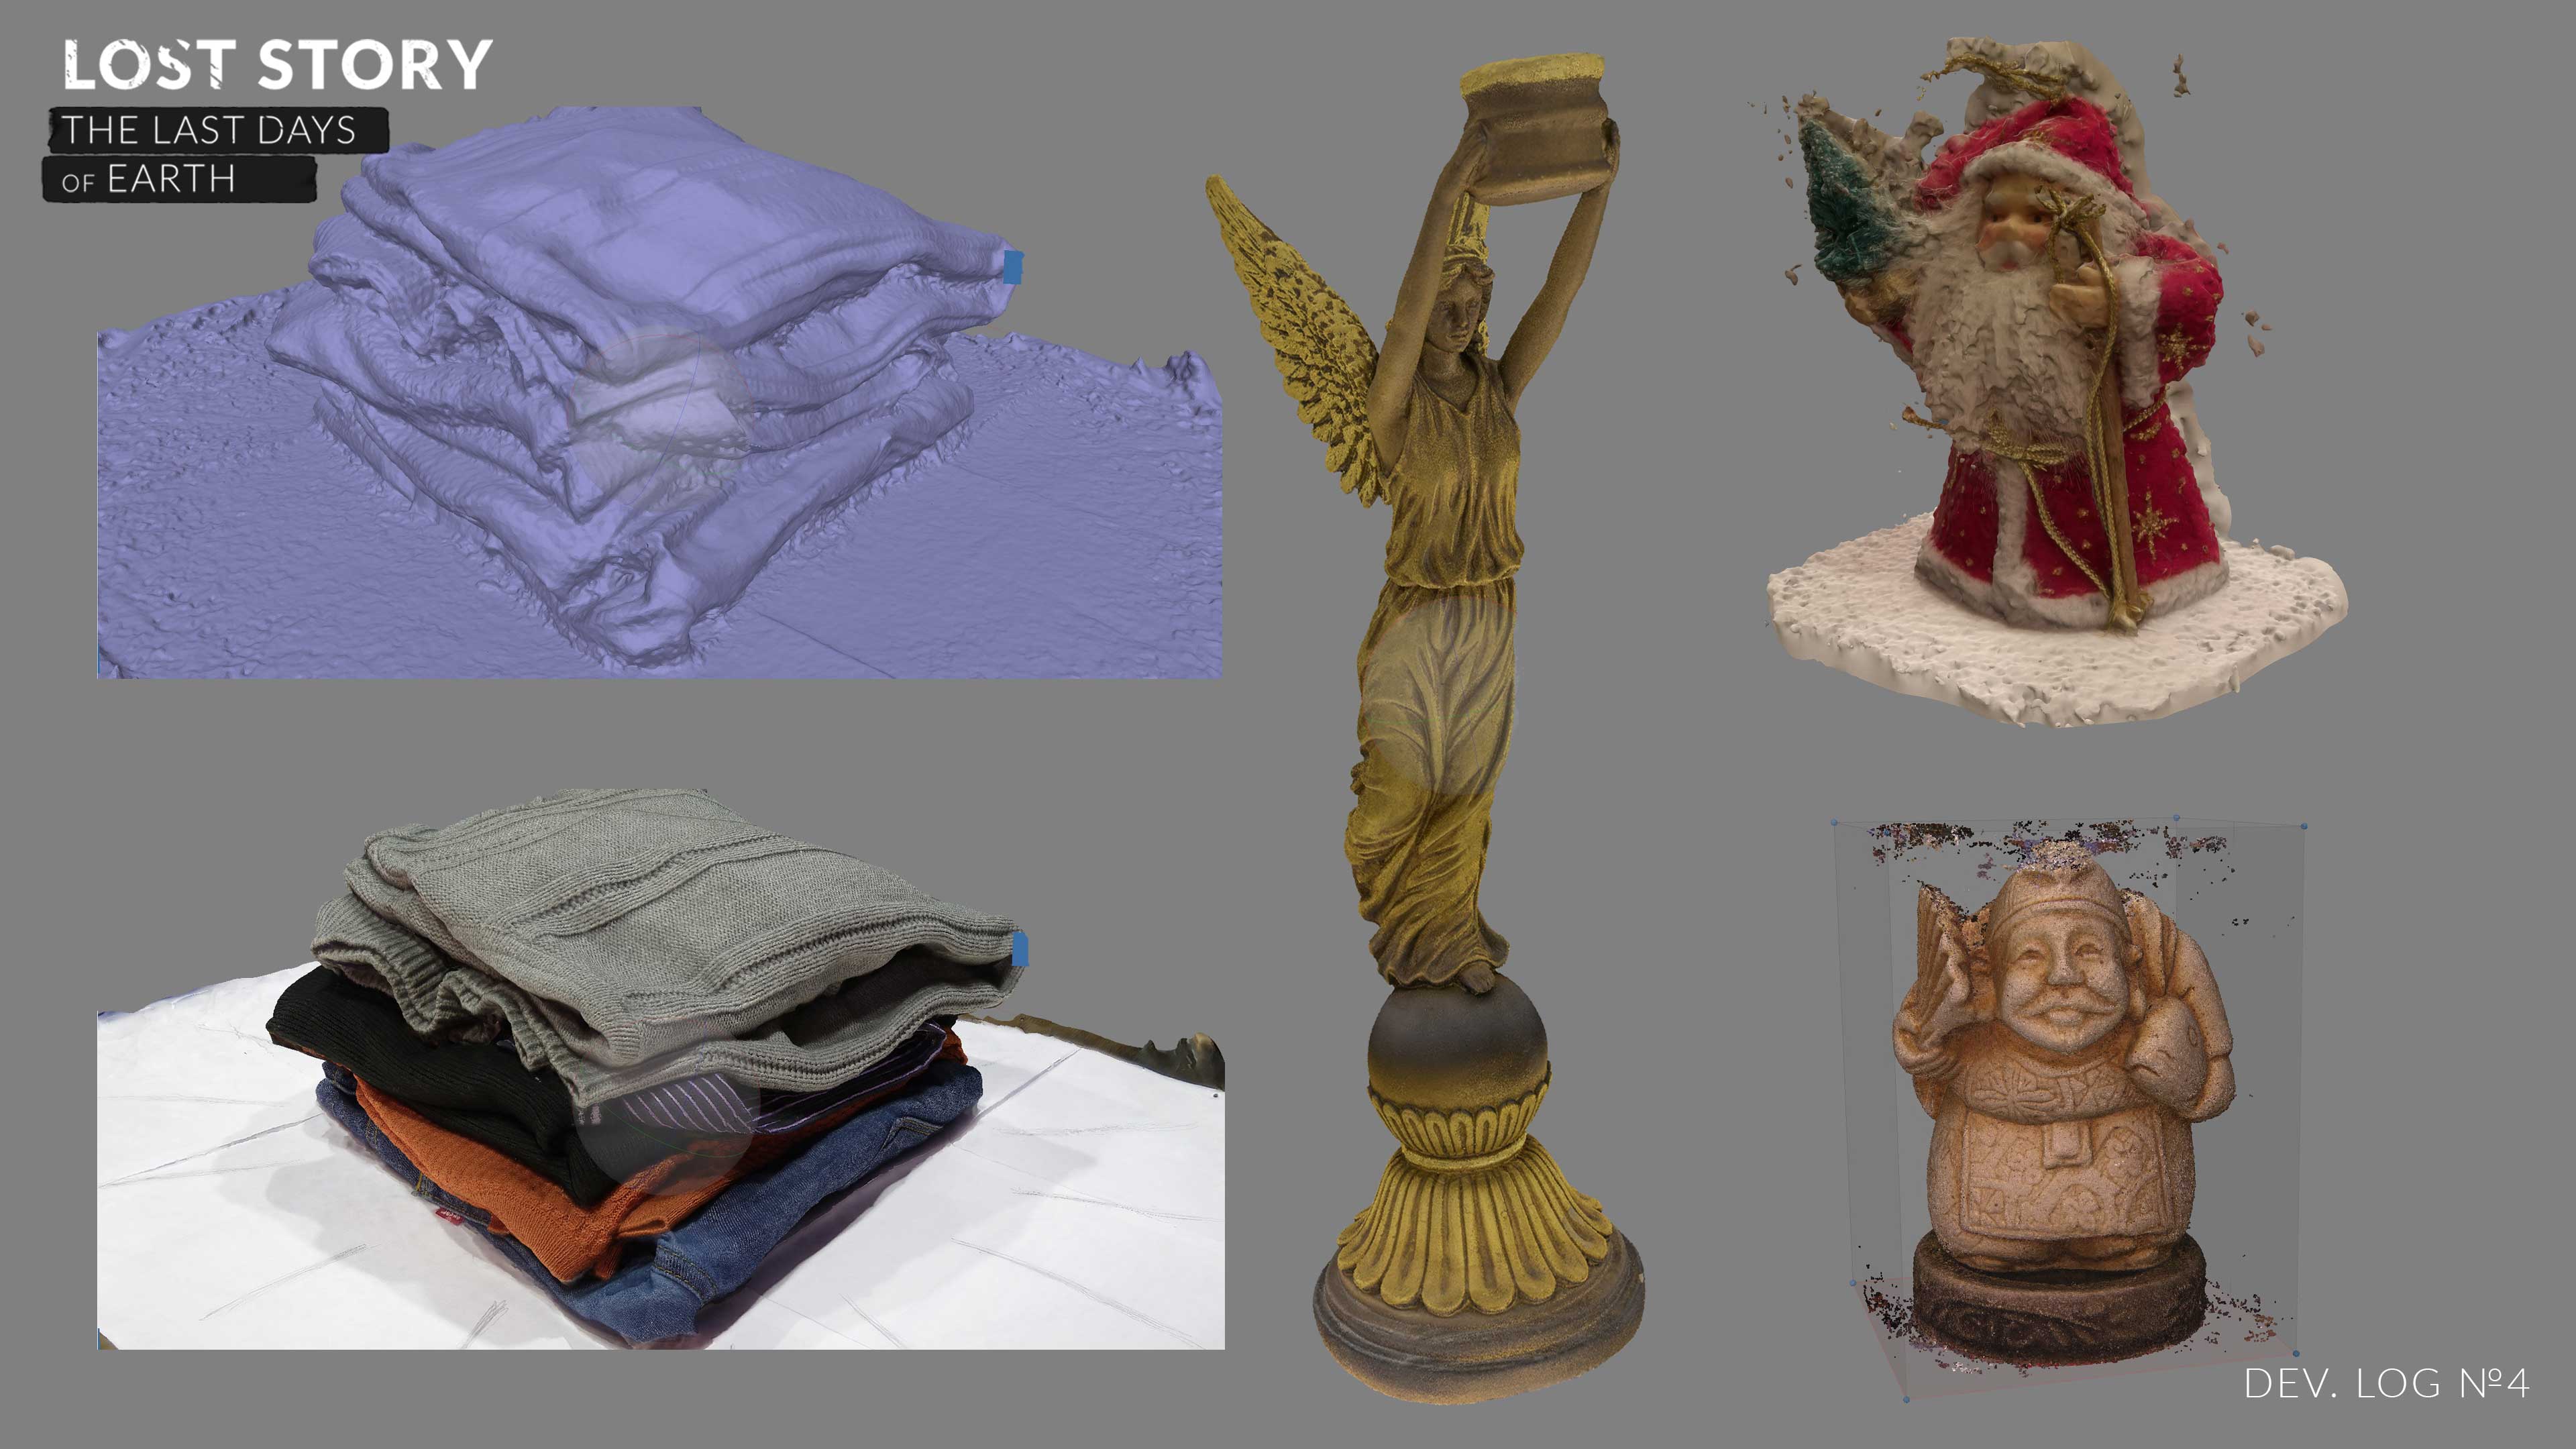
As a result of processing, we received models with polygons from 9 to 13 million triangles and an albedo map of 16,384 pixels for each model (presented below).
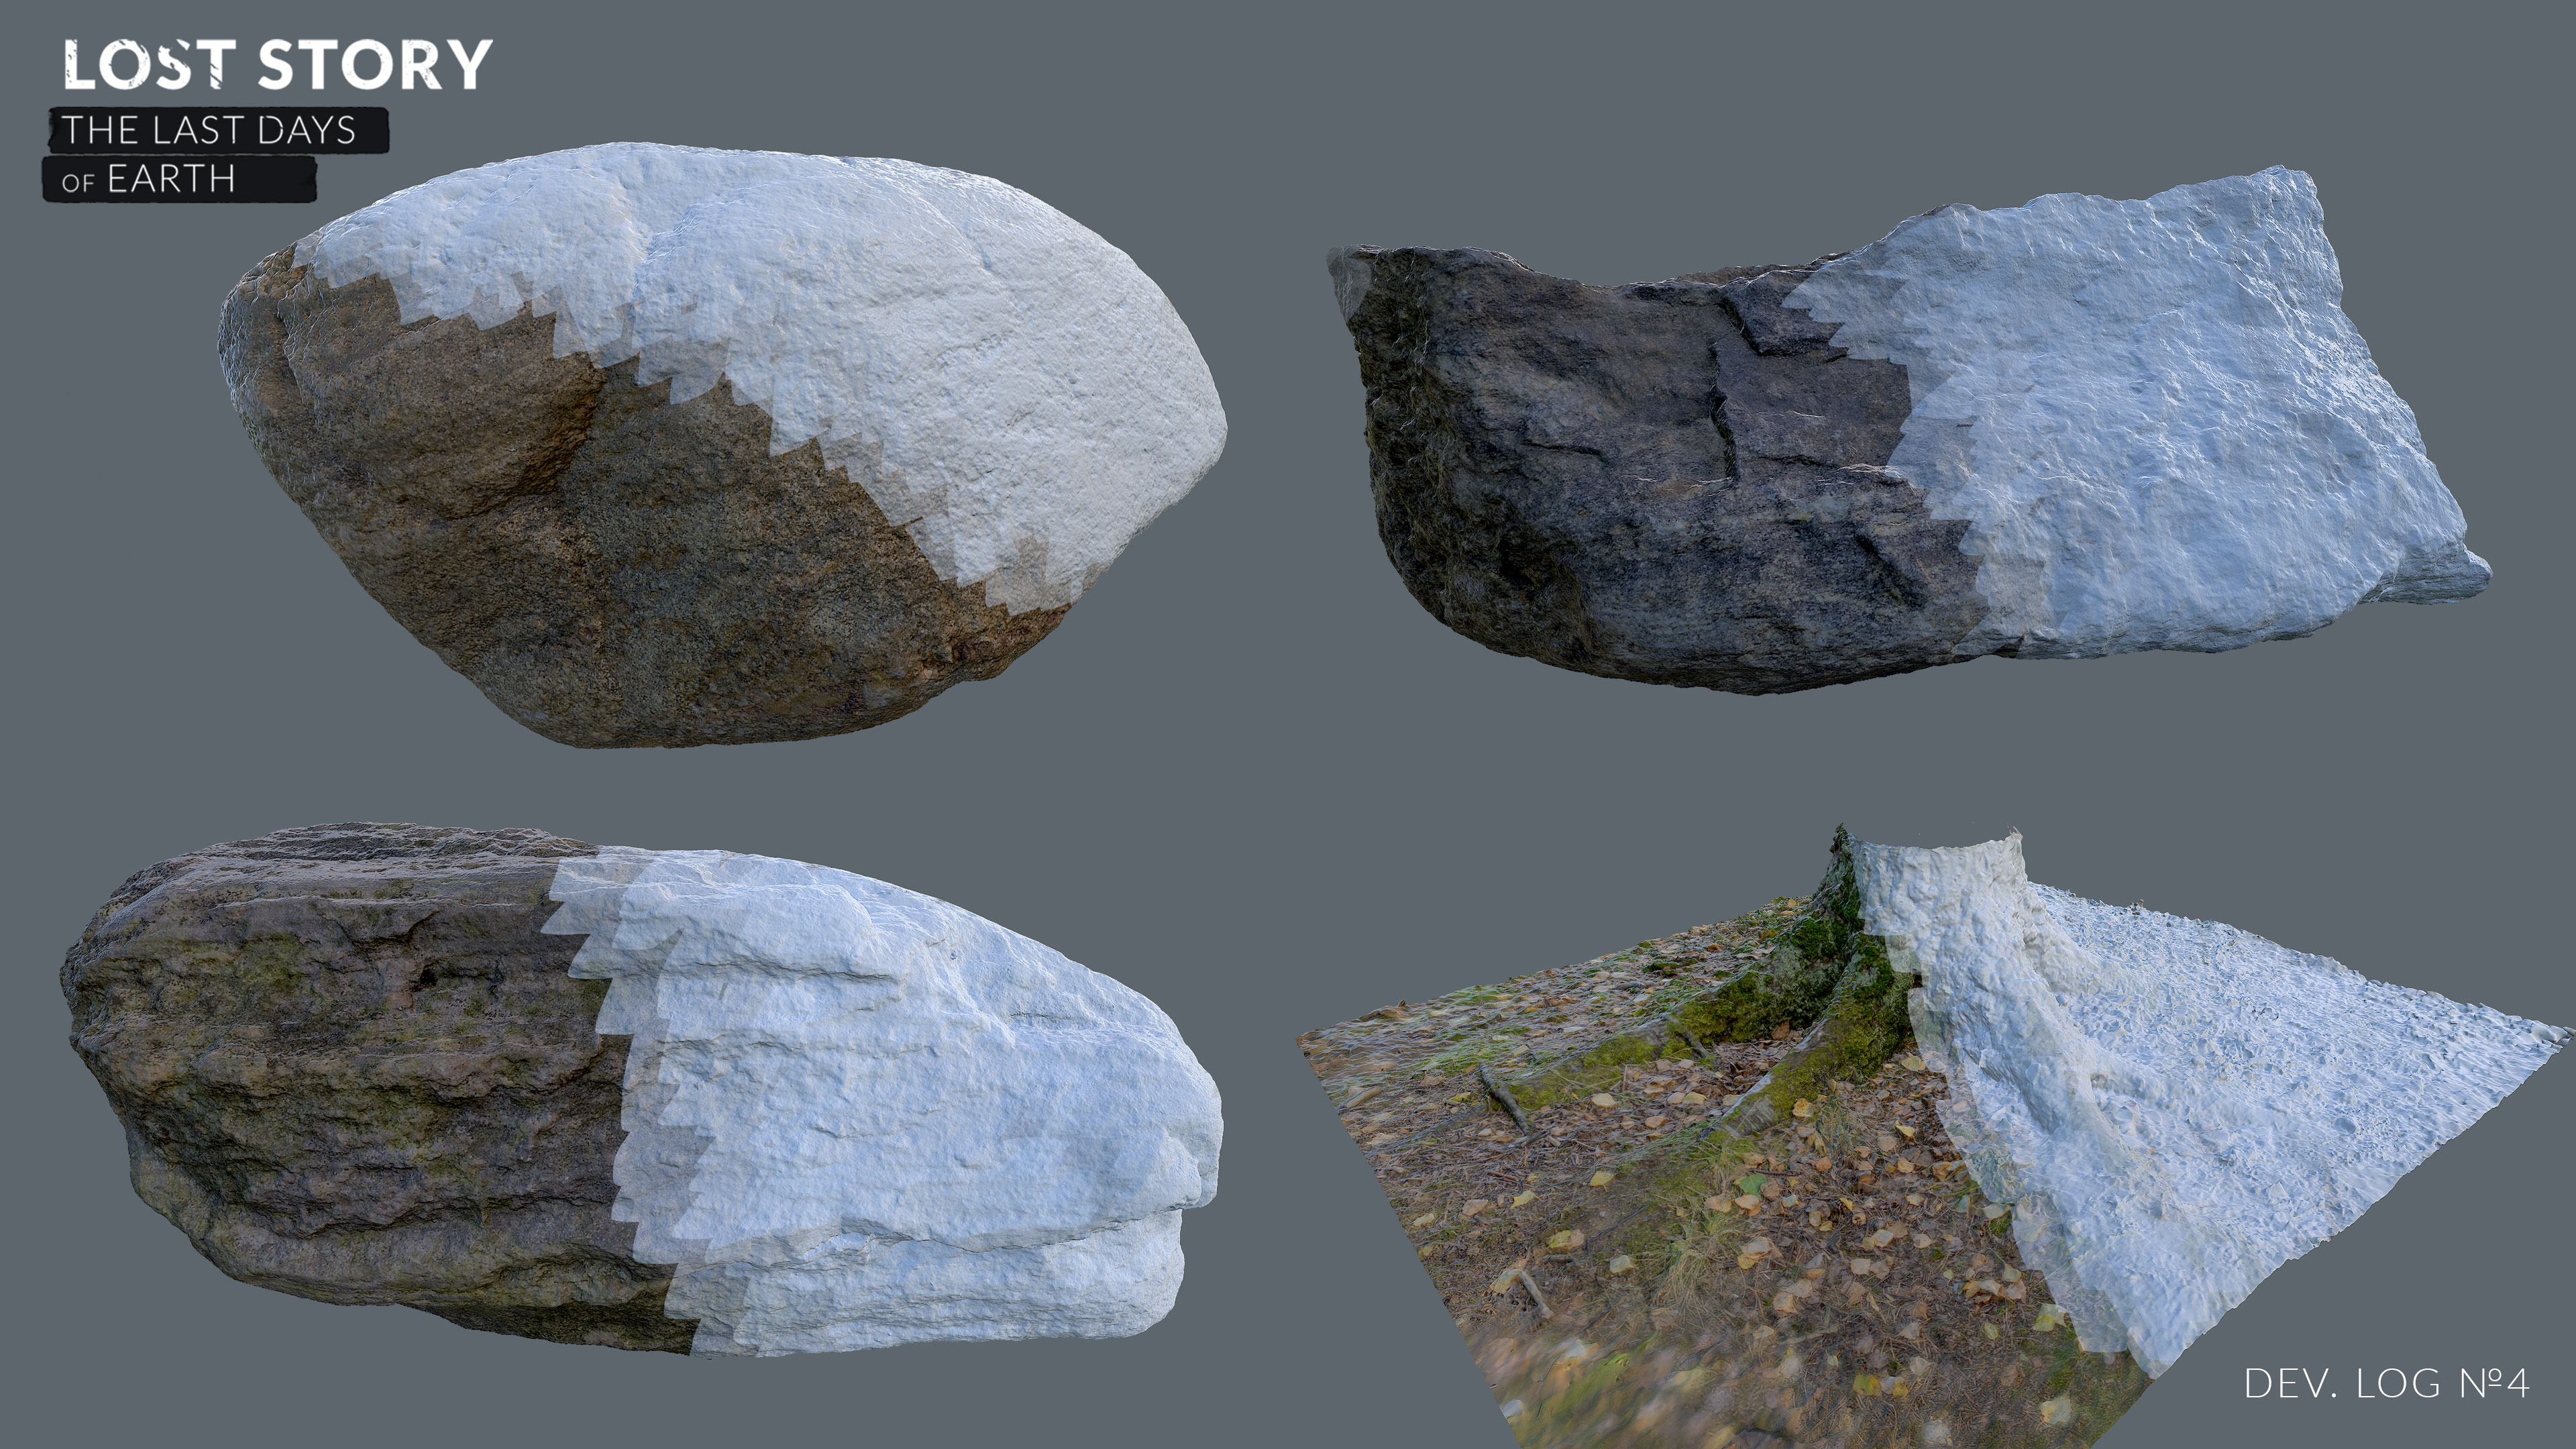
At the same time, as you can see, with those stones that we shot in the “studio” we managed to achieve complete isolation of the polygonal mesh, and thanks to the use of masks for photographs, no trace remains of the screws that held the stones.
results
After obtaining high-poly models, the process is not much different from the process of creating high-quality content for games using conventional methods, there are only small nuances. First, on some high-poly models, small relief defects were corrected, then low poly models were created for the game engine on the basis of high-poly models in the retopology process.
It is worth noting, however, that due to the fact that natural objects have a chaotic surface, the retopology was carried out almost completely in automatic mode. Another small difference: after creating a UV sweep, from a high-poly model besides the usual information (relief, shading, bending of a surface, etc.), the albedo map was transferred to the texture coordinates of the low-poly model.
The final stage of the work was the preparation of materials and models for the engine and setting the color of the albedo map so that all models would better fit each other and fit into the environment. But that is not all! In the final, we had another small experiment.
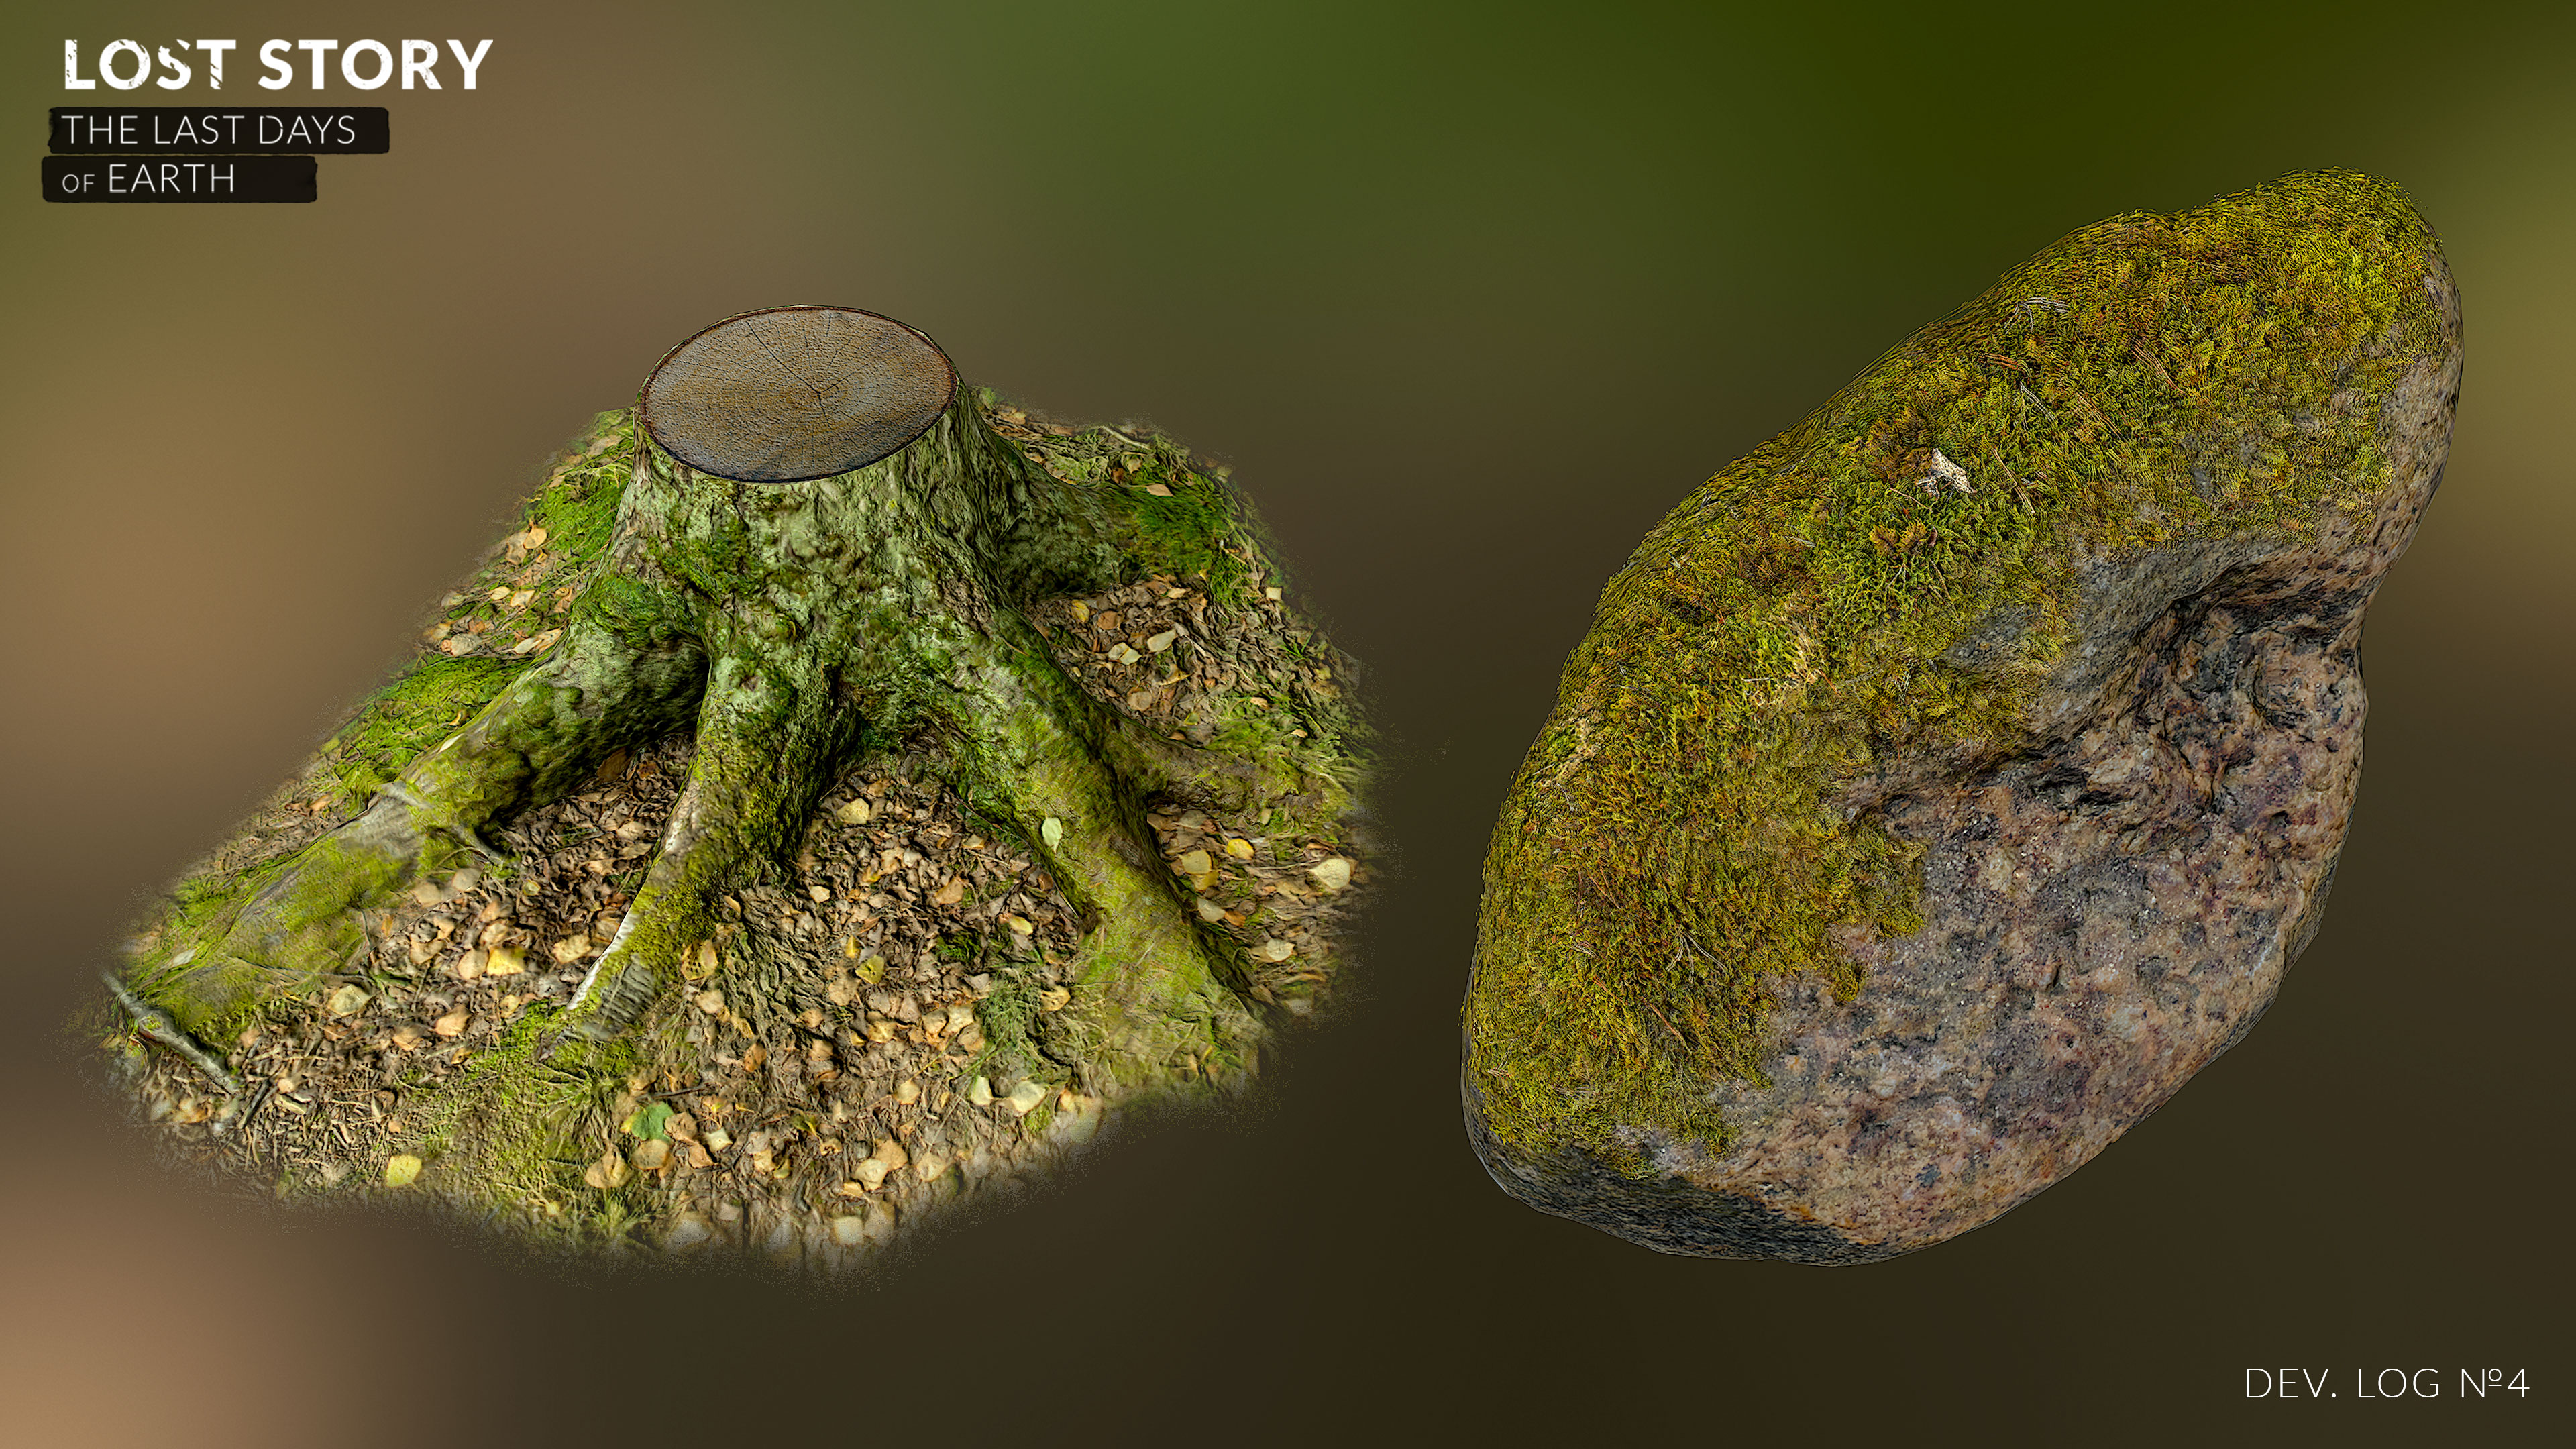
Our stone models have a closed geometry, which means that we can position them at any angle. At the same time, there is no moss on the texture of our stones, but we have a separate material of moss, also obtained using photogrammetry (for details, see the second part for details). Thus, we can impose moss from any side of our stones and get even more variations on how they will look!
“But the moss must be fluffy!” - you will say. Right! It was here that we remembered the Play Station 2 method of the times, namely, the multilayer geometry with the alpha channel. The result was quite satisfactory for us: it looks great, but it almost does not require resources! So, working on photogrammetry, we have a method for creating fluffy materials, be it moss, nap or even wool.
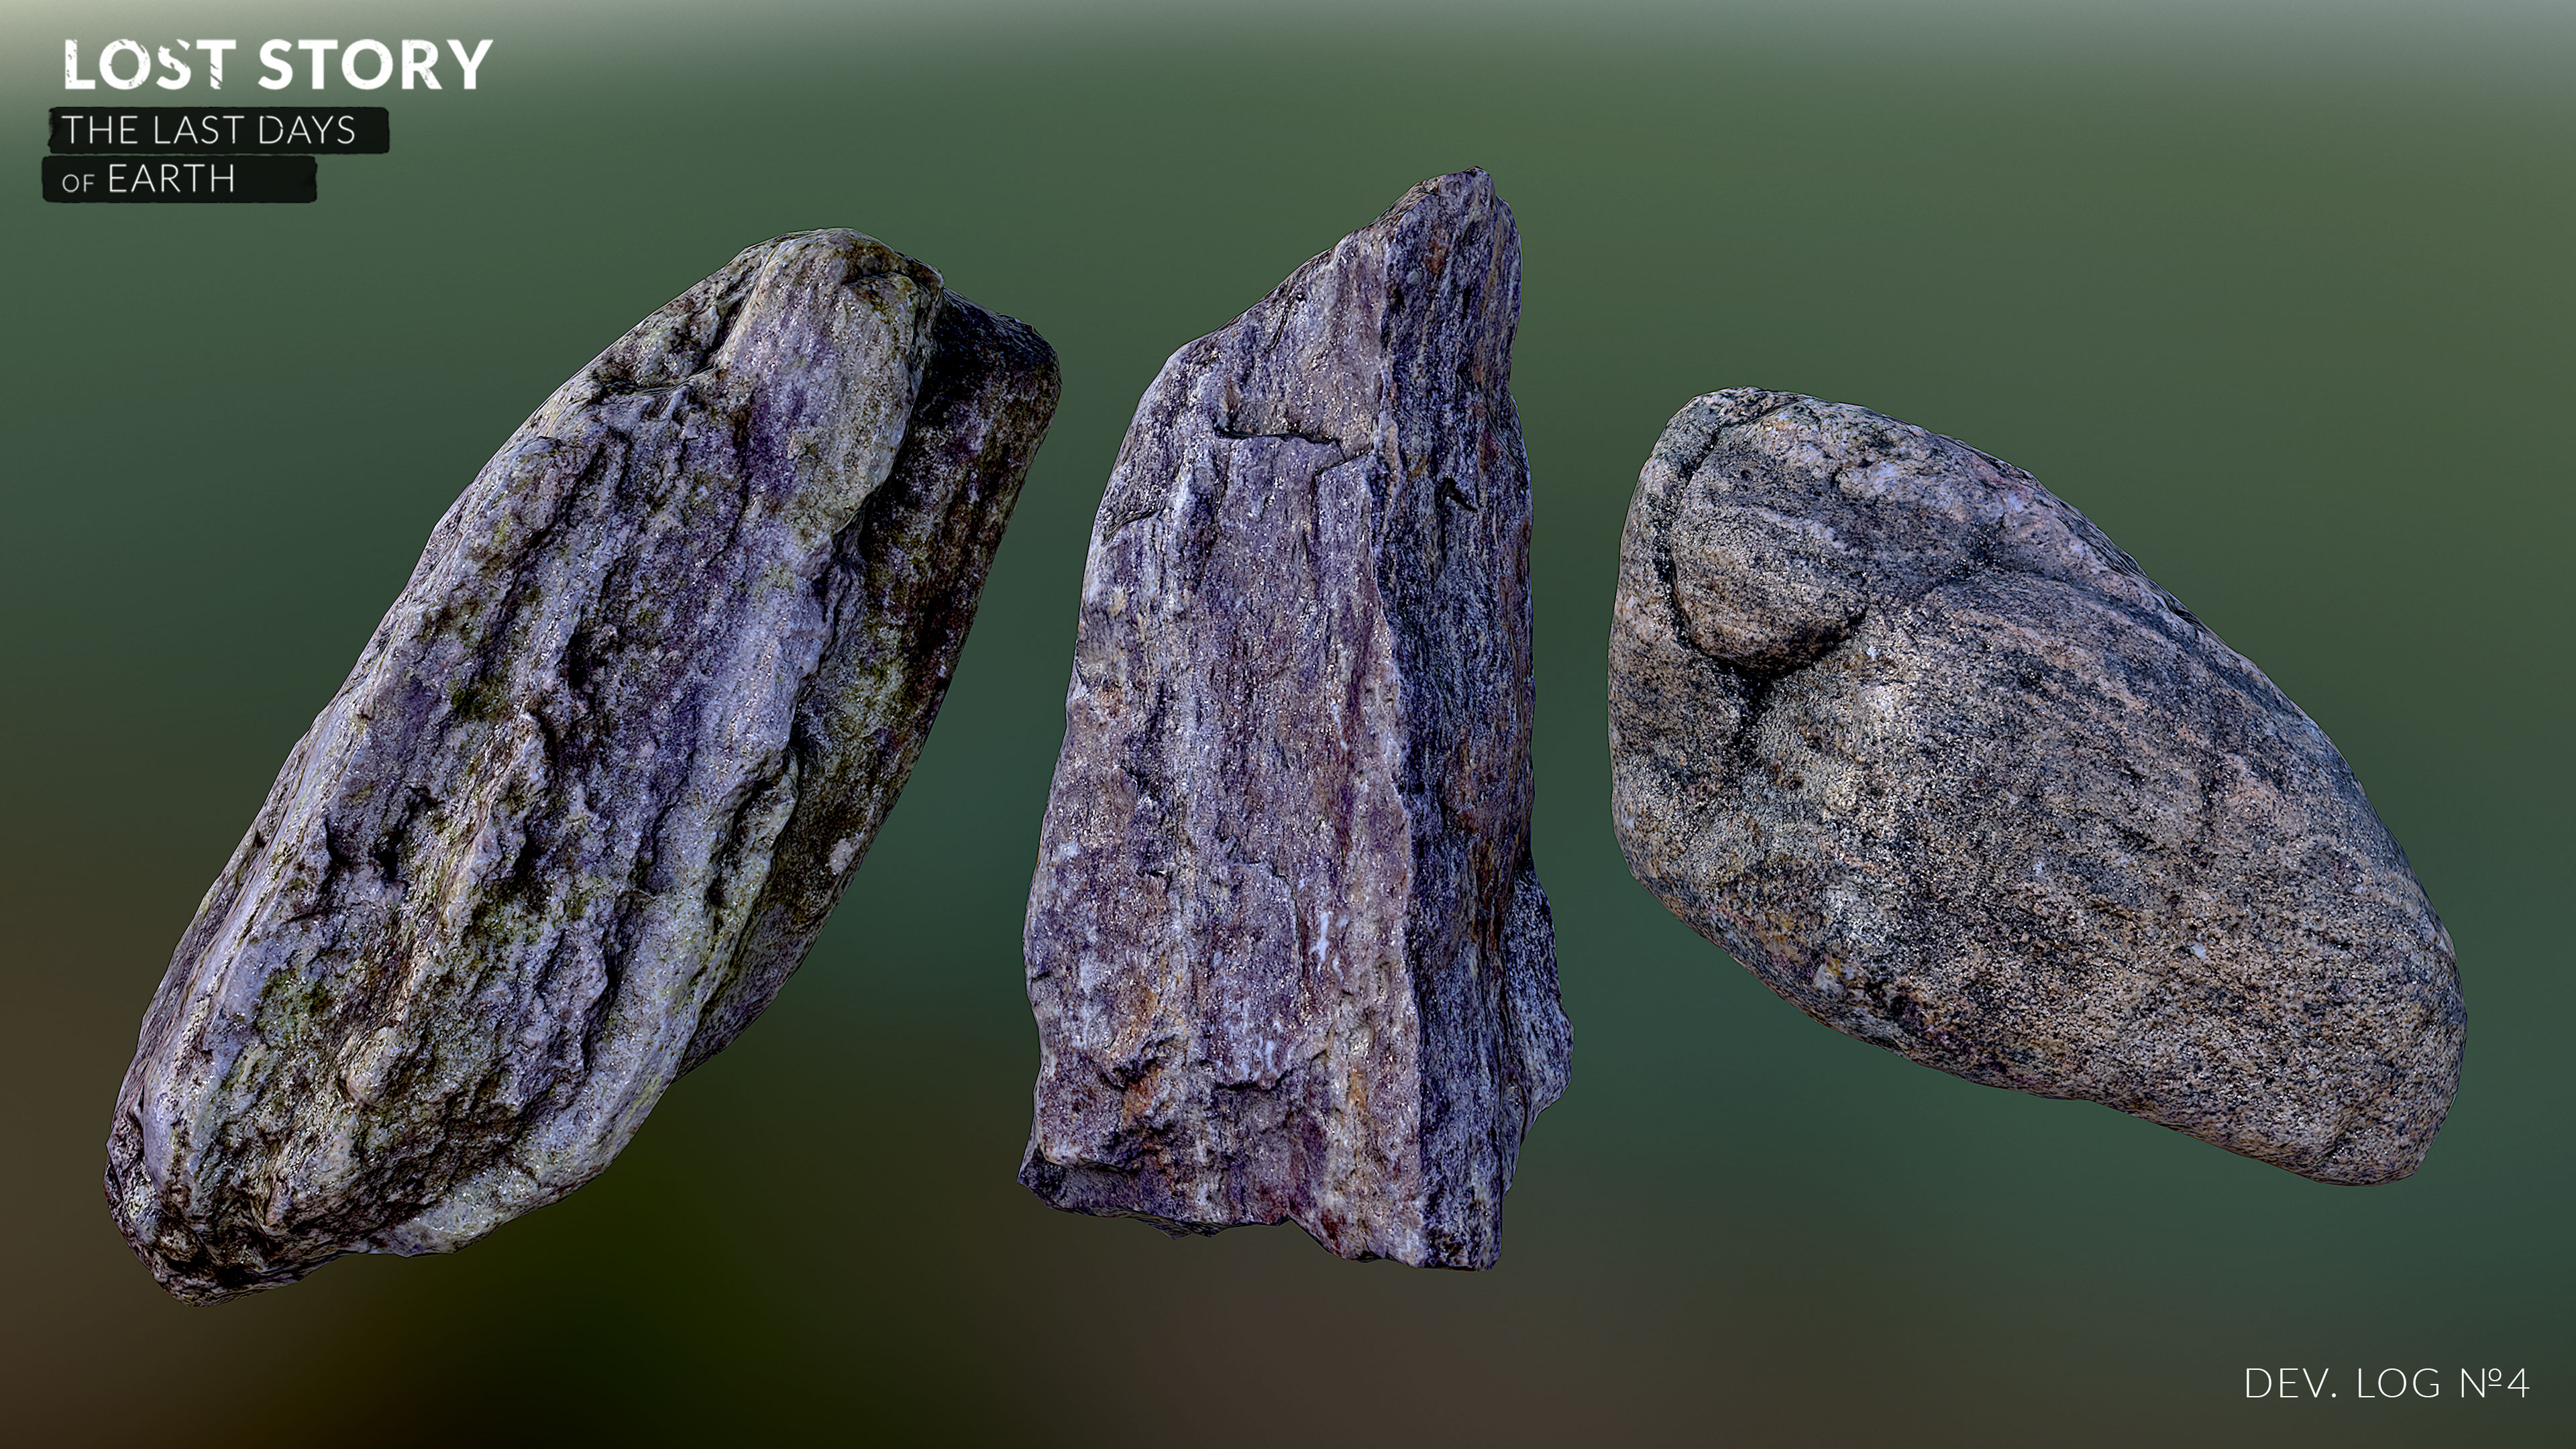
The final low poly models you can see above and below. Their render is as close as possible to how they will look in the game. Screenshots of the same game with the final models are waiting for you in the second part of this diary, which will be published a little later.
In conclusion, I would like to note that according to our calculations, it took us an average of 2-3 days to get one final model from the photos (not taking into account the time for shooting). In this case, only one 3D artist was engaged in this, and this is impressive, considering the final quality.
I hope the first part of the article was interesting. Do not forget to share your opinions in the comments and expect the second part of the diary .
Source: https://habr.com/ru/post/279591/
All Articles