How to write custom activation for a business process for cloud Bitrix24
At the winter partner conference 1C-Bitrix 2016, Oleg Strokaty and Alexey Kirsanov showed a master class, during which they developed custom activations for the business process under the cloudy Bitrix24. Information on this topic is also in the course "Bitrix Framework Developer" (links - at the end of the post).
Having studied these materials and tested them on our projects, we have compiled for ourselves a simple and detailed summary of actions to develop activites for the cloudy Bitrix24, which also includes some trifles, which in the above sources were understated, apparently, the developer who studies them already has a certain knowledge base. I want to share this memo in this post.
Custom activation for cloud Bitrix24 is implemented as an application of the so-called “second type”. That is, the php file with the activation handler and its installer must lie somewhere on the external web server, and Bitrix24 will access it at a specific address, for example,
')
https: //your_domain/b24/activate_name/index.php
It is this address that is used to add the application to the portal, and to publish the application to the Bitrix24 marketplace.
1 Where to start
1.1 SSL certificate
For such an application to work correctly, a domain must have an SSL certificate (at least Domain Validation (DV) Certificate). You can develop and test the application without an SSL certificate, but you will need it for the actual operation of the application, so you should take care of it in advance.
1.2 Application structure
In the application file itself, first of all, it is necessary to form the skeleton - the structure of the application page.
This skeleton can be immediately connected in the test portal as described below and start building up and debugging. When we change something in the application code on our server, there is no need to reconnect the application on the Bitrix24 side - just reload the application page.
2 What data we get and how to check them
When our custom activation will be called up as part of a business process, something will come to our application in the $ _REQUEST array.
The values of the activation parameters set during the execution of the business process will be available to us in $ _REQUEST ['properties'].
In the array $ _REQUEST ['auth'] there will be data for authorization, which will need to be used by sending requests to REST-api Bitrix24.
Naturally, you need to check the contents of the $ _REQUEST array for the correspondence of the incoming data to the data format that we expect to receive. Some minimal data check can be organized using simple functions:
It is possible (and necessary) to use more complex checks using regular expressions, but this post is not about them.
3 Using REST-api Bitrix24 on php
Next, we need a php function that, through curl, will send requests to Bitrix24:
If we need to call rest-api Bitrix24 from the php-code, we can further use this function:
4 Application Debugging Method
Immediately the question arises: how to debug our application? It is also performed on our server - that means we can safely log everything into a file. You can, for example, use the functions php fopen, fwrite, fclose. Well, we also have Bitrix on the server, so we like to use the AddMessage2Log function from the bitrix framework (having previously connected the header).
5 Using REST-api Bitrix24 on javascript
We can call rest-api bitriks24 and through javascript. In the following way:
6 Creating and deleting a simple activation
In particular, we need 2 java script handlers to install and remove our activations (in this example we create activations for the cloudy Bitrix24, which requests the user ID and returns its data to the business process: phone, skype and position):
7 Logging javascript requests and responses
If we plan to place our application in the Marketplace Bitrix24, we must log all requests and all responses from Bitrix24 - not only those that are sent from the php-code, but also those that are sent from javascript
If we also have Bitrix on the server, you can use the js functions of the Bitrix framework library.
The script logger that we pull on an Ajax from our javascript may look like this:
8 Do not forget to return the answer to the business process.
If declaring the activation, we set the parameter 'USE_SUBSCRIPTION': 'Y', we are obliged to return to the business process the answer corresponding to the array of output parameters RETURN_PROPERTIES described for activating. For this we use rest-api bizproc.event.send
9 Adding an application to the portal
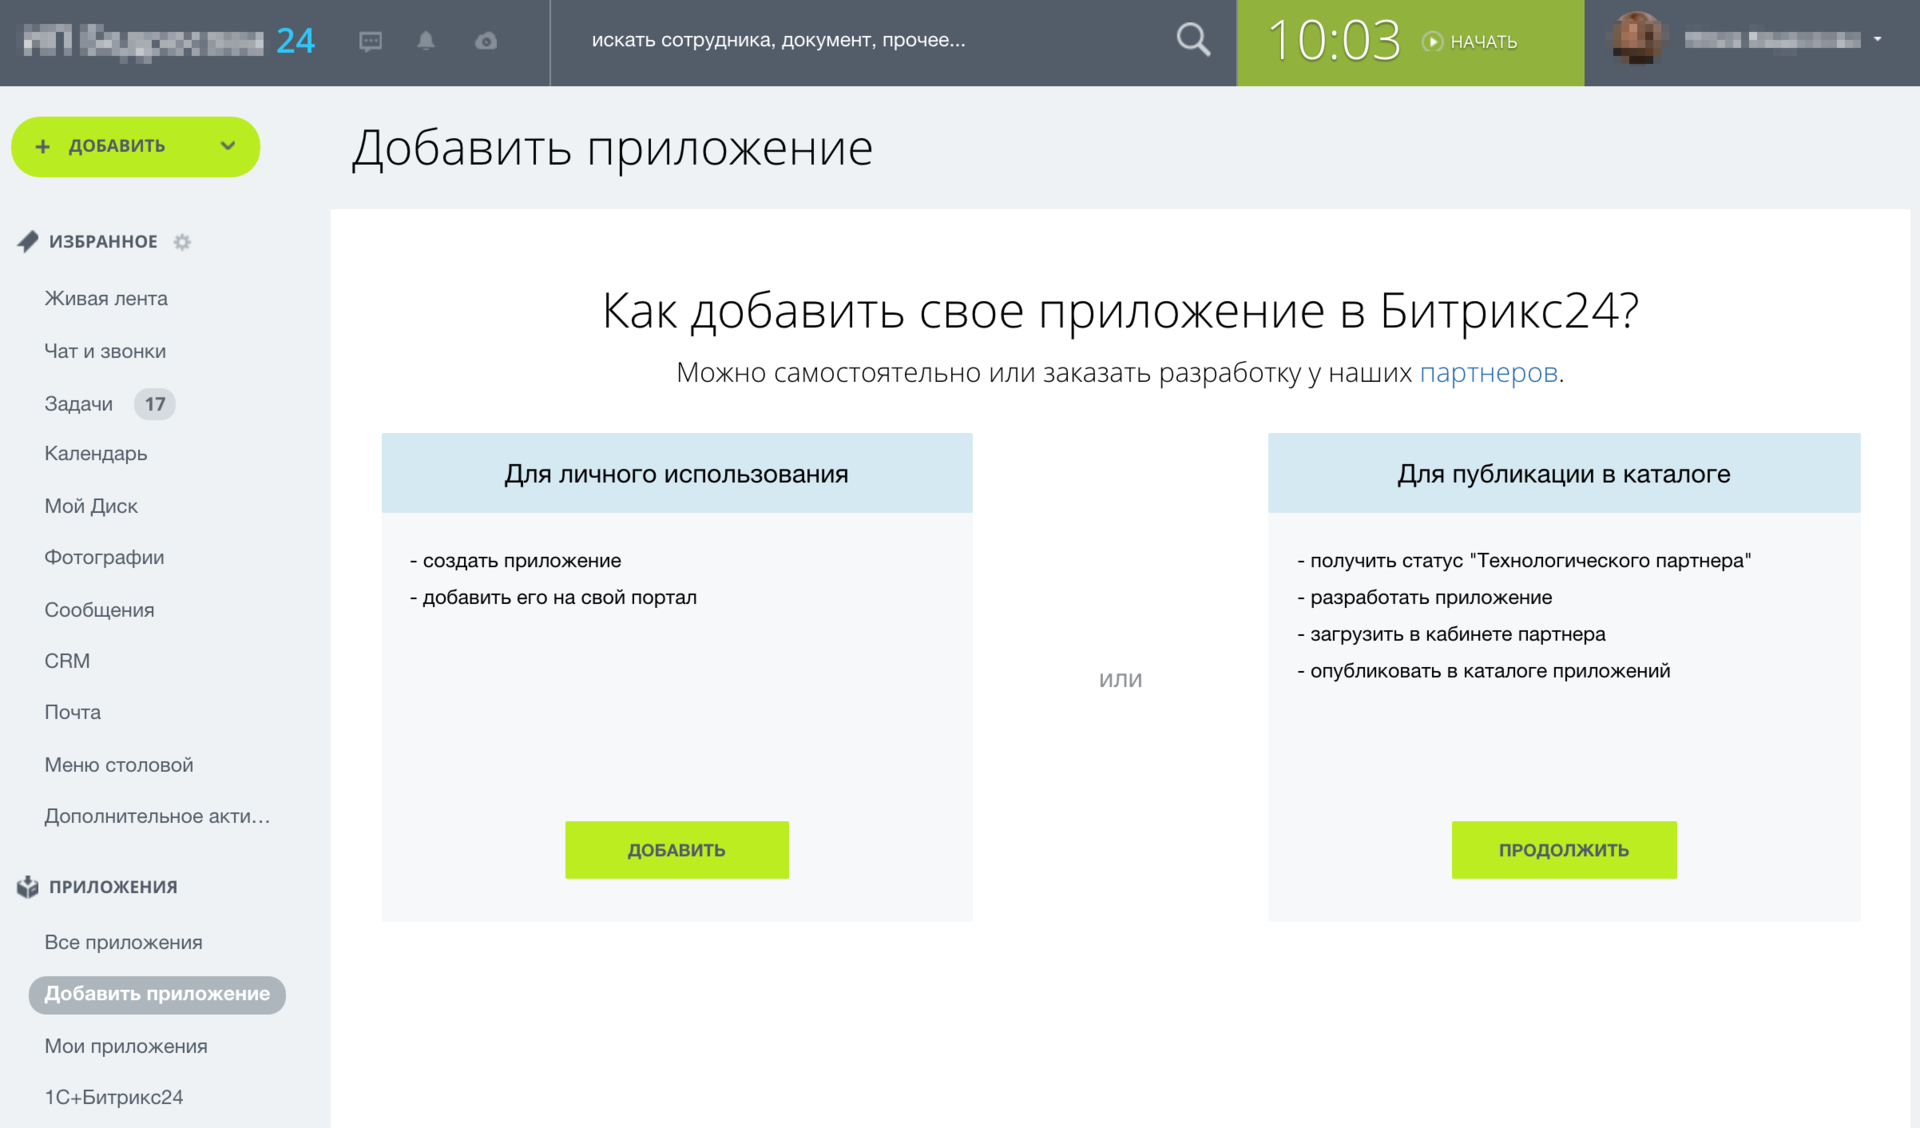
To add an application to the Bitrix24 portal, it is not necessary to publish it in the Marketplace - you can add it only to your portal - for use only in this portal. To do this, in the left menu of the Bitrix24 cloud, select the item “Add application”, then select “For personal use”.
In the form that opens, we indicate the name of the application, the name of the menu item, indicate the rights to access which subsystems the application needs. If our application adds activity to a business process, then you need to check Business processes. Specify the link to the application file lying on our server.

The added application appears in the list of local applications and in the application menu.

On the application page in the portal Bitrix24 we have 2 buttons, the handlers of which are described in a post earlier. One button sets our custom activity, the second one deletes.
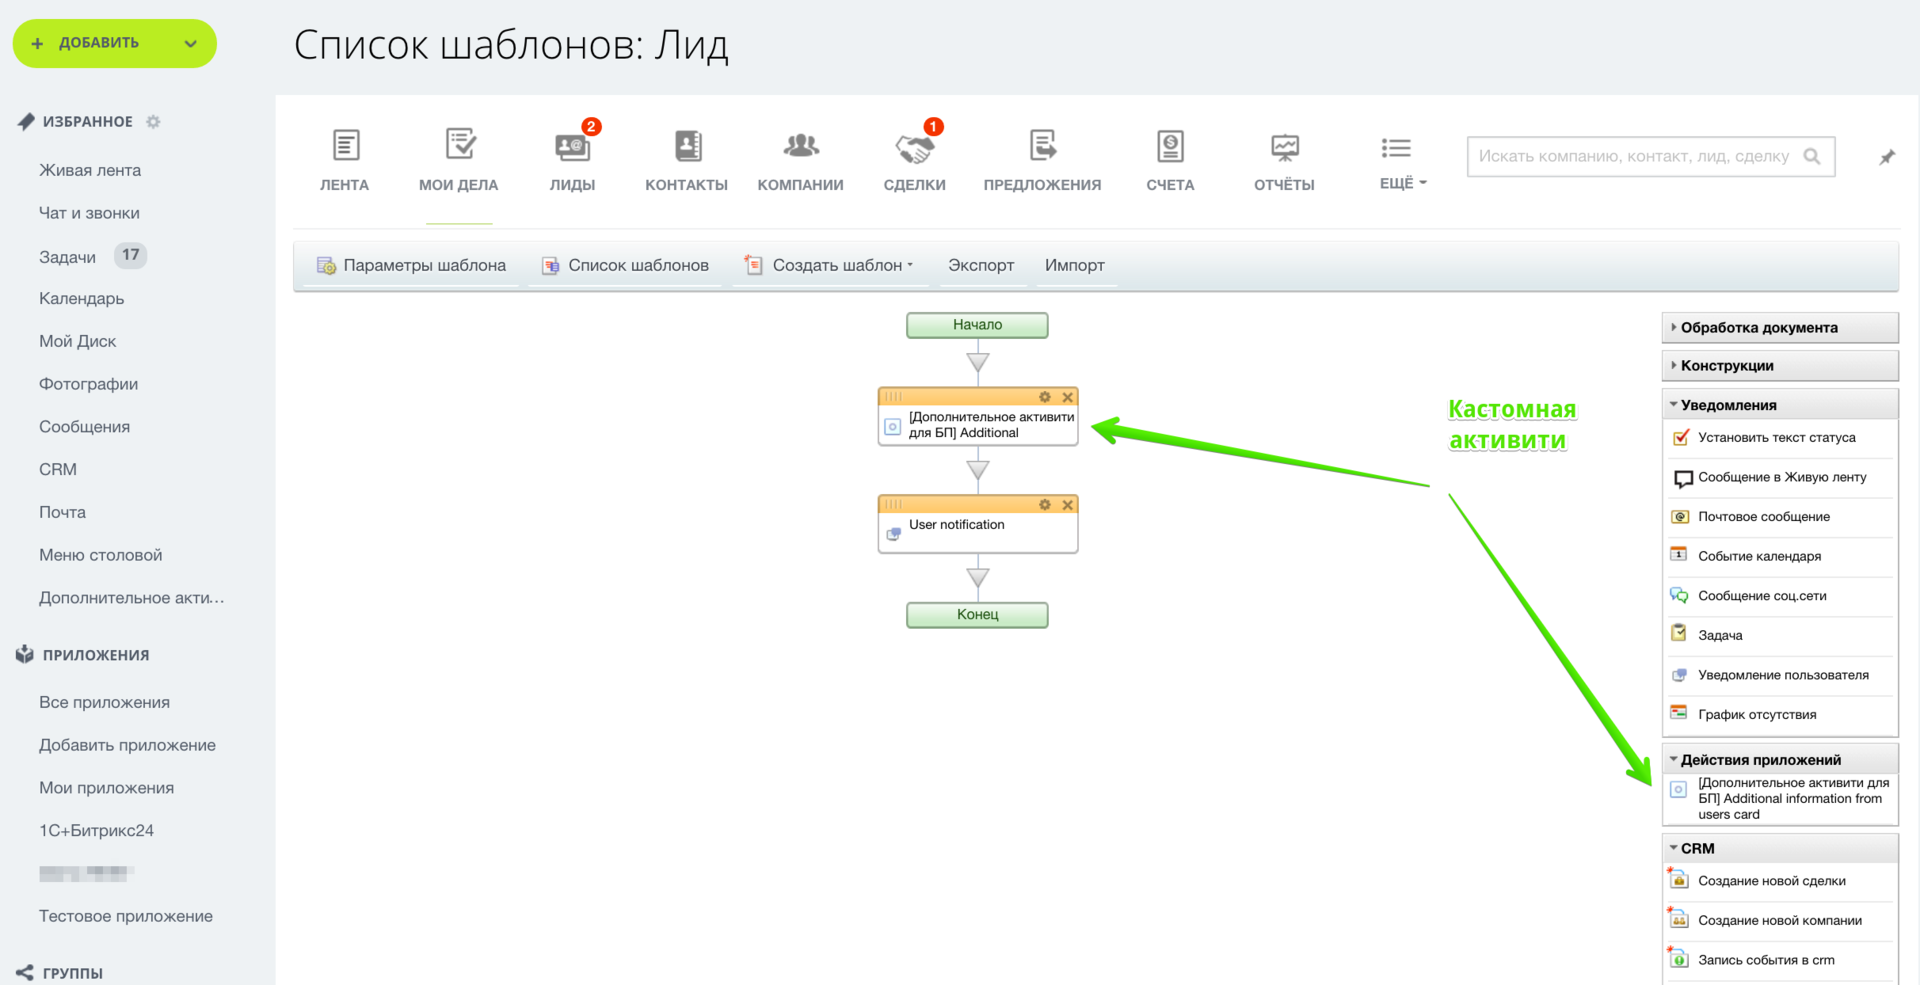
After installation, the activation appears in the business process editor.
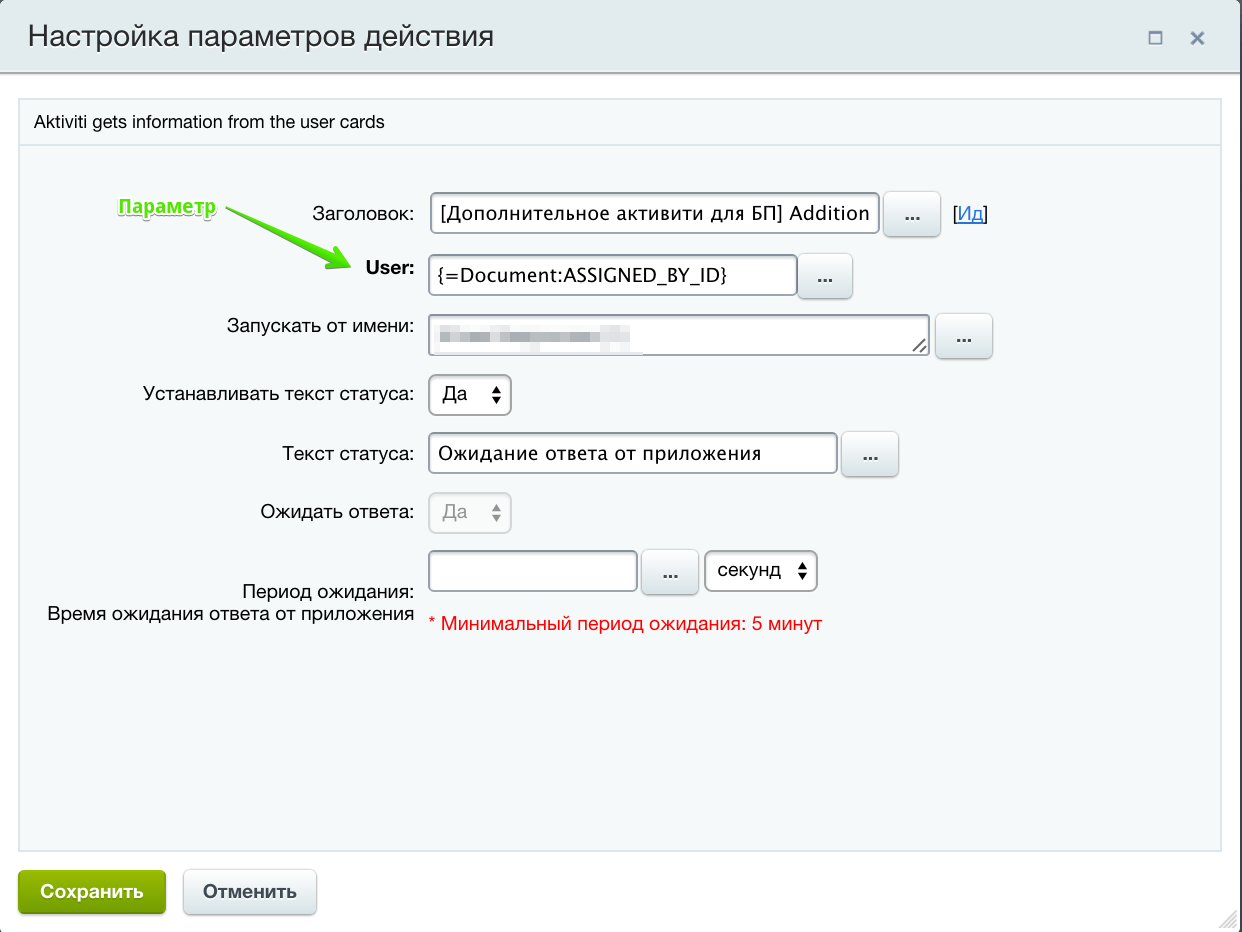
Custom activation can be included in the business process, set the input parameters that we have defined as input, and it will work.
10 What will happen if I remove the custom activation that is included in the business process?
In this case, the business process will stop working correctly, and in the business process editor, this activity will be highlighted in red.
Used materials:
1) Video recording of a master class on creating a PSU using REST ;
2) Training course "Developer Bitrix Framework", the head of "Marketplace Bitrix24" ;
3) Post in Anton Dolganin's Blog “Logging of JS-errors on the server” .
Having studied these materials and tested them on our projects, we have compiled for ourselves a simple and detailed summary of actions to develop activites for the cloudy Bitrix24, which also includes some trifles, which in the above sources were understated, apparently, the developer who studies them already has a certain knowledge base. I want to share this memo in this post.
Custom activation for cloud Bitrix24 is implemented as an application of the so-called “second type”. That is, the php file with the activation handler and its installer must lie somewhere on the external web server, and Bitrix24 will access it at a specific address, for example,
')
https: //your_domain/b24/activate_name/index.php
It is this address that is used to add the application to the portal, and to publish the application to the Bitrix24 marketplace.
1 Where to start
1.1 SSL certificate
For such an application to work correctly, a domain must have an SSL certificate (at least Domain Validation (DV) Certificate). You can develop and test the application without an SSL certificate, but you will need it for the actual operation of the application, so you should take care of it in advance.
1.2 Application structure
In the application file itself, first of all, it is necessary to form the skeleton - the structure of the application page.
<?php $protocol=$_SERVER['SERVER_PORT']=='443'?'https':'http'; $host=explode(':',$_SERVER['HTTP_HOST']); $host=$host[0]; define('BP_APP_HANDLER',$protocol.'://'.$host.$_SERVER['REQUEST_URI']); header('Content-Type: text/html; charset=UTF-8'); ?> <br/><br/> <!DOCTYPE html> <html lang="en"> <head> <meta charset="UTF-8"> <title></title> </head> <body> <script src=«//api.bitrix24.com/api/v1/"></script> </body> </html> This skeleton can be immediately connected in the test portal as described below and start building up and debugging. When we change something in the application code on our server, there is no need to reconnect the application on the Bitrix24 side - just reload the application page.
2 What data we get and how to check them
When our custom activation will be called up as part of a business process, something will come to our application in the $ _REQUEST array.
The values of the activation parameters set during the execution of the business process will be available to us in $ _REQUEST ['properties'].
In the array $ _REQUEST ['auth'] there will be data for authorization, which will need to be used by sending requests to REST-api Bitrix24.
Naturally, you need to check the contents of the $ _REQUEST array for the correspondence of the incoming data to the data format that we expect to receive. Some minimal data check can be organized using simple functions:
<?php function clean($value = "") { $value = trim($value); $value = stripslashes($value); $value = strip_tags($value); $value = htmlspecialchars($value); return $value; } ?> <br/><br/> <?php function check_length($value = "", $min, $max) { $result = (mb_strlen($value) < $min || mb_strlen($value) > $max); return !$result; } ?> It is possible (and necessary) to use more complex checks using regular expressions, but this post is not about them.
3 Using REST-api Bitrix24 on php
Next, we need a php function that, through curl, will send requests to Bitrix24:
<? function callB24Method(array $auth, $method, $params){ $c=curl_init('https://'.$auth['domain'].'/rest/'.$method.'.json'); $params["auth"]=$auth["access_token"]; curl_setopt($c,CURLOPT_RETURNTRANSFER,true); curl_setopt($c,CURLOPT_POST,true); curl_setopt($c,CURLOPT_POSTFIELDS,http_build_query($params)); AddMessage2Log($c, "demo_user_info"); $response=curl_exec($c); AddMessage2Log($response, "demo_user_info"); $response=json_decode($response,true); return $response['result']; } ?> If we need to call rest-api Bitrix24 from the php-code, we can further use this function:
<?php $user_info=callB24Method($auth,'user.get',array( 'ID'=>$ID ) ); // user.get - rest- // $auth - : //'auth' => // array ( // 'access_token' => 'numdjpxul1o8o5atfj5td4z73o8hhlds', // 'expires_in' => '3600', // 'scope' => 'user,bizproc', // 'user_id' => '1', // 'status' => 'L', // 'member_id' => '59f6a44727c5c05ae6f53b9dbea88c4f', // 'domain' => '__.bitrix24.ru', // ), ?> 4 Application Debugging Method
Immediately the question arises: how to debug our application? It is also performed on our server - that means we can safely log everything into a file. You can, for example, use the functions php fopen, fwrite, fclose. Well, we also have Bitrix on the server, so we like to use the AddMessage2Log function from the bitrix framework (having previously connected the header).
<?php define("LOG_FILENAME", $_SERVER[«DOCUMENT_ROOT»].»/__log_castom1_".date("Ymd").".txt»); AddMessage2Log($user_info, "demo_user_info"); ?> 5 Using REST-api Bitrix24 on javascript
We can call rest-api bitriks24 and through javascript. In the following way:
BX24.callMethod( 'bizproc.activity.add', //REST-api params, function(result) { if (result.error()) alertify.alert('Error: '+result.error()); else alertify.alert('Installation successfully completed'); } ); 6 Creating and deleting a simple activation
In particular, we need 2 java script handlers to install and remove our activations (in this example we create activations for the cloudy Bitrix24, which requests the user ID and returns its data to the business process: phone, skype and position):
BX24.init(function() { }); function installActivity1() { var params={ 'CODE':'user_additional_info', // 'HANDLER':'<?=BP_APP_HANDLER?>', 'AUTH_USER_ID':1, 'USE_SUBSCRIPTION':'Y', //Y - - , N - 'NAME':'Additional information from users card', 'DESCRIPTION':'Aktiviti gets information from the user cards', 'PROPERTIES':{ // 'User':{ 'Name':'User', 'Type':'user', 'Required':'Y', 'Multiple':'N', }, }, 'RETURN_PROPERTIES':{ //, - 'PERSONAL_MOBILE':{ 'Name':'Users_PERSONAL_MOBILE', 'Type':'string', 'Required':'N', 'Multiple':'N', }, 'WORK_POSITION':{ 'Name':'Users_WORK_POSITION', 'Type':'string', 'Required':'N', 'Multiple':'N', }, 'UF_SKYPE':{ 'Name':'Users_UF_SKYPE', 'Type':'string', 'Required':'N', 'Multiple':'N', }, } } BX24.callMethod( 'bizproc.activity.add', params, function(result) { if (result.error()) alertify.alert('Error: '+result.error()); else alertify.alert('Installation successfully completed'); } ); } function uninstallActivity1(){ var params={ 'CODE':'user_additional_info' } BX24.callMethod( 'bizproc.activity.delete', params, function (result) { if (result.error()) alertify.alert('Error: '+result.error()); else alertify.alert('Uninstallathion successfully completed'); } ); } 7 Logging javascript requests and responses
If we plan to place our application in the Marketplace Bitrix24, we must log all requests and all responses from Bitrix24 - not only those that are sent from the php-code, but also those that are sent from javascript
If we also have Bitrix on the server, you can use the js functions of the Bitrix framework library.
BX.ajax.get('/b24/ajax/js_request_log.php', { params }); The script logger that we pull on an Ajax from our javascript may look like this:
<?php require($_SERVER['DOCUMENT_ROOT'].'/bitrix/modules/main/include/prolog_before.php'); define('LOG_FILENAME', $_SERVER['DOCUMENT_ROOT'].'/ajax/js_error.txt'); $request = \Bitrix\Main\Context::getCurrent()->getRequest(); if ($request->get('data')) { AddMessage2Log(print_r($request->get('data'), true)); } ?> 8 Do not forget to return the answer to the business process.
If declaring the activation, we set the parameter 'USE_SUBSCRIPTION': 'Y', we are obliged to return to the business process the answer corresponding to the array of output parameters RETURN_PROPERTIES described for activating. For this we use rest-api bizproc.event.send
<?php callB24Method($auth,'bizproc.event.send',array( "EVENT_TOKEN"=>$event_token, "RETURN_VALUES"=>array( 'PERSONAL_MOBILE'=>$user_info[0]['PERSONAL_MOBILE'], 'WORK_POSITION'=>$user_info[0]['WORK_POSITION'], 'UF_SKYPE'=>$user_info[0]['UF_SKYPE'], ), "LOG_MESSAGE"=>'OK' )); ?> 9 Adding an application to the portal
To add an application to the Bitrix24 portal, it is not necessary to publish it in the Marketplace - you can add it only to your portal - for use only in this portal. To do this, in the left menu of the Bitrix24 cloud, select the item “Add application”, then select “For personal use”.
In the form that opens, we indicate the name of the application, the name of the menu item, indicate the rights to access which subsystems the application needs. If our application adds activity to a business process, then you need to check Business processes. Specify the link to the application file lying on our server.
The added application appears in the list of local applications and in the application menu.
On the application page in the portal Bitrix24 we have 2 buttons, the handlers of which are described in a post earlier. One button sets our custom activity, the second one deletes.
After installation, the activation appears in the business process editor.
Custom activation can be included in the business process, set the input parameters that we have defined as input, and it will work.
10 What will happen if I remove the custom activation that is included in the business process?
In this case, the business process will stop working correctly, and in the business process editor, this activity will be highlighted in red.
Used materials:
1) Video recording of a master class on creating a PSU using REST ;
2) Training course "Developer Bitrix Framework", the head of "Marketplace Bitrix24" ;
3) Post in Anton Dolganin's Blog “Logging of JS-errors on the server” .
Source: https://habr.com/ru/post/279477/
All Articles