Google's beacon platform. Part 2 - Nearby meassages API
Google's beacon platform is a solution for working with Bluetooth beacons. The platform works with different beacons from different manufacturers, providing developers with a single, simple and flexible tool.
Before reading this article, I recommend to get acquainted with the concept of Physical Web about which I spoke in my last article: The Concept of Physical web. Bluetooth beacons. Comparison of iBeacon, AltBeacon and Eddystone standards .
Google's beacon platform. Part 1 - Proximity beacon API
Google's beacon platform. Part 2 - Nearby meassages API
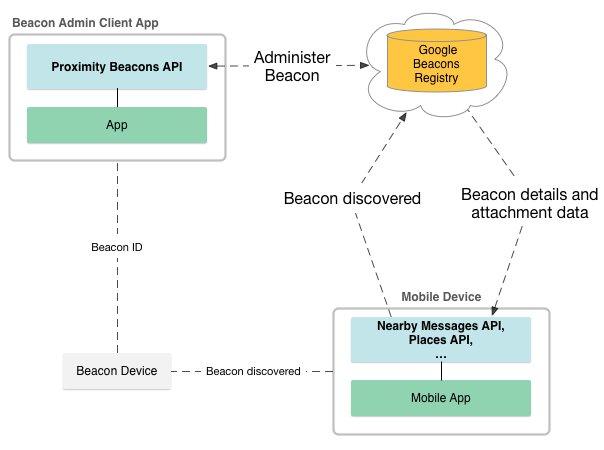
The main tool, within Google's beacon platform , to work on the client side with bluetooth beacons is the Nearby Messages API . In this article I will tell you how to set up projects on Android and iOS platforms, and add to the application the ability to receive and parse messages from ble-beacons.
Nearby Messages API
Nearby Messages API is an API that implements the publish-subscribe paradigm and allows different devices to publish and subscribe to messages, thus sharing data. Nearby Messages API is part of Nearby . For messaging, devices do not have to be on the same network, but must be connected to the Internet. In our case, the Internet connection should be in that smartphone or tablet on which we want to receive messages. Beacons do not need internet connection! The Nearby Messages API allows you to exchange messages using Bluetooth, Bluetooth Low Energy, Wi-Fi and even ultrasound, but we will only use Bluetooth Low Energy to minimize energy consumption.
Nearby Messages API on Android
The Nearby Messages API is available on Android devices in the Google Play services version 7.8.0 or higher.
Ensure that you have the latest version of the client library for Google Play installed on your development host:
- Open Android SDK Manager.
- Go to A ppearance & Behavior> System Settings> Android SDK> SDK Tools and make sure the following packages are installed:
- Google Play services
- Google Repository
To use the Nearby Messages API, of course, you need a Google Account. You also need to get the API key . Keys for Android, iOS and Proximity Beacon API must be created within the same project of the Google Developers Console. I strongly advise you to familiarize yourself with Best practices for securely using API keys
Customize the project:
Open or create a new project, open the build.gradle file and add the Google Play services client library to it as a dependency.
apply plugin: 'android' ... dependencies { compile 'com.google.android.gms:play-services-nearby:8.4.0' } <manifest xmlns:android="http://schemas.android.com/apk/res/android" package="com.google.sample.app" > <application ...> <meta-data android:name="com.google.android.nearby.messages.API_KEY" android:value="API_KEY" /> <activity> ... </activity> </application> </manifest> Create in our application GoogleApiClient and add Nearby Messages API
An example of code that shows how to add the Nearby Messages API:
mGoogleApiClient = new GoogleApiClient.Builder(this) .addApi(Nearby.MESSAGES_API) .addConnectionCallbacks(this) .addOnConnectionFailedListener(this) .build(); Receive messages
To receive messages from beacons, we need to first subscribe to them, there are two ways how our application can do this:
- In the active mode of the application, in response to user actions or events.
- In the background, i.e. when the application is inactive
The Nearby Messages API requires user permission to publish() and subscribe() requests. Therefore, the application must check for what the user has already given his consent, and if this is not the case, then call the permission request dialog.
To implement a request for permission from the user during the execution of your application, you can:
- Attach
result callbacktopublish()andsubscribe()calls. - Use
Nearby.Messages.getPermissionStatus()to check permission status just before callingpublish()orsubscribe()
Implement result callback
To check the status of the error code in the result callback you must call status.getStatusCode() . If the status code APP_NOT_OPTED_IN display the permission request dialog with a call to status.startResolutionForResult() and use onActivityResult() to re-initiate any outstanding subscription or publication requests.
The following example demonstrates a simple result callback that checks which user has granted permissions. If the user has not granted permissions, status.startResolutionForResult() is called to prompt the user to allow Nearby Messages. In this example, the boolean mResolvingError used to avoid repeatedly running such sentences:
private void handleUnsuccessfulNearbyResult(Status status) { Log.i(TAG, "Processing error, status = " + status); if (mResolvingError) { // Already attempting to resolve an error. return; } else if (status.hasResolution()) { try { mResolvingError = true; status.startResolutionForResult(getActivity(), Constants.REQUEST_RESOLVE_ERROR); } catch (IntentSender.SendIntentException e) { mResolvingError = false; Log.i(TAG, "Failed to resolve error status.", e); } } else { if (status.getStatusCode() == CommonStatusCodes.NETWORK_ERROR) { Toast.makeText(getActivity().getApplicationContext(), "No connectivity, cannot proceed. Fix in 'Settings' and try again.", Toast.LENGTH_LONG).show(); } else { // To keep things simple, pop a toast for all other error messages. Toast.makeText(getActivity().getApplicationContext(), "Unsuccessful: " + status.getStatusMessage(), Toast.LENGTH_LONG).show(); } } } You can also use this handler to process any other NearbyMessageStatusCodes received from operations or, for example, the status of a CommonStatusCodes.NETWORK_ERROR. code CommonStatusCodes.NETWORK_ERROR.
Re-implementing failed requests
The following example shows an implementation of the onActivityResult() method, which is called after the user responds to the permission request dialog. If the user agrees, any pending subscription or publication requests will be honored. In this example, the executePendingTasks() method is executePendingTasks()
@Override protected void onActivityResult(int requestCode, int resultCode, Intent data) { super.onActivityResult(requestCode, resultCode, data); if (requestCode == Constants.REQUEST_RESOLVE_ERROR) { // User was presented with the Nearby opt-in dialog and pressed "Allow". mResolvingError = false; if (resultCode == Activity.RESULT_OK) { // Execute the pending subscription and publication tasks here. mMainFragment.executePendingTasks(); } else if (resultCode == Activity.RESULT_CANCELED) { // User declined to opt-in. Reset application state here. } else { Toast.makeText(this, "Failed to resolve error with code " + resultCode, Toast.LENGTH_LONG).show(); } } Also, in order to reduce the delay in scanning beacons, we recommend using Strategy.BLE_ONLY when calling Nearby.Messages.subscribe (). When this option is set, the Nearby Messages API does not enable Wi-Fi scanning or classic Bluetooth scans. This reduces the detection delay of beacons, because the system does not cycle through all possible scan types, and also reduces power consumption.
Active subscription:
When your application subscribes to messages from beacons while in active mode, scanning is performed continuously until the application is unsubscribed. Such a subscription is recommended to be used only when your application is active, usually in response to some kind of user action.
An application can initiate a subscription in active mode by calling the Nearby.Messages.subscribe(GoogleApiClient, MessageListener, SubscribeOptions) method Nearby.Messages.subscribe(GoogleApiClient, MessageListener, SubscribeOptions) and setting the Strategy parameter to BLE_ONLY .
// Create a new message listener. mMessageListener = new MessageListener() { @Override public void onFound(Message message) { // Do something with the message. Log.i(TAG, "Found message: " + message); } // Called when a message is no longer detectable nearby. public void onLost(Message message) { // Take appropriate action here (update UI, etc.) } } // Subscribe to receive messages. Log.i(TAG, "Trying to subscribe."); // Connect the GoogleApiClient. if (!mGoogleApiClient.isConnected()) { if (!mGoogleApiClient.isConnecting()) { mGoogleApiClient.connect(); } } else { SubscribeOptions options = new SubscribeOptions.Builder() .setStrategy(Strategy.BLE_ONLY) .setCallback(new SubscribeCallback() { @Override public void onExpired() { Log.i(TAG, "No longer subscribing."); } }).build(); Nearby.Messages.subscribe(mGoogleApiClient, mMessageListener, options) .setResultCallback(new ResultCallback<Status>() { @Override public void onResult(Status status) { if (status.isSuccess()) { Log.i(TAG, "Subscribed successfully."); } else { Log.i(TAG, "Could not subscribe."); // Check whether consent was given; // if not, prompt the user for consent. handleUnsuccessfulNearbyResult(status); } } }); } To reduce energy consumption and consequently prolong battery life, call Nearby.Messages.unsubscribe() in the OnStop() method of your application.
When a subscription to messages is no longer needed, the application should unsubscribe by calling the Nearby.Messages.unsubscribe(GoogleApiClient, MessageListener) method Nearby.Messages.unsubscribe(GoogleApiClient, MessageListener) .
Subscription in the background
When an application subscribes to messages in the background, a low-power scan is triggered when the screen is turned on, even when the application is not currently active. You can use these background low-power scanning events to wake up the application in response to a specific message. Background subscriptions consume less power than an active subscription, but have higher latency and lower reliability.
A subscription in the background is initiated by calling the Nearby.Messages.subscribe(GoogleApiClient, PendingIntent,SubscribeOptions) method Nearby.Messages.subscribe(GoogleApiClient, PendingIntent,SubscribeOptions) and setting the Strategy parameter to BLE_ONLY .
// Subscribe to messages in the background. private void backgroundSubscribe() { // Connect the GoogleApiClient. if (!mGoogleApiClient.isConnected()) { if (!mGoogleApiClient.isConnecting()) { mGoogleApiClient.connect(); } } else { Log.i(TAG, "Subscribing for background updates."); SubscribeOptions options = new SubscribeOptions.Builder() .setStrategy(Strategy.BLE_ONLY) .build(); Nearby.Messages.subscribe(mGoogleApiClient, getPendingIntent(), options) .setResultCallback(new ResultCallback<Status>() { @Override public void onResult(Status status) { if (status.isSuccess()) { Log.i(TAG, "Subscribed successfully."); } else { Log.i(TAG, "Could not subscribe."); handleUnsuccessfulNearbyResult(status); } } }); } } private PendingIntent getPendingIntent() { return PendingIntent.getService(getApplicationContext(), 0, getBackgroundSubscribeServiceIntent(), PendingIntent.FLAG_UPDATE_CURRENT); } private Intent getBackgroundSubscribeServiceIntent() { return new Intent(getApplicationContext(), BackgroundSubscribeIntentService.class); } protected void onHandleIntent(Intent intent) { Nearby.Messages.handleIntent(intent, new MessageListener() { @Override public void onFound(Message message) { Log.i(TAG, "Found message via PendingIntent: " + message); } @Override public void onLost(Message message) { Log.i(TAG, "Lost message via PendingIntent: " + message); } }); } And of course, if we no longer need a subscription, we must unsubscribe by calling Nearby.Messages.unsubscribe(GoogleApiClient, PendingIntent) .
Parsing messages
As we already know from the first part, each attachment consists of the following parts:
- Namespace : Namespace ID.
- Type : Type of data.
- Data : The value of the attachment data.
mMessageListener = new MessageListener() { @Override public void onFound(Message message) { // Do something with the message here. Log.i(TAG, "Message found: " + message); Log.i(TAG, "Message string: " + new String(message.getContent())); Log.i(TAG, "Message namespaced type: " + message.getNamespace() + "/" + message.getType()); } ... }; It is worth considering that the analysis of the content depends on the format of bytes. This example assumes that messages are encoded in a UTF-8 string, but your messages from beacons can be encoded in a different format.
To find out which namespaces are associated with your project, you can call namespaces.list.
Nearby meassages API on iOS
To create a project using Nearby Messages API for iOS, we need Xcode version 6.3 or later.
The Google Nearby Messages API for iOS is available as a CocoaPods pod package . CocoaPods is an open source dependency manager for Swift and Objective-C Cocoa projects. For more information, I advise you to familiarize yourself with the CocoaPods Getting Started guide . If you have not installed it, you can do this by running the following command in the terminal:
$ sudo gem install cocoapods Install the Nearby messages API using CocoaPods:
- Open a project or create a new one; you should make sure that the Use Automatic Reference Counting option is turned on.
- Create a file called Podfile in the project directory. This file will define the dependencies of the project.
- Add dependencies to the Podfile. An example of a simple Podspec containing the name of the package that is to be installed.
source 'https://github.com/CocoaPods/Specs.git' platform :ios, '7.0' pod 'NearbyMessages' - In the terminal, go to the director in which the Podfile is located.
- To install along with the dependencies of the API specified in the Podfile, you need to run the command:
$ pod install
After that, close Xcode and then double-click on the .xcworkspace project and launch Xcode. From now on, you must use the .xcworkspace file to open the project.
As with Android, we need to get an API key . Keys for Android, iOS and Proximity Beacon API must be created within the same project of the Google Developers Console. I strongly advise you to familiarize yourself with Best practices for securely using API keys
Now that everything is set up, we can create a messageManager object and use the API key previously created.
#import <GNSMessages.h> GNSMessageManager *messageManager = [[GNSMessageManager alloc] initWithAPIKey:@"API_KEY"]; IOS Subscription
In iOS, beacon scanning occurs only when the application is active. Scanning beacons in the background is not available for iOS. To subscribe only to the BLE beacons, you need to set the deviceTypesToDiscover in the subscription parameters kGNSDeviceBLEBeacon .
_beaconSubscription = [_messageManager subscriptionWithMessageFoundHandler:myMessageFoundHandler messageLostHandler:myMessageLostHandler paramsBlock:^(GNSSubscriptionParams *params) { params.deviceTypesToDiscover = kGNSDeviceBLEBeacon; }]; This sample code subscribes only to the beacons of our project and receives all messages from them.
If we want to receive messages from beacons registered with a different namespace, we can pass the namespace to the subscription parameters. Similarly, we can do with the type of messages that we want to receive by passing a specific type of message for filtering. To do this, you need to enable device scanning in GNSStrategy and GNSStrategy namespace and subscription type values to the subscription parameters.
_beaconSubscription = [_messageManager subscriptionWithMessageFoundHandler:myMessageFoundHandler messageLostHandler:myMessageLostHandler paramsBlock:^(GNSSubscriptionParams *params) { params.deviceTypesToDiscover = kGNSDeviceBLEBeacon; params.messageNamespace = @"com.mycompany.mybeaconservice"; params.type = @"mybeacontype"; }]; By default, with a subscription, we scan both types of beacons at once, Eddystone and iBeacon. If we are involved in scanning beacons iBeacon, the user will receive a request to use geolocation. The application's Info.plist must include the NSLocationAlwaysUsageDescription key with a shortcut explaining why geolocation is used. I advise you to read Apple documentation for details.
If we want to scan only Eddystone beacons, we can disable the iBeacon GNSBeaconStrategy scanning in GNSBeaconStrategy . In this case, iOS will not ask the user for permission to use geolocation.
_beaconSubscription = [_messageManager subscriptionWithMessageFoundHandler:myMessageFoundHandler messageLostHandler:myMessageLostHandler paramsBlock:^(GNSSubscriptionParams *params) { params.deviceTypesToDiscover = kGNSDeviceBLEBeacon; params.messageNamespace = @"com.mycompany.mybeaconservice"; params.type = @"mybeacontype"; params.beaconStrategy = [GNSBeaconStrategy strategyWithParamsBlock:^(GNSBeaconStrategyParams *params) { params.includeIBeacons = NO; }; }]; When scanning iBeacon beacons, the geolocation permissions request dialog precedes the Nearby permissions dialog. We can override this dialog, for example, in order to bind the user for what permission for geolocation is requested. To do this, you must set the permissionRequestHandler in a separate block in the subscription parameters.
_beaconSubscription = [_messageManager subscriptionWithMessageFoundHandler:myMessageFoundHandler messageLostHandler:myMessageLostHandler paramsBlock:^(GNSSubscriptionParams *params) { params.deviceTypesToDiscover = kGNSDeviceBLEBeacon; params.messageNamespace = @"com.mycompany.mybeaconservice"; params.type = @"mybeacontype"; params.beaconStrategy = [GNSBeaconStrategy strategyWithParamsBlock:^(GNSBeaconStrategyParams *params) { params.includeIBeacons = NO; }; params.permissionRequestHandler = ^(GNSPermissionHandler permissionHandler) { // Show your custom dialog here, and don't forget to call permissionHandler after it is dismissed permissionHandler(userGavePermission); }; }]; Conclusion
I hope that this material will be useful to someone, save time and effort.
')
Source: https://habr.com/ru/post/279379/
All Articles