We organize the recovery of virtual machine files using the web portal Veeam Self-Service File Restore
Veeam Backup Enterprise Manager was initially positioned primarily as a tool for centralized management of Veeam Backup & Replication servers through a web console. However, using Enterprise Manager is also very convenient to delegate authority to restore virtual machine files. This functionality is available in all commercial editions of Veeam Backup & Replication 9.0 (that is, in Standard, Enterprise and Enterprise Plus ); with its help, you can assign the necessary privileges to those who, “by rank”, perform VM and / or individual files recovery. For example, if you have a separation of admins' areas of responsibility in your organization — someone is responsible for SQL, someone for Exchange, etc., then it is reasonable to delegate responsibility for restoring these servers with varying degrees of granularity (I’m not sure I'll tell you next time). If you have installed Enterprise Plus edition, the administrator will be able to save himself from the annoying requests of colleagues like “Oh, I only get one PDF from the backup” by sending the colleagues themselves to get the cherished files through the self-service portal Veeam Self-Service File . For details, welcome under cat.

')
The portal itself is installed during the Enterprise Manager setup on the same server. However, before you begin to delegate the rights to those who want to restore virtual machines or files on their own, you need to complete several steps:
Now you need to make sure that during the backup of the user's machine, the guest OS files are indexed, and the process that does this is performed under the user’s account. If everything goes as it should, the user, who at the time of the backup was created, was the local administrator, will open the self-service web portal and be able to view the contents of the backup, find the necessary files and restore them.
Important! The user will be able to work with all the recovery points of the machine created by the task with the appropriate settings after this user has received local administrator rights on this machine. If the user’s rights are revoked, the VM files from the recovery points will remain accessible to him through the portal until the task has been processed again, creating a new recovery point (in which the user is no longer the administrator of this VM).
So, enable guest OS indexing under the account of the desired user:
Run manually or wait until the job runs on schedule.

Then do the following:
Now our user will be able to enter the self-service portal and see the backup of his car there.
So, the user opens the Internet browser (all popular browsers are supported, including Edge) and in the address bar enters the portal URL:
In the dialog that opens, enter the username and password, then click Login :
The portal itself is extremely reminiscent of the Enterprise Manager interface, but with only one panel - Files . By default, the user will see there the guest OS files from the most recent backup of the machine, which he logged on with local administrator rights. You can use the select an earlier date links to open a more ancient backup of the same machine, or pick a different VM — to select another backup VM, where this user is also the administrator.
You can search for the desired files using a simple search (window on the BROWSE tab) or by entering more complex criteria on the SEARCH tab.
With the found files you can perform the following actions:
That, in general, is the whole process.
Well, if a colleague came running to you with a complaint that he did not see any files on the recovery portal, then it is usually recommended to start solving this problem like this:
- Check whether the Veeam backup server, which is responsible for the work of the corresponding task, is added to the Enterprise Manager. If not, add it as above.
- It is possible that the latest data on the task has not yet been collected from the Veeam backup server (by default, data collection starts every 15 minutes). You can start the data collection manually, as mentioned above.
- The option Enable guest file system indexing option was not selected in the task settings. Open the job settings and select this option.
- It is possible that at the time of creating a virtual machine restore point this user was not in the local administrators group. Check that he is currently the local admin, then follow the steps described in the article.
- If it does not help, act according to your usual algorithm (ask on the Veeam forum , search the knowledge base, etc.).
The next time I’ll talk about how to use the roles in Enterprise Manager to delegate the rights to restore servers, files and application objects. In the meantime, you can use a number of useful links:
Preparing users for work through the self-service portal
')
The portal itself is installed during the Enterprise Manager setup on the same server. However, before you begin to delegate the rights to those who want to restore virtual machines or files on their own, you need to complete several steps:
- Check that you have the Veeam Backup & Replication Enterprise Plus license - this functionality is not supported in other editions!
- Make sure that the thirsty user is a member of the local administrators group on the machine that he is going to restore, and is also in the same domain as the Enterprise Manager server (or in the trusted domain). Verify that the reverse DNS lookup is working for the Enterprise Manager server.
Note: Only Windows machines are supported; for users from the untrusted domain, work via the self-service portal will not be supported. - Make sure that the Veeam Backup & Replication server is connected to the Veeam Backup Enterprise Manager server (how to connect, described here ). This is necessary in order for the Enteprise Manager to receive data on the execution of a backup job.
Now you need to make sure that during the backup of the user's machine, the guest OS files are indexed, and the process that does this is performed under the user’s account. If everything goes as it should, the user, who at the time of the backup was created, was the local administrator, will open the self-service web portal and be able to view the contents of the backup, find the necessary files and restore them.
Important! The user will be able to work with all the recovery points of the machine created by the task with the appropriate settings after this user has received local administrator rights on this machine. If the user’s rights are revoked, the VM files from the recovery points will remain accessible to him through the portal until the task has been processed again, creating a new recovery point (in which the user is no longer the administrator of this VM).
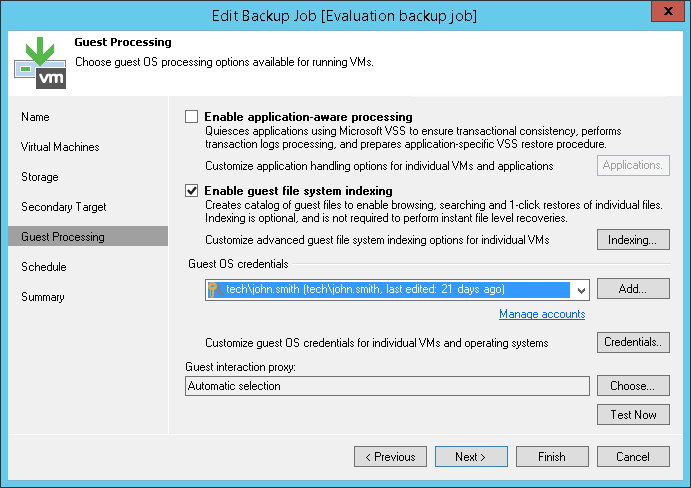
So, enable guest OS indexing under the account of the desired user:
- Open the task settings in the console Veeam Backup & Replication.
- Go to the Guest Processing step, select the option Enable gust file system indexing .
- In the Guest OS Credentials section, specify our user account.
Run manually or wait until the job runs on schedule.
Then do the following:
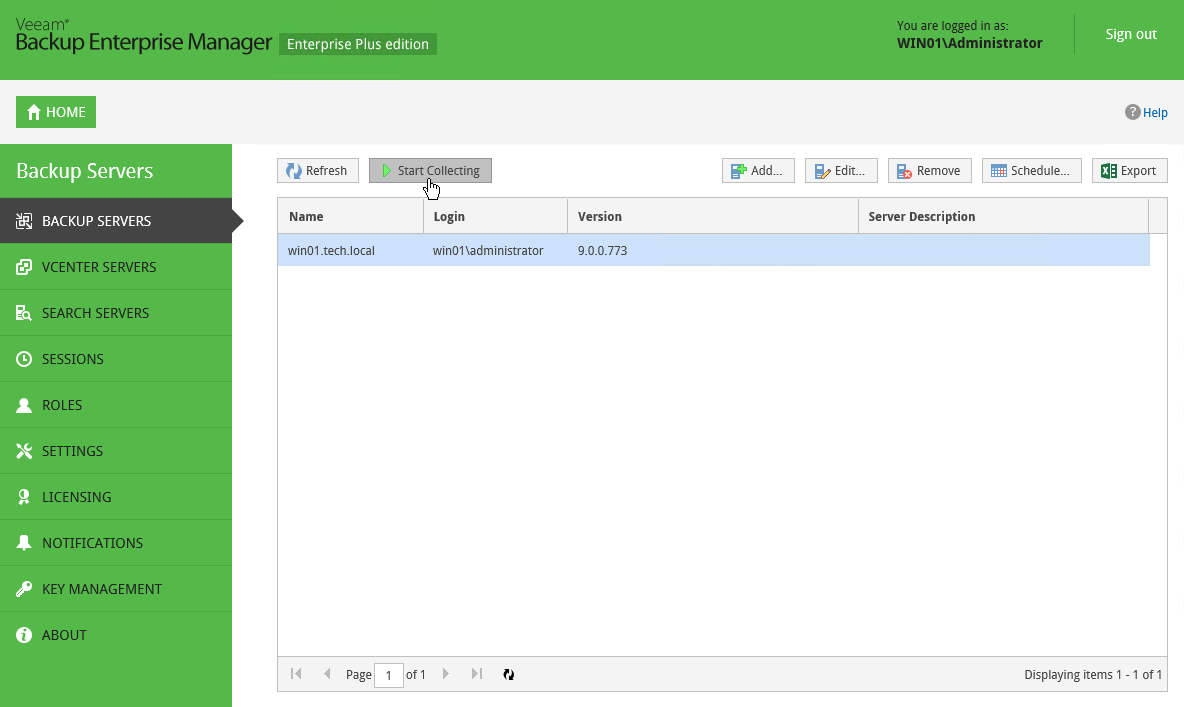
- Open the Enterprise Manager web console using an account with administrator rights ( Portal Administrator ). As a rule, it is the account of the one who installed the Enterprise Manager; more about administrators, operators, etc. I will tell you next time, or you can read it yourself here (in English).
- Clicking Configuration (top right), we get into the corresponding view - the administrative interface.
- Here we need to start collecting fresh data from Veeam Backup servers connected to Enterprise Manager in order to get information about the task that has just been worked out and the backup created. To do this, select Backup Servers in the panel on the left and click Start Collecting .
- Then you can select Sessions in the panel on the left and make sure that the data collection session has been successfully completed.
Now our user will be able to enter the self-service portal and see the backup of his car there.
Self-recovery of files using a web portal
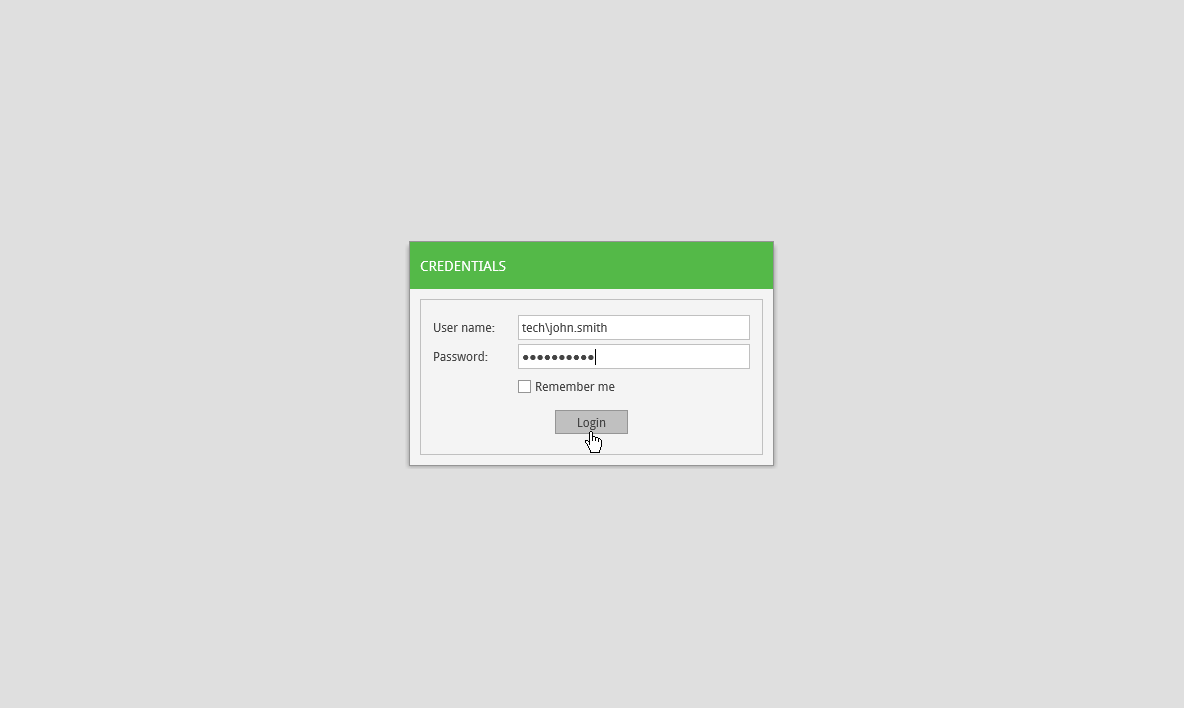
So, the user opens the Internet browser (all popular browsers are supported, including Edge) and in the address bar enters the portal URL:
https://enterprise_manager_server:9443/selfrestoreIn the dialog that opens, enter the username and password, then click Login :
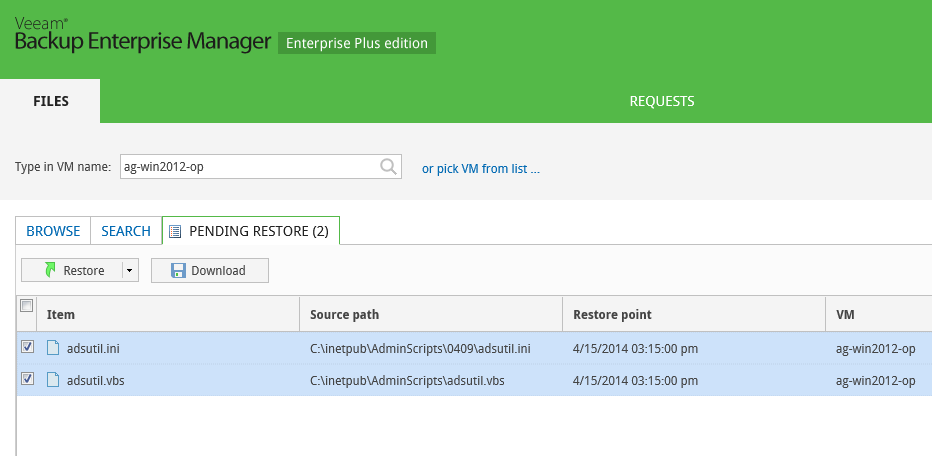
The portal itself is extremely reminiscent of the Enterprise Manager interface, but with only one panel - Files . By default, the user will see there the guest OS files from the most recent backup of the machine, which he logged on with local administrator rights. You can use the select an earlier date links to open a more ancient backup of the same machine, or pick a different VM — to select another backup VM, where this user is also the administrator.
You can search for the desired files using a simple search (window on the BROWSE tab) or by entering more complex criteria on the SEARCH tab.
With the found files you can perform the following actions:
- Restore - restore to original machine.
Important! The source machine must be turned on; Also, make sure that it has not been moved since this backup was created.
There are two options for restoring:
- overwrite - the file from the backup will overwrite the file on the target machine;
- keep — save both files on the target VM, while the file taken from the backup will have a Restored prefix.
Note: By default, to access the guest OS on the target machine, the account specified in the task properties that created this backup will be used (see above). If for some reason there are no rights - for example, the password has changed - then you will need to specify the necessary data in the input dialog. - Download - save. By default, the selected file (or several files) will be saved to the archive with the name FLR_date_time.zip in the Downloads folder.
Important! Veeam Backup & Replication periodically cleans this folder, deleting files older than 24 hours. - Add to restore list - add to the list to restore. This command is convenient to use to collect several files into the list, for example, from different recovery points or from several VMs. The selected files are listed in the Pending Restore tab.
Here you can also select the file (s) and click Restore or Download to perform the desired operation. Links to saved files are saved in the session log also during the day. You can open the log by clicking on the View History at the bottom right, then choose from the recovery operations you need, go to the Log tab and click download .
That, in general, is the whole process.
Well, if a colleague came running to you with a complaint that he did not see any files on the recovery portal, then it is usually recommended to start solving this problem like this:
- Check whether the Veeam backup server, which is responsible for the work of the corresponding task, is added to the Enterprise Manager. If not, add it as above.
- It is possible that the latest data on the task has not yet been collected from the Veeam backup server (by default, data collection starts every 15 minutes). You can start the data collection manually, as mentioned above.
- The option Enable guest file system indexing option was not selected in the task settings. Open the job settings and select this option.
- It is possible that at the time of creating a virtual machine restore point this user was not in the local administrators group. Check that he is currently the local admin, then follow the steps described in the article.
- If it does not help, act according to your usual algorithm (ask on the Veeam forum , search the knowledge base, etc.).
The next time I’ll talk about how to use the roles in Enterprise Manager to delegate the rights to restore servers, files and application objects. In the meantime, you can use a number of useful links:
Source: https://habr.com/ru/post/279327/
All Articles