1.5 Compiling SFML with CMake

From the translator: This article is the fifth in the translation cycle of the official SFML library guide. Past article can be found here. This series of articles aims to provide people who do not know the original language the opportunity to get acquainted with this library. SFML is a simple and cross-platform multimedia library. SFML provides a simple interface for developing games and other multimedia applications. The original article can be found here . Let's start.
Table of contents:
0.1 Introduction
1. Getting Started
')
2. System Module
3. Window Module
4. Graphics Module
5. Audio module
6. Network module
1. Getting Started
')
- SFML and Visual Studio
- SFML and Code :: Blocks (MinGW)
- SFML and Linux
- SFML and Xcode (Mac OS X)
- Compiling SFML with CMake
2. System Module
3. Window Module
- Opening and managing windows
- Event handling
- Work with the keyboard, mouse and joysticks
- Using OpenGL
4. Graphics Module
- Drawing 2D objects
- Sprites and textures
- Text and Fonts
- Forms
- Designing your own objects using arrays of vertices
- Position, Rotation, Scale: Transform Objects
- Adding special effects with shaders
- 2D camera control and view
5. Audio module
- Playing sounds and music
- Audio recording
- Custom audio streams
- Spitalization: sounds in 3D
6. Network module
- Socket communication
- Use and Expansion Packages
- Web requests using HTTP
- File Transfer Using FTP
Introduction
The title of this article may be misleading. You will not compile SFML with CMake, because CMake is not a compiler. So what is CMake?
CMake is a cross-platform automation system for building software from source code. Instead of building SFML, it assembles what SFML collects: the Visual Studio solution, the Code :: Blocks project, Linux makefiles, the XCode project, and so on. In fact, it can generate build or project files for any operating system or compiler of your choice. CMake is somewhat similar to autoconf / automake or premake.
CMake is used by many projects, including Blender, Boost, KDE, and Ogre. You can read more about CMake on the official website or on its wikipedia page .
As you might expect, this article is divided into two parts:
- Generating a build configuration file using CMake
- Build SFML and development kit using this configuration file
Installing dependencies
SFML depends on some libraries, so you must satisfy them before proceeding with the configuration.
On Windows and Mac OS X, all SFML dependencies come with it, so you don’t have to download / install anything. The build will work out of the box.
However, in Linux, no dependencies are satisfied in advance, so you have to install all the dependencies. Here is a list of dependencies that must be satisfied before building SFML:
- freetype
- jpeg
- x11
- xrandr
- xcb
- x11-xcb
- xcb-randr
- xcb-image
- opengl
- flac
- ogg
- vorbis
- vorbisenc
- vorbisfile
- openal
- pthread
The names of these packages in different distributions may differ. After installing them, do not forget to install the header files for developers.
Configuration of your SFML build
This step consists of creating a project / build file with which SFML will ultimately be compiled. Usually, this step is to select the assembly target, assembly method, and assembly location. There are several other options that allow you to create build configuration files that fit your needs. We will look at this topic in more detail below.
The first thing you need to choose is where the project / assembly files and object files (files received during the compilation process) will be created. They can also be generated in the source tree (i.e., in the SFML root directory), but this will cause the root directory to become dirty with object files and other garbage. The best solution is to generate them in a separate folder, which allows you to keep the SFML root directory clean. Using a separate directory will also help in using multiple assemblies (static, dynamic, debug, release, ...).
Now that you have chosen the build directory, there is one more thing that needs to be done before running CMake. When CMake configures your project, it searches for an available compiler (and, if necessary, checks its version). For this reason, the compiler executable must be available when CMake is launched. This is not a problem on Mac OS X and Linux, because the compiler is installed in the standard way and is always available, but on Windows you have to add the path to your compiler directory to the PATH environment variable so that CMake can find it automatically. This is especially important when you have several compilers installed or several versions of a single compiler.
On Windows, in case you use GCC (MinGW), you can temporarily add the path to the MinGW \ bin directory and then run CMake from the command line:
> set PATH=%PATH%;your_mingw_folder\bin > cmake -G"MinGW Makefiles" ./build With Visual C ++, you can simply launch CMake from the “Visual Studio command line” accessible from the Start menu, or run the .bat file of the vcvars32.bat of your Visual Studio installation in the console, the .bat file will set all the environment variables in the console you.
> your_visual_studio_folder\VC\bin\vcvars32.bat > cmake -G"NMake Makefiles" ./build Now you can run CMake. In fact, there are three ways to run it:
- cmake-gui
This is a CMake GUI that allows you to configure everything with buttons and text fields. It is very convenient to view and edit build options, and perhaps this is the easiest solution for beginners and people who do not want to deal with the command line. - cmake -i
This is an interactive CMake command line that guides you through the build options. This is a good solution if you want to run CMake from the command line, but do not remember all the parameters that are available when using from the command line, and which ones are important. - cmake
This is a direct call to CMake. If you use this method, you must specify all arguments and their values as command line parameters. To print an argument list, run cmake -L.
In this article we will use cmake-gui, since this option will most likely be used by a beginner. We assume that people using the command line will refer to the CMake documentation. With the exception of screenshots and instructions for clicking buttons, everything that is explained below is applicable to the command line (options, for example).
Here is what CMake GUI looks like:
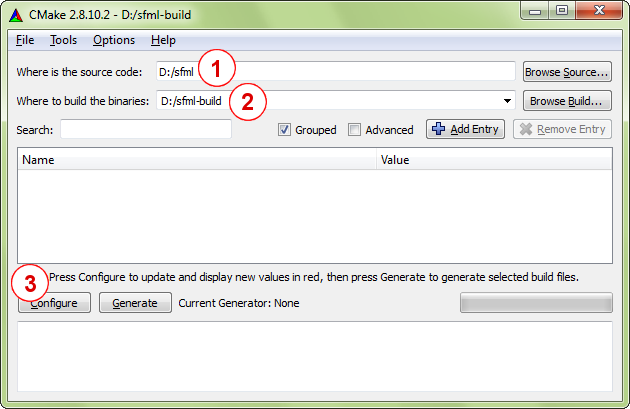
The first steps you should take are listed below:
- Point to CMake where the SFML source code is located (this should be the SFML root directory where the CMakeLists.txt file is located).
- Select the directory in which the project will be generated or the assembly files (if the directory does not exist, CMake will create it).
- Click on the “Configure” button.
If you are launching CMake for the first time in this directory (or if you have cleared the cache remaining from previous launches), the CMake GUI will prompt you to choose a generator. In other words, choose your compiler / IDE.

If you are using Visual Studio 2010, you must select "Visual Studio 10 2010" from the drop-down list. To generate an assembly file for Visual Studio NMake, select “NMake Makefiles”. To generate a build file for MinGW (GCC), select “MinGW Makefiles”. As a rule, it is easier to build SFML using assembly files: you can build the entire library using a single command, or even group several assemblies in a single script. In case you plan to build SFML and do not want to edit the source code of the library, the IDE project does not suit you.
More importantly, the installation process (it will be described below) does not work for the “Xcode” generator. For this reason, it is strongly recommended to use the “Makefile” generator when building on Mac OS X.
Always check if the option “Use default native compilers” is on. The remaining three options can not touch.
After selecting the generator, CMake will launch a series of tests to gather information about your toolbox: compiler, standard header files, SFML dependencies, and so on. If the tests complete successfully, the message “Configuring done” will be displayed. If something goes wrong - carefully read the text of the error. This can occur if your compiler is not available or configured incorrectly, or one of the SFML dependencies is not satisfied.

After the configuration is complete, the build options will appear in the center of the window. CMake has many options, but many of them are set to the correct default. Some of them are cache variables and it’s better not to change them.
These are some parameters you may want to define when configuring your SFML assembly:
| Parameter | Value |
|---|---|
| CMAKE_BUILD_TYPE | This parameter sets the type of configuration to be collected. Accepts the “Debug” and “Release” keys (there are other accepted keys, such as “RelWithDebInfo” or “MinSizeRel”, but they are intended for more advanced builds). Remember that if you use a generator for an IDE that supports multiple configurations (for example, Visual Studio), this parameter is ignored because the assembly can contain several configurations at the same time. |
CMAKE_INSTALL_PREFIX | The path that will be installed. By default, it is installed in the most typical installation path for this operating system ("/ usr / local" for Linux and Mac OS X, "C: \ Program Files" for Windows and so on). Installing SFML after assembly is optional, you can use binary files directly from the directory where the assembly was made. However, installing SFML is preferred. |
CMAKE_INSTALL_FRAMEWORK_PREFIX( Mac OS X) | The path that the framework will be installed on. By default, this is the root folder of libraries, i.e. / Library / Frameworks. As in the case of CMAKE_INSTALL_PREFIX, this parameter is optional, but it is recommended to keep the system clean. This path is also used to install the sndfile framework (a dependency not provided by Apple) and the SFML framework if the LD_FRAMEWORKS option was selected. |
BUILD_SHARED_LIBS | This boolean parameter determines whether SFML will be built as a dynamic (shared) library, or static. This option should not be enabled at the same time as SFML_USE_STATIC_STD_LIBS, they are mutually exclusive. |
SFML_BUILD_FRAMEWORKS( Mac OS X) | This boolean parameter determines whether you will build SFML as a framework or as a binary dynamic library . Building the framework requires defining the parameter BUILD_SHARED_LIBS. When publishing your product, it is recommended to use SFML as a framework. Note that SFML cannot be compiled in a debug configuration as a framework. In case you need to use SFML in a debug configuration, use it as a dynamic library. |
SFML_BUILD_EXAMPLES | This boolean parameter determines whether SFML usage examples will be built with the library or not. |
SFML_BUILD_DOC | This boolean parameter determines whether SFML documentation will be generated. Please note that Doxygen must be installed and available, otherwise turning on this option will result in an error. On Mac OS X, you can install classic Unix doxygen into / usr / bin or a similar directory directory, or install Doxygen.app into the “Applications” directory, i.e. in ~ / Applications. |
SFML_USE_STATIC_STD_LIBS ( Windows) | This boolean parameter selects the type of C / C ++ runtime library with which SFML will be linked. If the parameter is set to TRUE, static linking occurs with the standard compiler libraries. As a result, SFML becomes self-sufficient and does not depend on dynamic libraries. If the parameter is set to FALSE (standard version), dynamic linking with standard libraries occurs. As a result, SFML will depend on the compiler dll libraries (msvcrxx.dll / msvcpxx.dll in the case of Visual C ++, libgcc_s_xxx-1.dll / libstdc ++ - 6.dll in the case of GCC). Be careful when setting this parameter. The settings must match your own project. This option should not be enabled at the same time as BUILD_SHARED_LIBS. |
CMAKE_OSX_ARCHITECTURES( Mac OS X) | This parameter specifies which SFML architecture should be built for. The “i386; x86_64” value is recommended for generating generic binary files for both architectures. |
SFML_INSTALL_XCODE_TEMPLATES( Mac OS X) | This boolean parameter determines whether CMake will install templates for Xcode on your system. Please ensure that the / Library / Developer / Xcode / Templates / SFML directory exists and is writable. For more information about these templates, see the article on installing SFML on Mac OS X. |
| SFML_INSTALL_PKGCONFIG_FILES (for Linux shared libraries only) | This boolean parameter determines whether CMake will install pkg-config files on your system. pkg-config is a tool that provides a unified interface for querying installed libraries. |
After everything has been configured, click on the “Configure” button again. Options should not be highlighted in red and the Generate button should be available. Click on it to finally generate build / project files.

CMake creates a cache of variables for each project. Therefore, if you decide to reconfigure something later, you will find that the settings of the past configuration have been saved. Make the necessary changes, reconfigure and generate new build / project files.
C ++ 11 and Mac OS X
If you want to use the C ++ 11 functions in your application on Mac OS X, you must use clang (the official compiler from Apple) and libc ++. In addition, you will need to build SFML using these tools to eliminate any incompatibility between the SFML libraries and the compiler.
Settings you should use when building SFML with clang and libc ++:
- Select “Specify native compilers” rather than “Use default native compilers” when choosing a generator.
- Set the
CMAKE_CXX_COMPILERoption to / usr / bin / clang ++ (see screenshot). - Set the
CMAKE_C_COMPILERoption to / usr / bin / clang (see screenshot). - Set the
CMAKE_CXX_FLAGSandCMAKE_C_FLAGSto "-stdlib = libc ++".

SFML build
Let's start with the good news: you no longer have to go through the configuration step, even if you update your working SFML copy. CMake is smart: it adds a custom step for generating build / project files, which means that these files are regenerated without making changes.
Now you can build SFML. Of course, how to do this depends on what exactly you generated (build files or project files). If a project / solution / workspace has been generated, open it in your IDE and build SFML as if it were any other project. We will not go into details since there are too many different development environments; we assume that you know how to use your IDE, and will be able to perform this simple task yourself.
If you generated a makefile, open a command prompt and execute the make command for your environment. For example, “nmake” if you generated the NMake assembly file (Visual Studio), “mingw32-make” if you generated the MinGW (GCC) makefile, or just “make” if you generated the Linux makefile.
Note: on Windows, the make program (nmake or mingw32-make) may not be available. If so, do not forget to add its location to the PATH environment variable. For details, see the Configuration section of your SFML assembly.
By default, the project builds everything (all SFML libraries, as well as SFML usage examples, if you set the SFML_BUILD_EXAMPLES option). If you want to build a specific SFML library or a specific example of using a library, you can choose different build targets. You can also select as a target the cleanup of the build directory, the installation of the collected files, using the appropriate build targets (install and clean).
The following are all available build targets, depending on the options selected in the configuration:
| purpose | Value |
|---|---|
all | The default target. Used when no assembly target has been specified. All targets are assembled, as a result of which binary files are obtained (SFML libraries and examples). |
sfml-system | Builds the appropriate SFML libraries. The “sfml-main” target is available only when building for Windows. |
cocoa | Build relevant SFML examples. These targets are only available if SFML_BUILD_EXAMPLES . Remember that some targets are available only on certain operating systems (“cocoa” is available only on Mac OS X, “win32” is available only on Windows, “X11” is available only on Linux, and so on). |
doc | Generate API documentation. This target is available only if SFML_BUILD_DOC . |
clean | Delete all object files, libraries and samples created during the previous build. In most cases, you do not need to call the build for this purpose, except when you want to rebuild SFML (when updating the source code, some files may not be compatible with existing object files and cleaning is the only solution to this problem). |
install | Install SFML using the standard path specified by CMAKE_INSTALL_PREFIX or CMAKE_INSTALL_FRAMEWORK_PREFIX . All libraries and SFML header files are copied, as well as examples and documentation, if the SFML_BUILD_EXAMPLES and SFML_BUILD_DOC parameters have been set. After installation, you will receive the SFML distribution as if you downloaded the SDK or installed SFML from the package repository of your distribution. |
If you use an IDE, then the goal is just a project. To build a target, select the appropriate project and compile it (even “clean” and “install” must be built to be completed. Don't be confused by the fact that the source codes will not be compiled). If you are using build files, pass the target name to the make command to build the target. For example, “nmake doc”, “mingw32-make install”, “make sfml-network”.
Now you have successfully built SFML. Congratulations!
Next article: Handling time .
Source: https://habr.com/ru/post/279279/
All Articles