Stack of mean. Usage example
Hello, dear readers.
Today, your attention is invited to an article about the MEAN stack (Mongo, Express, Angular, Node) which seems to us a promising (and quite fashionable) topic. Please speak up if you want to see a book about this stack in Russian. Welcome under cat.
In this article, we will introduce the MEAN stack, which combines several free JavaScript frameworks. We will discuss how they work and how to create a one-page application with their help. JavaScript technologies in this case are involved not only on the frontend, but also on the backend.
As the name implies, MEAN is an abbreviation, under which three JavaScript frameworks and a document-oriented NoSQL database are combined. So,
')
M is MongoDB
MongoDB is a free document-oriented database, organized in such a way as to provide both scalability and flexibility in development. Data in MongoDB is not recorded in tables and columns, as in a relational database. Instead, MongoDB stores JSON-like documents with dynamic schemas.
E is ExpressJS
Express.js is a Node.js application server framework for creating single-page, multipage, and hybrid web applications. De facto, it is the standard server framework for node.js.
A is AngularJS
AngularJS is a structured framework for dynamic web applications. It can use HTML as a template language, as well as extend HTML syntax for a clear and concise description of the components of your application. Data binding and dependency injection in Angular allows you to get rid of the mass of code that would otherwise have to be written.
N is NodeJS
Node.js is a free cross-platform runtime environment for developing web server applications. Node.js applications are written in JavaScript and can be launched in the Node.js runtime environment on OS X, Microsoft Windows, Linux, FreeBSD, NonStop, IBM AIX, IBM System z and IBM.

The term “MEAN stack” means a set of JavaScript-based technologies for developing web applications. MEAN is short for MongoDB, ExpressJS, AngularJS and Node.js. At the client, server, and database levels, the entire MEAN stack is written in JavaScript.
I'll tell you how they interact. Angular is used to design the client side. I will develop views using Angular.js so that they all appear on the same page. On the server side, I will use Node.js, that is, I will use the Express.js framework. Using Express, I will write an API for communicating with the database. Finally, I will use MongoDB for data storage. All this is shown in the diagram.
So, from the very beginning.
Instruments
First you need to install Node and MongoDB. They are here
Download Mongodb
Download Node
In this article I will work with Visual Studio Code version 0.9.2, but you can easily use the Sublime Text editor. Packages will be installed using the Node Package Manager via the Windows command line. This is very easy to do with the node cmd command after nodejs is installed.
The article was conceived as an introduction to the work of the MEAN stack and Node, I decided to write it under the impression of a lot of simple questions encountered on stackoverflow. In principle, it shows how to register a user, and then authenticate him using the appropriate controllers and modules.
I have a main directory called MeanApp. There are various subdirectories in this root directory.
I will describe some of the most important subdirectories.
In the root directory, I will use server.js for the startup file. So, let's begin.
All other free libraries in your application need to be installed via the npm package manager using the command:
Run the following command to install the required training packages:
Let's start with the design of the user interface. First, create a new modules.js file in the Angular / Modules directory.
Now create the
The model is ready. Now create two new controllers:
and
in the Angular / Controller directory.
Create a new Views directory, and add the following ejs code to the main directory, since ejs is the mapping mechanism used by nodejs in the Starter.ejs file.
Now create the Authentication directory in the Views directory; this will contain all views for authentication (registration, login, etc.).
For the authentication view, we will add a new file in the Authentification directory called login.html.
For the submission intended for registration, add a new file to the Authentification directory called register.html
For a view reporting that authentication failed, add a new file to the Authentification directory called unauth.html:
Now we will create a new Main directory in the Views directory. It will contain all the basic views (index, about us, contact, etc.).
For the Index view, add a new index.html file to the Main directory.
For the About us view, we will add a new About.html file to the Main directory.
So, we have completed the design of the interface on angular.
Let's write a backend on node.js
We create new routes based on authentication requests called authentication.js in the Routes directory.
Create router.js in the same directory.
Create a new directory called Passport and add a new file (API) Name passport-init.js, then add the following code. In your authentication route, this will be called Authentication Api.
Now we add a new server.js file to the root directory, since it is from this file that we will start:
So, everything is ready with the code. This application can be started using the node server.js command via the command line, but first go to the root MEANApp directory using the cd command: c: // MeanApp etc.
You will also need to start the mongodb server. To do this, open a new window cmd and enter mongod -dbpath. If the mongodb database is installed and the variable name is added, then this command will successfully start your mongodb server. Do not close this command window, because if you close it, the server will also stop working.
After running the above command, you can check your database on the command line. To do this, open another command line window, enter mongodb in it - you will see a client of the database you are interested in among the connected clients and can switch to it. About mongodb can be read in the documentation located here .
You can start the application using the following command:
After logging in, you can check all calls.
So, we have a working application that supports authentication and sessions for storing data on the server side.
All code is located on github here .
Today, your attention is invited to an article about the MEAN stack (Mongo, Express, Angular, Node) which seems to us a promising (and quite fashionable) topic. Please speak up if you want to see a book about this stack in Russian. Welcome under cat.
In this article, we will introduce the MEAN stack, which combines several free JavaScript frameworks. We will discuss how they work and how to create a one-page application with their help. JavaScript technologies in this case are involved not only on the frontend, but also on the backend.
Introduction
As the name implies, MEAN is an abbreviation, under which three JavaScript frameworks and a document-oriented NoSQL database are combined. So,
')
M is MongoDB
MongoDB is a free document-oriented database, organized in such a way as to provide both scalability and flexibility in development. Data in MongoDB is not recorded in tables and columns, as in a relational database. Instead, MongoDB stores JSON-like documents with dynamic schemas.
E is ExpressJS
Express.js is a Node.js application server framework for creating single-page, multipage, and hybrid web applications. De facto, it is the standard server framework for node.js.
A is AngularJS
AngularJS is a structured framework for dynamic web applications. It can use HTML as a template language, as well as extend HTML syntax for a clear and concise description of the components of your application. Data binding and dependency injection in Angular allows you to get rid of the mass of code that would otherwise have to be written.
N is NodeJS
Node.js is a free cross-platform runtime environment for developing web server applications. Node.js applications are written in JavaScript and can be launched in the Node.js runtime environment on OS X, Microsoft Windows, Linux, FreeBSD, NonStop, IBM AIX, IBM System z and IBM.
What is MEAN?
The term “MEAN stack” means a set of JavaScript-based technologies for developing web applications. MEAN is short for MongoDB, ExpressJS, AngularJS and Node.js. At the client, server, and database levels, the entire MEAN stack is written in JavaScript.
I'll tell you how they interact. Angular is used to design the client side. I will develop views using Angular.js so that they all appear on the same page. On the server side, I will use Node.js, that is, I will use the Express.js framework. Using Express, I will write an API for communicating with the database. Finally, I will use MongoDB for data storage. All this is shown in the diagram.
So, from the very beginning.
Instruments
First you need to install Node and MongoDB. They are here
Download Mongodb
Download Node
In this article I will work with Visual Studio Code version 0.9.2, but you can easily use the Sublime Text editor. Packages will be installed using the Node Package Manager via the Windows command line. This is very easy to do with the node cmd command after nodejs is installed.
Prerequisites
The article was conceived as an introduction to the work of the MEAN stack and Node, I decided to write it under the impression of a lot of simple questions encountered on stackoverflow. In principle, it shows how to register a user, and then authenticate him using the appropriate controllers and modules.
Code usage
I have a main directory called MeanApp. There are various subdirectories in this root directory.
I will describe some of the most important subdirectories.
- In Angular there will be three subdirectories: Controllers for angular controllers, Modules and Models.
- In Public will be all the javascript libraries.
- In Routes, api expressjs api will lie, which will process the request and interact with MongoDB.
- Views will contain all the views in question, all in their own catalogs.
In the root directory, I will use server.js for the startup file. So, let's begin.
All other free libraries in your application need to be installed via the npm package manager using the command:
npm install [package] --save
Run the following command to install the required training packages:
npm install express --save
npm install path --save
npm install morgan --save
npm install cookie-parser --save
npm install body-parser --save
npm install bcrypt-nodejs --save
npm install passport --save
npm install passport-local --save
npm install express-session --save
npm install mongoose --save
Let's start with the design of the user interface. First, create a new modules.js file in the Angular / Modules directory.
// Angular var main = angular.module("main", ['ui.router','ngRoute','ngResource']) .run(function($http,$rootScope) { if(sessionStorage.length > 0){ $rootScope.current_user = sessionStorage.current_user; $rootScope.authenticated = true; }else{ $rootScope.authenticated = false; $rootScope.current_user = 'Guest'; } $rootScope.signout = function(){ $http.get('auth/signout'); $rootScope.authenticated = false; $rootScope.current_user = 'Guest'; sessionStorage.clear(); }; }); // ( ) main.config([ '$stateProvider', '$urlRouterProvider', '$httpProvider', function ($stateProvider, $urlRouterProvider,$rootScope) { $urlRouterProvider.otherwise('/'); $stateProvider .state('home', { url: '/', templateUrl: 'Index.html', caseInsensitiveMatch: true, controller: 'MainController' }) .state('contact', { url: '/contact', templateUrl: 'Contact.html', caseInsensitiveMatch: true, controller: 'MainController' }) .state('about', { url: '/about', templateUrl: 'About.html', caseInsensitiveMatch: true, controller: 'MainController' }) .state('login',{ url: '/login', templateUrl: 'login.html', caseInsensitiveMatch: true, controller: 'AuthController' }) .state('register',{ url: '/register', templateUrl: 'register.html', caseInsensitiveMatch: true, controller: 'AuthController' }).state('unauth',{ url: '/unauth', templateUrl: 'unauth.html', caseInsensitiveMatch: true }); } ]); Now create the
user.js model in the Angular / Models directory: // var mongoose = require('mongoose'); // mongoose // var userSchema = new mongoose.Schema({ username: String, password: String, email: String, role: String, created_at: {type: Date, default: Date.now} }); mongoose.model('User', userSchema); var User = mongoose.model('User'); exports.findByUsername = function(userName, callback){ User.findOne({ user_name: userName}, function(err, user){ if(err){ return callback(err); } return callback(null, user); }); } exports.findById = function(id, callback){ User.findById(id, function(err, user){ if(err){ return callback(err); } return callback(null, user); }); } The model is ready. Now create two new controllers:
AuthController.js
and
MainController.js
in the Angular / Controller directory.
// auth main.controller("AuthController", function ($scope, $http, $rootScope, $location) { $scope.user = {username: '', password: ''}; $scope.error_message = ''; // webapi (, node) $scope.login = function(){ $http.post('/auth/login', $scope.user).success(function(data){ if(data.state == 'success'){ $rootScope.authenticated = true; $rootScope.current_user = data.user.username; $rootScope.sess = data.user; sessionStorage.setItem('current_user', $rootScope.sess.username); $location.path('/'); } else{ $scope.error_message = data.message; $rootScope.sess = null; } }); }; // webapi (, node) $scope.register = function(){ console.log($scope.user); $http.post('/auth/signup', $scope.user).success(function(data){ if(data.state == 'success'){ $rootScope.authenticated = true; $rootScope.current_user = data.user.username; $location.path('/'); } else{ $scope.error_message = data.message; } }); }; }); // you main.controller("MainController", function ($scope) {}); // , – Create a new Views directory, and add the following ejs code to the main directory, since ejs is the mapping mechanism used by nodejs in the Starter.ejs file.
<html ng-app="main"> <head> <meta charset="utf-8" /> <meta name="viewport" content="width=device-width, initial-scale=1.0"> <meta name="viewport" content="width=device-width" /> <title>Super Application</title> <link href="bootstrap.css" rel="stylesheet" /> <link href="Site.css" rel="stylesheet" /> <script src="modernizr-2.6.2.js"></script> <script src="jquery-1.10.2.js"></script> <script src="bootstrap.js"></script> <script src="angular.js"></script> <script src="angular-route.js"></script> <script src="angular-ui-router.js"></script> <script src="angular-resource.js"></script> <script src="/Modules/mainApp.js"></script> <script src="/Controllers/MainController.js"></script> <script src="/Controllers/AuthController.js"></script> </head> <body> <div class="navbar navbar-inverse navbar-fixed-top"> <div class="container"> <div class="navbar-header"> <button type="button" class="navbar-toggle" data-toggle="collapse" data-target=".navbar-collapse"> <span class="icon-bar"></span> <span class="icon-bar"></span> <span class="icon-bar"></span> </button> <a class="navbar-brand" href="#/home">Application name</a> </div> <div class="navbar-collapse collapse"> <ul class="nav navbar-nav"> <li><a href="#/home">Home</a></li> <li><a href="#/about">About</a></li> <li><a href="#/contact">Contact</a></li> </ul> <ul class="nav navbar-nav navbar-right"> <li><p class="navbar-right navbar-text">Signed in as {{current_user}}</p></li> <li><p class="navbar-right navbar-text" ng-hide="authenticated"> <a href="#/login">Login</a> or <a href="#/register">Register</a> </p></li> <li><p class="navbar-right navbar-text" ng-show="authenticated"> <a href="#" ng-click="signout()">Logout</a> </p></li> </ul> </div> </div> </div> <div class="container body-content"> <div ui-view> </div> <hr /> <footer> <p>My ASP.NET Application</p> </footer> </div> </body> </html> Now create the Authentication directory in the Views directory; this will contain all views for authentication (registration, login, etc.).
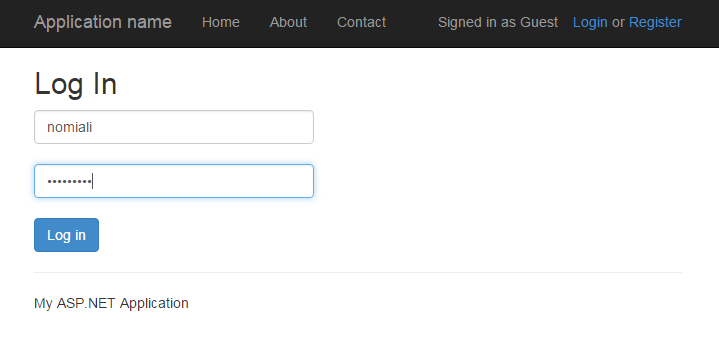
For the authentication view, we will add a new file in the Authentification directory called login.html.
<form class="form-auth" ng-submit="login()"> <h2>Log In</h2> <p class="text-warning">{{error_message}}</p> <input type="username" ng-model="user.username" placeholder="Username" class="form-control" required><br> <input type="password" ng-model="user.password" placeholder="Password" class="form-control" required><br> <input type="submit" value="Log in" class="btn btn-primary" /> </form> For the submission intended for registration, add a new file to the Authentification directory called register.html
<form class="form-auth" ng-submit="register()"> <h2>Register</h2> <p class="text-warning">{{error_message}}</p> <input type="email" ng-model="user.email" placeholder="Email" class="form-control" required><br> <input type="username" ng-model="user.username" placeholder="Username" class="form-control" required><br> <input type="password" ng-model="user.password" placeholder="Password" class="form-control" required><br> <select ng-init="user.role = roles[0].name" ng-model="user.role" ng-options="role.name as role.name for role in roles" class="form-control" required></select><br> <input type="submit" value="Sign Up" class="btn btn-primary" /> </form> For a view reporting that authentication failed, add a new file to the Authentification directory called unauth.html:
<form class="form-auth"> <h2>You are Authentic/Unauthorize to access this page, This is because </h2> <p>1) Not login? Please register to access resources.</p> <p>2) Registered: You are not Authorize user, Please contact Administrator.</p> </form> Now we will create a new Main directory in the Views directory. It will contain all the basic views (index, about us, contact, etc.).
For the Index view, add a new index.html file to the Main directory.
<div> <div class="jumbotron"> <h1>Node.js Application</h1> <p class="lead">Node.js is a free Javascript framework for building great Web sites and Web applications using HTML, CSS and JavaScript.</p> <p><a class="btn btn-primary btn-lg">Learn more »</a></p> </div> <div class="row"> <div class="col-md-4"> <h2>Getting started</h2> <p> ASP.NET MVC gives you a powerful, patterns-based way to build dynamic websites that enables a clean separation of concerns and gives you full control over markup for enjoyable, agile development. </p> <p><a class="btn btn-default" href="http://go.microsoft.com/fwlink/?LinkId=301865">Learn more »</a></p> </div> <div class="col-md-4"> <h2>Get more libraries</h2> <p>NuGet is a free Visual Studio extension that makes it easy to add, remove, and update libraries and tools in Visual Studio projects.</p> <p><a class="btn btn-default" href="http://go.microsoft.com/fwlink/?LinkId=301866">Learn more »</a></p> </div> <div class="col-md-4"> <h2>Web Hosting</h2> <p>You can easily find a web hosting company that offers the right mix of features and price for your applications.</p> <p><a class="btn btn-default" href="http://go.microsoft.com/fwlink/?LinkId=301867">Learn more »</a></p> </div> </div> </div> For the About us view, we will add a new About.html file to the Main directory.
<div> <h2>About Us</h2> <h3>Message</h3> <p>Use this area to provide additional information.</p> </div> «Contact us» Contact.html Main. <div> <h2>Contact Us</h2> <h3>Message</h3> <address> One Microsoft Way<br /> Redmond, WA 98052-6399<br /> <abbr title="Phone">P:</abbr> 425.555.0100 </address> <address> <strong>Support:</strong> <a href="mailto:Support@example.com">Support@example.com</a><br /> <strong>Marketing:</strong> <a href="mailto:Marketing@example.com">Marketing@example.com</a> </address> </div> So, we have completed the design of the interface on angular.
Let's write a backend on node.js
We create new routes based on authentication requests called authentication.js in the Routes directory.
var express = require('express'); var router = express.Router(); module.exports = function(passport){ // (angular) router.get('/success',function(req,res){ res.send({state: 'success', user: req.user ? req.user: null}); }); // (angular) router.get('/failure',function(req,res){ res.send({state: 'failure',user:null,message:"Invalid username or password"}); }); // router.post('/login',passport.authenticate('login',{ successRedirect: '/auth/success', failureRedirect: '/auth/failure' })); // router.post('/signup', passport.authenticate('signup', { successRedirect: '/auth/success', failureRedirect: '/auth/failure' })); // router.get('/signout', function(req, res) { req.session.user = null; req.logout(); res.redirect('/'); }); return router; } Create router.js in the same directory.
var express = require('express'); var router = express.Router(); var mongoose = require( 'mongoose' ); router.get('/',function(req,res,next){ res.render('Starter',{title:"Super App"}); }); module.exports = router; Create a new directory called Passport and add a new file (API) Name passport-init.js, then add the following code. In your authentication route, this will be called Authentication Api.
var mongoose = require('mongoose'); var User = mongoose.model('User'); var LocalStrategy = require('passport-local').Strategy; var bCrypt = require('bcrypt-nodejs'); module.exports = function(passport){ // Passport , passport.serializeUser(function(user, done) { console.log('serializing user:',user.username); done(null, user._id); }); passport.deserializeUser(function(id, done) { User.findById(id, function(err, user) { console.log('deserializing user:',user.username); done(err, user); }); }); passport.use('login', new LocalStrategy({ passReqToCallback : true }, function(req, username, password, done) { // mongo, User.findOne({ 'username' : username }, function(err, user) { // done if (err) return done(err); // , if (!user){ console.log('User Not Found with username '+username); return done(null, false); } // , . if (!isValidPassword(user, password)){ console.log('Invalid Password'); return done(null, false); // } // , done // return done(null, user); } ); } )); passport.use('signup', new LocalStrategy({ passReqToCallback : true // }, function(req, username, password, done, email, role) { // mongo User.findOne({ 'username' : username }, function(err, user) { // done if (err){ console.log('Error in SignUp: '+ err); return done(err); } // if (user) { console.log('User already exists with username: '+username); return done(null, false); } else { // – var newUser = new User(); // newUser.username = username; newUser.password = createHash(password); newUser.email = req.body.email; newUser.role = req.body.role; // newUser.save(function(err) { if (err){ console.log('Error in Saving user: '+err); throw err; } console.log(newUser.username + ' Registration succesful'); return done(null, newUser); }); } }); }) ); var isValidPassword = function(user, password){ return bCrypt.compareSync(password, user.password); }; // bCrypt var createHash = function(password){ return bCrypt.hashSync(password, bCrypt.genSaltSync(10), null); }; }; Now we add a new server.js file to the root directory, since it is from this file that we will start:
//server.js // var express = require('express'); //express var path = require('path'); // var logger = require('morgan'); var cookieParser = require('cookie-parser'); // var bodyParser = require('body-parser'); // json var bcrypt = require('bcrypt-nodejs'); var passport = require('passport'); // passportjs var LocalStrategy = require('passport-local').Strategy; // var session = require('express-session'); // var mongoose = require('mongoose'); // mongodb, var models_user = require('./Angular/Models/user.js'); // server.js // mongoose.connect('mongodb://localhost/AngularizeApp'); // var router = require('./Routes/router'); var authenticate = require('./Routes/authentication')(passport); // express var app = express(); // , My application ejs , app.set('views', path.join(__dirname, 'Views')); app.set('view engine', 'ejs'); // parser, logger passport app.use(cookieParser()); app.use(logger('dev')); app.use(session({ secret: 'keyboard cat' })); app.use(bodyParser.json()); app.use(bodyParser.urlencoded({ extended: false })); app.use(passport.initialize()); // app.use(passport.session()); // // , app.use('/', router); app.use('/auth', authenticate); app.use(express.static(path.join(__dirname, 'scripts'))); app.use(express.static(path.join(__dirname, 'Content'))); app.use(express.static(path.join(__dirname, 'Angular'))); app.use(express.static(path.join(__dirname, 'Views/Main'))); app.use(express.static(path.join(__dirname, 'Views/Authentication'))); // auth-api , , . var initPassport = require('./Passport/passport-init'); initPassport(passport); // var server = app.listen(3000, function () { var host = server.address().address; var port = server.address().port; console.log('Example app listening at http://%s:%s', host, port); }); // module.exports = app; So, everything is ready with the code. This application can be started using the node server.js command via the command line, but first go to the root MEANApp directory using the cd command: c: // MeanApp etc.
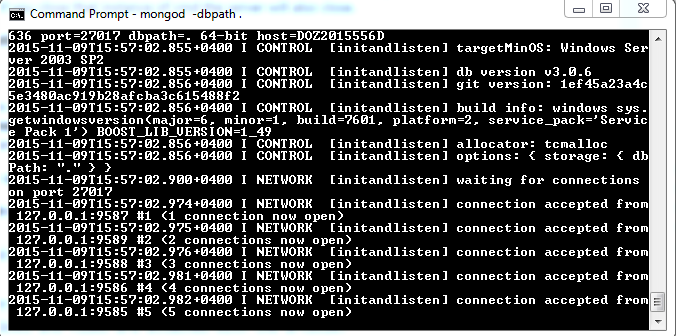
You will also need to start the mongodb server. To do this, open a new window cmd and enter mongod -dbpath. If the mongodb database is installed and the variable name is added, then this command will successfully start your mongodb server. Do not close this command window, because if you close it, the server will also stop working.
mongod -dbpath
After running the above command, you can check your database on the command line. To do this, open another command line window, enter mongodb in it - you will see a client of the database you are interested in among the connected clients and can switch to it. About mongodb can be read in the documentation located here .
You can start the application using the following command:
MeanApp>node server.js
After logging in, you can check all calls.
So, we have a working application that supports authentication and sessions for storing data on the server side.
All code is located on github here .
Source: https://habr.com/ru/post/279237/
All Articles