Installing applications in Caché using projections

Hello. This article will describe another way to create an installer for applications in InterSystems Caché. Applications here mean different libraries or utilities that can be added to or removed from Caché with just one action. If you are still writing instructions for users to install your applications in Caché, consisting of more than one line - it's time to automate it.
Formulation of the problem
Suppose we have developed some web utility for Caché, which we want to deliver in the future. Of course, I would like not to disturb the users who are going to install it with all sorts of details on the configuration and detailed instructions of the installation process. In addition, all these instructions should be as detailed and focused on users who may not know Caché. In the case of a web utility, during installation, you will need to ask the user not only to import utility classes into Caché, but also, at a minimum, to configure the web application to access it, which is quite a lengthy set of actions:

Of course, it is not difficult to perform all these actions programmatically - you only need to figure out once how web applications are created using Caché ObjectScript. But even in this case it will be necessary, for example, to ask the user to run the installation script through the terminal.
Installation in one import
In Caché, it is possible to limit to just one action on delivery — import a class package. And this is enough - the user will just need to import the XML file with the class package in any way familiar to him:
')
- Simply drag and drop the XML file onto the Studio area using drag-n-drop;
- Through the management portal: Observer -> Classes -> Import;
- Via terminal: do $ system.OBJ.Load ("C: \ FileToImport.xml", "ck") .
At the same time the compilation of classes will be executed code that installs. Moreover, if the user does not like the application (package) installed by him, and he removes it, there is also the possibility to execute arbitrary code during the so-called “decompilation” for rolling back the actions performed during the installation.
Creating a projection
Extending the behavior of the Caché compiler, namely, to execute arbitrary code when compiling and “decompiling” classes allows the creation of a projection class in the package that we are going to install to the user. This is a class that inherits % Projection.AbstractProjection and overrides two class methods: CreateProjection , which runs when the class is compiled, and RemoveProjection , which runs before the class is recompiled and removed.
Usually this class is called Installer. Let's look at an example of such a class for our MyPackage application:
Class MyPackage.Installer Extends %Projection.AbstractProjection [ CompileAfter = (Class1, Class2) ] { Projection Reference As Installer; /// This method is invoked when a class is compiled. ClassMethod CreateProjection(cls As %String, ByRef params) As %Status { write !, "Installing..." } /// This method is invoked when a class is 'uncompiled'. ClassMethod RemoveProjection(cls As %String, ByRef params, recompile As %Boolean) As %Status { write !, "Uninstalling..." } } The behavior here can be described as:
- At the first package import, only the CreateProjection method is executed;
- If you recompile the MyApp.Installer class or import this class “on top” of the already existing method, RemoveProjection will be called with the recompile = 1 parameter of the old class (which was compiled earlier), and only then the CreateProjection method of the new class will be executed (which is loaded) ;
- If the package is removed (and along with the MyApp.Installer class), only RemoveProjection will be called with the parameter recompile = 0 .
It is also important to note the following:
- The keyword of the CompileAfter class contains a list of the names of the classes of our application, the compilation (or deletion) of which must be waited before executing the methods of the projection class. It is strongly recommended to always enter the names of all classes of your application in this list, since if an error occurs during the compilation of other classes, the code in the projection class should not be executed;
- Both methods take the first parameter cls - this is the name of the class, in our case, it will always be equal to “MyApp.Installer” . The fact is that such an “installer” can be created for any class of our application separately, inheriting them from a class inheriting % Projection.AbstractProjection . Only in this case it will make sense to use this parameter, but for our purpose it is not necessary to do this;
- Both methods take the second params parameter - this is an associative array, which contains a lot of additional information about the current compilation settings and a set of parameter values for the current class in the form of “parameter name” - “value”. You can look in more detail at what is contained in params by running zwrite params ;
- The RemoveProjection method accepts the recompile parameter, which equals 0 only if the class is removed and not compiled again.
The % Projection.AbstractProjection class also contains other methods that we can override, but they are not needed for the task.
Example
Now let's look a little deeper at the task of creating a web application for our utility. Let's simulate a simple case - suppose we have a REST application that just responds with “I am installed!” When trying to open it through a web browser. To create such an application, we need to create a class describing it:
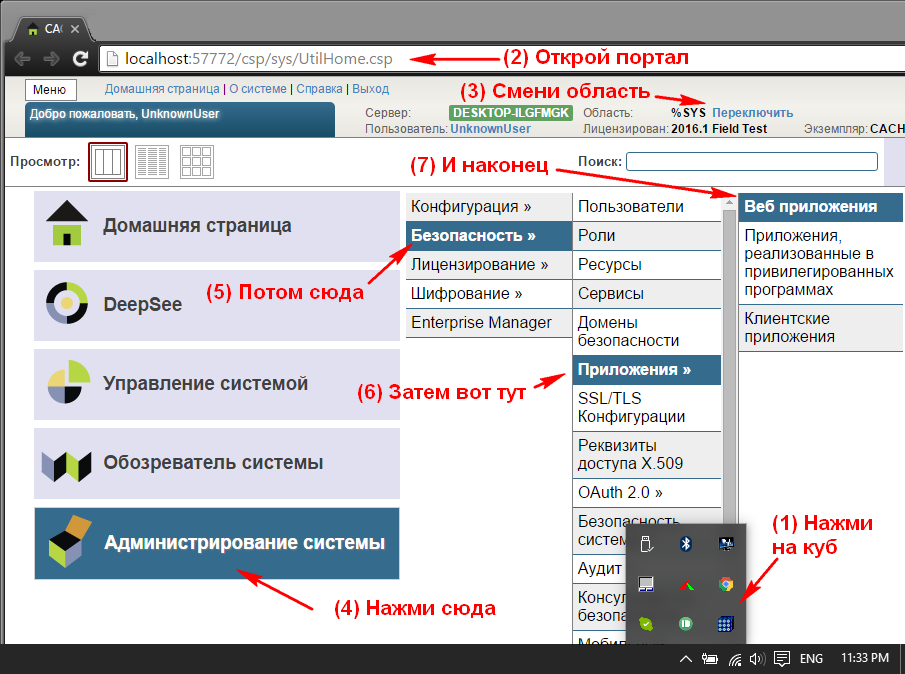
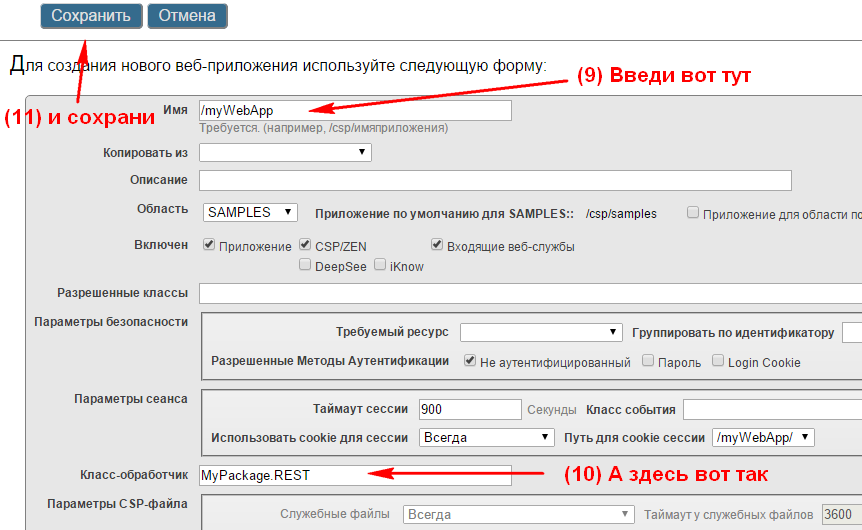
Class MyPackage.REST Extends %CSP.REST { XData UrlMap { <Routes> <Route Url="/" Method="GET" Call="Index"/> </Routes> } ClassMethod Index() As %Status { write "I am installed!" return $$$OK } } The class has been created, it now remains to register this web application through the management portal. How this is done is just shown in the pictures at the beginning of this article. After performing these steps, at this stage it would be nice to make sure that the web application is working by going to http: // localhost: 57772 / myWebApp / (1. A slash is required at the end; 2. Port 57772 may be different in your system. It will be identical to the port on which you viewed the management portal).
Of course, you can automate all this web application creation routine by overriding the CreateProjection method to create a web application, and the RemoveProjection method to remove it. Our projection class in the simplest case will look like this:
Class MyPackage.Installer Extends %Projection.AbstractProjection [ CompileAfter = MyPackage.REST ] { Projection Reference As Installer; Parameter WebAppName As %String = "/myWebApp"; Parameter DispatchClass As %String = "MyPackage.REST"; ClassMethod CreateProjection(cls As %String, ByRef params) As %Status { set currentNamespace = $Namespace write !, "Changing namespace to %SYS..." znspace "%SYS" // %SYS, Security.Applications write !, "Configuring WEB application..." set cspProperties("AutheEnabled") = $$$AutheUnauthenticated // set cspProperties("NameSpace") = currentNamespace // , set cspProperties("Description") = "A test WEB application." // set cspProperties("IsNameSpaceDefault") = $$$NO // set cspProperties("DispatchClass") = ..#DispatchClass // - return ##class(Security.Applications).Create(..#WebAppName, .cspProperties) } ClassMethod RemoveProjection(cls As %String, ByRef params, recompile As %Boolean) As %Status { write !, "Changing namespace to %SYS..." znspace "%SYS" write !, "Deleting WEB application..." return ##class(Security.Applications).Delete(..#WebAppName) } } In this example, each time the MyPackage.Installer class is compiled , a web application will be created, and “decompiled” to be deleted. Of course, it would be good to add a few checks on whether a web application exists before removing or creating it ( ## class (Security.Applications) .Exists (“Name”) ), but for the sake of simplicity, let's leave it to the reader as homework.
At this stage, after creating the classes MyPackage.REST and MyPackage.Installer , we can export the classes as one XML file and share this file with everyone. They, in turn, will automatically create a web application when importing and compiling an XML file, and all that remains to be done is to go to the address you specified in the instructions.
The sample application in this article that installs itself can be downloaded from here and immediately try to install.
Total
In contrast to the method of installing applications using the % Installer system class, which was also written on the desktop , the installation through the projection class has the following significant differences:
- Only pure Caché ObjectScript is used. For% Installer, it is necessary to fill in the xData-block with specific markup, described by a considerable piece of documentation;
- The installation method is executed immediately after importing and compiling the classes of our application, and it does not need to be called separately;
- The removal method is automatically executed when the class (package) is removed, which a priori cannot be implemented through% Installer.
This approach to the delivery of applications is already used in my projects - Caché WEB Terminal and Caché Class Explorer . In the same place it is possible to peep and an example of the implemented class Installer .
I would like to add finally that the InterSystems engineering community is experimenting with the implementation of the Package Manager , which has long existed for platforms such as NodeJS (npm), Ruby (RubyGems), etc. This tool allows you to install and configure any packages and applications (such as a web terminal for Caché ) using just one command. In the meantime, new applications on InterSystems Caché and Ensemble with source codes can be found in this repository .
Source: https://habr.com/ru/post/279207/
All Articles