Creating reports in PowerShell
The issues of text output, reporting, sending mail. Tips are given on how to write reports so that you can use code fragments many times, add missing pieces, and collect a longer report.
Definitely needed by everyone who collects information using PowerShell, or wants to learn how to use it effectively.
This chapter contains
In this chapter, we will look at how PowerShell works when creating reports. PowerShell does not shine if you need to work with strings, try to use objects for this. The more you use objects when creating reports, the better you can do the processing.
')
33.1 What not to do.
Let's start the chapter with what we consider an example of a bad reporting technique. We constantly meet this style. Most IT professionals do not think about it and perpetuate the style of other languages, such as VBScript, in code.
The following code is written in a style that we hope you will not use, and which you will see in the code of less-informed system administrators.
Listing 33.1 Poorly designed inventory script
The code in Listing 33.1 will produce an output like this.

Figure 33.1 conclusion based on strings.
As you can see, this script works, Don Jones (one of the authors), seeing the output from the script in clear lines, angrily pronounces a saying with the participation of the deity and puppies (probably, the curse in the original and puppies that outputs pure text like this). First of all - this script can only display on the screen, because The output is conducted through the Write-Host. In most cases, when you use Write-Host , you will do it wrong. It would be nice if it would be possible to display this information in a file, or in HTML? You can achieve this by changing all Write-Host to Write-Output , but this will still be the wrong way.
There are more effective ways to generate a report, and this is the reason why we wrote this chapter. First, we would suggest for each block or function where information is generated to create one object containing all the necessary information. The more code you break into blocks, the more you can reuse these blocks. In our bad example, the first section "Computer Information" should be the function we write. It can be used in all reports of this type. In the "disk information" section, the data is specified as one object, it is not necessary to combine information from different sources, but all cmdlets on Write must go. (example of a translator. How to do this, see the example in section 33.2.1 Getting the initial information)
Exceptions to every rule
There are exceptions to every rule. Richard Siddaway spends a lot of time auditing foreign systems. It makes it a standard set of scripts. Scripts are designed to produce output, which then either go directly to a Word document, or files are generated and then inserted into a document. Thus, the initial data can be obtained and viewed very quickly, so that their analysis and discussion is not delayed.
The rules violated in these scenarios are as follows
This is a conscious decision, since it is known how the scripts will be applied and how the report should look. The moral of this story is to bring objects, and be ready to go beyond the paradigm if there are reasons.
33.2 Working with HTML snippets and files
The trick of our method is that ConvertTo-HTML can be used in two different ways. The first way is to produce a full HTML page, the second is to produce an HTML fragment. This fragment is just an HTML table with the data that was passed to the cmdlet, we will produce each section of the report as a fragment, and then we will assemble the fragments into a full HTML page.
33.2.1 Obtaining baseline information
We begin by collecting data into objects, one object for each section of the report. In our case there will be two objects - information about the computer and information about the disks. We agree that for meekness and clarity we will skip error handling and other subtleties. In the wild, we would add them. Get-WMIObject itself produces an object containing information on disks. This means that you also need to create a function that gives out an object with information about the computer.
The function retrieves information from three different WMI classes. We create an object using a hash table assembled from three objects, since we want to be able to transfer the output of the function through a pipeline. Usually we prefer to give names to properties without spaces, now we will deviate from this rule because we are going to use names in the final report.
33.2.2 Production of fragments of HTML reports.
Now we can use the written function to get the report in HTML
We have been moving for a long time to this trick, so it must be taken apart:
1. You save the output as an HTML fragment in a variable named $ frag1 , later we can insert it in the right place of the output or save it entirely in the file.
2. Get-CSInfo is launched , the name of the computer from which we want to receive data is transferred to it, now we set the name of the computer hard, in the future we will replace it with a variable.
3. The resulting output is served on ConvertTo-HTML , this command generates HTML fragment in the output in the form of a vertical list, not horizontally. The list will mimic the look of the old report on bad-technology-output-information .
4. We use the –PreContent parameter to add an inscription in front of the report label. We added tags to make a bold title.
5. All that happened - this is a trick - is passed on to the Out-String . You will see that ConvertTo-HTML will put a whole bunch in the pipeline. You see that lines, collections of lines, and various other objects are written to the pipeline. All this will lead to problems in the end, when you try to collect it all into a final HTML page, instead we just filed for an Out-String and got the good old string as output.
You can go ahead and produce the second fragment. This is easier because no need to write a function, HTML generation will look exactly the same. The only difference is that we collect the data in this section into a table, not a list:
We have both fragments, we can proceed to the formation of the final report.
33.2.3 Building the final HTML file
The build includes adding your two fragments, and style sheets. Using a CSS style sheet and language is beyond the scope of this book. The style sheet allows you to control the formatting of the HTML page so that it looks much better. If you want a good tutorial and links to additional CSS content, check out http://www.w3schools.com/css/
The style sheet $ head is created , the desired style is described in the string type variable. This variable is then passed to the –head parameter, and your fragments are listed separated by a comma in the –PostContent parameter. A report title is also added in the –PreContent parameter. Save the entire script as C: \ Good.ps1 and run it as follows:
./good> Report.htm
This will redirect the output to the Report.htm file, which will be beautiful, as in Figure 33.2.
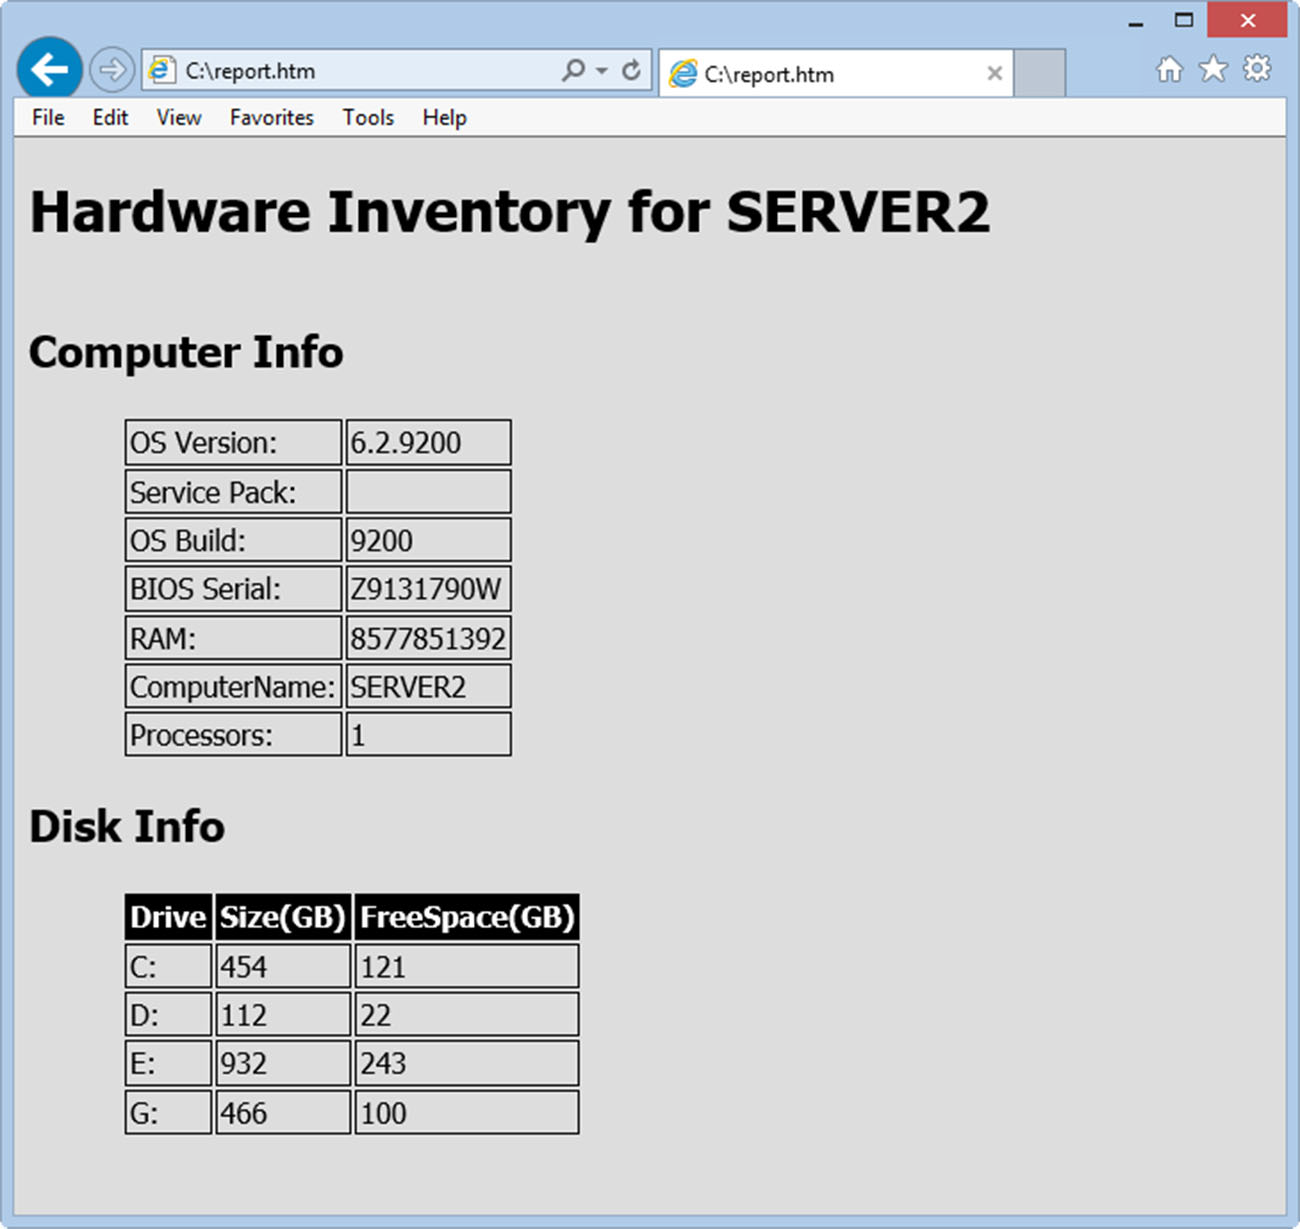
Figure 33.2 report from several fragments
Maybe this is not a work of art, but it is a report that looks better than a report on the screen that began this chapter. Listing 33.2 shows a hung script where you can set the name of the computer, the default is localhost . The header contains [CmdletBinding ()], which allows the use of –verbose . Write-Verbose is inserted in the body of the script, you can see what each step is doing.
Listing 33.2 HTML script inventory
Script use
The script generates an HTML file that can be used in the future, and displays a report. Keep in mind that the Get-CSInfo function can be reused. Since it displays the object, not the text, you can use it in various places where you need to display the same information.
If you need to add more information to the report, then to add a new section you will need:
Yes, this report is text. In the end, every report will be text, because the text is what we read. The essence of this method is that everything remains an object until the last moment. You let PowerShell format for you. The work items of this script can be copied and used elsewhere, which is not possible using the source text at the beginning of the chapter.
33.3 Email Sending
What could be better than HTML report? Report that will automatically come to email!
By part, PowerShell already contains the Send-MailMessage cmdlet . Let's fix our script a bit:
we changed the end of the pipeline by redirecting the output to a file. Then used Send-MailMessage as an attachment. You can send HTML as the message body itself. You do not need to create a file on disk for this, you can take output from the pipeline directly. Here is an alternative example.
Here we built the Send-MailMessage parameters in the hash table and saved them in the $ Param variable. This allows you to use splat technique and feed all the parameters to the team at once. It makes no difference that you type them as parameters or you specify it through a hash table, it will work anyway, but it’s better to read.
33.4 Total
Building reports is certainly a great need for administrators, we wanted to show that PowerShell is well suited for this task. The trick is to create reports in such a way that the extraction of information is separated from formatting and creating output. In fact, PowerShell can provide great formatting and output capabilities with a small amount of work on your part.
ZY from translator
for correct display of Russian text you need to use
Definitely needed by everyone who collects information using PowerShell, or wants to learn how to use it effectively.
Secrets of creating reports Chapter 33
This chapter contains
- Work with HTML fragments
- Create stylish HTML reports
- Sending reports by email
In this chapter, we will look at how PowerShell works when creating reports. PowerShell does not shine if you need to work with strings, try to use objects for this. The more you use objects when creating reports, the better you can do the processing.
')
33.1 What not to do.
Let's start the chapter with what we consider an example of a bad reporting technique. We constantly meet this style. Most IT professionals do not think about it and perpetuate the style of other languages, such as VBScript, in code.
The following code is written in a style that we hope you will not use, and which you will see in the code of less-informed system administrators.
Listing 33.1 Poorly designed inventory script
param ($computername) Write-Host '------- COMPUTER INFORMATION -------' Write-Host "Computer Name: $computername" $os = Get-WmiObject -Class Win32_OperatingSystem -ComputerName $computername Write-Host " OS Version: $($os.version)" Write-Host " OS Build: $($os.buildnumber)" Write-Host " Service Pack: $($os.servicepackmajorversion)" $cs = Get-WmiObject -Class Win32_ComputerSystem -ComputerName $computername Write-Host " RAM: $($cs.totalphysicalmemory)" Write-Host " Manufacturer: $($cs.manufacturer)" Write-Host " Model: $($cd.model)" Write-Host " Processors: $($cs.numberofprocessors)" $bios = Get-WmiObject -Class Win32_BIOS -ComputerName $computername Write-Host "BIOS Serial: $($bios.serialnumber)" Write-Host '' Write-Host '------- DISK INFORMATION -------' Get-WmiObject -Class Win32_LogicalDisk -Comp $computername –Filt 'drivetype=3' | Select-Object @{n='Drive';e={$_.DeviceID}}, @{n='Size(GB)';e={$_.Size / 1GB -as [int]}}, @{n='FreeSpace(GB)';e={$_.freespace / 1GB -as [int]}} | Format-Table –AutoSize The code in Listing 33.1 will produce an output like this.
Figure 33.1 conclusion based on strings.
As you can see, this script works, Don Jones (one of the authors), seeing the output from the script in clear lines, angrily pronounces a saying with the participation of the deity and puppies (probably, the curse in the original and puppies that outputs pure text like this). First of all - this script can only display on the screen, because The output is conducted through the Write-Host. In most cases, when you use Write-Host , you will do it wrong. It would be nice if it would be possible to display this information in a file, or in HTML? You can achieve this by changing all Write-Host to Write-Output , but this will still be the wrong way.
There are more effective ways to generate a report, and this is the reason why we wrote this chapter. First, we would suggest for each block or function where information is generated to create one object containing all the necessary information. The more code you break into blocks, the more you can reuse these blocks. In our bad example, the first section "Computer Information" should be the function we write. It can be used in all reports of this type. In the "disk information" section, the data is specified as one object, it is not necessary to combine information from different sources, but all cmdlets on Write must go. (example of a translator. How to do this, see the example in section 33.2.1 Getting the initial information)
Exceptions to every rule
There are exceptions to every rule. Richard Siddaway spends a lot of time auditing foreign systems. It makes it a standard set of scripts. Scripts are designed to produce output, which then either go directly to a Word document, or files are generated and then inserted into a document. Thus, the initial data can be obtained and viewed very quickly, so that their analysis and discussion is not delayed.
The rules violated in these scenarios are as follows
- The output is a mixture of text and objects.
- Output immediately formatted
This is a conscious decision, since it is known how the scripts will be applied and how the report should look. The moral of this story is to bring objects, and be ready to go beyond the paradigm if there are reasons.
33.2 Working with HTML snippets and files
The trick of our method is that ConvertTo-HTML can be used in two different ways. The first way is to produce a full HTML page, the second is to produce an HTML fragment. This fragment is just an HTML table with the data that was passed to the cmdlet, we will produce each section of the report as a fragment, and then we will assemble the fragments into a full HTML page.
33.2.1 Obtaining baseline information
We begin by collecting data into objects, one object for each section of the report. In our case there will be two objects - information about the computer and information about the disks. We agree that for meekness and clarity we will skip error handling and other subtleties. In the wild, we would add them. Get-WMIObject itself produces an object containing information on disks. This means that you also need to create a function that gives out an object with information about the computer.
function Get-CSInfo { param($computername) $os = Get-WmiObject -Class Win32_OperatingSystem -ComputerName $computername $cs = Get-WmiObject -Class Win32_ComputerSystem -ComputerName $computername $bios = Get-WmiObject -Class Win32_BIOS -ComputerName $computername #property names with spaces need to be enclosed in quotes $props = @{ComputerName = $computername 'OS Version' = $os.version 'OS Build' = $os.buildnumber 'Service Pack' = $os.sevicepackmajorversion RAM = $cs.totalphysicalmemory Processors = $cs.numberofprocessors 'BIOS Serial' = $bios.serialnumber} $obj = New-Object -TypeName PSObject -Property $props Write-Output $obj } The function retrieves information from three different WMI classes. We create an object using a hash table assembled from three objects, since we want to be able to transfer the output of the function through a pipeline. Usually we prefer to give names to properties without spaces, now we will deviate from this rule because we are going to use names in the final report.
33.2.2 Production of fragments of HTML reports.
Now we can use the written function to get the report in HTML
$frag1 = Get-CSInfo –computername SERVER2 | ConvertTo-Html -As LIST -Fragment –PreContent '<h2>Computer Info</h2>' | Out-String We have been moving for a long time to this trick, so it must be taken apart:
1. You save the output as an HTML fragment in a variable named $ frag1 , later we can insert it in the right place of the output or save it entirely in the file.
2. Get-CSInfo is launched , the name of the computer from which we want to receive data is transferred to it, now we set the name of the computer hard, in the future we will replace it with a variable.
3. The resulting output is served on ConvertTo-HTML , this command generates HTML fragment in the output in the form of a vertical list, not horizontally. The list will mimic the look of the old report on bad-technology-output-information .
4. We use the –PreContent parameter to add an inscription in front of the report label. We added tags to make a bold title.
5. All that happened - this is a trick - is passed on to the Out-String . You will see that ConvertTo-HTML will put a whole bunch in the pipeline. You see that lines, collections of lines, and various other objects are written to the pipeline. All this will lead to problems in the end, when you try to collect it all into a final HTML page, instead we just filed for an Out-String and got the good old string as output.
You can go ahead and produce the second fragment. This is easier because no need to write a function, HTML generation will look exactly the same. The only difference is that we collect the data in this section into a table, not a list:
$frag2 = Get-WmiObject -Class Win32_LogicalDisk -Filter 'DriveType=3' -ComputerName SERVER2 | Select-Object @{name='Drive';expression={$_.DeviceID}}, @{name='Size(GB)';expression={$_.Size / 1GB -as [int]}}, @{name='FreeSpace(GB)';expression={ $_.freespace / 1GB -as [int]}} | ConvertTo-Html -Fragment -PreContent '<h2>Disk Info</h2>' | Out-String We have both fragments, we can proceed to the formation of the final report.
33.2.3 Building the final HTML file
The build includes adding your two fragments, and style sheets. Using a CSS style sheet and language is beyond the scope of this book. The style sheet allows you to control the formatting of the HTML page so that it looks much better. If you want a good tutorial and links to additional CSS content, check out http://www.w3schools.com/css/
$head = @' <style> body { background-color:#dddddd; font-family:Tahoma; font-size:12pt; } td, th { border:1px solid black; border-collapse:collapse; } th { color:white; background-color:black; } table, tr, td, th { padding: 2px; margin: 0px } table { margin-left:50px; } </style> '@ ConvertTo-HTML -head $head -PostContent $frag1, $frag2 -PreContent "<h1>Hardware Inventory for SERVER2</h1>" The style sheet $ head is created , the desired style is described in the string type variable. This variable is then passed to the –head parameter, and your fragments are listed separated by a comma in the –PostContent parameter. A report title is also added in the –PreContent parameter. Save the entire script as C: \ Good.ps1 and run it as follows:
./good> Report.htm
This will redirect the output to the Report.htm file, which will be beautiful, as in Figure 33.2.
Figure 33.2 report from several fragments
Maybe this is not a work of art, but it is a report that looks better than a report on the screen that began this chapter. Listing 33.2 shows a hung script where you can set the name of the computer, the default is localhost . The header contains [CmdletBinding ()], which allows the use of –verbose . Write-Verbose is inserted in the body of the script, you can see what each step is doing.
Listing 33.2 HTML script inventory
<# .DESCRIPTION Retrieves inventory information and produces HTML .EXAMPLE ./Good > Report.htm .PARAMETER The name of a computer to query. The default is the local computer. #> [CmdletBinding()] param([string]$computername=$env:computername) # function to get computer system info function Get-CSInfo { param($computername) $os = Get-WmiObject -Class Win32_OperatingSystem -ComputerName $computername $cs = Get-WmiObject -Class Win32_ComputerSystem -ComputerName $computername $bios = Get-WmiObject -Class Win32_BIOS -ComputerName $computername $props = @{'ComputerName'=$computername 'OS Version'=$os.version 'OS Build'=$os.buildnumber 'Service Pack'=$os.servicepackmajorversion 'RAM'=$cs.totalphysicalmemory 'Processors'=$cs.numberofprocessors 'BIOS Serial'=$bios.serialnumber} $obj = New-Object -TypeName PSObject -Property $props Write-Output $obj } Write-Verbose 'Producing computer system info fragment' $frag1 = Get-CSInfo -computername $computername | ConvertTo-Html -As LIST -Fragment -PreContent '<h2>Computer Info</h2>' | Out-String Write-Verbose 'Producing disk info fragment' $frag2 = Get-WmiObject -Class Win32_LogicalDisk -Filter 'DriveType=3' -ComputerName $computername | Select-Object @{name='Drive';expression={$_.DeviceID}}, @{name='Size(GB)';expression={$_.Size / 1GB -as [int]}}, @{name='FreeSpace(GB)';expression={$_.freespace / 1GB -as [int]}} | ConvertTo-Html -Fragment -PreContent '<h2>Disk Info</h2>' | Out-String Write-Verbose 'Defining CSS' $head = @' <style> body { background-color:#dddddd; font-family:Tahoma; font-size:12pt; } td, th { border:1px solid black; border-collapse:collapse; } th { color:white; background-color:black; } table, tr, td, th { padding: 2px; margin: 0px } table { margin-left:50px; } </style> '@ Write-Verbose 'Producing final HTML' Write-Verbose 'Pipe this output to a file to save it' ConvertTo-HTML -head $head -PostContent $frag1,$frag2 -PreContent "<h1>Hardware Inventory for $ComputerName</h1>" Script use
PS C:\> $computer = SERVER01 PS C:\> C:\Scripts\good.ps1 -computername $computer | >> Out-File "$computer.html" >> PS C:\> Invoke-Item "$computer.html" The script generates an HTML file that can be used in the future, and displays a report. Keep in mind that the Get-CSInfo function can be reused. Since it displays the object, not the text, you can use it in various places where you need to display the same information.
If you need to add more information to the report, then to add a new section you will need:
- Write a function or command generating object, with the information of the new report section.
- Create an HTML fragment from this object and save it to a variable.
- Add this variable to the variable list of the final report assembly command. So you complete the report.
- Everything
Yes, this report is text. In the end, every report will be text, because the text is what we read. The essence of this method is that everything remains an object until the last moment. You let PowerShell format for you. The work items of this script can be copied and used elsewhere, which is not possible using the source text at the beginning of the chapter.
33.3 Email Sending
What could be better than HTML report? Report that will automatically come to email!
By part, PowerShell already contains the Send-MailMessage cmdlet . Let's fix our script a bit:
Write-Verbose 'Producing final HTML' Write-Verbose 'Pipe this output to a file to save it' ConvertTo-HTML -head $head -PostContent $frag1,$frag2 -PreContent "<h1>Hardware Inventory for $ComputerName</h1>" | Out-File report.htm Write-Verbose "Sending e-mail" $params = @{'To'='whomitmayconcern@company.com' 'From'='admin@company.com' 'Subject'='That report you wanted' 'Body'='Please see the attachment.' 'Attachments'='report.htm' 'SMTPServer'='mail.company.com'} Send-MailMessage @params we changed the end of the pipeline by redirecting the output to a file. Then used Send-MailMessage as an attachment. You can send HTML as the message body itself. You do not need to create a file on disk for this, you can take output from the pipeline directly. Here is an alternative example.
Write-Verbose 'Producing final HTML' $body = ConvertTo-HTML -head $head -PostContent $frag1,$frag2 -PreContent "<h1>Hardware Inventory for $ComputerName</h1>" | Out-String Write-Verbose "Sending e-mail" $params = @{'To'='whomitmayconcern@company.com' 'From'='admin@company.com' 'Subject'='That report you wanted' 'Body'=$Body 'BodyAsHTML'=$True 'SMTPServer'='mail.company.com'} Send-MailMessage @params Here we built the Send-MailMessage parameters in the hash table and saved them in the $ Param variable. This allows you to use splat technique and feed all the parameters to the team at once. It makes no difference that you type them as parameters or you specify it through a hash table, it will work anyway, but it’s better to read.
33.4 Total
Building reports is certainly a great need for administrators, we wanted to show that PowerShell is well suited for this task. The trick is to create reports in such a way that the extraction of information is separated from formatting and creating output. In fact, PowerShell can provide great formatting and output capabilities with a small amount of work on your part.
ZY from translator
for correct display of Russian text you need to use
$encoding = [System.Text.Encoding]::UTF8 Send-MailMessage @params -Encoding $encoding Source: https://habr.com/ru/post/279005/
All Articles