We continue to accelerate the blog on WordPress - PHP7, ESI in Varnish, XtraDB, effective compression and shutdown of excess
In my previous article on optimizing a WordPress site, I talked about a very effective approach to optimizing through page caching. As a result, for non-logged-in users, the page waiting time by the client (excluding the TLS session establishment time) was reduced from 820 ms to 30 ms (this and all subsequent measurements were taken from a server located in the same city as my VDS), agree is an excellent indicator. However, for logged-in users, page generation was still long — an average of 770 ms on the server. In this part I will talk about how I reduced this time to 65 ms , while fully preserving the functionality of the user functionality.
The purpose of this and previous articles is my desire to show the possibility of optimizing websites not only on WordPress, but generally any web application. Therefore, I use such a number of tools, and so I analyze their configuration in detail. If you just need to speed up WordPress, install the WP Super Cache plugin. If you, like me, are interested in technologies that allow you to optimize any site, and you are also interested in what should be taken into account when developing web applications designed for high loads - I ask for the cat, but only after reading the first part - I will be developing the same the system.
The recommendations in this section may seem trivial to many, but I promise you, the further we progress, the more interesting the points will be. This item has led to a significant acceleration of the site, and I believe that this should be here.
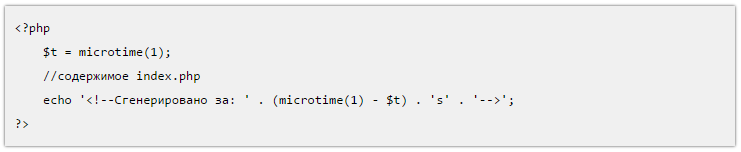
So, the average time for generating a dynamic page for a logged in user is 770 ms . The generation time was measured by adding lines to the index.php source:
')
Next, I conducted a preliminary stress test: 50 users simultaneously access a dynamically generated page as soon as the page loading is completed - the next request is right there.

The maximum response time in this case was 45.721 seconds.
We follow the popular advice in the WordPress optimizer circles, namely - disable unnecessary plugins. In my blog, almost every article provides code / configuration listings. For these purposes, I used the Crayon Syntax Highlighter plugin, recommended by almost every blogger as the best tool for syntax highlighting in listings. However, the light itself was not so necessary for me, the main thing is a neatly decorated window with a scroll bar with tab support. For testing purposes, I tried to disable this plugin. The result - instead of 770 ms, page generation occurred on average over 170 ms , which is 4.5 times faster . However, the listings were no longer decorated - the text of the articles merged with the code. Further, in search of a replacement, I came across a wp-syntax plugin, which did not have such rich functionality as Crayon Syntax Highlighter, but with its main task - syntax highlighting, I coped with a bang. The average time to generate a page with this plugin averaged 235 ms , which is, in general, acceptable. Here I re-conducted the stress test. The results are as follows:
The maximum response time is now 9.897 seconds. The difference is colossal.
However, as I said above, the backlight was not so important to me. Therefore, I decided to remove this plugin too, and instead, in the theme styles for the <pre> tag (it contained the code listings in the above-described plugins) to register the following styles:
Listings took the following form:
That was enough for me. The page generation time on the server is 170 ms . We carry out a stress test:
The maximum response time is now 7.002 seconds. The difference is palpable, I leave this option.
Next, I removed 2 widget from the footer - recent comments and a tag cloud. By reducing the number of queries to the database, the average page generation time on the server was reduced to 155 ms . The results of the stress test lost, but the maximum response time was about 6.5 seconds.
In the comments to the previous article I was told that using MyISAM as a table engine in the MariaDB DBMS is unreasonable. I agree, correcting. I will choose between MyISAM , Aria , XtraDB .
The configuration of my.cnf in the case of MyISAM and Aria will be the same, and does not differ from the configuration given in the first article . However, for Aria , use the directive default-storage-engine = Aria .
The following directives should be set for XtraDB (I’m giving only what I changed compared to the configuration in the previous article):
As a selection criterion, I first wanted to use the page generation time, but all types of engines with a simple page request showed the same results, so it was decided to perform stress tests with a load of 100 users. My test account did not allow running stress tests with more than 50 users, however, as it was found out by experience, it was possible to run several tests from different browser tabs at the same time, which I used. We check MyISAM. Users: 100 (in the other tab, the same test was launched a little earlier):
Maximum response time: 17.473 seconds.
Check Aria. Users: 100 (in the other tab, the same test was launched a little earlier):
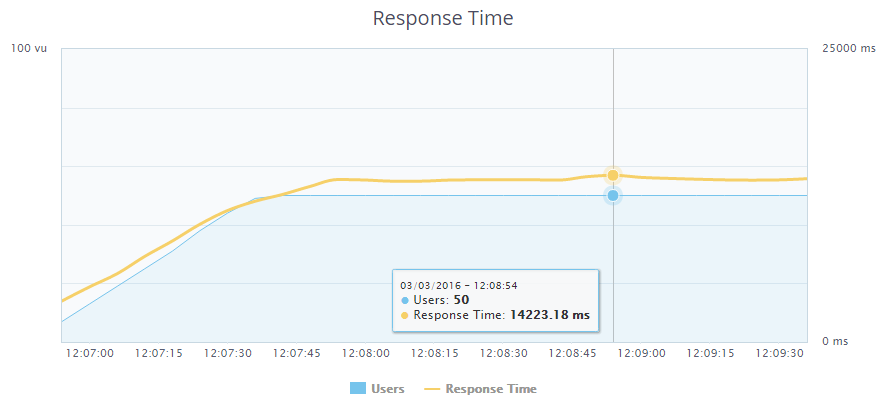
Maximum response time: 14.223 seconds. At the same time a smoother change in response time.
We check XtraDB. Users: 100 (in the other tab, the same test was launched a little earlier):
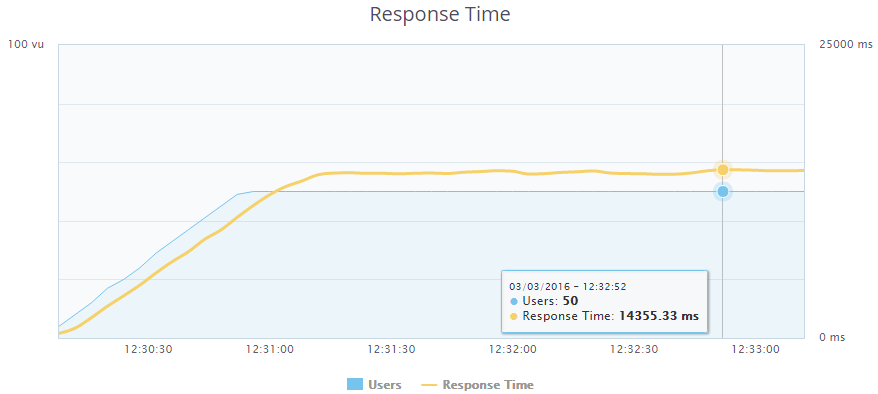
Maximum response time: 14.355 seconds.
Since the results on XtraDB and Aria turned out to be almost the same, leaving MyISAM behind, I decided to go ahead and increase the number of requests until the site is down. On which engine will withstand a large load - he will choose.
Testing Aria again. Users: 150 (in the other two tabs, the same tests were started a little earlier):
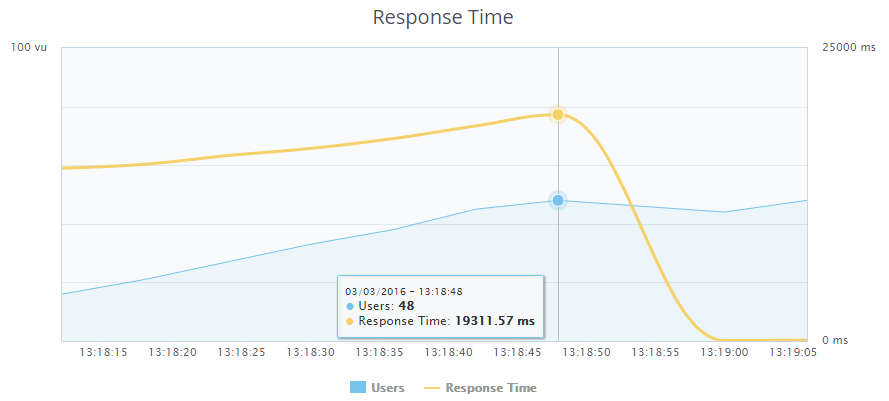
Dropped by 148 users. Response time: 19.311 seconds .
We are testing XtraDB. Users: 150 (in the other two tabs, the same tests were started a little earlier):
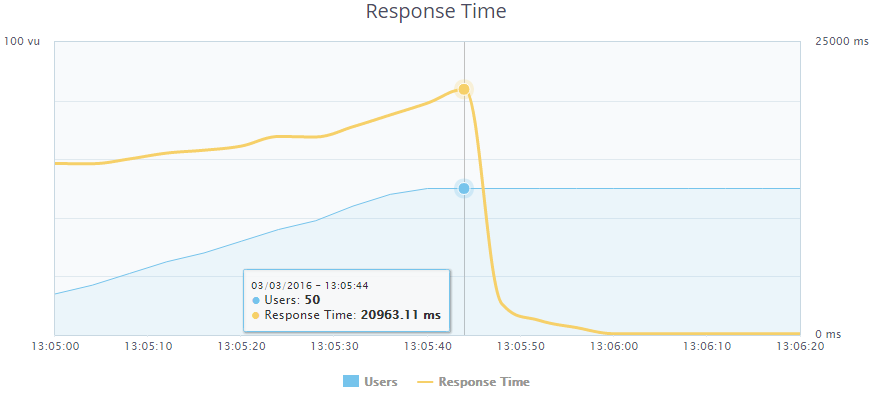
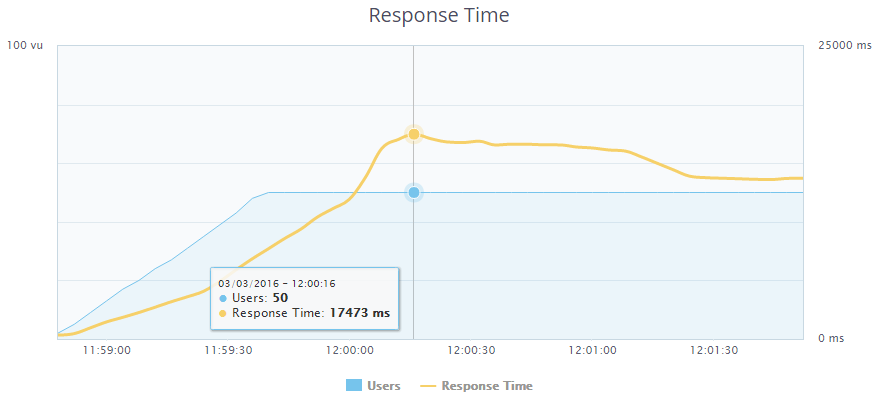
Fell on 150 users. Response time: 20.963 seconds . Overall, the results on Aria and XtraDB are almost identical. But I decided to choose XtraDB , because in the future I want to implement a data request for pages with articles using the NoSQL solution HandlerSocket, which only works with InnoDB / XtraDB. At the moment there is an extension compiled for PHP (php-handlersocket) and a library written in PHP (HSPHP). I managed to try the extension together with PHP5.6. With it, I made a sample of the database on the PRIMARY KEY about 2.5 times faster than using a SQL query. But under PHP7, it refuses to compile (and the next step is to switch to the new version). As for the HSPHP library - having measured the sample acquisition time with its help and with the help of a SQL query (taking into account the library connection time), I found out that with a single query in the database it does not increment. Therefore, I refused to use it and now I am waiting for a version of the extension that is compatible with PHP7.
March 3, the release of a new version of PHP7.0.4. And we will put it. First, remove the previous version of PHP and php-fpm:
apt-get purge php5 php5-fpm
Download and unpack the archive with source code:
Install everything you need to compile:
Create a symlink, otherwise we will not be able to compile php with imap support.
Create a folder for installation:
Configuring:
Compile and install (if you have a VDS with the same characteristics as mine, you can safely go and drink coffee):
Copy configs:
In the /opt/php-7.0.4/etc/php-fpm.conf file we uncomment the following lines:
The /opt/php-7.0.4/etc/php-fpm.d/www.conf file contains the same settings for workers as in the first article . Directive listen = 127.0.0.1:9000 Replace with the following lines:
Accordingly, in the settings of nginx in the /etc/nginx/conf.d/backend.conf file, the directive should be indicated:
At the same time, it is necessary to increase the maximum number of allowed connections to a Unix-socket in the system by adding a directive to the end of the /etc/sysctl.conf file:
After this, it is necessary to re-read the config:
In the file /opt/php-7.0.4/lib/php.ini we set the same settings as in the first article. To enable OPcache, in addition, add the line:
We create symlinks for PHP and utilities:
Now create the systemd /etc/systemd/system/php-7.0.4-fpm.service unit file:
We activate the service and restart systemd:
It remains only to run php-fpm:
Check the speed of page generation on the server: 45 ms . Compared with the previous step, the performance increased 3.4 times . We carry out load testing. 150 users were not enough for the site to fall. Open another tab with the dough. At 179 users, an error (not a complete crash) slips, I stop the test. Maximum response time: 8.966 seconds . In general, go to PHP7.

ESI is a language for incorporating web page fragments into other pages. This allows you to use cached pages, using dynamic elements in them, reducing the generation time due to this. This is an analogue of SSI.
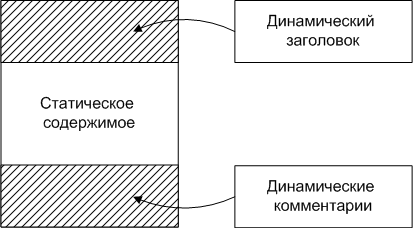
In WordPress, I decided to use this to implement the following scheme: if the user is logged in, then generate on the backend for him only the header containing the top user menu. For pages with posts also dynamically generate a block with comments. Everything else is taken from the cache. Also, to maintain a high rate of return for logged in users, a static header is generated for each page and subsequently used from the cache.
Since now everything that is below the header is cached, it’s impossible to determine the page generation rate using PHP. For this, I used the Pingdom Tools service, which allows me to estimate the download speed of the site as a whole and of each document. I chose it because it is possible for them to start testing from a server located in Amsterdam, where my VDS is located. Due to this, the time to establish a connection was around 20 ms and the time the page was generated after sending the request to the server with several requests sent in a row remained almost unchanged (± 5 ms). Before activating ESI, I measured the download speed of the site using this service. Here are the results:

The site was fully loaded in 360 ms, and the generation time of the page itself was 135 ms. We proceed to the setting.
Slightly modify the VCL configuration file /etc/varnish/default.vcl , shown in the first part .
After the block in the section vcl_backend_response , describing work with static files
Add the following block:
Enabling processing will be enabled only for those cases for which the prohibition of processing is not specified in the vcl_recv section using the set req.esi = false directive ;
Block of code in the vcl_recv section, sending a logged-in user to the backend
replace the block:
And at the very beginning of the vcl_recv section we place the following block:
Now we need to make WordPress work the way we want it. But first, I’ll talk about the tags used in ESI, which allow you to create 2 different pages in the browser, depending on whether ESI processing is enabled or not.
So, set up WordPress. The code of the top user panel is generated, as a rule, in the file header.php . However, in my case, a part of the styles was moved to footer.php in order to speed up page loading and was generated when the function wp_footer () was called. First of all, I transferred the call to this function to the file header.php , placing the code after the opening <body> tag:
and removed it in the file footer.php .
Now edit the theme file index.php . Instead of code
write:
If you do not understand, I will explain how it works. The $ beforeHeader variable contains the character that will be placed before the parameter in the URL. If the query string is empty, add a question mark and a parameter after the address, and if not, the ' & ' symbol and the parameter. If the dynamic-header or static-header variable was set using the GET method, output the header and die. Otherwise, in the case of ESI enabled (and for us this means that we have a logged in user), request the current page with the addition of ? Dynamic-header . Since the URL contains the word dynamic, Varnish will send a request to the backend. Then the current page with the ? Static-header at the end will be loaded using the file_get_contents () function; no cookies from the user will reach this page and a static header will be created for guests, which due to the lack of the dynamic word in the URL will go to the cache .
If ESI is disabled (the guest has come), the dynamic header will not be included, and commented out code will be sent. The <esi: remove> and </ esi: remove> tags will also be sent commented out, and the static header code will be loaded from the cache, or generated and stored in the cache if the page is accessed for the first time.
We make a similar code replacement <? Php get_header (); ?> in all pages of the topic where it is available.
It remains only to implement dynamic work with comments on the pages of records. To do this, open the template single.php and look for the function responsible for issuing the comment code. In my case, this is the comments_template () function ; and at the top of the code, in addition to the one we have already added,
And instead of calling the function
We write:
Everything works exactly the same as in the case above, only comments will always be issued dynamically, because if someone adds a comment, the PURGE request will be sent only to the page, but not to page? Static-comments and comments for logged in users will not update , and everything works.
Restart varnish:
We measure the download speed of the site with ESI enabled:

The total site loading time is 289 ms . The page generation time was 65 ms . Thus, with the help of ESI, we accelerated the page generation for the user by a little more than 2 times.
After that, I conducted the final load testing. Users: 300 (in the other five tabs, the same tests were started a little earlier):
The server crashed with a load of 276 logged in users. The response time was 7.155 seconds .
In the comments to the previous article, I was told that compression at the output of nginx with compression level 9 would put an extra load on the processor, while the files would compress by about 5 percent more than compression level 1, which gives a much smaller load on the processor.
Actually, the thought came to compress static files (.css, .js) to use 9th degree and compress them on the backend side, after which they will fall into the Varnish cache and already without a subsequent load on the processor due to the compression operation are transferred to the user, The generated page itself is compressed on the front end with a compression ratio of 1.
Thus, we will save space in the cache, and we will give smaller files to users.
For this you need to set the following directives in the frontend config nginx /etc/nginx/conf.d/frontend.conf :
And in the config of the backend /etc/nginx/conf.d/backend.conf :
I didn’t give any tangible results in the download speed, but the sizes of static files still decreased by several KB. On a super-loaded system, it will give off.
In addition to all of the above, you can wait for the release of memcache for PHP7 and cache database requests using the W3 Total Cache plugin or some similar. I would also like to see an extension for php-handlersocket for PHP7, try to use to get materials by ID. The speed of access to this data should increase 2 times exactly. Most of the tips that were given in the comments to the last article complied. Thank you very much to the commentators, thanks to you, I managed to disperse the site as I never dreamed of. Thanks for reading.
Source: webshake.ru/post/265
The purpose of this and previous articles is my desire to show the possibility of optimizing websites not only on WordPress, but generally any web application. Therefore, I use such a number of tools, and so I analyze their configuration in detail. If you just need to speed up WordPress, install the WP Super Cache plugin. If you, like me, are interested in technologies that allow you to optimize any site, and you are also interested in what should be taken into account when developing web applications designed for high loads - I ask for the cat, but only after reading the first part - I will be developing the same the system.
Turning off the excess
The recommendations in this section may seem trivial to many, but I promise you, the further we progress, the more interesting the points will be. This item has led to a significant acceleration of the site, and I believe that this should be here.
So, the average time for generating a dynamic page for a logged in user is 770 ms . The generation time was measured by adding lines to the index.php source:
')
<?php $t = microtime(1); // index.php echo '<!-- : ' . (microtime(1) - $t) . 's' . '-->'; ?> Next, I conducted a preliminary stress test: 50 users simultaneously access a dynamically generated page as soon as the page loading is completed - the next request is right there.
The maximum response time in this case was 45.721 seconds.
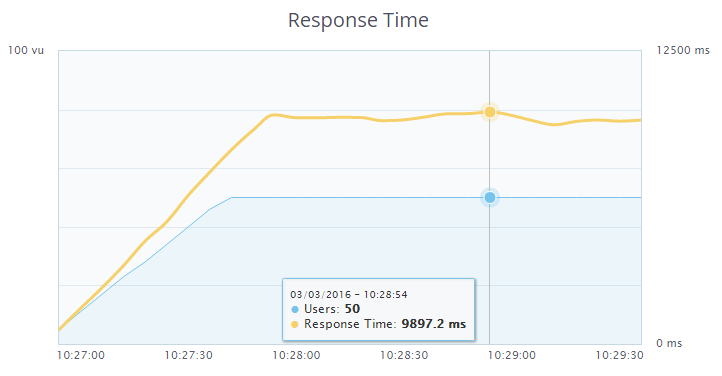
We follow the popular advice in the WordPress optimizer circles, namely - disable unnecessary plugins. In my blog, almost every article provides code / configuration listings. For these purposes, I used the Crayon Syntax Highlighter plugin, recommended by almost every blogger as the best tool for syntax highlighting in listings. However, the light itself was not so necessary for me, the main thing is a neatly decorated window with a scroll bar with tab support. For testing purposes, I tried to disable this plugin. The result - instead of 770 ms, page generation occurred on average over 170 ms , which is 4.5 times faster . However, the listings were no longer decorated - the text of the articles merged with the code. Further, in search of a replacement, I came across a wp-syntax plugin, which did not have such rich functionality as Crayon Syntax Highlighter, but with its main task - syntax highlighting, I coped with a bang. The average time to generate a page with this plugin averaged 235 ms , which is, in general, acceptable. Here I re-conducted the stress test. The results are as follows:
The maximum response time is now 9.897 seconds. The difference is colossal.
However, as I said above, the backlight was not so important to me. Therefore, I decided to remove this plugin too, and instead, in the theme styles for the <pre> tag (it contained the code listings in the above-described plugins) to register the following styles:
pre { max-height: 700px; margin-bottom: 20px; overflow: auto; background: #f0f0f0; padding: 10px; -webkit-box-shadow: 0px 0px 3px 0px rgba(0,0,0,0.75); -moz-box-shadow: 0px 0px 3px 0px rgba(0,0,0,0.75); box-shadow: 0px 0px 3px 0px rgba(0,0,0,0.75); } Listings took the following form:
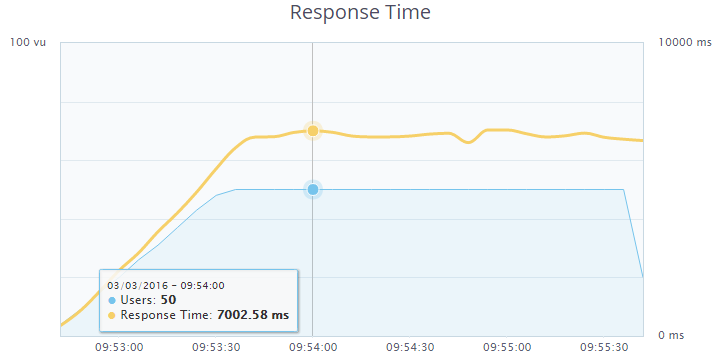
That was enough for me. The page generation time on the server is 170 ms . We carry out a stress test:
The maximum response time is now 7.002 seconds. The difference is palpable, I leave this option.
Next, I removed 2 widget from the footer - recent comments and a tag cloud. By reducing the number of queries to the database, the average page generation time on the server was reduced to 155 ms . The results of the stress test lost, but the maximum response time was about 6.5 seconds.
Selecting the table engine in MariaDB
In the comments to the previous article I was told that using MyISAM as a table engine in the MariaDB DBMS is unreasonable. I agree, correcting. I will choose between MyISAM , Aria , XtraDB .
The configuration of my.cnf in the case of MyISAM and Aria will be the same, and does not differ from the configuration given in the first article . However, for Aria , use the directive default-storage-engine = Aria .
The following directives should be set for XtraDB (I’m giving only what I changed compared to the configuration in the previous article):
key_buffer = 32M # MyISAM Aria #skip-innodb # XtraDB #default-storage-engine=MyISAM #- XtraDB innodb_buffer_pool_size = 128M # XtraDB innodb_flush_method = "O_DIRECT" # As a selection criterion, I first wanted to use the page generation time, but all types of engines with a simple page request showed the same results, so it was decided to perform stress tests with a load of 100 users. My test account did not allow running stress tests with more than 50 users, however, as it was found out by experience, it was possible to run several tests from different browser tabs at the same time, which I used. We check MyISAM. Users: 100 (in the other tab, the same test was launched a little earlier):
Maximum response time: 17.473 seconds.
Check Aria. Users: 100 (in the other tab, the same test was launched a little earlier):
Maximum response time: 14.223 seconds. At the same time a smoother change in response time.
We check XtraDB. Users: 100 (in the other tab, the same test was launched a little earlier):
Maximum response time: 14.355 seconds.
Since the results on XtraDB and Aria turned out to be almost the same, leaving MyISAM behind, I decided to go ahead and increase the number of requests until the site is down. On which engine will withstand a large load - he will choose.
Testing Aria again. Users: 150 (in the other two tabs, the same tests were started a little earlier):
Dropped by 148 users. Response time: 19.311 seconds .
We are testing XtraDB. Users: 150 (in the other two tabs, the same tests were started a little earlier):
Fell on 150 users. Response time: 20.963 seconds . Overall, the results on Aria and XtraDB are almost identical. But I decided to choose XtraDB , because in the future I want to implement a data request for pages with articles using the NoSQL solution HandlerSocket, which only works with InnoDB / XtraDB. At the moment there is an extension compiled for PHP (php-handlersocket) and a library written in PHP (HSPHP). I managed to try the extension together with PHP5.6. With it, I made a sample of the database on the PRIMARY KEY about 2.5 times faster than using a SQL query. But under PHP7, it refuses to compile (and the next step is to switch to the new version). As for the HSPHP library - having measured the sample acquisition time with its help and with the help of a SQL query (taking into account the library connection time), I found out that with a single query in the database it does not increment. Therefore, I refused to use it and now I am waiting for a version of the extension that is compatible with PHP7.
Install and configure PHP7 + php-fpm
March 3, the release of a new version of PHP7.0.4. And we will put it. First, remove the previous version of PHP and php-fpm:
apt-get purge php5 php5-fpm
Download and unpack the archive with source code:
mkdir /usr/local/src/php7-build cd /usr/local/src/php7-build curl -O http://se1.php.net/get/php-7.0.4.tar.bz2/from/this/mirror tar jxf php-7.0.4.tar.bz2 cd php-7.0.4/ Install everything you need to compile:
apt-get install build-essential libfcgi-dev libfcgi0ldbl libjpeg62-turbo-dbg libmcrypt-dev libssl-dev libc-client2007e libc-client2007e-dev libxml2-dev libbz2-dev libcurl4-openssl-dev libjpeg-dev libpng12-dev libfreetype6-dev libkrb5-dev libpq-dev libxml2-dev libxslt1-dev Create a symlink, otherwise we will not be able to compile php with imap support.
ln -s /usr/lib/libc-client.a /usr/lib/x86_64-linux-gnu/libc-client.a Create a folder for installation:
mkdir /opt/php-7.0.4 Configuring:
./configure --prefix=/opt/php-7.0.4 --with-pdo-pgsql --with-zlib-dir --with-freetype-dir --enable-mbstring --with-libxml-dir=/usr --enable-soap --enable-calendar --with-curl --with-mcrypt --with-zlib --with-gd --with-pgsql --disable-rpath --enable-inline-optimization --with-bz2 --with-zlib --enable-sockets --enable-sysvsem --enable-sysvshm --enable-pcntl --enable-mbregex --enable-exif --enable-bcmath --with-mhash --enable-zip --with-pcre-regex --with-pdo-mysql --with-mysqli --with-mysql-sock=/var/run/mysqld/mysqld.sock --with-jpeg-dir=/usr --with-png-dir=/usr --enable-gd-native-ttf --with-openssl --with-fpm-user=www-data --with-fpm-group=www-data --with-libdir=/lib/x86_64-linux-gnu --enable-ftp --with-imap --with-imap-ssl --with-kerberos --with-gettext --with-xmlrpc --with-xsl --enable-opcache --enable-fpm Compile and install (if you have a VDS with the same characteristics as mine, you can safely go and drink coffee):
make make install Copy configs:
cp /usr/local/src/php7-build/php-7.0.4/php.ini-production /opt/php-7.0.4/lib/php.ini cp /opt/php-7.0.4/etc/php-fpm.conf.default /opt/php-7.0.4/etc/php-fpm.conf cp /opt/php-7.0.4/etc/php-fpm.d/www.conf.default /opt/php-7.0.4/etc/php-fpm.d/www.conf In the /opt/php-7.0.4/etc/php-fpm.conf file we uncomment the following lines:
pid = run/php-fpm.pid events.mechanism = epoll The /opt/php-7.0.4/etc/php-fpm.d/www.conf file contains the same settings for workers as in the first article . Directive listen = 127.0.0.1:9000 Replace with the following lines:
listen = /var/run/php7.0.4-fpm.sock listen.owner = www-data listen.group = www-data Accordingly, in the settings of nginx in the /etc/nginx/conf.d/backend.conf file, the directive should be indicated:
fastcgi_pass unix:/var/run/php7.0.4-fpm.sock; At the same time, it is necessary to increase the maximum number of allowed connections to a Unix-socket in the system by adding a directive to the end of the /etc/sysctl.conf file:
net.core.somaxconn = 65535 After this, it is necessary to re-read the config:
sysctl -p /etc/sysctl.conf In the file /opt/php-7.0.4/lib/php.ini we set the same settings as in the first article. To enable OPcache, in addition, add the line:
zend_extension=opcache.so We create symlinks for PHP and utilities:
ln -s /opt/php-7.0.4/bin/pear /bin/pear ln -s /opt/php-7.0.4/bin/peardev /bin/peardev ln -s /opt/php-7.0.4/bin/pecl /bin/pecl ln -s /opt/php-7.0.4/bin/phar /bin/phar ln -s /opt/php-7.0.4/bin/phar.phar /bin/phar.phar ln -s /opt/php-7.0.4/bin/php /bin/php ln -s /opt/php-7.0.4/bin/php-cgi /bin/php-cgi ln -s /opt/php-7.0.4/bin/php-config /bin/php-config ln -s /opt/php-7.0.4/bin/phpdbg /bin/phpdbg ln -s /opt/php-7.0.4/bin/phpize /bin/phpize Now create the systemd /etc/systemd/system/php-7.0.4-fpm.service unit file:
[Unit] Description=The PHP 7 FastCGI Process Manager After=network.target [Service] Type=simple PIDFile=/opt/php-7.0.4/var/run/php-fpm.pid ExecStart=/opt/php-7.0.4/sbin/php-fpm --nodaemonize --fpm-config /opt/php-7.0.4/etc/php-fpm.conf ExecReload=/bin/kill -USR2 $MAINPID [Install] WantedBy=multi-user.target We activate the service and restart systemd:
systemctl enable php-7.0.4-fpm.service systemctl daemon-reload It remains only to run php-fpm:
systemctl start php-7.0.4-fpm.service Check the speed of page generation on the server: 45 ms . Compared with the previous step, the performance increased 3.4 times . We carry out load testing. 150 users were not enough for the site to fall. Open another tab with the dough. At 179 users, an error (not a complete crash) slips, I stop the test. Maximum response time: 8.966 seconds . In general, go to PHP7.
Configuring Edge Side Includes (ESI) in Varnish
ESI is a language for incorporating web page fragments into other pages. This allows you to use cached pages, using dynamic elements in them, reducing the generation time due to this. This is an analogue of SSI.
In WordPress, I decided to use this to implement the following scheme: if the user is logged in, then generate on the backend for him only the header containing the top user menu. For pages with posts also dynamically generate a block with comments. Everything else is taken from the cache. Also, to maintain a high rate of return for logged in users, a static header is generated for each page and subsequently used from the cache.
Since now everything that is below the header is cached, it’s impossible to determine the page generation rate using PHP. For this, I used the Pingdom Tools service, which allows me to estimate the download speed of the site as a whole and of each document. I chose it because it is possible for them to start testing from a server located in Amsterdam, where my VDS is located. Due to this, the time to establish a connection was around 20 ms and the time the page was generated after sending the request to the server with several requests sent in a row remained almost unchanged (± 5 ms). Before activating ESI, I measured the download speed of the site using this service. Here are the results:
The site was fully loaded in 360 ms, and the generation time of the page itself was 135 ms. We proceed to the setting.
Slightly modify the VCL configuration file /etc/varnish/default.vcl , shown in the first part .
After the block in the section vcl_backend_response , describing work with static files
# , ... { ... } Add the following block:
# ESI , URL dynamic, - , if (!(bereq.url ~ "dynamic")) { set beresp.do_esi = true; } Enabling processing will be enabled only for those cases for which the prohibition of processing is not specified in the vcl_recv section using the set req.esi = false directive ;
Block of code in the vcl_recv section, sending a logged-in user to the backend
if (req.http.Cookie ~ "wordpress_" || req.http.Cookie ~ "comment_") { return (pass); } replace the block:
# ESI. if (!(req.http.Cookie ~ "wordpress_" || req.http.Cookie ~ "comment_")) { set req.esi = false; } And at the very beginning of the vcl_recv section we place the following block:
# , dynamic if (req.url ~ "dynamic") { return (pass); } Now we need to make WordPress work the way we want it. But first, I’ll talk about the tags used in ESI, which allow you to create 2 different pages in the browser, depending on whether ESI processing is enabled or not.
- The comment tag <! - esi ... -> - subject to the inclusion of ESI processing, these comments are removed, and what they commented out is executed. If ESI is disabled, then in the client’s browser this section of code will be interpreted as a simple HTML comment and will be ignored;
- <esi: include src = "address / page" /> - if ESI is enabled, this page will be turned on at this place. If ESI is disabled, it will be transmitted to the browser in its original form. Therefore, it consists in the comment tag described above;
- <esi: remove> ... </ esi: remove> - if ESI is enabled, this portion of the code will be removed. If ESI is disabled, it will be transmitted to the browser in its original form. Therefore, it also consists in the comment tag described above.
So, set up WordPress. The code of the top user panel is generated, as a rule, in the file header.php . However, in my case, a part of the styles was moved to footer.php in order to speed up page loading and was generated when the function wp_footer () was called. First of all, I transferred the call to this function to the file header.php , placing the code after the opening <body> tag:
<?php wp_footer(); ?> and removed it in the file footer.php .
Now edit the theme file index.php . Instead of code
<?php get_header(); ?> write:
<?php $beforeHeader = '?'; if(isset($_GET['dynamic-header']) || isset($_GET['static-header'])) { get_header(); die(); } elseif ($_SERVER['QUERY_STRING'] != '') { $beforeHeader = '&'; } ?> <!--esi <esi:include src="<?php echo $_SERVER['REQUEST_URI'] . $beforeHeader; ?>dynamic-header"/> <esi:remove> --> <?php echo file_get_contents('http://webshake.ru'.$_SERVER['REQUEST_URI'] . $beforeHeader .'static-header'); ?> <!--esi </esi:remove> --> If you do not understand, I will explain how it works. The $ beforeHeader variable contains the character that will be placed before the parameter in the URL. If the query string is empty, add a question mark and a parameter after the address, and if not, the ' & ' symbol and the parameter. If the dynamic-header or static-header variable was set using the GET method, output the header and die. Otherwise, in the case of ESI enabled (and for us this means that we have a logged in user), request the current page with the addition of ? Dynamic-header . Since the URL contains the word dynamic, Varnish will send a request to the backend. Then the current page with the ? Static-header at the end will be loaded using the file_get_contents () function; no cookies from the user will reach this page and a static header will be created for guests, which due to the lack of the dynamic word in the URL will go to the cache .
If ESI is disabled (the guest has come), the dynamic header will not be included, and commented out code will be sent. The <esi: remove> and </ esi: remove> tags will also be sent commented out, and the static header code will be loaded from the cache, or generated and stored in the cache if the page is accessed for the first time.
We make a similar code replacement <? Php get_header (); ?> in all pages of the topic where it is available.
It remains only to implement dynamic work with comments on the pages of records. To do this, open the template single.php and look for the function responsible for issuing the comment code. In my case, this is the comments_template () function ; and at the top of the code, in addition to the one we have already added,
<?php if(isset($_GET['dynamic-comments'])) { comments_template( '', true ); die(); } And instead of calling the function
<?php comments_template( '', true ); ?> We write:
<!--esi <esi:include src="<?php echo $_SERVER['REQUEST_URI'] . $beforeHeader; ?>dynamic-comments"/> <esi:remove> --> <?php echo file_get_contents('https://webshake.ru'.$_SERVER['REQUEST_URI'] . $beforeHeader .'dynamic-comments'); ?> <!--esi </esi:remove> --> Everything works exactly the same as in the case above, only comments will always be issued dynamically, because if someone adds a comment, the PURGE request will be sent only to the page, but not to page? Static-comments and comments for logged in users will not update , and everything works.
Restart varnish:
service varnish restart We measure the download speed of the site with ESI enabled:
The total site loading time is 289 ms . The page generation time was 65 ms . Thus, with the help of ESI, we accelerated the page generation for the user by a little more than 2 times.
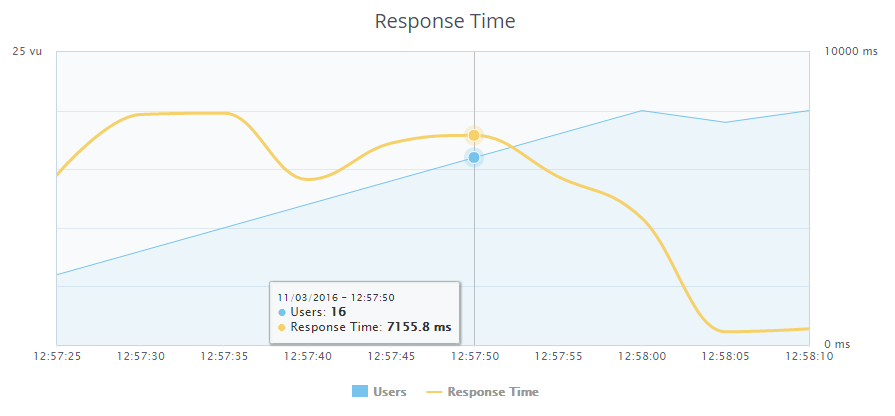
After that, I conducted the final load testing. Users: 300 (in the other five tabs, the same tests were started a little earlier):
The server crashed with a load of 276 logged in users. The response time was 7.155 seconds .
Efficient compression
In the comments to the previous article, I was told that compression at the output of nginx with compression level 9 would put an extra load on the processor, while the files would compress by about 5 percent more than compression level 1, which gives a much smaller load on the processor.
Actually, the thought came to compress static files (.css, .js) to use 9th degree and compress them on the backend side, after which they will fall into the Varnish cache and already without a subsequent load on the processor due to the compression operation are transferred to the user, The generated page itself is compressed on the front end with a compression ratio of 1.
Thus, we will save space in the cache, and we will give smaller files to users.
For this you need to set the following directives in the frontend config nginx /etc/nginx/conf.d/frontend.conf :
gzip on; gzip_comp_level 1; gzip_min_length 512; gzip_buffers 8 64k; gzip_types text/plain; gzip_proxied any; And in the config of the backend /etc/nginx/conf.d/backend.conf :
gzip on; gzip_comp_level 9; gzip_min_length 512; gzip_buffers 8 64k; gzip_types text/css application/json application/x-javascript text/xml application/xml application/xml+rss text/javascript application/javascript image/svg+xml; gzip_proxied any; I didn’t give any tangible results in the download speed, but the sizes of static files still decreased by several KB. On a super-loaded system, it will give off.
Conclusion
In addition to all of the above, you can wait for the release of memcache for PHP7 and cache database requests using the W3 Total Cache plugin or some similar. I would also like to see an extension for php-handlersocket for PHP7, try to use to get materials by ID. The speed of access to this data should increase 2 times exactly. Most of the tips that were given in the comments to the last article complied. Thank you very much to the commentators, thanks to you, I managed to disperse the site as I never dreamed of. Thanks for reading.
Source: webshake.ru/post/265
Source: https://habr.com/ru/post/278899/
All Articles