Adaptive Split View Controller and Popover in iOS 9 (Swift). Part 2

This is the second part of the tutorial article related to the study of the adaptive behavior of the Split View Controller and Popover in iOS 9 on the iPad and on the iPhone, made possible by the concept of Size Classes . The training consists in creating practical applications on Swift that work with the Flickr.com server, which is a cloud-based photo storage service.
The first part lists five interesting from the point of view of the developer cases of application of adaptive Split View Controller and Popover , which are distinguished by the complexity of the Master . Detail is the same everywhere - the only Image View Controller , inserted into the Navigation Controller and designed to show the image of the photo:
')
1. The classic version: one item in the Master , inserted into the Navigation Controller , (often a Table View Controller )
2. Many Table View Controller elements inserted into the Navigation Controller
3. Tab Bar Controller as Master
4. The case of different UI and different user classes for devices with different Size Classes is not discussed here, but the idea can be found in “Adaptive interface with two storyboards for iOS 9” .
5. Adaptive Popover
In the first part , the basic experimental application was built on Swift, which was extended to cases 1-2. In this article we will further complicate our experimental application and extend it to cases 3 and 5. The code for all the options can be found on Github .
3. Tab Bar Controller as Master
We will improve our application and allow the user to remember the “recently” viewed photos in the
NSUserDefaults repository (that is, they must be permanently stored between launches of this application) and view them on a separate tab Tab Bar Controller . To do this, based on the previous AdaptiveSplitViewController2Swift application, create a new AdaptiveSplitViewController3Swift application and add a Tab Bar Controller on the storyboard, delete the accompanying View Controllers accompanying it, and instead connect our Photographers to it, inserted into the Navigation Controller and another Resents screen fragment intended for viewing the recent reports photos and also inserted in the navigation controller :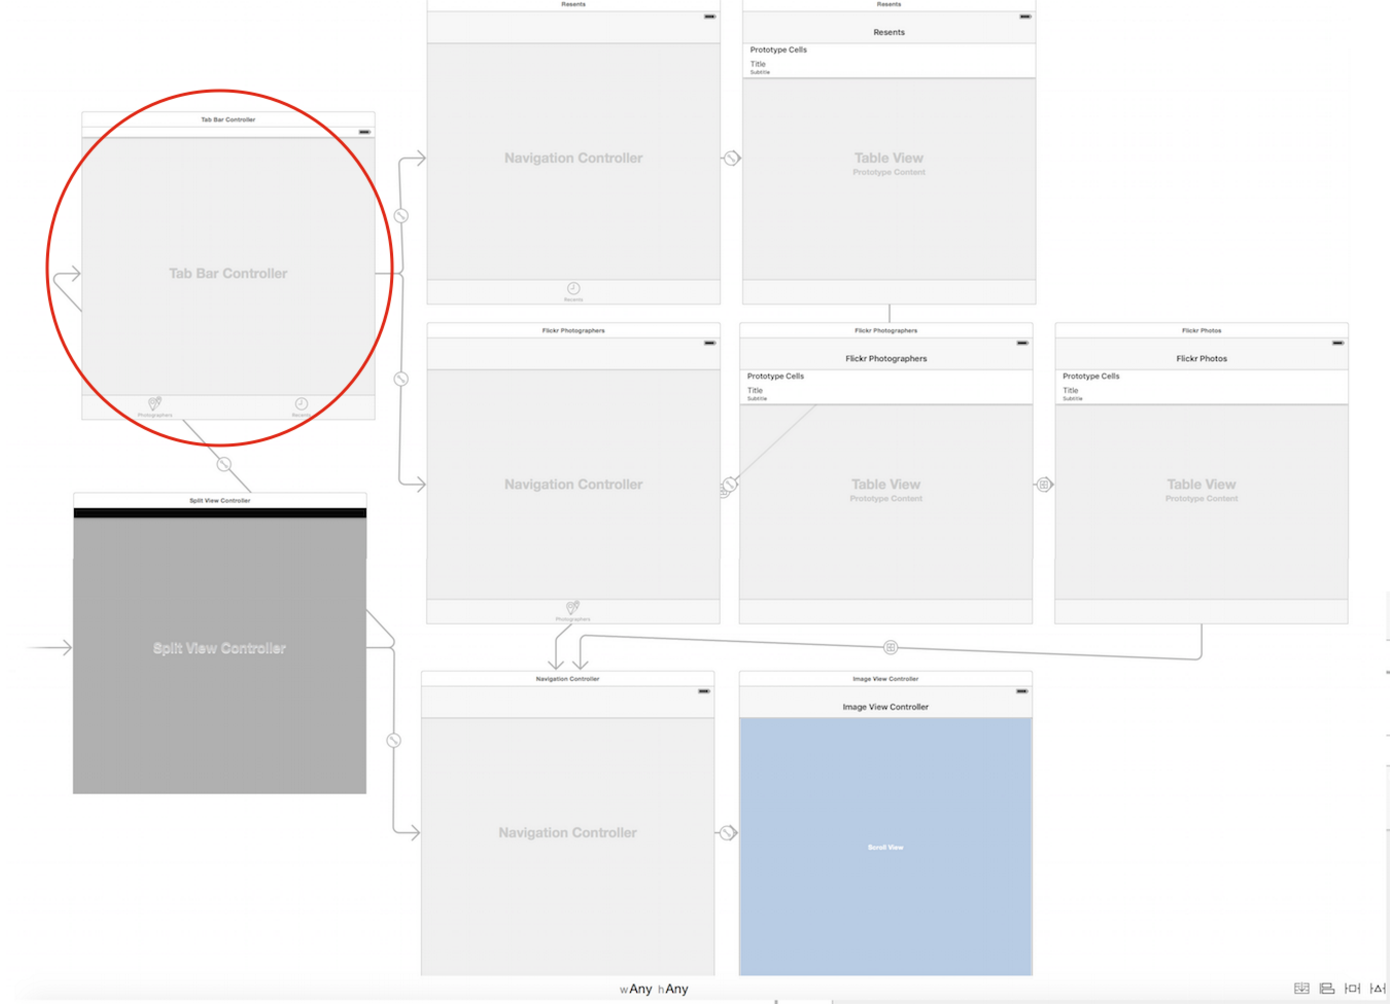
We try to start the application and find out that everything is working fine on the iPad, and on all iPhones in Compact-width mode, images of images using
ImageViewController are ImageViewController on the screen modally with a title, but without a navigation bar and without additional buttons on it. But the saddest thing is that we cannot move anywhere from this screen: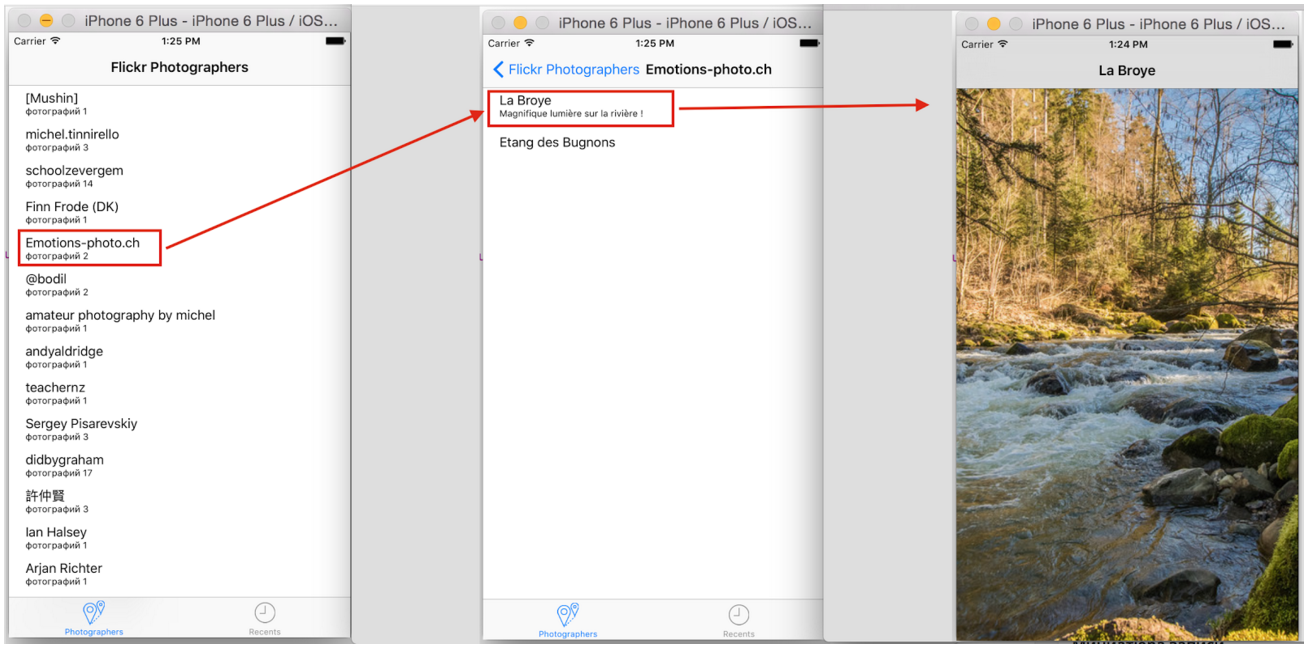
This suggests that SplitViewController cannot place our
ImageViewController on the Navigation Controller stack for the Master , since SplitViewController controls the Master via the Tab Bar Controller , which offers a modal Detail view. To fix this situation, we can put ImageViewController ourselves on the Navigation Controller stack for the Master and will do this in the showDetailViewController method of the showDetailViewController delegate for Compact-width mode.First we define the Compact-width mode and get the Navigation Controller for the Master . Then we extract the
ImageViewController , put it on the Navigation Controller stack for the Master and show it on the screen:AppDelegate.swift

A return of
true means that the SplitViewController should not control the Detail display, we will show it ourselves. Now the image of the photo for Compact-width devices will be shown correctly: with the return button and slide as in the Navigation Controller , and not appear modally with the inability to leave it:
But as soon as we added the
ImageViewController to the Navigation Controller stack for the Master , we can get our ImageViewController in the Master when switching to landscape mode, which, of course, is unacceptable, since the ImageViewController should appear only in the Detail view :
Therefore, when switching to landscape mode, we need to remove
ImageViewController from the Navigation Controller stack for Master :AppDelegate.swift

Using the
imageURL knowledge of the newly cleaned ImageViewController , we can set up the corresponding line in the list of photos:AppDelegate.swift

Restore Detail with storyboard and set up its Model on the resulting photo:
AppDelegate.swift

As a result, the situation on iPhones will get better, including the transition from portrait mode to landscape on iPhone 6+:

Now let's talk a little about the “Resents” tab, the so-called “recent” photos. This View Controlle r is served by the custom class
ResentsTVC
The
ResentsTVC class inherits from the FlickrPhotosTVC class and its only functional feature is the reading of a list of photos from NSUserDefaults :ResentsTVC.swift

It took us only two lines of code and it will be shown below why it is so simple.
Interaction with
NSUserDefaults organized using the special class ResentsDefault and the var resentsPhotos property of var resentsPhotos :ResentsDefault.swift

which is an array of dictionaries with keys of type
String and values of type String . Moreover, {get} this property reads data from NSUserDefaults , and {set} NSUserDefaults it to NSUserDefaults . Note that NSUserDefaults is essentially a very small database for permanently storing a Property List of data between the runs of your application. Our internal data structure for storing information about photos received from the Flickr.com server, we chose the [Photo] array, where Photo is a struct and the struct is neither NSDates , nor NSStrings , nor NSArrays , or NSDictionarys . We will not be able to use [Photo] for storage in NSUserDefaults , as this is not the Property List .I will use the array of
[[String : String]] dictionaries for storing data on Flickr photos in NSUserDefaults , which is a Property List data, but of course I will need Photo conversion to [[String : String]] and back:DataModel.swift

The
ResentsDefault class, serving interaction with NSUserDefaults , has two properties as a public API :var addedPhoto = Photo? - the photo we want to add to NSUserDefaults ,var resentsPhotos: [[String : String]] - an array of dictionaries with information about photos stored in NSUserDefaults :ResentsDefault.swift

Our work with the
NSUserDefaults repository begins with the fact that we add addedPhoto to an existing repository and this is done with one line of code and the addPhoto helper function, which has photo at the entrance and an array of photos resentsPhotos photos stored in NSUserDefaults :addPhoto (photo, inDefaultsPhotos: resentsPhotos)When we use
resentsPhotos as an input parameter of an auxiliary function, {get} triggered for this calculated property and the data is read from the NSUserDefaults repository to resentsPhotos . Then we add a new photo photo to the very beginning of the resentsPhotos array as the most “recent”:ResentsDefault.swift

The resulting array will be assigned again to
resentsPhotos :resentsPhotos = addPhoto (photo, inDefaultsPhotos: resentsPhotos), which means that
{set} works for this computed property and the updated array is written to the NSUserDefaults repository.The
NSUserDefaults mechanism NSUserDefaults designed to save a very small amount of data, so we will limit ourselves to the number of photos specified by the ResentPhotoAmount constant, which in our particular case is equal to 20.Now we will think about where it is best to record information about a photo in the
NSUserDefaults repository. If the user chooses a photo, then we should put the information about it in NSUserDefaults , and this is best done in the prepareForSegue method of the prepareForSegue class, but we will leave this class more general (we may need it for other purposes). Therefore, we will place the new functionality related to the recording of photo information in NSUserDefaults in the new class PhotosSavedNSUserDefaults , which is a subclass of the FlickrPhotosTVC class:PhotosSavedNSUserDefaults.swift

It is necessary to install the new
PhotosSavedNSUserDefaults class as a user for the Flickr Photos screen fragment on the storyboard
But back to the
ResentsTVC class, which serves “recent” photos and Resents screen snippet. His task is to restore information about “recent” photos from NSUserDefaults and we used a single line of code for this:ResentsTVC.swift

If we compare this line with a similar line of another class
JustPostedFlickrPhotosTVC , also inheriting from FlickrPhotosTVC :JustPostedFlickrPhotosTVC.swift

then we will see the same
.flatMap(Photo.init) construction .flatMap(Photo.init) . In the first case, when recovering from NSUserDefaults , [String : String] NSUserDefaults to the input, and in the second case, when reading data from the Flickr server, [String : AnyObject] . How does the compiler know which Photo initializer to run? After all, two of them?DataModel.swift

In Swift, a
struct can have several initializers, as long as they differ in input parameters. In our case, there are two:init?(json:[String:AnyObject]), to initialize thestruct Photofrom the JSON data from the Flickr server,init(userDefaults:[String:String]), to initialize thestruct Photofrom theNSUserDefaultsrepository.
Here, the mechanism of type inference from the context ( type Inference ) and overloading ( overload ) of functions depending on the type of the input parameter works. Therefore, the correct
struct Photo initializer is called.Conclusion: in order to ensure the adaptive work of the Split View Controller with the Table Bar Controller as a Master , you must use the methods of the
separateSecondaryViewControllerFromPrimaryViewController showDetailViewController and showDetailViewController delegate UISplitViewControllerDelegate .The code is on Github - the AdaptiveSplitViewController3Swift application.
4. Adaptive Popover
Previously, Popover could only be shown on the iPad, but since iOS 8 it is shown on the iPhone both in portrait and landscape modes in the so-called “adaptive” version (more on that later). The concept of Popover remains the same: we need the View Controller as the content that is shown inside the Popover , but the Popover itself is not a
UIViewController . It appears on the screen using the so-called Popover Presentation Controller mechanism.Let's continue to work with our experimental application and add another screen fragment on the storyboard, which will show the URL of the image of the selected photo in the Popover “window”. To do this, based on the AdaptiveSplitViewController2Swift application (with numerous Table View Controllers as Master ), create a new application, AdaptiveSplitViewController4Swift, and add the left button “URL” to the navigation panel of the Image View Controller screen (display of the photo) and segue of Presents as Popover type . Now our user interface looks like this:

Regarding Popover , it is interesting that although it is not in itself MVC , it still uses a segue of the type Present as Popover to cause the View Controller it presents.
To create a segue of the type Present as Popover, use as usual CTRL- dragging to some View Controller , and you also get the opportunity to execute the
prepareForSegue method.Once you have installed a segue of type Presents as Popover ,

It is possible to adjust the size of the “window”, namely the size of the top view :

Set the identifier “Show URL” for segue and add the
prepareForSegue method for ImageViewController :ImageViewController.swift

Attention should be paid to some additional features when preparing a segue for Popover . One of them is that inside your
prepareForSegue you can get what is called a UIPopoverPresentationController and configure the Popover presentation. For example, you can say that you do not want the Popover to “pop up” to the left of something, but you want the Popover to always “pop up” to the right of something. You can manage all of this. In addition, in the prepareForSegue method, prepareForSegue can define yourself as a delegate:ImageViewController.swift

Next, confirm the
UIPopoverPresentationControllerDelegate protocol:ImageViewController.swift

and “turn off” adaptive behavior by implementing the
UIPopoverPresentationControllerDelegate delegate UIPopoverPresentationControllerDelegate , which returns .None , that is, a “rejection” of iPhone Popover adaptation:ImageViewController.swift

And this is all that is needed to represent Popover in the form of a small “window” on the iPhone. Usually this method is found in blogs.
But in our experimental application, we implement it a little differently, adhering to the idea that the
ImageViewController class should remain independent of the way the image URL of the photo is displayed, and the screen fragment that TextView to display the URL of the photo image should be self-adjusting.Let's look at this second way.
The display of the image URL of a photo is served by the custom class
URLViewController .A model of the
URLViewController class is the propertyvar url : NSURL?When it is installed, as well as in the “life cycle” method of
updateUI() user interface is updated using the updateUI() method. We will conduct the entire Popover setting directly in this class, so the URLViewController class confirms the UIPopoverPresentationControllerDelegate protocol:
In the
awakeFromNib “life cycle” awakeFromNib , which is called before everyone else, we set the presentation style .Popover and assign ourselves to the UIPopoverPresentationControllerDelegate protocol UIPopoverPresentationControllerDelegate .URLViewController.swift

Using
UIPopoverPresentationControllerDelegate , you can impact how the Popover adapts to the iPhone. Popover on the iPad “pops up” like we used to - in the form of a small window. On iPhone, Popover adapts and turns into a full-screen modal window instead of a small window. It doesn't “pop up” like something small on the iPhone. Why? Because the iPhone screen is much smaller, and if the “pop-up” thing is really big, then there may not be a way to make it fit the screen size. But if you present it modally on the whole screen, then it will exactly fit the screen size. iOS automatically makes this adaptation for you, just as Split View Controller and Navigation Controller automatically adapt. But by using the UIPopoverPresentationControllerDelegate delegate, you can impact this adaptation, and that is what we will do.In iOS 9, when Popover tries to make a presentation, it asks us how we want it to “adapt” the Popover to the iPhone? By default, this is a full-screen modal view (
.FullScreen returns), but we can say that we want to use UIModalPresentationStyle.None , which means there is no automatic adaptation. That is, the presentation on the iPhone will be exactly the same as on the iPad. For a little popover, this makes a lot of sense. We can “turn off” the behavior of “adaptation” by implementing the delegate method UIPopoverPresentationControllerDelegate , in which we return UIModalPresentationStyle.None :URLViewController.swift

The last and very important thing regarding Popover is the size of the pop-up window.
You really like it when a “pop-up” window that perfectly matches the MVC size appears. Because MVC can be of a different size. In any case, you would like to really manage its size. In the object-oriented world, the system asks MVC , which is in Popover , what size does this MVC prefer? What size do you want to be? Because in reality, only MVC itself can know which size may be preferable. But this is only a recommendation, because Popover also has some limitations. For example, Popover can appear on the screen only in a certain place, the screen should be large enough, arrows can have certain directions. Popover has a lot of limitations of this kind.
But he still asks MVC , which places inside, what he wants to be?
There is a special property in your
UIViewController :var preferredContentSize: CGSizeYou can override this property and return the preferred size. If your preferred size is always the same, you can simply install it. If you need to calculate your preferred size based on its content, you can do it as follows:
URLViewController.swift

As a result, we get the same small “window” on Compact-width devices as on Regular-width devices:

There is one problem with the work of Popover in portrait mode on the iPad. If I’m in portrait mode on the iPad and show the URL for a particular photo, then I’ll click on Flickr Photographers on the left side of the navigation bar and select another photographer and another photo ... You can see that the previous URL remains on the screen, although I thought that if I click somewhere outside of Popover , then Popover will go away.

We have already changed the picture, and the URL will remain old until we click on the picture itself outside of Popover .
The answer is that if you click on the same panel as the “URL” button, then you are allowed to interact with everything that is there, that is, click on any buttons and Popover will not go away. In particular, when we click on the return button Flickr Photographers . This situation is related to
passthroughViews . The whole navigation bar is part of passthroughViews , and the really bad thing is that if I click on another photo in the list, the image of the photo is updated, but the Popover from the URL is not. Still on the screen will be the URL of the old photo. This is really very bad.This problem in the code will be solved as follows. Every time someone installs a new
image , I will dismiss any Popover that I have.ImageViewController.swift

Now the situation has changed

Conclusion. In order to present Popover as a “small window” on Compact-width devices, you need to cancel Popover's adaptive automatic presentation for Compact-width devices in the form of a modal window to the full screen. This can be done using the
adaptivePresentationStyleForPresentationController method.UIPopoverPresentationControllerDelegate delegate, in which we return the value of UIModalPresentationStyle.None :The code is on Github - the AdaptiveSplitViewController4Swift application.
Source: https://habr.com/ru/post/278781/
All Articles