How to write a simple blog using Asp .Net MVC, Nhibernate and Ninject. Part 1
Transfer
Introduction
There are various ways to study technology: reading books, participating in conferences, creating examples and others. I think one of the best ways is to create something useful for myself using the technology being studied. A blog is one of the useful things you can easily do. In a series of articles, we will explore ASP.NET MVC, step by step, by creating a blog from scratch.
For simplicity, we will not build a commenting system; instead, we will use Disqus . Try creating a commenting system yourself; this will be a good exercise for you.
We will use ASP.NET MVC 4 to develop the application. I am not strong in the Entity Framework and we will use Fluent NHibernate / NHibernate to create a data access system (DAL). But if you like, you can use the Entity Framework. Finally, we’ll use Ninject for dependency injection due to its simplicity.- In the first part, we will create the basic blog infrastructure. Create the necessary classes of models, data access components.
- In the second part, we implement controllers, action methods, and views. At the end of the second part we will have a working blog in which we can look at the latest posts, read the full text of the post, choose posts by category or tags and even search for interesting posts (posts).
- In the third part, we will create an administrator console for managing posts, categories and tags.
- In the fourth part, we will introduce the Disqus comment system into our blog. Also, we will introduce two new services: the AddThis exchange service and the Feedburner subscription service .
Technology
- ASP.NET MVC 4.0
- Fluent NHibernate and NHibernate
- SQL Server 2012
- Ninject
- jQuery
')Creation of basic infrastructure.
We describe the tasks that we need to implement in this part:
Problem 1.Delete the latest blog post.
Task 2. To remove posts of a certain category,
Task 3.Display posts based on the tag.
Task 4. Search for posts
Task 5. Complete the post
Task 6.Vyvodit posts a certain category in the widget
Task 7.Vyvodit posts based on the tag in the widget
Task 8.Vyvodit last post in the widgetTask 1. Display the latest blog post.
To perform this task, we need to select the blog posts from the database and display them in the view.
This task is quite large, so let's break it down into several smaller subtasks that will be easier to perform separately.- Create a basic solution (solution)
- Create domain classes
- Configure Fluent NHibernate and NHibernate
- Create mapping classes, data access classes and methods
- Configure Ninject for the JustBlog.Core Project
- Configure Ninject for an MVC project
- Create controller and actions
- Create a presentation
4.1 Creating a baseline solution
Create an MVC 4 web application project and name it JustBlog .
In the “Select a template” window, select “Empty template” .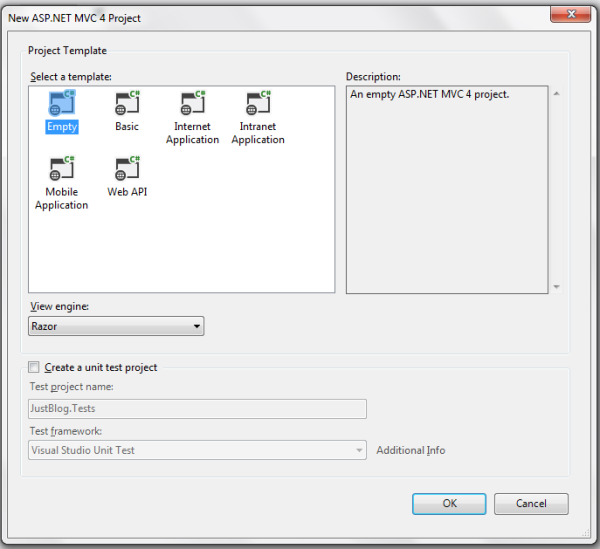
Create a class library and name it JustBlog.Core . It is recommended to store domain classes and data access components in separate projects, so it will be easier for us to manage the application in terms of development, testing and deployment. Do not forget to add the link to JustBlog.Core in JustBlog .
The solution should look like the one below.
4.2 Creating Domain Classes
In the JustBlog.Core project , create a new folder called Objects to place the domain classes in it. For our blog, we need to create three classes: Post , Category and Tag . Each Post belongs to one Category , but it can be tagged with multiple Tags . There are many one-to-one relationships between Post and Category , and many-to-many relationships between Post and Tag .
The relationships between the classes are shown in the screenshot below.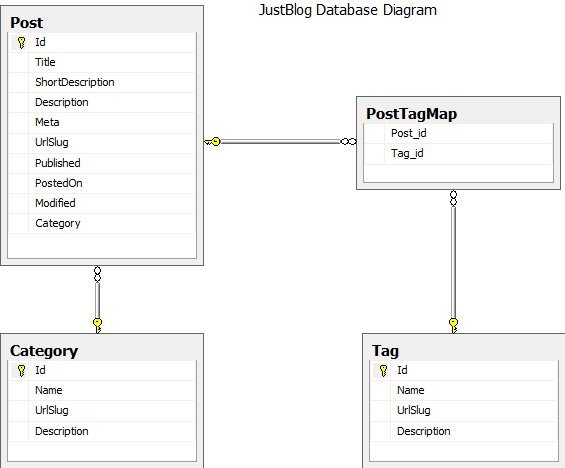
Below is our Post class.namespace JustBlog.Core.Objects { public class Post { public virtual int Id { get; set; } public virtual string Title { get; set; } public virtual string ShortDescription { get; set; } public virtual string Description { get; set; } public virtual string Meta { get; set; } public virtual string UrlSlug { get; set; } public virtual bool Published { get; set; } public virtual DateTime PostedOn { get; set; } public virtual DateTime? Modified { get; set; } public virtual Category Category { get; set; } public virtual IList<Tag> Tags { get; set; } } }
Most properties require no explanation. The UrlSlug property is an alternative to the Title property and is used for addressing.Slug is a newspaper term. “Slug” is a short label name that contains only letters, numbers, underscores, or hyphens. Mostly used in URLs.
For example, we have a post titled "Advanced Linq in C #", published in August 2010, we create for it the URL http // localhost / archive / 2010/8 / Advanced Linq in C # . The post header may contain special characters (in this example, "#") and not all servers can handle requests containing special characters. Instead of using the Title property directly in the URL, we will use some alternative text that is similar to the post title and we will take it from the URL property Slug .
In the above case, instead of using “Advanced Linq in C #” in the URL, we are going to use the friendly text (slug) “advanced_linq_in_csharp” , so the address will be http // localhost / archive / 2010/8 / advanced_linq_in_csharp. In part 3, we learn how to automatically create a slug from a post title.URL Slug
URL Slug is SEO - and the user-friendly part of the string in the URL for identification, description and access to the resource. Often an article page title is a suitable candidate for this.
The Meta property is used to store post description metadata and is used for SEO. All properties are marked as virtual, because NHibernate at runtime creates a proxy server and it needs to have all the properties of this class to be virtual.
The Category and Tag classes are very simple and are shown below. We use the UrlSlug property for the same reason that we discussed above.namespace JustBlog.Core.Objects { public class Category { public virtual int Id { get; set; } public virtual string Name { get; set; } public virtual string UrlSlug { get; set; } public virtual string Description { get; set; } public virtual IList<Post> Posts { get; set; } } }namespace JustBlog.Core.Objects { public class Tag { public virtual int Id { get; set; } public virtual string Name { get; set; } public virtual string UrlSlug { get; set; } public virtual string Description { get; set; } public virtual IList<Post> Posts { get; set; } } }4.3 Configuring Fluent NHibernate and NHibernate
To access the database, we will use NHibernate along with Fluent NHibernate . NHibernate is an ORM tool like the Entity Framework, where relationships between classes and database tables are mapped via XML files. Fluent NHibernate is an extension for NHibernate which replaces the mapping with XML files with a mapping using special classes. Mapping through classes is much easier than through XML files.
We can easily add links to NHibernate and Fluent NHibernate assemblies using the Nuget Package Manager Console . Open Package Manager from the menu Tools -> Library Package Manager -> Package Manager Console .
In the console, run the following command.PM> Install-Package FluentNHibernate
If the installation was successful, you will see the following assemblies in the References folder of the JustBlog.Core project.
FluentNHibernate
NHibernate
Esi.collections4.4 Creating mapping classes, data access classes and methods
The next thing we need to do is create the necessary mapping classes. A mapping class is used to map a class and its properties to a table and its columns. Create a new folder called Mappings in the JustBlog.Core project to store all the mapping classes.
To create a mapping class, we must inherit it from the generalized ClassMap class of the Fluent NHibernate framework. All mappings must be performed in the constructor.
The mapping class for the Post class.using FluentNHibernate.Mapping; using JustBlog.Core.Objects; namespace JustBlog.Core.Mappings { public class PostMap: ClassMap<Post> { public PostMap() { Id(x => x.Id); Map(x => x.Title).Length(500).Not.Nullable(); Map(x => x.ShortDescription).Length(5000).Not.Nullable(); Map(x => x.Description).Length(5000).Not.Nullable(); Map(x => x.Meta).Length(1000).Not.Nullable(); Map(x => x.UrlSlug).Length(200).Not.Nullable(); Map(x => x.Published).Not.Nullable(); Map(x => x.PostedOn).Not.Nullable(); Map(x => x.Modified); References(x => x.Category).Column("Category").Not.Nullable(); HasManyToMany(x => x.Tags).Table("PostTagMap"); } } }
The Id extension method represents the name of the property that you want to set as the primary key for the table column.
The Map extension method is used to map a property to a table column. During property mapping, we can set the size of a column, indicate whether it allows storing NULL values, or set other specifications.
For example:Map(x => x.ShortDescription).Length(5000).Not.Nullable();
If the generated column name is different from the property name, then we must pass the column name using the Column extension method.Map(x => x.Title).Column("post_title")
The References method is used to represent the many-to-one relationship between Post and Category using the external key Category column of the Post table. The HasManyToMany method is used to represent the many-to-many relationship between Post and Tag via the PostTagMap staging table. You can learn more about Fluent NHibernate and its method extensions from here .
By default, Fluent NHibernate assumes that the table name is exactly the same as the class name, and the column names are the same as the property names. If the table name is different, then we must map the table to the class using the Table extension method.
For example:Table("tbl_posts");
The mapping classes for Category and Tag are exactly the same, except for their relationship with Post . A category has a one-to-many relationship with Post , while a Tag has a many-to-many relationship with Post .namespace JustBlog.Core.Mappings { public class CategoryMap: ClassMap<Category> { public CategoryMap() { Id(x => x.Id); Map(x => x.Name).Length(50).Not.Nullable(); Map(x => x.UrlSlug).Length(50).Not.Nullable(); Map(x => x.Description).Length(200); HasMany(x => x.Posts).Inverse().Cascade.All().KeyColumn("Category"); } } }
The Inverse () extension method makes the other side of the relationship responsible for persistence.
The Cascade.All () extension method runs a cascade event call (down the hierarchy) in the collection entities (therefore, when the category is saved, posts will also be saved).namespace JustBlog.Core.Mappings { public class TagMap: ClassMap<Tag> { public TagMap() { Id(x => x.Id); Map(x => x.Name).Length(50).Not.Nullable(); Map(x => x.UrlSlug).Length(50).Not.Nullable(); Map(x => x.Description).Length(200); HasManyToMany(x => x.Posts).Cascade.All().Inverse().Table("PostTagMap"); } } }
We will use the Repository template to access the database. We use this template to separate the data access code from the controllers, and this will help us simplify the unit testing of our controllers. The core of the repository template is an interface that contains descriptions of all data access methods.
In the JustBlog.Core project, we will create an IBlogRepository interface with two methods.using JustBlog.Core.Objects; namespace JustBlog.Core { public interface IBlogRepository { IList<Post> Posts(int pageNo, int pageSize); int TotalPosts(); } }
The Posts method is used to return the latest published posts paginated according to the values passed to it. The TotalPosts method returns the total number of published posts. Next, we fill the interface with other methods.
In the JustBlog.Core project , a class named BlogRepository and implement the interface.using JustBlog.Core.Objects; using NHibernate; using NHibernate.Criterion; using NHibernate.Linq; using NHibernate.Transform; using System.Collections.Generic; using System.Linq; namespace JustBlog.Core { public class BlogRepository: IBlogRepository { // NHibernate object private readonly ISession _session; public BlogRepository(ISession session) { _session = session; } public IList<Post> Posts(int pageNo, int pageSize) { var posts = _session.Query<Post>() .Where(p => p.Published) .OrderByDescending(p => p.PostedOn) .Skip(pageNo * pageSize) .Take(pageSize) .Fetch(p => p.Category) .ToList(); } var postIds = posts.Select(p => p.Id).ToList(); return _session.Query<Post>() .Where(p => postIds.Contains(p.Id)) .OrderByDescending(p => p.PostedOn) .FetchMany(p => p.Tags) .ToList(); } public int TotalPosts() { return _session.Query<Post>().Where(p => p.Published).Count(); } } }
All database access must be done through the NHibernate ISession object. When we read a collection of posts through ISessions , the Category and Tags dependencies are not populated by default. The methods Fetch and FetchMany are used to tell NHibernate to fill them immediately.
In the Posts method, in order to get posts, we request the database twice, because we cannot use FetchMany together with the Skip and Take methods in the Linq query. So, first we select all the posts, then using their ID, we again select the posts to get their tags. Please see this thread for more information about this issue.NHibernate ISession
ISession is a persistence manager interface that is used to store and retrieve objects from a database.
Persistent means that this instance should be implemented in such a way that it persists after the process that generated it is completed. Unlike transient, meaning that this instance of the object is temporary - it ceases to exist after the process that generated it is completed. (comment of the translator).4.5 Customizing Ninject for the JustBlog.Core project
Dependency injection (DI) avoids instantiating specific implementations of dependencies within a class. These dependencies are usually introduced into the class through the constructor, but sometimes through the properties. One of the main advantages of dependency injection is unit testing and we will see this when we write unit tests for controllers in part 3.
There are many frameworks to simplify dependency injection, like Castle Windsor, Unity, Autofac, StructureMap, Ninject, etc. We chose Ninject because it is easy to use.
Install Ninject in the JustBlog.Core project by running the following commands in the Package Manager Console .PM> Install-Package Ninject
PM> Install-Package Ninject.Web.Common
After successful execution of commands, we will see that the Ninject and NinjectWeb.Common assemblies are added to the project. Along with the builds, the NinjectWebCommon.cs file was also added to the App_Start folder. In the near future I will explain why we need to install the extension Ninject.Web.Common.
We can configure Ninject in two ways, either using Global.asax.cs or via the App_Start file. We will use the first approach, so please delete the NinjectWebCommon.cs file from the App_Start folder, and also remove unnecessary references to the WebActivator and Microsoft.Web.Infrastructure assemblies from the project.
The main functionality of any DI framework is the binding of interfaces with specific implementations of these interfaces. Mapping an interface to a specific implementation is called binding. We can group a set of bindings associated with a specific Ninject module using Ninject Modules. All bindings and modules are loaded into the main component of the Kernel Ninject core. Whenever an application needs an instance of a particular class that implements the interface, Kernel exposes it to the application.Ninject Module
The Ninject module is used to group the mappings / bindings related to a specific module in one class.
The BlogRepository class has a dependency with Nibernate ISession . To create an instance of ISession, we need another Nibernate interface called ISessionFactory . Let's create a class ninject module in the JustBlog.Core project called RepositoryModule , which will connect both of these interfaces.
The created Ninject-module must inherit from the abstract class NinjectModule and implement the Load method. In the Load method, we will associate both interfaces with the methods using the Bind method.
The Bind method is used to associate an interface with a class that implements it.
For example:Bind<IFoo>().To<Foo>();
We can also match the interface with the method that creates and return the interface implementation.Bind<IFoo>().ToMethod(c => { var foo = new Foo(); return foo; });NHibernate ISessionFactory
Unlike ISession, we need one instance of ISessionFactory in the entire application.using FluentNHibernate.Cfg; using FluentNHibernate.Cfg.Db; using JustBlog.Core.Objects; using NHibernate; using NHibernate.Cache; using NHibernate.Tool.hbm2ddl; using Ninject; using Ninject.Modules; using Ninject.Web.Common; namespace JustBlog.Core { public class RepositoryModule: NinjectModule { public override void Load() { Bind<ISessionFactory>() .ToMethod ( e => Fluently.Configure() .Database(MsSqlConfiguration.MsSql2008.ConnectionString(c => c.FromConnectionStringWithKey("JustBlogDbConnString"))) .Cache(c => c.UseQueryCache().ProviderClass<HashtableCacheProvider>()) .Mappings(m => m.FluentMappings.AddFromAssemblyOf<Post>()) .ExposeConfiguration(cfg => new SchemaExport(cfg).Execute(true, true, false)) .BuildConfiguration() .BuildSessionFactory() ) .InSingletonScope(); Bind<ISession>() .ToMethod((ctx) => ctx.Kernel.Get<ISessionFactory>().OpenSession()) .InRequestScope(); } } }As the Fluent NHibernate Wiki tells us, in general, setting up NHibernate using the Fluent NHibernate API is done using 5 main methods, 3 of which are mandatory:
Fluently.Configure() .Database(/* your database settings */) .Mappings(/* your mappings */) .ExposeConfiguration(/* alter Configuration */) // optional .BuildSessionFactory();
Fluently.Configure begins the setup process.
Database , sets up a database connection string
Mappings customizes mappings based on your entity classes.
ExposeConfiguration is optional, but allows you to create a database schema from your mappings (create tables from our classes)
BuildSessionFactory is the last method, and it creates an instance of NHibernate SessionFactory based on the settings of the previous methods.
The Cache method is optional; it configures the provider to cache requests.
There are many extensions available in Ninject and one of them is Ninject.Web.Common, which contains some of the common functionality needed by WebForms and MVC applications. We need to make sure that while the Ninject request is being executed return the same ISession instance. The InRequestScope () extension method, defined in the Ninject.Web.Common namespace, tells Ninject that only one instance of the class should be created for each HTTP request received by ASP.NET. The InSingletonScope () extension method creates a single instance (singleton) that is available throughout the application.4.6 Ninject Setup for MVC Project
All database calls from the controllers are made via the IBlogRepository interface. To embed an instance of a class that implements the IBlogRepository into the controller, you need to configure Ninject in the MVC application. There is an extension (Ninject.Mvc3) specially created to support MVC applications.
Install Ninject.Mvc3 in our JustBlog project by executing the following command.PM> Install-Package Ninject.Mvc3
After successful execution of commands in the MVC project the following assemblies will be added:
Ninject
Ninject.Web.Common
Ninject.Web.Mvc
Delete the NinjectWebCommon.cs file from the App_Start folder. Inherit our global application class from the NinjectHttpApplication class and override the CreateKernel method.
Modify the Global.asax.cs file as shown below.using Ninject; using Ninject.Web.Common; using System.Web.Mvc; using System.Web.Routing; namespace JustBlog { public class MvcApplication : NinjectHttpApplication { protected override IKernel CreateKernel() { var kernel = new StandardKernel(); kernel.Load(new RepositoryModule()); kernel.Bind<IBlogRepository>().To<BlogRepository>(); return kernel; } protected override void OnApplicationStarted() { RouteConfig.RegisterRoutes(RouteTable.Routes); base.OnApplicationStarted(); } } }
In the CreateKernel method, we create and return an instance of StandardKernel of type IKernel . IKernel is the core of the application, where we specify our bindings and when we need an instance associated with the interface it provides us with it.
With an instance of the StandardKernel class, we do a couple of important things. First, we load an instance of our Repository module, which contains all the bindings associated with NHibernate interfaces and then we associate the IBlogRepository interface directly with its BlogRepository implementation. Finally, at the end of the example, the application startup code moved to the OnApplicationStarted method.
That's all about the Ninject configuration in the app. In the next part, we will start working on controllers and views.
Source: https://habr.com/ru/post/278633/
All Articles