libuniset2 is a library for creating ACS. It’s better to see once ... Part 5 (uniset2-testsuite)
In the previous sections ( Part 1 , Part 2 , Part 3 , Part 4 ), the creation of two simulator processes and a control process and pre-commissioning was described. And now I wanted to talk about writing functional tests and specifically designed for this tool called uniset2-testsuite.
In general, testing comes down to the idea of “ Submit test exposure, test response .” Since in a uniset system, everything with the help of sensors and testing is reduced to putting up some sensors and checking the reaction of the system with other sensors ( Systems, since functions can be performed by a group of processes and possibly scattered across different nodes ).
This idea was used as the basis for a small test framework for libuniset-based projects. And it is called uniset2-testsuite . In general, this is not even a framework , but simply a program (in python) that can play “test scripts” written in xml and allows you to do various checks on uniset sensors. A full description of the features can be found in a small documentation here .
And I will try to show how this is done on the example of testing our management process .
So at the moment we already have the following components in our project
Our test implies that it will be self-sufficient . Those. they launched the test, he himself launched all the necessary programs, conducted testing and completed the programs, issuing a report.
And also, to create a test script, you need to think about what we want to check. Based on the analysis of our original assignment, we can single out the following simple checks:
Let's try to write all this in the form of a test script ...
')
In general, the structure of the script is as follows:
For our case, the RunList section will look like
All possible fields are described in sufficient detail in the documentation for uniset2-testsuite , so I will not stop. Here we see that we just listed what processes we need to run.
We proceed to the actual recording of tests.
First check that the process "does nothing" . Since the result of the management process is a change in the level sensor Level_AS (well, of course, setting control commands), then we can reformulate “does nothing” into “ sensors do not change for a sufficient time ”.
Let's write ...
Those. we check that the sensors do not change for a given time ( holdtime ).
The second test, it is necessary to check the actual work after the filing of the command. Those. we give the command “start work” (OnControl_S = 1), the management process gives the command “fill” (CmdLoad_C = 1), the level in the “tank” starts to increase and reaches the upper bar (it is not necessary to check the threshold, the main thing is to fix what is changing) .
Then the management process should begin to “empty” the tank by issuing the “emptying” command (CmdUnload_C = 0) and the level should decrease to some level. In general, this is sufficient to verify that the process is running.
We write in the test ...
And the last check: That when you remove the "start work" command, the process stops.
Here the only subtlety is that we do not know at what level the previous test ended, we only know that the tank was empty. Therefore, to check that nothing is happening, we check that the level does not rise> 80 preset time.
As a result, the full version of our test script will be
To run the test, create a small script.
running the test player with our script.
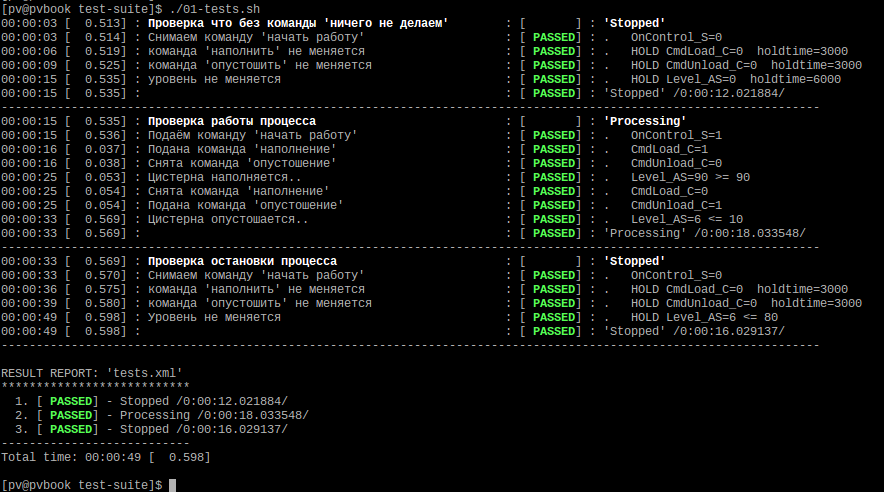
Go to the directory src / Algorithms / Controller / test-suite / run ./01-tests.sh and this is what we should see:
That's all about functional testing.
I just want to note that it was a simple demo test. In general, uniset2-testsuite allows you to write complex multi-component tests, refer to other test files (build test hierarchies), do “autochange” tests (that is, essentially an analogue of “templates”), work with sensors from different nodes networks), save reports in junit format, write scripts working under the ModbusTCP protocol (ie, you can test not only uniset projects), etc. All this is reflected in the documentation .
While writing these articles, I realized that a lot of things remained "behind the scenes". Therefore, there will be also the “final part” ..
Introductory
In general, testing comes down to the idea of “ Submit test exposure, test response .” Since in a uniset system, everything with the help of sensors and testing is reduced to putting up some sensors and checking the reaction of the system with other sensors ( Systems, since functions can be performed by a group of processes and possibly scattered across different nodes ).
This idea was used as the basis for a small test framework for libuniset-based projects. And it is called uniset2-testsuite . In general, this is not even a framework , but simply a program (in python) that can play “test scripts” written in xml and allows you to do various checks on uniset sensors. A full description of the features can be found in a small documentation here .
And I will try to show how this is done on the example of testing our management process .
Creating a test script
So at the moment we already have the following components in our project
- simulator - which we “manually” tested here
- management process - which we are going to test
- SharedMemory - mandatory part (storage of the current state of the sensors)
Our test implies that it will be self-sufficient . Those. they launched the test, he himself launched all the necessary programs, conducted testing and completed the programs, issuing a report.
And also, to create a test script, you need to think about what we want to check. Based on the analysis of our original assignment, we can single out the following simple checks:
- The management process should not do anything until the “get started” command came
- When the team came the management process must fill the "tank", then "empty".
- When the “start work” command was “shot” - the management process should stop working
Let's try to write all this in the form of a test script ...
')
In general, the structure of the script is as follows:
<?xml version="1.0" encoding="utf-8"?> <TestScenario> <RunList> .. ( ) </RunList> <TestList> <test name="XXX" comment="zzz"> ...... </test> <test name="YYY" comment="yyy"> ...... </test> ... </TestList> </TestScenario> For our case, the RunList section will look like
<RunList after_run_pause="3000"> <item after_run_pause="500" chdir="../../../SharedMemory" name="SharedMemory" script="./start_fg.sh" silent_mode="1"/> <item chdir="../../Imitator" name="imitator" script="./start_fg.sh" silent_mode="1"/> <item chdir="../" name="controller" script="./start_fg.sh" silent_mode="1"/> </RunList> All possible fields are described in sufficient detail in the documentation for uniset2-testsuite , so I will not stop. Here we see that we just listed what processes we need to run.
We proceed to the actual recording of tests.
First check that the process "does nothing" . Since the result of the management process is a change in the level sensor Level_AS (well, of course, setting control commands), then we can reformulate “does nothing” into “ sensors do not change for a sufficient time ”.
Let's write ...
<test name="Stopped"> <check test="CmdLoad_C=0" comment=" '' " holdtime="3000"/> <check test="CmdUnload_C=0" comment=" '' " holdtime="3000"/> <check test="Level_AS=0" comment=" " holdtime="6000"/> </test> Those. we check that the sensors do not change for a given time ( holdtime ).
The second test, it is necessary to check the actual work after the filing of the command. Those. we give the command “start work” (OnControl_S = 1), the management process gives the command “fill” (CmdLoad_C = 1), the level in the “tank” starts to increase and reaches the upper bar (it is not necessary to check the threshold, the main thing is to fix what is changing) .
Then the management process should begin to “empty” the tank by issuing the “emptying” command (CmdUnload_C = 0) and the level should decrease to some level. In general, this is sufficient to verify that the process is running.
We write in the test ...
Test text
<test name="Processing" comment=" "> <action set="OnContol_S=1" comment=" ' '"/> <check test="CmdLoad_C=1" comment=" ''"/> <check test="CmdUnload_C=0" comment=" ''"/> <check test="Level_AS>=90" comment=" .." timeout="15000"/> <check test="CmdLoad_C=0" comment=" ''"/> <check test="CmdUnload_C=1" comment=" ''"/> <check test="Level_AS<=10" comment=" .." timeout="15000"/> </test> And the last check: That when you remove the "start work" command, the process stops.
Test text
<test name="Stopped" comment=" "> <action set="OnContol_S=0" comment=" ' '"/> <check test="CmdLoad_C=0" comment=" '' " holdtime="3000"/> <check test="CmdUnload_C=0" comment=" '' " holdtime="3000"/> <check test="Level_AS<=80" comment=" " holdtime="10000"/> </test> Here the only subtlety is that we do not know at what level the previous test ended, we only know that the tank was empty. Therefore, to check that nothing is happening, we check that the level does not rise> 80 preset time.
As a result, the full version of our test script will be
Test script
<?xml version="1.0" encoding="utf-8"?> <TestScenario> <RunList after_run_pause="3000"> <item after_run_pause="500" chdir="../../../SharedMemory" name="SharedMemory" script="./start_fg.sh" silent_mode="1"/> <item chdir="../../Imitator" name="imitator" script="./start_fg.sh" silent_mode="1"/> <item chdir="../" name="controller" script="./start_fg.sh" silent_mode="1"/> </RunList> <TestList> <test name="Stopped" comment=" ' '"> <action set="OnControl_S=0" comment=" ' '"/> <check test="CmdLoad_C=0" comment=" '' " holdtime="3000"/> <check test="CmdUnload_C=0" comment=" '' " holdtime="3000"/> <check test="Level_AS=0" comment=" " holdtime="6000"/> </test> <test name="Processing" comment=" "> <action set="OnControl_S=1" comment=" ' '"/> <check test="CmdLoad_C=1" comment=" ''"/> <check test="CmdUnload_C=0" comment="C ''"/> <check test="Level_AS>=90" comment=" .." timeout="15000"/> <check test="CmdLoad_C=0" comment=" ''"/> <check test="CmdUnload_C=1" comment=" ''"/> <check test="Level_AS<=10" comment=" .." timeout="15000"/> </test> <test name="Stopped" comment=" "> <action set="OnControl_S=0" comment=" ' '"/> <check test="CmdLoad_C=0" comment=" '' " holdtime="3000"/> <check test="CmdUnload_C=0" comment=" '' " holdtime="3000"/> <check test="Level_AS<=80" comment=" " holdtime="10000"/> </test> </TestList> </TestScenario> Test run
To run the test, create a small script.
#!/bin/sh uniset2-start.sh -f uniset2-testsuite-xmlplayer --confile configure.xml --testfile tests.xml --show-test-log --show-result-report --show-comments --show-action-log $* running the test player with our script.
Go to the directory src / Algorithms / Controller / test-suite / run ./01-tests.sh and this is what we should see:
That's all about functional testing.
I just want to note that it was a simple demo test. In general, uniset2-testsuite allows you to write complex multi-component tests, refer to other test files (build test hierarchies), do “autochange” tests (that is, essentially an analogue of “templates”), work with sensors from different nodes networks), save reports in junit format, write scripts working under the ModbusTCP protocol (ie, you can test not only uniset projects), etc. All this is reflected in the documentation .
While writing these articles, I realized that a lot of things remained "behind the scenes". Therefore, there will be also the “final part” ..
Source: https://habr.com/ru/post/278607/
All Articles