We get acquainted with web standards. Work with audio. - Video and creation history
Hello! Especially for those who are just familiar with web technologies and new web standards, we have prepared an introductory 15-minute video telling about working with audio on the web (HTML Audio and Web Audio).
When we began to show the video to experts from the market, one of the first questions was about how such a video was created, how much time was spent and what was used.
')
I hope you have already watched the video and understand what it is about. As you can see, we have a mixture of scribing (when hand-drawing content is recorded or emulated) and animation. Below I will tell you how we worked on the video.

Everything is quite simple here:
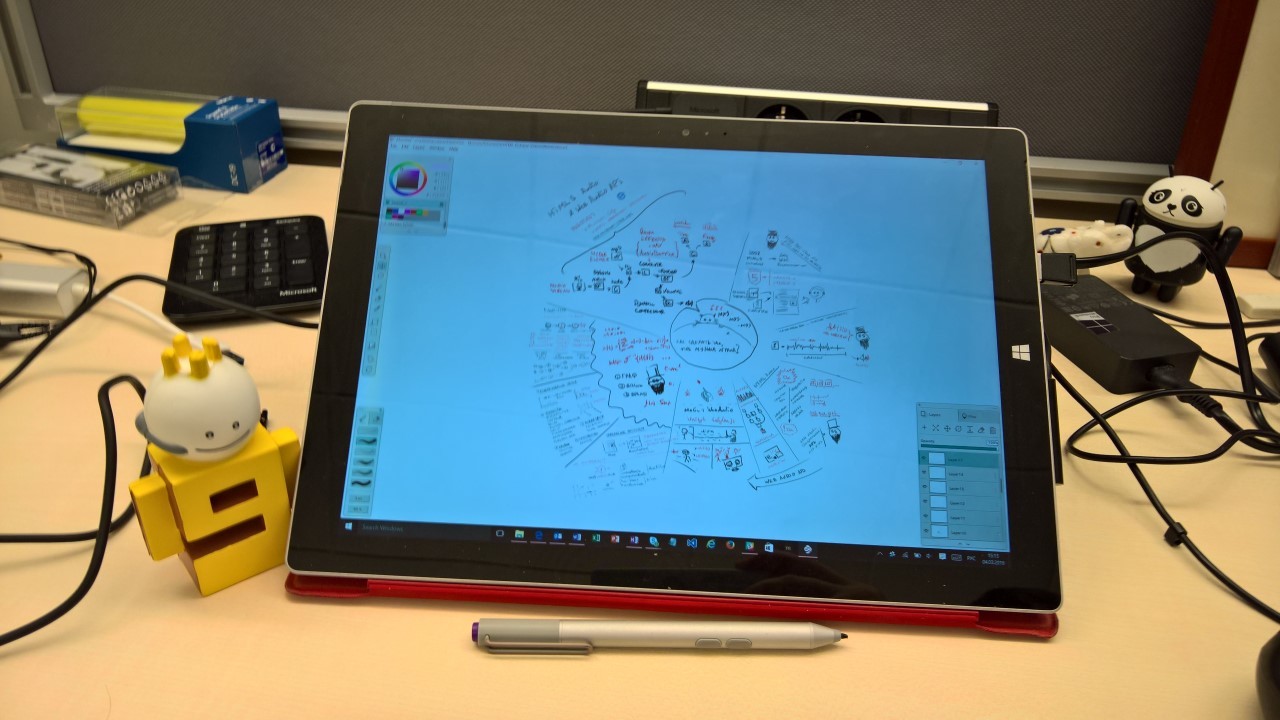
All the image that you saw in the video is really made by hand. I use Surface 3 Pro and the Mischief app . It focuses specifically on “artistic” tasks, supports work with layers and allows you to export to raster or PSD.
This is one of the longest stages of production, because you need to do a lot of exercises in parallel:
Depending on how familiar the artist is with the subject of the drawing, there can be more or less iterations and approaches to the projectile (from sketches and storyboards to the final drawing).
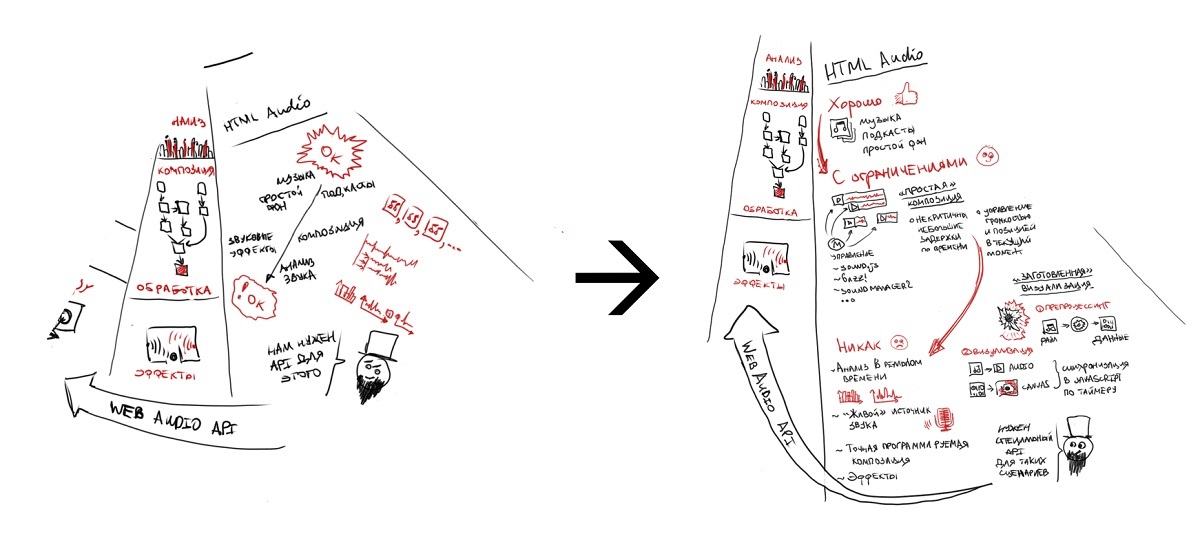
In our case, for example, individual fragments were redrawn over time in favor of a more understandable presentation. Although, I should note that explaining the API with pictures is always difficult.
Note : Separately, I note that the formation of such a picture is immediately tied to some logic of animation (see the third and fourth stages), that is, it is not just artistic creation, but some story that can be spoken orally at this stage, but then it will be recorded. Also an interesting point: in the scribing video, which we looked at as guidelines, we liked the moments when the previous image changed over time, something was drawn on top, etc. In our case, working with layers helped to realize such moments.
Further on the picture and some sketches of the text or phrases from the head is written the text, which will be further voiced by the speaker. Moreover, in the case of scrabing video and animation in general, it is important that the visual range corresponds to the speech. We managed a fairly simple solution:
In Word, it looks like this:

Under the 15-minute video, we got a 10-page document with pictures, which was then transmitted for reading and as an instruction to animators. Also for the avoidance of errors for English terms, the pronunciation was separately attributed.
As you work on the text (and this is the place where the content is actually fixed), minor edits to the image can be made. For example, if it becomes clear that a quantity of graphics is not enough for some important phrase, then either the phrase should be shortened or elements added to the image. Otherwise, a negative effect occurs when nothing happens on the screen, and the announcer does not voice the picture, but says something from himself.
True, in our case it was not always possible to do everything in an ideal form. In the block with filters, you might have noticed that the names of the filters just appear in the video series, and the voice acting explains why they are needed and what they do. Here the changes occurred in the text: as we work on it, it became clear that nothing would be clear from a simple listing of filters. But ideally, about each filter should be told separately, and we make an introductory video, so we made a compromise - slightly increase the text, but not complicate the graphics.
Comment. As we talked about Web Audio, we decided that it would be nice to add corresponding effects over speech. You may have noticed this in the last episode, where we analyze the example of the graph. Accordingly, the script contained instructions for the audio director to add effects.
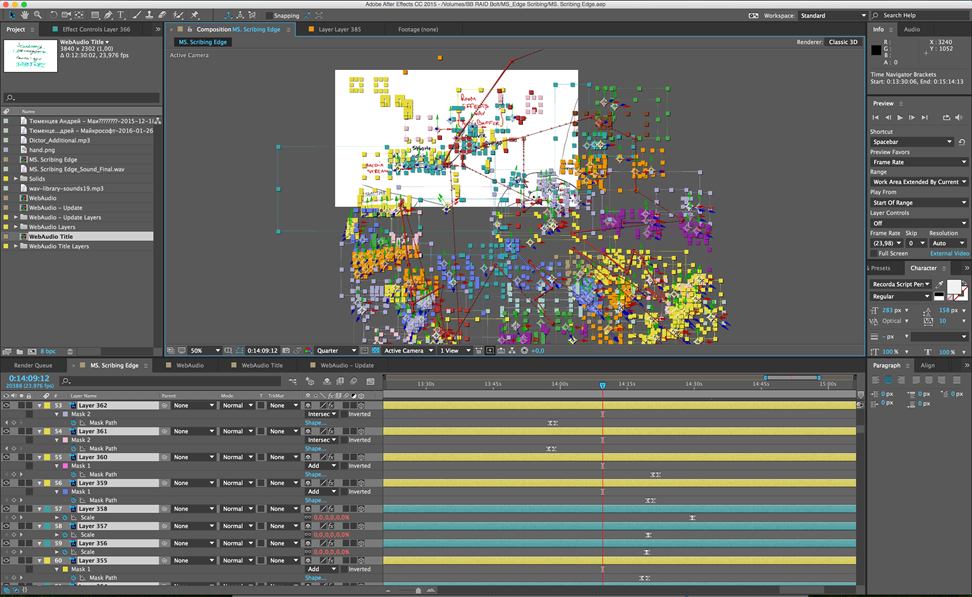
Here the professional team is involved in the process (the guys from BeaversBrothers helped us) and the corresponding tools (Adobe After Effects).
Below are a few screenshots of the workflow:


After a few hours of rendering, we get the finished video, which after a couple of iterations takes the final form. And we wonder what you think about this format?
When we began to show the video to experts from the market, one of the first questions was about how such a video was created, how much time was spent and what was used.
')
I hope you have already watched the video and understand what it is about. As you can see, we have a mixture of scribing (when hand-drawing content is recorded or emulated) and animation. Below I will tell you how we worked on the video.
Stage 1. Scenario planning
Everything is quite simple here:
- We study the whole subject area
- We form the general outline of the story (in this case, we start with the story, go to the explanation of why the Web Audio standard was needed, then we’ll tell you more about the standard itself).
Stage 2. Content rendering
All the image that you saw in the video is really made by hand. I use Surface 3 Pro and the Mischief app . It focuses specifically on “artistic” tasks, supports work with layers and allows you to export to raster or PSD.
This is one of the longest stages of production, because you need to do a lot of exercises in parallel:
- Immerse yourself in technology - from examining introductory and review articles ( html5rocks , etc.) to documentation ( MDN , MSDN ) and the standard itself. Here it is important to understand how the technology is arranged and how it is displayed in the standard (for example, how the various nodes of an audiograph are grouped).
- On the basis of various articles and related materials to assess whether there is a well-established translation of individual terms. Here the recent article by our colleagues from Yandex about sound theory turned out to be very useful.
- Come up with a visual structure of the story and metaphors for individual blocks and elements.
- Draw everything directly.
Depending on how familiar the artist is with the subject of the drawing, there can be more or less iterations and approaches to the projectile (from sketches and storyboards to the final drawing).
In our case, for example, individual fragments were redrawn over time in favor of a more understandable presentation. Although, I should note that explaining the API with pictures is always difficult.
Note : Separately, I note that the formation of such a picture is immediately tied to some logic of animation (see the third and fourth stages), that is, it is not just artistic creation, but some story that can be spoken orally at this stage, but then it will be recorded. Also an interesting point: in the scribing video, which we looked at as guidelines, we liked the moments when the previous image changed over time, something was drawn on top, etc. In our case, working with layers helped to realize such moments.
Stage 3. Scenario
Further on the picture and some sketches of the text or phrases from the head is written the text, which will be further voiced by the speaker. Moreover, in the case of scrabing video and animation in general, it is important that the visual range corresponds to the speech. We managed a fairly simple solution:
- the whole picture is broken into fragments,
- individual image elements are assigned a number,
- in the text numbers of elements are placed.
In Word, it looks like this:
Under the 15-minute video, we got a 10-page document with pictures, which was then transmitted for reading and as an instruction to animators. Also for the avoidance of errors for English terms, the pronunciation was separately attributed.
As you work on the text (and this is the place where the content is actually fixed), minor edits to the image can be made. For example, if it becomes clear that a quantity of graphics is not enough for some important phrase, then either the phrase should be shortened or elements added to the image. Otherwise, a negative effect occurs when nothing happens on the screen, and the announcer does not voice the picture, but says something from himself.
True, in our case it was not always possible to do everything in an ideal form. In the block with filters, you might have noticed that the names of the filters just appear in the video series, and the voice acting explains why they are needed and what they do. Here the changes occurred in the text: as we work on it, it became clear that nothing would be clear from a simple listing of filters. But ideally, about each filter should be told separately, and we make an introductory video, so we made a compromise - slightly increase the text, but not complicate the graphics.
Comment. As we talked about Web Audio, we decided that it would be nice to add corresponding effects over speech. You may have noticed this in the last episode, where we analyze the example of the graph. Accordingly, the script contained instructions for the audio director to add effects.
Stage 4. Animation and voice
Here the professional team is involved in the process (the guys from BeaversBrothers helped us) and the corresponding tools (Adobe After Effects).
Below are a few screenshots of the workflow:
After a few hours of rendering, we get the finished video, which after a couple of iterations takes the final form. And we wonder what you think about this format?
Source: https://habr.com/ru/post/278593/
All Articles