Adaptive Split View Controller and Popover in iOS 9 (Swift). Part 1
From time immemorial, the Split View Controller and Popover in iOS were only available on the iPad.
Starting with iOS 8, they now work on both the iPad and the iPhone, thanks to the concept of Size Classes and their adaptive behavior. However, the automatic adaptation offered by Apple out of the box most often does not suit us and we have to write a small additional code using the
UISplitViewControllerDelegate and UIPopoverPresentationControllerDelegate delegates methods. In this article, we will explore the adaptive abilities of the Split View Controller and Popover using the example of very simple practical applications that work with the Flickr.com server, which is a cloud service for storing photos. By itself, this task has a great practical meaning, since it is a common case when data is read from a certain server and then presented as related tables and images. Along the way, we will demonstrate live Swift syntax constructions, such as computed properties c {get} and {set} , observers of didSet{} properties, higher-order functions map, flatMap, filter , type inference from the context, and overload, sharing Swift and Objective-C code, working with NSUserDefaults , using NSUserDefaults storage, etc. But still, this article focuses on more complex configurations of adaptive Split View Controller and Popover .Later, all the applications in this article can be used as templates for developing your applications with similar tasks.
So, according to the iOS philosophy, the user interface (UI) can quickly be configured to any type of device, depending on which Size Class has its screen.
To classify various devices in iOS 8, the concept of Size Class was introduced. Only four Size Classes :
- Horizontal Regular
- Horizontal compact
- Vertical Regular
- Vertical Compact
Your
View Controller ( Split View Controller or Popover ) always exists in a Size Class environment with a specific width (width) and height (height). Currently, the Size Class can be either Compact or Regular :')

Full-size View Controllers on iPad are always Regular in both directions (horizontal and vertical). On all iPhones before the appearance of the iPhone 6+ and iPhone 6s +, the horizontal size was always Compact (both in portrait and landscape modes), and the vertical size was Regular in portrait mode and Compact in landscape mode. With the advent of large iPhones 6+ and iPhones 6s +, unlike other iPhones, their width became Regular in landscape mode, which made it possible to extend the use of the full-fledged Split View Controller to iPhones 6+ and iPhones 6s + in landscape mode.
It will not be very convenient if I create various interfaces for all 4 situations for my applications. Therefore, in Xcode 7 we have another Size Class , called Any (w Any h Any ), which we use when designing universal applications:

In iOS 7, we had to use two completely different user interfaces built on different types of Controllers when creating a universal application (below are the photoboards from the Photomania Universal URL from the previous Stanford CS193P course Fall 2013 - Winter 2014. “Developing iOS 7 Apps for iPhone and iPad” ):
Split View Controller on iPad
Main_iPad.storyboard

Navigation Controller on iPhone
Main_iPhone.storyboard

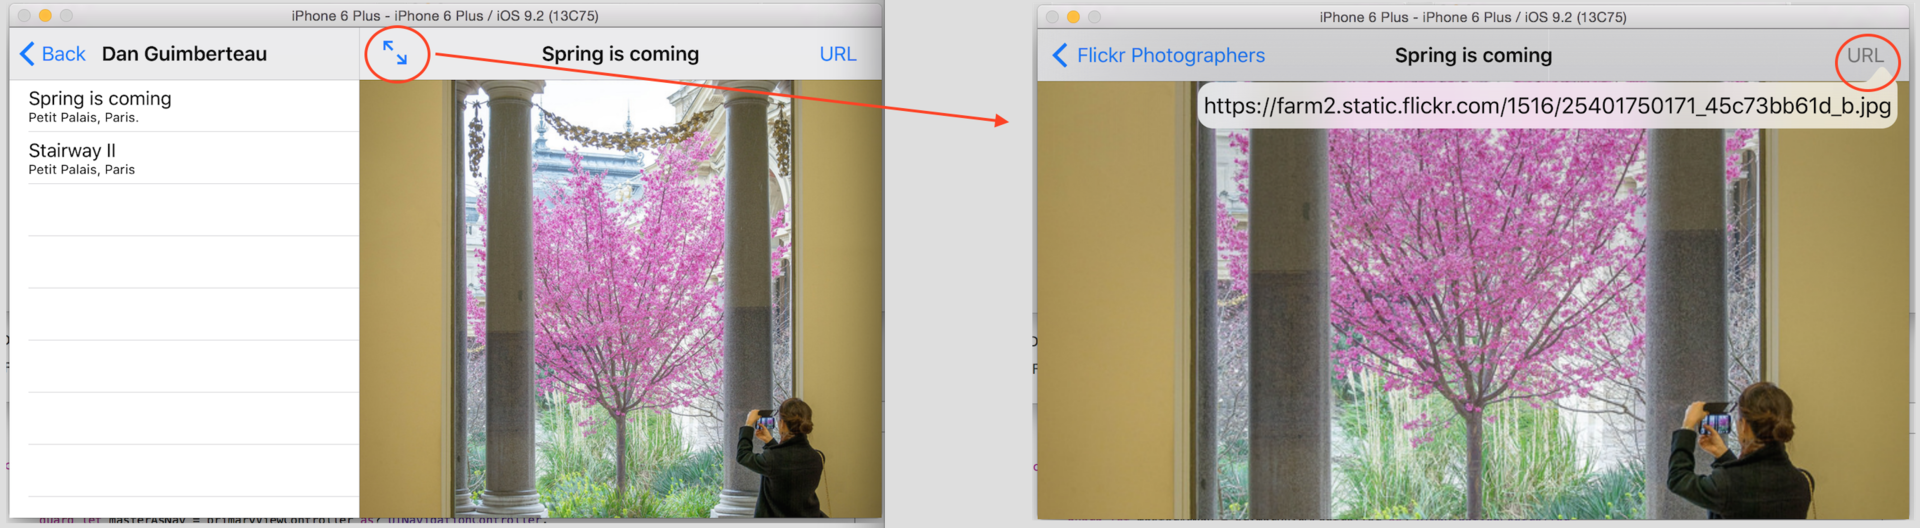
The Photomania Universal URL app queries the Flickr server for the most recent photos, compiles a list of photographers who took these photos, and shows it to you. If you click on the photographer, a list of the photos taken by him appears in the table. Then you can click on any photo in the list, and get both a full-scale image of your photo and the URL of that image.
Here is how this application works with Compact-width devices:

And this is how it works with Regular-width devices:

This background application constantly queries the Flickr server for more and more recent photos and uploads them to the Core Data database. The list of photographers on the screen tracks the appearance of this data, which is constantly updated automatically. The application was designed for iOS 7 and written in Objective-C. Its implementation included two storyboards: one for the iPhone, and the other for the iPad (listed above). It was in the order of things, and there was no talk of any adaptive interface, except for using the Autolayout mechanism.
However, the Photomania Universal application designed in this way for iOS 7 will not work correctly on all devices in iOS 9: on iPhone 5s and older iPhones, black bars will appear below and above the screen.
Therefore, the task was to create a modern adaptive UI of this application for iOS 9 on Swift. It is solved using the Split View Controller container, which, starting with iOS 8, becomes adaptive. This means that the only Split View Controller can manage two different architectures: for iPhone and for iPad.
To get an adaptive interface in iOS 9, you need to select a storyboard file with a Split View Controller , specify Size Class and Auto Layout mode in the File Inspector

and add a new adaptive segue like Show Detail :

The adaptive storyboard is very similar to the storyboard for iPad in iOS 7, except for two things:
- the sizes of all screen fragments are the same and correspond to the class w Any h Any that is universal in Xcode,
- a new adaptive segue of type Show Detai l appeared, which helps the Split View Controller to perform two functions at once: “sliding” along the stack elements in the Navigation Controller , as was the case for the iPhone, and “moving” to Detail , as is the case in the Split View Controller for iPad. (Previously, there was no segue on the iPad at all)
Next, we have to investigate the work of the adaptive Split View Controller on various devices, and in case of deviation of its work from our usual functioning, make certain additions to the code. The number of these additions depends on what elements are included in the Master and Detail . We will list five interesting cases from the developer’s point of view, which are different in Master complexity, and the Detail is the same everywhere — the only
ImageViewController inserted into the Navigation Controller and designed to show the image of the photo:1. The classic version: one element in the Master , inserted into the Navigation Controller , (often the Table View Controller ) - the AdaptiveSplitViewController1Swift application on Github .

2. Many Table View Controller elements inserted into the Navigation Controller - the AdaptiveSplitViewController2Swift application on Github .

3. Tab Bar Controller as Master - AdaptiveSplitViewController3Swift application on Github .

4. The case of different UI and different user classes for devices with different Size Classes is not discussed here, but the idea can be found in “Adaptive interface with two storyboards for iOS 9” .
5. Adaptive Popover - AdaptiveSplitViewController4Swift application on Github .

The easiest way to understand the need for additional corrections is to experiment not with the cumbersome Photomania Universal URL application c “uploading” Flickr photos in the background in Core Data , but with a very simple application also working with photos located on the Flickr server. Information about these photos is read asynchronously in the application and placed in a table so that after the user selects a particular photo, show its full-scale image. Designing such an application from scratch will allow us to “kill two birds with one stone”. On the one hand, demonstrate the syntax of Swift. And, on the other hand, use this simple experimental application as a base for more complex adaptive configurations of Split View Controller and Popover .
Experimental application
Open a new project for a universal application on Swift, call it AdaptiveSplitViewController1Swift and use the Single View Application template (this is the template, not the Master-Detail Application , which we will explore later).

We will design our application from scratch. Therefore, we remove the single screen fragment of the View Controller from the storyboard and leave the storyboard completely empty. Also remove the ViewController.swift file.
Set the adaptive mode on the storyboard, that is, enable the Size Class and Auto Layout options:

Drag from the object palette to the storyboard Table View Controller for the Flickr photo list and the usual View Controller for the full-scale image of the photo. The last screen fragment will receive the URL of the photo as a Model and display its image. Therefore, it will be called Image View Controller .
Paste the Table View Controller into the Navigation Controller

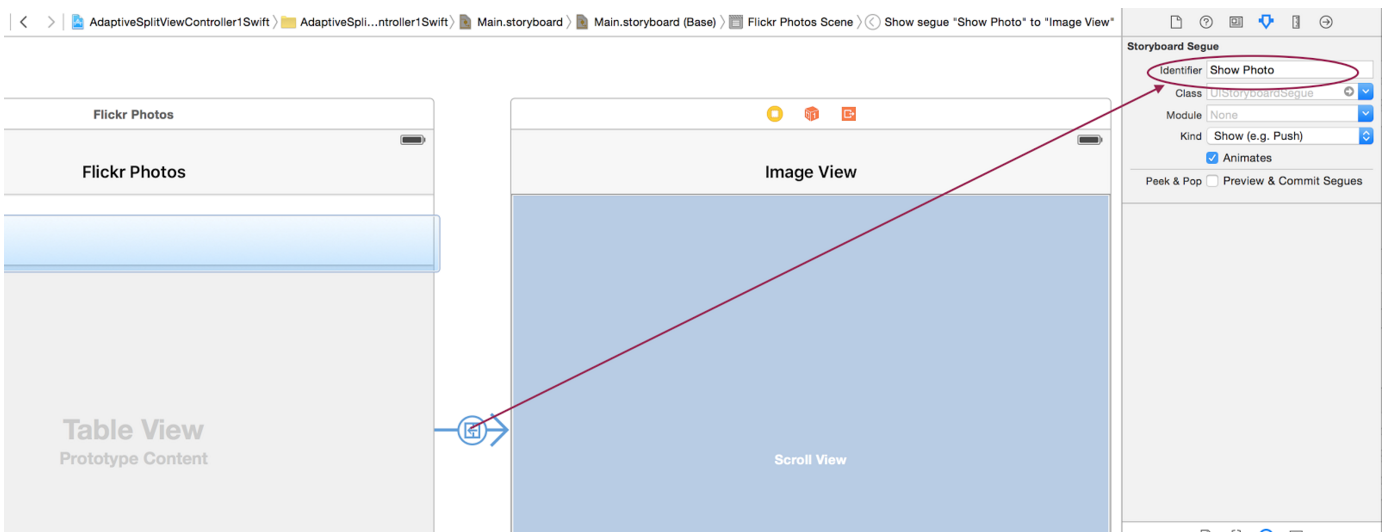
and connect the Table View Controller and the Image View Controller with the usual Show segue with the identifier “Show Photo”:
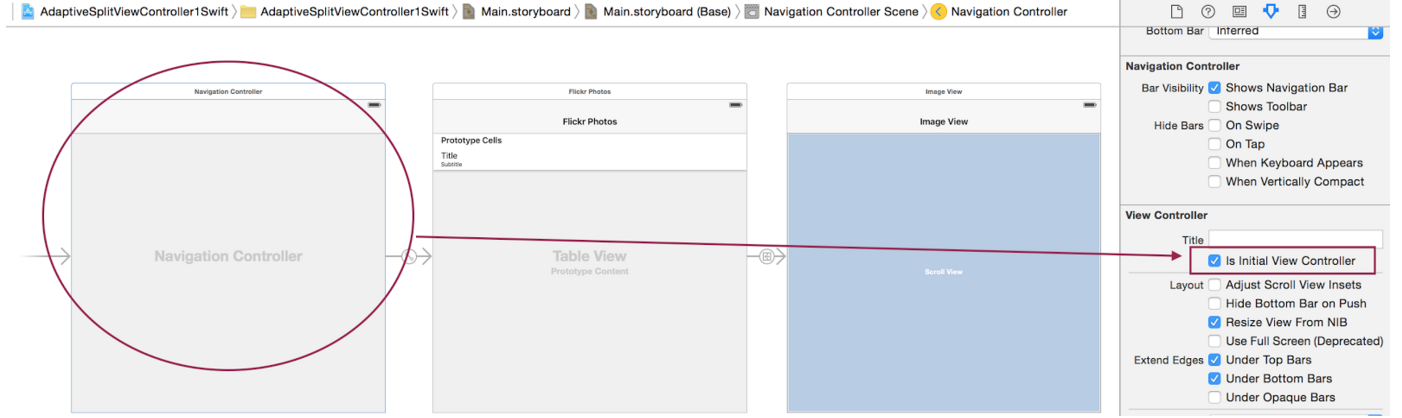
Set the Navigation Controller as a start screen fragment:
In the Table View Controller, set the style of the dynamic cell prototype as Subtitle and set the identifier
photoCell for the reused cell
For a table with photos, we create a very simple
FlickrPhotosTVC class, which inherits from UITableViewController and whose task is to display a list of photos represented by an array of Photo structures:FlickrPhotosTVC.swift

The
Photo structure, which we place in the DataModel.swift file, contains the title of the photo title , more detailed information about the photo subtitle , the unique identifier of the photo unique , the imageURL image imageURL , which made the photographer’s photo:DataModel.swift

The
struct Photo structure has a convenience initializer init?(json:[String:AnyObject]) , which has input data from the Flickr server as a dictionary [String:AnyObject] . This is an Optional initializer, and that is why it has a sign ? question in the name of init? :DataModel.swift

There are special requirements for the formation of attributes
Photo . If the photo does not have a title, then you need to use a detailed description of the subtitle photo as the title . If the photo has neither title title nor detailed description of subtitle , you need to use “Unknown” as title . The keys FLICKR_PHOTO_TITLE, FLICKR_PHOTO_ID, FLICKR_PHOTO_DESCRIPTION and FLICKR_PHOTO_OWNER of the Flickr photo dictionary are defined in the FlickrFetcher.h file containing the public API for Flickr (more on that later).The array of structures
var photos = [Photo] is the model for MVC FlickrPhotosTVC and is used in the UITableViewDataSource methods:FlickrPhotosTVC.swift

and also when “moving” to the Image View Controller under the assumption that the model of the
ImageViewController class that serves it is the property var imageURL: NSURL? The URL of the photo image. We prepare the new segue Show Detail type in the code of the FlickrPhotosTVC class FlickrPhotosTVC such a way as to take into account the presence of the Navigation Controller preceding the Image View Controller , and add the displayModeButtonItem button on the navigation bar (but more on that later) to Split View Controller :FlickrPhotosTVC.swift

The constants for the storyboard are collected in the
privater structure of the Storyboard :FlickrPhotosTVC.swift

According to the concept of object-oriented programming, we will make the
FlickrPhotosTVC class more generic, that is, it will form a table of photos represented by the [Photo] array and, when selecting a specific row in the table, show an image of the corresponding photo using MVC ImageViewController . But he will not care how the [Photo] array is obtained: from the Flickr server or from the NSUserDefaults repository.Therefore, in order to display photos from the Flickr.com server, we create a new class
JustPostedFlickrPhotosTVC , which is a subclass of the FlickrPhotosTVC class:JustPostedFlickrPhotosTVC.swift

............................
The data from the Flickr server will be loaded in the class
JustPostedFlickrPhotosTVC using the public API for Flickr , which was provided by the Stanford website in the form of the Flickr Fetcher folder. It allows you to get the URL s for various requests to Flickr , its code is written in Objective-C. The easiest way to include Objective-C code in a Swift project is to copy one file from the Flickr Fetcher folder (there are only three of them) into your Swift project, then before you copy the FlickrFetcher.m file you will be asked if you want to add Objective- C header file for communication with Swift ?:
You reply “Create a header header file”. As a result, an empty AdaptiveSplitViewController1Swift-Bridging-Header.h header file will be generated for your project, to which you add the necessary public API files for Flickr :

Everything. You don’t need to do anything else; now you can directly access classes and constants of the public API for Flickr . All you have to do is get the Flickr API key. A free Flickr.com account is fine, since you will not post photos on Flickr , but only request them.
The newly received header file is automatically registered in the project settings:

Let's go back to the
JustPostedFlickrPhotosTVC class, which is specifically designed to read the most “fresh” photos from Flickr , and use the public API to form the URL request for “recent” photos. Data reading at this URL is asynchronous and the resulting information is converted into an array [Photo] :JustPostedFlickrPhotosTVC.swift

JSON data is converted into an array of
[Photo] structures by a single line, thanks to the flatMap function, type out of context, and Optional Photo initializer.self.photos array self.photos “picked up” by superclas s FlickrPhotosTVC and we see a table of photos, provided that we put a custom class for the Flickr Photos table as JustPostedFlickrPhotosTVC on the storyboard:
In order to show the user that data is being downloaded from the network, which takes some time, let's enable Flickr Photos on the storyboard Refresh Control :

Before the
func fetchPhotos () method of loading data from the Flickr server, we put @IBAction - that is, we show that this is an Action :
Using CTRL- dragging, we will bind Refresh Control to
@IBAction func fetchPhotos () :
To get a full-scale image of a photo, use the
ImageViewController class, whose model is var imageURL: NSURL? :ImageViewController.swift

Details of the design of this class are described in Lecture 9 CS193P Winter 2015 - Scroll View and Multithreading of the course “Developing iOS 8 Apps with Swift” at Stanford University CS193P Winter 2015.
Install this class for the remaining on the storyboard Image View Controller :

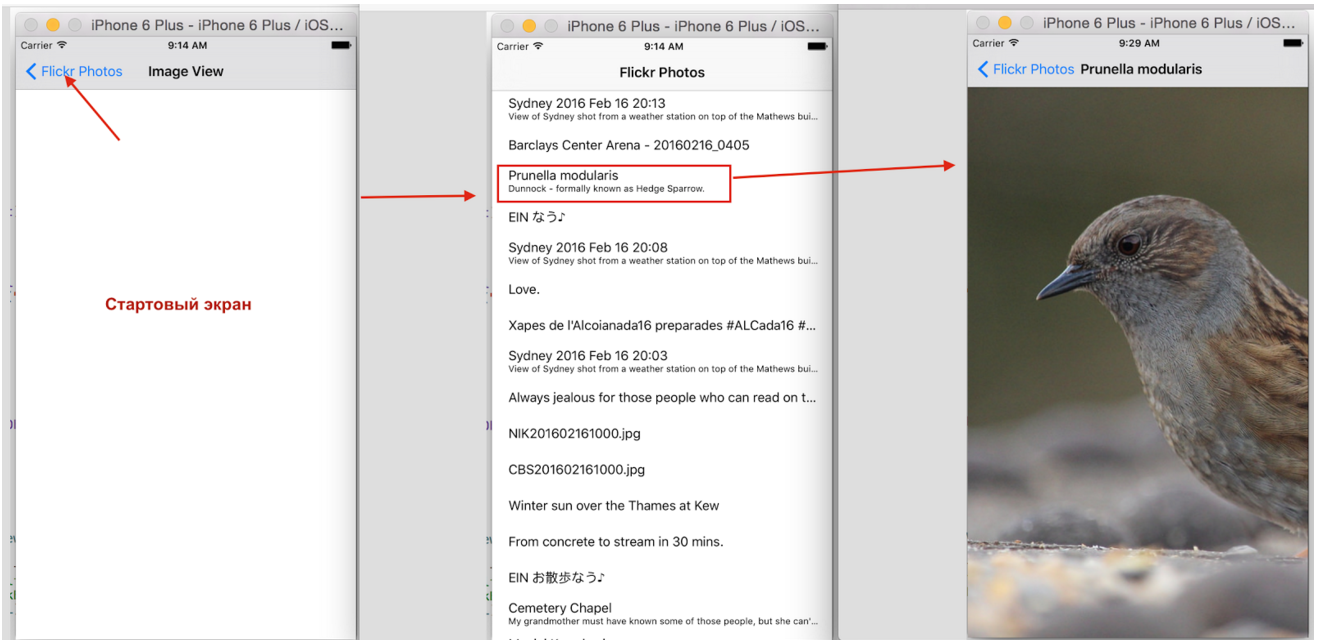
Run the application, wait for the download to finish c Flickr , select a photo, get its image.

Everything functions correctly and looks good on Compact-width devices (all iPhones except iPhone 6+ and iPhone 6s +, for which this mode is valid only in portrait view), but on Regular-width devices (all iPad and iPhone 6+ and iPhone 6s + in landscape mode) should use Split View Controller .
The code is on Github - the AdaptiveSplitViewController1Swift application.
This concludes the formation of our experimental application and proceeds with the implementation of the adaptive Split View Controller in the classic version.
1. Classic version of adaptive Split View Controller
To do this, create another storyboard in this application using the menu File -> New -> File -> User Interface :

Let's call it conditionally iPad.storyboard (in fact, the name has no meaning, since we later rename iPad.storyboard to Main.storyboard):

As a result, we get an empty iPad.storyboard. In order for the application to work with iPad.storyboard, add the code to AppDelegate.swift :

Extract from the Objects Palette and place on the storyboard Split View Controller , which appears along with the two accompanying View Controllers, which we will immediately remove, and instead of the Master, copy
Flickr Photos from the Main.storyboard, inserted into the Navigation Controller , and instead of Detail - Image View Controller , also inserted into the Navigation Controller .
We use the new adaptive segue of type Show Detail with the identifier "Show Photo".

The brackets in the picture in the Attributes Inspector clarify that the segue of the Show Detail type is Replace segu e, which means that the Detail of this Split View Controller will be replaced with a new MVC instance. This is very important for further understanding. Like any other segue , segue of the Show Detail type needs preparation, especially if the
destination (the View Controller where we “move” thanks to this segue ) is the UINavigationController :FlickrPhotosTVC.swift

Please note that when using segue, there is a complete replacement of Detail with new MVC , and
prepareForSegue works even before loading ImageViewController and setting a new Model value (that is, imageURL ) may not update the Image View Controller user interface to the end, as some outlets are not yet exposed and we are not completely on the screen yet. Therefore, the ImageViewController class is designed in such a way that when you install the Model - imageURL , the sample image data is imageURL from the Flickr server and the user interface is updated only if the ImageViewController already on the screen:ImageViewController.swift

In our case, when Detail will be completely replaced by a new MVC instance, we will fetch the data from the network and update the UI in the “life cycle”
viewWillAppear , that is, just before the image appears on the screen:ImageViewController.swift


Run the application on iPhone 6+ and iPad in portrait mode:
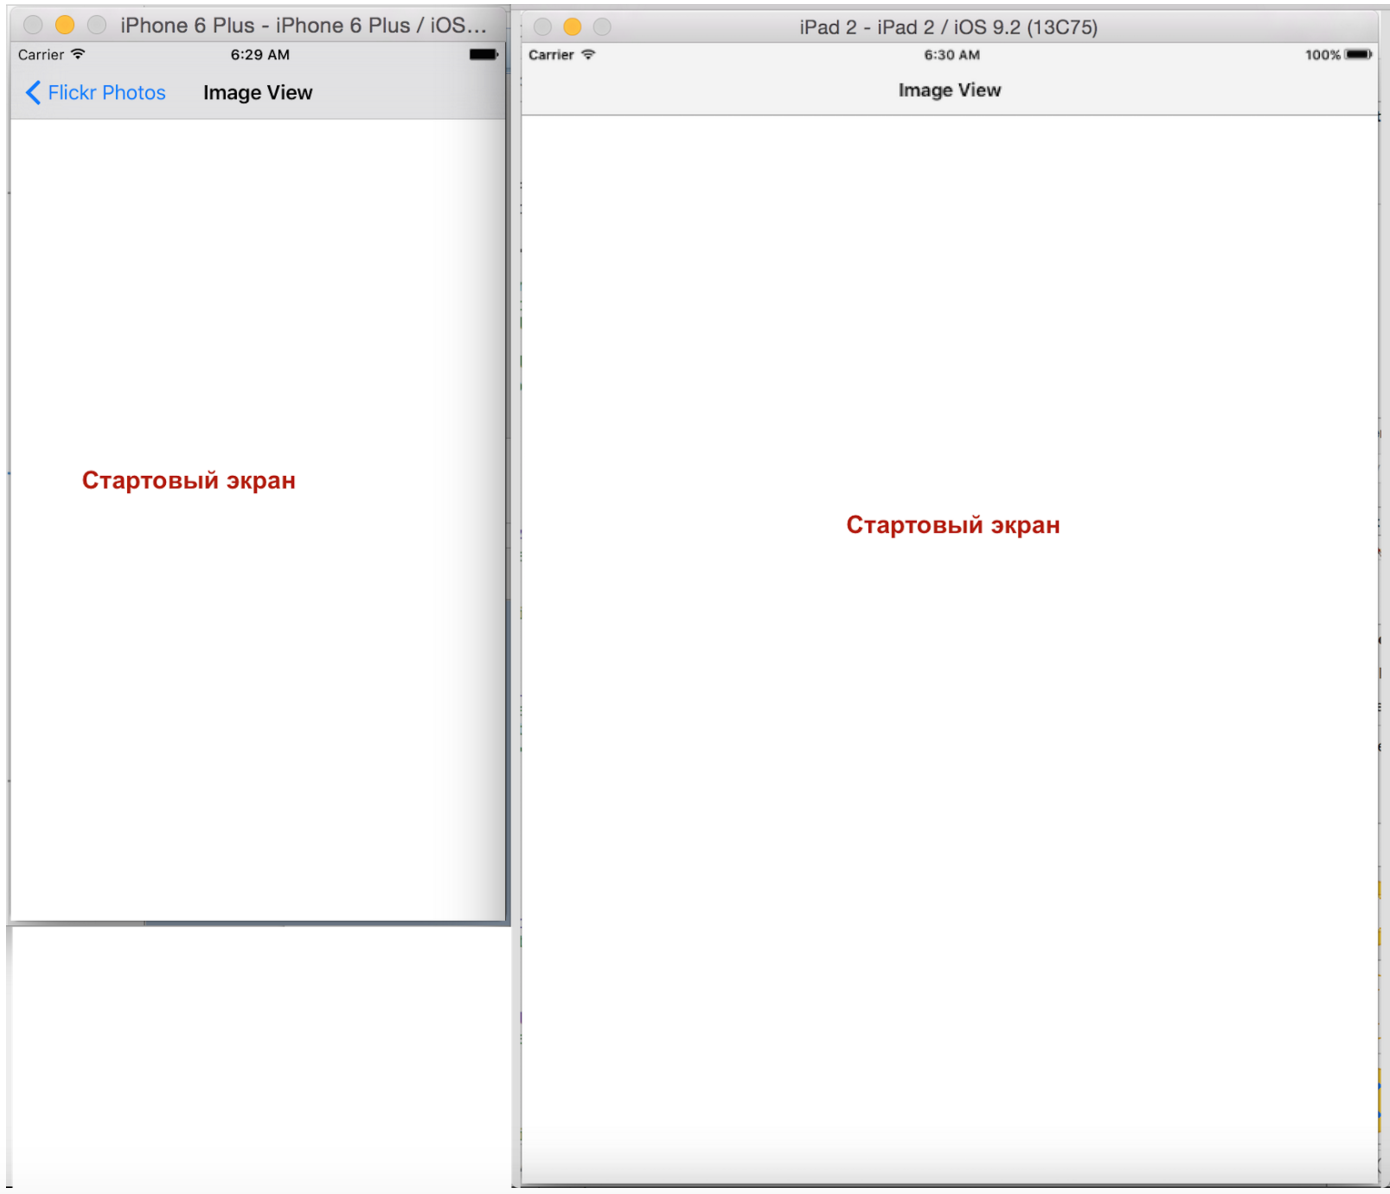
On iPhone 6+ and iPad 2, a blank screen appears - this is Detail (in our case,
ImageViewController ) for SplitViewController , and this was the usual SplitViewController behavior previously when it was designed only for iPad. But if the iPhone 6+ has a return button to the Master (in our case, this is a table with a list of Flickr photos), then on the iPad it’s not even clear what to do. The user must in some magical way guess that the swipe gesture works, which will show us the Master , that is, the Flickr photo list.Then you can choose a photo and the screen with a photo will be automatically updated. Everything works, but there is no return button in the Master .
Run the application on the iPad in portrait mode.

Run the application on the iPad in landscape mode.

Everything is working.
Run the application on iPhone 6+ in portrait mode
When launched in portrait mode, there is a return button that calls us to select a Flickr photo. Click on this button, and really get into the Master , that is, the screen fragment with a list of photos. Then you can choose a photo and receive its image. This mode works.
Go to landscape mode on iPhone 6+

Everything is working. Photos are updated in Detail .
What can be concluded from these experiments?
If we are dealing with Regular-width devices (iPad in portrait and landscape modes and iPhone 6+, iPhone 6s + in landscape mode), then both Master and Detail are on the screen at the same time. This mode for the adaptive Split View Controller is called
expanded . This is the previously known habitual mode of the usual Split View Controller .If we are dealing with Compact-width devices (iPhone 6+, iPhone 6s + in portrait mode, all other iPhones in portrait and landscape modes), then only one MVC is on the screen: either Master or Detail , therefore this mode is called
collapsed for Split View Controller .This is the mode when the adaptive Split View Controller operates as a Navigation Controller , in the stack of which both Master and Detail are located .We have one storyboard that works on both platforms (iPhone and iPad) and automatically adapts.
But we are not satisfied with two things:
- We want the same return button to appear on any iPad in portrait mode, as on any iPhone in portrait mode;
- When launched on any iPhone in portrait mode, it would not be Detail with a blank screen (as was the case for the iPad), but Master (as was the case for the iPhone).
In order for a launch button on any iPad to appear in portrait mode, you must place it explicitly on the navigation bar in AppDelegate.swift :

and
prepareForSeguein the class method FlickrPhotos:FlickrPhotos.swift

In addition, give the heading Navigation Controller for Master , which in our case will be “Flickr Photos”:

As a result, we have the necessary return button for iPad in portrait mode and the mode switch button for iPhone 6+, iPhone 6s + in landscape mode.

Here's how the mode switch button works on iPhone 6+, iPhone 6s + in landscape mode:

Now the work of the adaptive Split View Controller forRegular-width devices can be considered satisfactory.
What does not suit us in work of adaptive Split View Controller for Compact-width devices?
On iPhones, work should immediately begin with the Master display and continue to move sequentially in the direction of Detail with the help of the stack mechanism Navigation Controller . This is provided by delegate methods
UISplitViewControllerDelegate, one of which we are now implementing in AppDelegate.First, we confirm the protocol
UISplitViewControllerDelegate:AppDelegate.swift

And finally, we implement the
collapseSecondaryViewController, ontoPrimaryViewControllerdelegate method UISplitViewControllerDelegate, which is triggered when switching to the collapsedmode when only one View Controller should remain on the screen . He asks us if we need to drop Detail ? If we answer true, then collapsedonly Master remains on the screen in mode , if false- then Detail . We want to have Master only at the start, that is, when the Detail - this Navigation Controller, its masthead View Controller in the stack is ImageViewController , M Odel which imageURLhas a value of nil . This is the condition we select before returning true :AppDelegate.swift

We start iPhone 6+ in portrait mode :

Now our adaptive interface works as it should, that is, for Compact-width devices, we start from the Flickr photo list.
So, the configuration of the adaptive Split View Controller for the classic case is complete.
Rename the storyboard Main.storyboard in iPhone.storyboard and leave it to history in this application, and in iPad.storyboard Main.storyboard and make it the basis for a universal application:

as well as get rid of extra code
AppDelegate:
The final version of a simple application AdaptiveSplitViewController1Swift is on github .
To summarize our actions for creating an adaptive Split View Controller :
Step 1. Drag and drop the Split View Controller from the Object Palette.
Step 2. Insert the Master and Detail into the Navigation Controller and connect it to the Split View Controller .
Step 3. Add segue of the Show Detail type.
Step 4. Set up a segue method
prepareForSegue, taking into account that destinationViewControllerfor this segue can be both ImageViewController, and UINavigationControllerin whose stack it is at the very top ImageViewController.Step 5. Add buttons to the navigation bar in the segue and c
prepareForSeguepreparation method . Step 6. Implement the delegate method that is triggered when switching to the mode when only one View Controller should remain on the screen ; in this case, we drop the Detail when starting. You can do without these 6 steps and get exactly the same code and UI immediately, if you use the excellent Master-Detail application template, which already has Show Detail segue , Navigation Controller , and all the necessary code. We can improve a little more.AppDelegateAppDelegatecollapseSecondaryViewController:ontoPrimaryViewController:UISplitViewControllerDelegatecollapsedSplit View Controller for iPad, setting preferential display mode
.AllVisible:AppDelegate.swift

What
preferredDisplayMode?this property means defines the preferred display mode. Split View Controller does its best to adjust the interface accordingly, but it can also use a different display mode if, for example, there is not enough space to display in your preferred mode. By default, the value of the property preferredDisplayModeis .Automatic. On the iPad, this leads to the use of the mode .PrimaryOverlayin portrait orientation and .AllVisiblein landscape orientation. By setting the preferred display mode .AllVisible, we actually only affect the display of the Split View Controller on the iPad in portrait mode
. AppDelegate.swift shows two more commented out lines of code.
// splitViewController.preferredPrimaryColumnWidthFraction = 0.5
// splitViewController.maximumPrimaryColumnWidth = 512
If you remove comments from these lines, you can adjust the width of the columns for Master and Detail . You can use a property
preferredPrimaryColumnWidthFractionthat takes a value from 0.0 to 1.0 to represent a fraction of the total width of the screen that the Master occupies . By default, this property accepts a value UISplitViewControllerAutomaticDimensionthat leads to the appropriate width of the Master selected by the Split View Controller .The actual master width is limited to values in the range
minimumPrimaryColumnWidthand maximumPrimaryColumnWidth. Split view controllerIt will do its best to customize the interface according to the property values you specify, but it can change them to others depending on the space available. You can get the actual width of the master using the property primaryColumnWidth.
The code is on Github - the AdaptiveSplitViewController1Swift application .
2. Set Table View Controllers in Master
But let's go ahead and add another screen fragment of the Table View Controller for photographers who took Flickr photos.
To do this, based on the previous AdaptiveSplitViewController1Swift application, we will create a new AdaptiveSplitViewController2Swift application and enable another Table View Controller in the Master . Now our user interface looks like this:

First we select a photographer, then any photo of this photographer from the list of his photos, and then we show the selected photo: The Table View Controller

screen fragment for photographers is served by a fairly simple class . It is almost a copy of the class , there is also a property that is a list of photos, but its installation leads to the calculation of other property , which is a list of photographers who took these pictures, and a M dressed for class : FlickrPhotographersTVS.swift Photo and photographer defines the structure and are in the DataModel.swift file :
FlickrPhotographersTVCFlickrPhotoTVvar photos = [Photo]()var photographers = [Photographer]()FlickrPhotographersTVC
PhotoPhotographer
The following
var photographers = [Photographer]()methods are implemented on the basis of the Model UITableViewDataSource:FlickrPhotographersTV.Swift

To prepare a “move” to a table with a list of photos, Flickr Photos uses a method
prepareForSeguethat, like in the class, FlickrPhotostakes into account that destinationViewControllerwhich we “move” to can be inserted into Navigation Controller :FlickrPhotographersTV. swift

Choosing a photographer
photographer, we ask for the Model destinationViewController, only photos photostaken by this photographer.The constants for the storyboard are assembled in the
privatestructure Storyboard:FlickrPhotographersTV.Swift

Just as in the “classic version”, we assume that the class
FlickrPhotographersTVCAccording to the concept of object-oriented programming is more general. It does not care how the array is obtained [Photo]: from or from the Flickr server NSUserDefaults. To get an array of [Photo]the Flickr server, we already have a class JustPostedFlickrPhotosTVC, which we will now make the subclass not FlickrPhotosTVCin the “classic” version, but in the subclass FlickrPhotographersTVC :JustPostedFlickrPhotosTV.Swift

This
JustPostedFlickrPhotosTVCwill be the user class for the Flickr Photographers screen fragment :
and for the Flickr Photos screen fragment, the user class will be
FlickrPhotosTVC:
Launch the application, see how it works. Everything works fine, except for one situation where the iPhone 6+ (or iPhone 6s +) switches from portrait mode to landscape mode (that is, from
collapsedmode to expandedaccording to the terminology of the adaptive Split View Controller ). At that, its screen in portrait mode shows the List of Photos at the Detail location , and not the image of the selected photo at all:
When switching from the
collapsedmode when there is only one View Controller on the screen , to the expanded( Master and Detail simultaneously on the screen) adaptive Split View Controller takes the current screen as a detaildefault. And this is not at all what we need: Detail can be in place only ImageViewController. With the help of another separateSecondaryViewControllerFromPrimaryViewControllerdelegate method, UISplitViewControllerDelegatewe ourselves have to make the necessary configuration:AppDelegate.swift

The method is
separateSecondaryViewControllerFromPrimaryViewControllertriggered when switching from collapsedmode to, expandedand it asks us which View Controller should be taken as Detail . By default, the current View Controller is taken as the Detail , if it is not the Master . In our special case, when - a table with a list of photos inserted into the Navigation Controller , we have to generate Detail in the conditions of scant information. We have nowhere to get (photo image) as soon as from the storyboard and we need the ID of the screen fragment Detail on the storyboard (in our case it’sprimaryViewControllerFlickrPhotosTVCImageViewControllerNavigation Controller for Detail ). Let this identifier will be "detailNavigation":
After the restoration Detail from a storyboard, we can get our
ImageViewController(the code is controller) and make the necessary adjustments: Add a button on the navigation bar, put a header ImageViewControllerand set up his M Odel (in this case imageURL), which will match the first line in the list of photos: Run the application, now everything is working correctly. In addition, the first line in the photo list is highlighted, for which a photo is shown: Output: in order to ensure the adaptive operation of the Split View Controller, there are numerous (> 1)if let photo = photosView.photos.first {
controller.imageURL = NSURL(string: photo.imageURL)
controller.title = photo.title
}
Table View Controllers as Master , you need to use the
separateSecondaryViewControllerFromPrimaryViewControllerdelegate method UISplitViewControllerDelegate.The code is on Github - the AdaptiveSplitViewController2Swift application .
In the second part of this tutorial, we will further complicate our experimental application and extend it to case 3 - Tab Bar Controller as the Master for Split View Controller , and 5 - adaptive Popover .
The code for all options can be found on Github .
Source: https://habr.com/ru/post/278573/
All Articles