Very smart WordPress blog with nginx + PHP-FPM + MariaDB + Varnish
In this article, I will talk about how I made my blog on WordPress fly at the expense of proper caching, compression and other optimization of the server and client sides. At the time of this writing, the characteristics of VDS are as follows:
The scheme of the system is as follows:
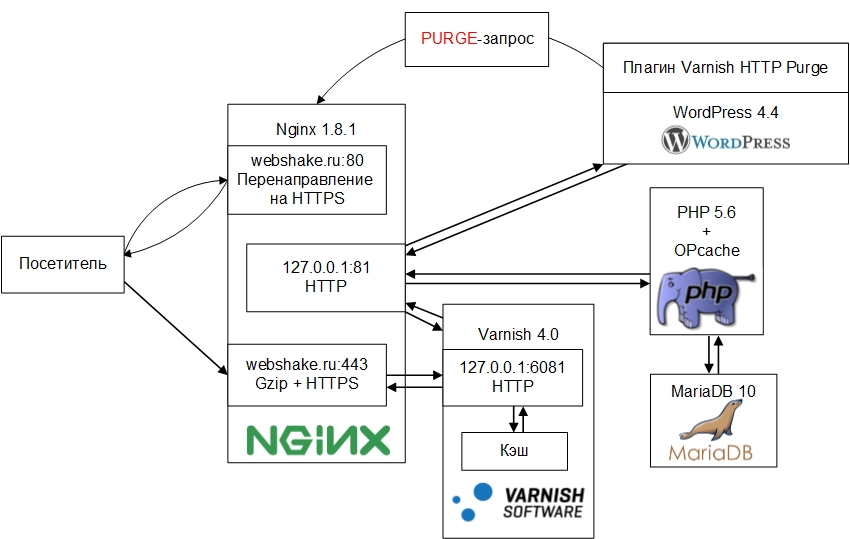
For site visitors there is a redirection to HTTPS, where nginx works as a proxy for Varnish, while at the output of nginx, in addition to implementing an HTTPS connection, there is gzip compression of the data transmitted to the user. The next element in this system is the Varnish HTTP accelerator, waiting for a connection on port 6081. When receiving a request from a client, it searches for the requested URL in the cache, and if it is found it instantly returns it to the frontend. Thus, if the requested file is in the cache, the speed of the request for pages is reduced to the speed of the request for static data. If the requested file is not found in the cache, Varnish passes the request to the backend. Also in Varnish, client side optimization is implemented — here, the Cache-Control and Expires headers are set to static data, which indicate to the browser the need for caching this data on the client side. This reduces the time to load the site and reduces the load on the server.
The backend is again nginx, waiting for connections at 127.0.0.1:81. PHP interpretation is implemented using FPM. PHP version is 5.6 with OPcache accelerator enabled by default. As a DBMS, MariaDB 10 is one of the best in performance and moderately operative DBMS among MySQL forks. MyISAM is used as a table engine, since writing is rarely done, mainly reading, for which this engine is more optimized. By turning off the engine InnoDB saves RAM. Finally, WordPress functions as a CMS with the Varnish HTTP Purge plugin installed, sending PURGE requests to the addresses of the pages on which changes were made, which causes the Varnish cache for these pages to be cleared. Thus, the user always receives the current version of the site. Next, I will talk in detail about installing and configuring these components, as well as the problems that I encountered.
')
Install:
The contents of the main config /etc/nginx/nginx.conf:
Create a backend configuration file /etc/nginx/conf.d/backend.conf:
For a detailed description of how to configure HTTPS in nginx, I recommend reading this article for reading: habrahabr.ru/post/252821
Create a frontend settings file /etc/nginx/conf.d/frontend.conf:
Re-read nginx configs:
Now, when you try to enter the site, you will see error 502. This is normal, since Varnish is not yet running.
Install Varnish:
The startup options file is located here - / etc / default / varnish. In DAEMON_OPTS we set the following parameters:
-a - sets the port on which Varnish will accept connections, in our case from the frontend - nginx;
-T - here the admin is spinning, in more detail in the description of the -S flag;
-f - VCL configuration file - a special language for defining query processing and caching rules in Varnish;
-S - Varnish has an admin panel. To enter, you must run the varnishadm command, and the user must have read permissions on the / etc / varnish / secret file to authenticate;
-s specifies where the cache is stored and its size, in this case 128MB in RAM.
As you have probably understood, the most interesting is waiting for us in the file with the rules for processing requests. During the start of the Varnish process, this file is compiled. The VCL uses several sub-functions that describe these rules. I will briefly tell about them, I recommend reading the full description on the official website.
sub vcl_recv - this function is used when a request comes from a client;
sub vcl_pass - executed when the client request needs to be sent directly to the backend, not to cache and not look for matches in the cache;
sub vcl_hash - defines caching rules; you can use several storages for the same document, depending on different conditions, for example, support for client compression, or any other client features. In our case, it will not be used, since we have only one client for Varnish - nginx on the frontend;
sub vcl_backend_response - this function is used when a request comes from the backend (nginx);
sub vcl_deliver - used immediately before sending data to the client, for example, to add / change headers.
The scheme of the VCL components can be represented as follows:
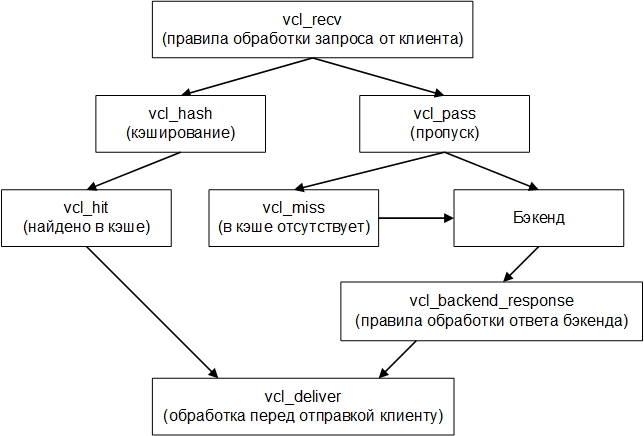
If the backend is accessed from the vcl_miss function, the backend response is sent to the cache. The language itself is very similar to C. We proceed to the setting. Open the file /etc/varnish/default.vcl and start to code:
Then execute the command:
Having passed now in the browser to our site, we will see index.php which needs to be created previously.
And what if you want to change the port on which Varnish will accept incoming connections or change the cache size. Judging by the official documentation, you need to change the file with Varnish startup parameters, which is located along the path: / etc / default / varnish and restart the service. But no! Nothing will change, and if we go to the top and press the 'c' key, we will see that the service is started with the same settings. And the thing is that the new version of Debian uses systemd instead of init.d as the initialization system, and therefore you need to go to the /lib/systemd/system/varnish.service file and write the same startup parameters there in the ExecStart directive:
After saving, execute the following commands to make the changes effective:
At the moment, this problem is unsubscribed to the developers, when and how they will solve it is unknown, so just in case, make the same changes in both files so that once after the update everything does not fall.
Install FPM and PHP library for working with DBMS:
Go to the configuration file /etc/php5/fpm/pool.d/www.conf and change the directive:
To the following:
In the same file we set the settings of the workers:
Change several directives in /etc/php5/fpm/php.ini
post_max_size we set a little more than upload_max_filesize, because in addition to the file, there is other data in the request.
Here, by the allow_url_fopen directive, we prohibit the execution of scripts located remotely (by removing the possibility of exploiting the vulnerability of a remote inclusion).
And we say FPM to re-read the config:
Now create a file that displays phpinfo () and access it in the browser, everything should work. Do not forget that it has already been cached in Varnish and if you change the configuration of PHP, it will not be updated in your browser. You can write a rule to skip this file in Varnish, or, for the duration of the tests, do not proxy Varnish, but directly backend on port 81.
I chose this DBMS because of its better performance and ability to withstand heavy loads, while spending less RAM compared to MySQL, as well as its full compatibility with WordPress. Installation is very simple; a password will be requested for the root user.
I use MyISAM as an engine for tables, because writing to a table is rarely done, and on reading MyISAM shows the best characteristics. I completely disabled support for InnoDB to free up RAM. Settings are stored in the /etc/mysql/my.cnf file. I will describe only those directives that I changed:
After saving the changes, restart the service:
Install the Varnish HTTP Purge plugin in the WP administration panel. Now when updating data to the changed pages, a PURGE request will be sent, clearing the cache in Varnish, and for visitors the data will always be updated.
To optimize the client side with Varnish, we indicate to the browser the need to store static data in the local client cache. But if you're craving for even more optimization, go to the developers.google.com/speed/pagespeed/insights page and enter the URL of your site or even a specific page. You will be given a list of recommendations, as well as offer an archive with compressed versions of your css and js styles. Replace them on your website and get even greater download speed due to the reduced amount of data transferred, as well as the load on the server and the space occupied by these files in the cache.
What should I do with documents requested from third-party servers, such as fonts or the jquery library? You can transfer them to yourself, and here, by establishing a connection with only one server, the speed of loading pages increases, however, at the same time, the list of calls and the total load will increase. Which option to choose - decide for yourself, depending on the workload of your server and your laziness.
For the most part gzip compression and caching in Varnish gave the greatest effect. The comments have already written a lot of additional optimization methods that I will certainly learn and implement as necessary. In the meantime, the optimization results are as follows:
Before

After
Full stress tests will hold later.
Source: webshake.ru/post/206
CPU: 1 x 2GHz
HDD: 10Gb
RAM: 512Mb
OS: Debian 8 x64
The scheme of the system is as follows:
Description of the scheme
For site visitors there is a redirection to HTTPS, where nginx works as a proxy for Varnish, while at the output of nginx, in addition to implementing an HTTPS connection, there is gzip compression of the data transmitted to the user. The next element in this system is the Varnish HTTP accelerator, waiting for a connection on port 6081. When receiving a request from a client, it searches for the requested URL in the cache, and if it is found it instantly returns it to the frontend. Thus, if the requested file is in the cache, the speed of the request for pages is reduced to the speed of the request for static data. If the requested file is not found in the cache, Varnish passes the request to the backend. Also in Varnish, client side optimization is implemented — here, the Cache-Control and Expires headers are set to static data, which indicate to the browser the need for caching this data on the client side. This reduces the time to load the site and reduces the load on the server.
The backend is again nginx, waiting for connections at 127.0.0.1:81. PHP interpretation is implemented using FPM. PHP version is 5.6 with OPcache accelerator enabled by default. As a DBMS, MariaDB 10 is one of the best in performance and moderately operative DBMS among MySQL forks. MyISAM is used as a table engine, since writing is rarely done, mainly reading, for which this engine is more optimized. By turning off the engine InnoDB saves RAM. Finally, WordPress functions as a CMS with the Varnish HTTP Purge plugin installed, sending PURGE requests to the addresses of the pages on which changes were made, which causes the Varnish cache for these pages to be cleared. Thus, the user always receives the current version of the site. Next, I will talk in detail about installing and configuring these components, as well as the problems that I encountered.
')
Install and configure nginx
Install:
apt-get install nginx The contents of the main config /etc/nginx/nginx.conf:
# , user www-data www-data; # auto worker_processes auto; error_log /var/log/nginx/error.log; pid /var/run/nginx.pid; events { # worker_connections 1024; # ( FreeBSD kqueue) use epoll; # multi_accept on; } http { # mime- - include /etc/nginx/mime.types; default_type application/octet-stream; # nginx server_tokens off; # sendfile read+write sendfile on; # , sendfile(). sendfile_max_chunk 128k; # tcp_nopush on; tcp_nodelay on; # reset_timedout_connection on; # client_header_timeout 3; client_body_timeout 5; # , 3 send_timeout 3; # client_header_buffer_size 2k; client_body_buffer_size 256k; # client_max_body_size 12m; # access_log off; # include /etc/nginx/conf.d/*.conf; } Create a backend configuration file /etc/nginx/conf.d/backend.conf:
server { # 81 listen 127.0.0.1:81; # root /var/www/site.ru/public_html; index index.php; # gzip- . . 9 . , text/plain, 1 , CPU gzip on; gzip_comp_level 9; gzip_min_length 512; gzip_buffers 8 64k; gzip_types text/css application/json application/x-javascript text/xml application/xml application/xml+rss text/javascript application/javascript image/svg+xml; gzip_proxied any; # server_name site.ru www.site.ru; # location ~ /\. { deny all; } # location ~* /(?:uploads|files)/.*\.php$ { deny all; } # URI location / { try_files $uri $uri/ /index.php?$args; } # */wp-admin rewrite /wp-admin$ $scheme://$host$uri/ permanent; location ~ \.php$ { # 404 , WordPress try_files $uri =404; # php FPM include fastcgi_params; fastcgi_param SCRIPT_FILENAME $document_root$fastcgi_script_name; fastcgi_pass unix:/var/run/php5-fpm.sock; } } For a detailed description of how to configure HTTPS in nginx, I recommend reading this article for reading: habrahabr.ru/post/252821
Create a frontend settings file /etc/nginx/conf.d/frontend.conf:
server { # HTTPS listen REAL_IP:80; server_name site.ru www.site.ru; return 301 https://$server_name$request_uri; } server { listen 93.170.105.102:443 ssl; server_name site.ru www.site.ru; # Keep-Alive keepalive_timeout 60 60; # . , text/plain, , . , CPU . gzip on; gzip_comp_level 1; gzip_min_length 512; gzip_buffers 8 64k; gzip_types text/plain; gzip_proxied any; # , ssl_prefer_server_ciphers on; # TLS 2 ssl_session_cache shared:TLS:2m; ssl_session_timeout 2m; # , ssl_certificate /etc/ssl/combined.crt; # ssl_certificate_key /etc/ssl/3_site.ru.key; # - ssl_dhparam /etc/ssl/dh2048.pem; # ssl_protocols TLSv1.2 TLSv1.1 TLSv1; # , forward secrecy ssl_ciphers EECDH+ECDSA+AESGCM:EECDH+aRSA+AESGCM:EECDH+ECDSA+SHA512:EECDH+ECDSA+SHA384:EECDH+ECDSA+SHA256:ECDH+AESGCM:ECDH+AES256:DH+AESGCM:DH+AES256:RSA+AESGCM:!aNULL:!eNULL:!LOW:!RC4:!3DES:!MD5:!EXP:!PSK:!SRP:!DSS; # Strict-Transport-Secutiry add_header Strict-Transport-Security 'max-age=31536000; includeSubDomains'; location / { # Varnish proxy_pass http://127.0.0.1:6081/; proxy_set_header Host $host; proxy_set_header X-Real-IP $remote_addr; proxy_set_header X-Forwarded-For $proxy_add_x_forwarded_for; proxy_set_header X-Forwarded-Proto https; proxy_set_header X-Forwarded-Port 443; } } Re-read nginx configs:
service nginx reload Now, when you try to enter the site, you will see error 502. This is normal, since Varnish is not yet running.
Install and configure Varnish
Install Varnish:
apt-get install varnish The startup options file is located here - / etc / default / varnish. In DAEMON_OPTS we set the following parameters:
DAEMON_OPTS="-a :6081 \ -T 127.0.0.1:6082 \ -f /etc/varnish/default.vcl \ -S /etc/varnish/secret \ -s malloc,128m" -a - sets the port on which Varnish will accept connections, in our case from the frontend - nginx;
-T - here the admin is spinning, in more detail in the description of the -S flag;
-f - VCL configuration file - a special language for defining query processing and caching rules in Varnish;
-S - Varnish has an admin panel. To enter, you must run the varnishadm command, and the user must have read permissions on the / etc / varnish / secret file to authenticate;
-s specifies where the cache is stored and its size, in this case 128MB in RAM.
As you have probably understood, the most interesting is waiting for us in the file with the rules for processing requests. During the start of the Varnish process, this file is compiled. The VCL uses several sub-functions that describe these rules. I will briefly tell about them, I recommend reading the full description on the official website.
sub vcl_recv - this function is used when a request comes from a client;
sub vcl_pass - executed when the client request needs to be sent directly to the backend, not to cache and not look for matches in the cache;
sub vcl_hash - defines caching rules; you can use several storages for the same document, depending on different conditions, for example, support for client compression, or any other client features. In our case, it will not be used, since we have only one client for Varnish - nginx on the frontend;
sub vcl_backend_response - this function is used when a request comes from the backend (nginx);
sub vcl_deliver - used immediately before sending data to the client, for example, to add / change headers.
The scheme of the VCL components can be represented as follows:
If the backend is accessed from the vcl_miss function, the backend response is sent to the cache. The language itself is very similar to C. We proceed to the setting. Open the file /etc/varnish/default.vcl and start to code:
# , VCL 4 vcl 4.0; # backend default { .host = "127.0.0.1"; .port = "81"; } # IP/, PURGE- acl purge { "localhost"; "127.0.0.1"; } # sub vcl_recv { # if (req.method == "PURGE") { # , if (!client.ip ~ purge) { return(synth(405, "This IP is not allowed to send PURGE requests.")); } return (purge); } # POST- Basic- if (req.http.Authorization || req.method == "POST") { return (pass); } # if (req.url ~ "wp-(login|admin)" || req.url ~ "preview=true") { return (pass); } # sitemap robots, sitemap Google XML Sitemaps if (req.url ~ "sitemap" || req.url ~ "robots") { return (pass); } # cookies, "has_js" "__*", CloudFlare Google Analytics, Varnish , cookies. set req.http.Cookie = regsuball(req.http.Cookie, "(^|;\s*)(_[_a-z]+|has_js)=[^;]*", ""); # ";" cookies, set req.http.Cookie = regsub(req.http.Cookie, "^;\s*", ""); # Quant Capital cookies ( ) set req.http.Cookie = regsuball(req.http.Cookie, "__qc.=[^;]+(; )?", ""); # wp-settings-1 cookie set req.http.Cookie = regsuball(req.http.Cookie, "wp-settings-1=[^;]+(; )?", ""); # wp-settings-time-1 cookie set req.http.Cookie = regsuball(req.http.Cookie, "wp-settings-time-1=[^;]+(; )?", ""); # wp test cookie set req.http.Cookie = regsuball(req.http.Cookie, "wordpress_test_cookie=[^;]+(; )?", ""); # cookie, ( ) if (req.http.cookie ~ "^ *$") { unset req.http.cookie; } # cookies, if (req.url ~ "\.(css|js|png|gif|jp(e)?g|swf|ico|woff|svg|htm|html)") { unset req.http.cookie; } # cookies "wordpress_" "comment_" if (req.http.Cookie ~ "wordpress_" || req.http.Cookie ~ "comment_") { return (pass); } # cookie , if (!req.http.cookie) { unset req.http.cookie; } # cookies, WordPress if (req.http.Authorization || req.http.Cookie) { # Not cacheable by default return (pass); } # return (hash); } sub vcl_pass { return (fetch); } sub vcl_hash { hash_data(req.url); return (lookup); } # sub vcl_backend_response { # unset beresp.http.Server; unset beresp.http.X-Powered-By; # robots sitemap if (bereq.url ~ "sitemap" || bereq.url ~ "robots") { set beresp.uncacheable = true; set beresp.ttl = 30s; return (deliver); } # , ... if (bereq.url ~ "\.(css|js|png|gif|jp(e?)g)|swf|ico|woff|svg|htm|html") { # unset beresp.http.cookie; # - set beresp.ttl = 7d; # Cache-Control Expires, , unset beresp.http.Cache-Control; set beresp.http.Cache-Control = "public, max-age=604800"; set beresp.http.Expires = now + beresp.ttl; } # if (bereq.url ~ "wp-(login|admin)" || bereq.url ~ "preview=true") { set beresp.uncacheable = true; set beresp.ttl = 30s; return (deliver); } # , if (!(bereq.url ~ "(wp-login|wp-admin|preview=true)")) { unset beresp.http.set-cookie; } # POST- Basic if ( bereq.method == "POST" || bereq.http.Authorization ) { set beresp.uncacheable = true; set beresp.ttl = 120s; return (deliver); } # if ( bereq.url ~ "\?s=" ){ set beresp.uncacheable = true; set beresp.ttl = 120s; return (deliver); } # , ! if ( beresp.status != 200 ) { set beresp.uncacheable = true; set beresp.ttl = 120s; return (deliver); } # set beresp.ttl = 1d; # TTL set beresp.grace = 30s; return (deliver); } # sub vcl_deliver { # unset resp.http.X-Powered-By; unset resp.http.Server; unset resp.http.Via; unset resp.http.X-Varnish; return (deliver); } Then execute the command:
service varnish restart Having passed now in the browser to our site, we will see index.php which needs to be created previously.
Varnish and Debian 8 problem
And what if you want to change the port on which Varnish will accept incoming connections or change the cache size. Judging by the official documentation, you need to change the file with Varnish startup parameters, which is located along the path: / etc / default / varnish and restart the service. But no! Nothing will change, and if we go to the top and press the 'c' key, we will see that the service is started with the same settings. And the thing is that the new version of Debian uses systemd instead of init.d as the initialization system, and therefore you need to go to the /lib/systemd/system/varnish.service file and write the same startup parameters there in the ExecStart directive:
[Unit] Description=Varnish HTTP accelerator [Service] Type=forking LimitNOFILE=131072 LimitMEMLOCK=82000 ExecStartPre=/usr/sbin/varnishd -C -f /etc/varnish/default.vcl ExecStart=/usr/sbin/varnishd -a :6081 -T 127.0.0.1:6082 -f /etc/varnish/default.vcl -S /etc/varnish/secret -s malloc,128m ExecReload=/usr/share/varnish/reload-vcl [Install] WantedBy=multi-user.target After saving, execute the following commands to make the changes effective:
systemctl daemon-reload service varnish restart At the moment, this problem is unsubscribed to the developers, when and how they will solve it is unknown, so just in case, make the same changes in both files so that once after the update everything does not fall.
Install and configure PHP-FPM
Install FPM and PHP library for working with DBMS:
apt-get install php5-fpm php5-mysqlnd Go to the configuration file /etc/php5/fpm/pool.d/www.conf and change the directive:
listen = 127.0.0.1:9000 To the following:
listen = /var/run/php5-fpm.sock In the same file we set the settings of the workers:
; pm = dynamic ; , , pm.max_spare_servers. pm.max_children = 10 ; FPM pm.start_servers = 1 ; ( ) pm.min_spare_servers = 1 ; ( , ) pm.max_spare_servers = 3 ; , , pm.max_requests = 500 Change several directives in /etc/php5/fpm/php.ini
upload_max_filesize = 10M post_max_size = 12M allow_url_fopen = Off post_max_size we set a little more than upload_max_filesize, because in addition to the file, there is other data in the request.
Here, by the allow_url_fopen directive, we prohibit the execution of scripts located remotely (by removing the possibility of exploiting the vulnerability of a remote inclusion).
And we say FPM to re-read the config:
service php5-fpm reload Now create a file that displays phpinfo () and access it in the browser, everything should work. Do not forget that it has already been cached in Varnish and if you change the configuration of PHP, it will not be updated in your browser. You can write a rule to skip this file in Varnish, or, for the duration of the tests, do not proxy Varnish, but directly backend on port 81.
Install and configure MariaDB
I chose this DBMS because of its better performance and ability to withstand heavy loads, while spending less RAM compared to MySQL, as well as its full compatibility with WordPress. Installation is very simple; a password will be requested for the root user.
apt-get install mariadb-server I use MyISAM as an engine for tables, because writing to a table is rarely done, and on reading MyISAM shows the best characteristics. I completely disabled support for InnoDB to free up RAM. Settings are stored in the /etc/mysql/my.cnf file. I will describe only those directives that I changed:
# key_buffer = 64M # query_cache_size = 32M # MyISAM default-storage-engine=MyISAM # InnoDB skip-innodb After saving the changes, restart the service:
service mysql restart WordPress Customization - Varnish HTTP Purge Plugin
Install the Varnish HTTP Purge plugin in the WP administration panel. Now when updating data to the changed pages, a PURGE request will be sent, clearing the cache in Varnish, and for visitors the data will always be updated.
Additional optimization
To optimize the client side with Varnish, we indicate to the browser the need to store static data in the local client cache. But if you're craving for even more optimization, go to the developers.google.com/speed/pagespeed/insights page and enter the URL of your site or even a specific page. You will be given a list of recommendations, as well as offer an archive with compressed versions of your css and js styles. Replace them on your website and get even greater download speed due to the reduced amount of data transferred, as well as the load on the server and the space occupied by these files in the cache.
What should I do with documents requested from third-party servers, such as fonts or the jquery library? You can transfer them to yourself, and here, by establishing a connection with only one server, the speed of loading pages increases, however, at the same time, the list of calls and the total load will increase. Which option to choose - decide for yourself, depending on the workload of your server and your laziness.
Total
For the most part gzip compression and caching in Varnish gave the greatest effect. The comments have already written a lot of additional optimization methods that I will certainly learn and implement as necessary. In the meantime, the optimization results are as follows:
Before
After
Full stress tests will hold later.
Source: webshake.ru/post/206
Source: https://habr.com/ru/post/278189/
All Articles