My "Smart Home" on the PLC and with the web interface. Part 2. Web interface
"Prelude"

In continuation of the previous story, I will talk about creating a display tool in my apartment (HMI, SCADA, whatever you want to call it).
At the moment I have not met SCADA – systems that met my requirements:
- the client part should work on any platform, and especially on a mobile platform;
- free system
- access to data from the PLC by OPC - technology.
Total searching options SCADA (with crack and without), I realized that the options are mostly clumsy or expensive. I decided to go a different way and this path is called “your crutch plus framework”. Then I dug Google - Node ModBus-clients, self-made PHP scripts, etc. And from what I chose CSWorks. Installed, configured, works and seems to work well + HTML5. The license is distributed "Free 999 variables, 1 session" and it suited me. And I settled on CSWorks.
Below, I tried to make a small instruction on how to set up CSWorks. Probably for industrial automation engineers, this instruction will be useful, since you can make sufficiently simple (and complex) projects through the web interface;
I will describe all my actions on the following equipment:
PC: Win 10, OPC Codesys v2, IIS 10
PLC: ABB AC500 PM554-Ethernet
"Installing, configuring the server application"
')
Preparing to install CSWorks:
- Install additional components (IIS and ASP) in the “Add or Remove Programs”,
see fig.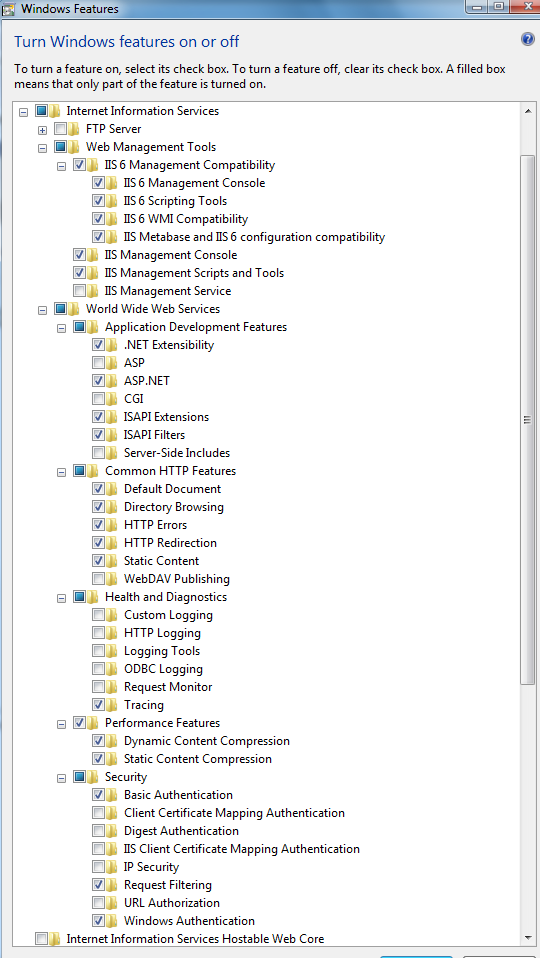
- Then we reboot and go to the IIS settings, check if the IIS server is on and ASP.NET is on
see fig.
- Make the default ASP.NET v4.0 Classic in DefaultAppPool
- if you have a 64 bit system do it like this
see fig.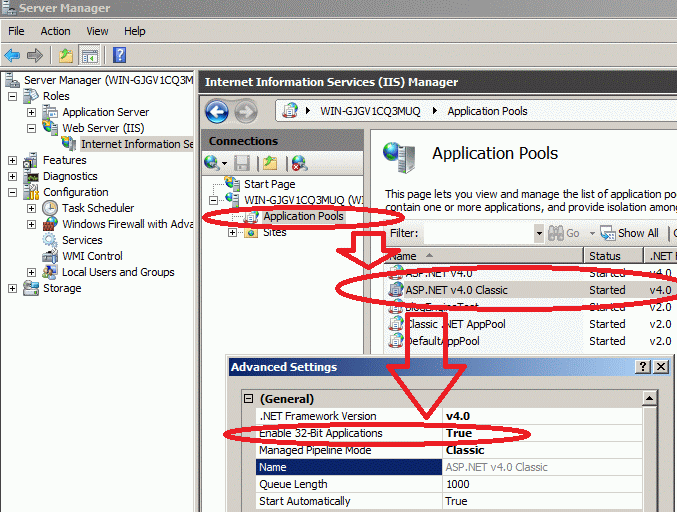
Installing the CSWorks Platform (hereinafter referred to as the CA)
- Go to the site CSWorks
- Selects the width of the system X86, X64, download. Everything should be without errors. Then we overload the system.
Customize components
- You need to configure DCOM for the Codesys v2 OPC server in the system (Google to help you). Overload and check its availability from outside.
- CSWorks you should appear in the services of Windows. Basically, I use LiveData, other CSWorks services can be disabled.
see fig.
Configuring CSWorks configuration
- Go to the folder C: \ Program Files \ CSWorks \ Framework \ Server (the path may be different for X86 and X64)
- We see a file called CSWorks.Server.LiveDataService.exe.config, open.
- Find the line
<opcLiveDataSources type="CSWorks.Server.DataSource.Opc.OpcLiveDataSource, CSWorks.Server.OpcProvider"> And we change the parameters of the CA for myself - my example
<opcLiveDataSources type="CSWorks.Server.DataSource.Opc.OpcLiveDataSource, CSWorks.Server.OpcProvider"> <opcLiveDataSource name="PLC" hostName="localhost" progId="CoDeSys.OPC.02" subscriptionUpdateRate="1000" resetTimeout="5"> <templates> <template name="AnalogAI" type="Double" readPath="PLC:($tagName)" canWrite="true" /> <template name="AnalogINT" type="Int16" readPath="PLC:($tagName)" canWrite="true" /> <template name="Bool" type="Boolean" readPath="PLC:($tagName)" canWrite="true" /> <template name="String" type="String" readPath="PLC:($tagName)" canWrite="true" /> </templates> </opcLiveDataSource> </opcLiveDataSources> What is there to change
- Setting up a binding to the server
<opcLiveDataSource name=" . " hostName=" IP " progId=" OPC " subscriptionUpdateRate="1000" resetTimeout="5"> - Lines of the declaration of data types, with their binding to the OPC server
<template name=" " type=" " readPath=" OPC" canWrite=" " /> That is, in the configuration of the CA, we indicate that it has a name, it is associated with the data type "such." For example, with data type int16 and with internal naming in javascript AnalogINT . We will register the variables ourselves later.
- Then we go to the folder C: \ Program Files \ CSWorks \ Web \ WebServices \ Rest and open the file web.config. Here you must specify the CA-y, to which OPC server to connect:
liveDataPartition name="partition1" primaryLiveDataServer="liveDataServer_1_primary" secondaryLiveDataServer=""> <dataSources> <dataSource name="PLC"/> </dataSources> As you can see, the dataSource name = "PLC" has a data source named PLC - this is the name we specified in the opcLiveDataSource name = "PLC".
- Similarly, we do in C: \ Program Files \ CSWorks \ Web \ WebServices \ Soap \ LiveData
<liveDataTopology> <liveDataPartitions> <liveDataPartition name="partition1" primaryLiveDataServer="liveDataServer_1_primary" secondaryLiveDataServer=""> <dataSources> <dataSource name="PLC"/> </dataSources> </liveDataPartition> </liveDataPartitions> The setup stage is finished, we reboot the OS. After the OS is loaded, we check that the CA service has started and it has initialized the OPC server and the data exchange is on.
We configure the web page, we connect scripts:
- We transfer the csworks.core.js script from the C: \ Program Files \ CSWorks \ Framework \ Client \ Html5 script to the IIS server folder. C: \ inetpub \ wwwroot \ JS (for convenience, you must create a folder for scripts such as JS and put them all there)
For the CA to work, you need to download and connect to the page the following scripts (any version):
a) jquery-2.1.1.js
b) knockout-2.3.0.min.js
- Create an HTML page (for ease of developing pages, install Subline ) with the name index.html with the text:
<!doctype html> <html> <head> <title> </title> <meta charset="UTF-8"> <xmlns="http://www.w3.org/2000/svg"> <xmlns:xlink="http://www.w3.org/1999/xlink"> <!— - --> <script type="text/javascript" src=" JS/jquery-2.1.1.js"></script> <script type="text/javascript" src=" JS/knockout-2.3.0.min.js "></script> <script type="text/javascript" src="JS/csworks.core.js"></script> <!— - --> <!— --> <script type="text/javascript" src="JS/PLC.js"></script> </head> <body> <!— , --> </body> </html> - Save the page and go to the declaration of variables. In the subline we create a script called PLC.js (you can call it the way you want to connect it). A simple example of 4 variables with different types will be presented below.
function dataManagerUpdateHandler(responseItems) { } function dataManagerErrorHandler(data, httpStatus) { } function MyViewModel() { // - this.AI_T_ULICA = new $.csworks_core.FloatDataItem("fddc58f7-a215-406c-8909-4bfe4728a9fc", "PLC", "AnalogAI", "tagName=.OUT_T_ULICASUN;", 1); this.setpoint_T_SPALNYA = new $.csworks_core.IntDataItem("57e71dd1-169b-4ece-917b-e5906c674522", "PLC", "AnalogINT", "tagName=.setpoint_T_SPALNAY;", 0); this.KM8_POL_TUALET = new $.csworks_core.BoolDataItem("a8cf572e-843d-400a-83a5-7171062ed96b", "PLC", "Bool", "tagName=.KM8_POL_TUALET;"); this.door_event1= new $.csworks_core.StringDataItem("2566ed88-c5af-40e1-ab6c-429c7402b5cf", "PLC", "String", "tagName=.door_event1;"); // - } var g_vm = new MyViewModel(); var g_dm = new $.csworks_core.LiveDataManager("8a93ccaa-1a4b-482a-92cc-f1ed590fb033", 250, 5000, "../CSWorksRest/LiveData/", dataManagerUpdateHandler, dataManagerErrorHandler); // - g_dm.addDataItem(g_vm.AI_T_ULICA); g_dm.addDataItem(g_vm. setpoint_T_SPALNYA); g_dm.addDataItem(g_vm. KM8_POL_TUALET); g_dm.addDataItem(g_vm. door_event1); // - ko.applyBindings(g_vm); g_dm.start(); 8a93ccaa-1a4b-482a-92cc-f1ed590fb033", function dataManagerUpdateHandler(responseItems) { } function dataManagerErrorHandler(data, httpStatus) { } function MyViewModel() { // - this.AI_T_ULICA = new $.csworks_core.FloatDataItem("fddc58f7-a215-406c-8909-4bfe4728a9fc", "PLC", "AnalogAI", "tagName=.OUT_T_ULICASUN;", 1); this.setpoint_T_SPALNYA = new $.csworks_core.IntDataItem("57e71dd1-169b-4ece-917b-e5906c674522", "PLC", "AnalogINT", "tagName=.setpoint_T_SPALNAY;", 0); this.KM8_POL_TUALET = new $.csworks_core.BoolDataItem("a8cf572e-843d-400a-83a5-7171062ed96b", "PLC", "Bool", "tagName=.KM8_POL_TUALET;"); this.door_event1= new $.csworks_core.StringDataItem("2566ed88-c5af-40e1-ab6c-429c7402b5cf", "PLC", "String", "tagName=.door_event1;"); // - } var g_vm = new MyViewModel(); var g_dm = new $.csworks_core.LiveDataManager("8a93ccaa-1a4b-482a-92cc-f1ed590fb033", 250, 5000, "../CSWorksRest/LiveData/", dataManagerUpdateHandler, dataManagerErrorHandler); // - g_dm.addDataItem(g_vm.AI_T_ULICA); g_dm.addDataItem(g_vm. setpoint_T_SPALNYA); g_dm.addDataItem(g_vm. KM8_POL_TUALET); g_dm.addDataItem(g_vm. door_event1); // - ko.applyBindings(g_vm); g_dm.start(); ); function dataManagerUpdateHandler(responseItems) { } function dataManagerErrorHandler(data, httpStatus) { } function MyViewModel() { // - this.AI_T_ULICA = new $.csworks_core.FloatDataItem("fddc58f7-a215-406c-8909-4bfe4728a9fc", "PLC", "AnalogAI", "tagName=.OUT_T_ULICASUN;", 1); this.setpoint_T_SPALNYA = new $.csworks_core.IntDataItem("57e71dd1-169b-4ece-917b-e5906c674522", "PLC", "AnalogINT", "tagName=.setpoint_T_SPALNAY;", 0); this.KM8_POL_TUALET = new $.csworks_core.BoolDataItem("a8cf572e-843d-400a-83a5-7171062ed96b", "PLC", "Bool", "tagName=.KM8_POL_TUALET;"); this.door_event1= new $.csworks_core.StringDataItem("2566ed88-c5af-40e1-ab6c-429c7402b5cf", "PLC", "String", "tagName=.door_event1;"); // - } var g_vm = new MyViewModel(); var g_dm = new $.csworks_core.LiveDataManager("8a93ccaa-1a4b-482a-92cc-f1ed590fb033", 250, 5000, "../CSWorksRest/LiveData/", dataManagerUpdateHandler, dataManagerErrorHandler); // - g_dm.addDataItem(g_vm.AI_T_ULICA); g_dm.addDataItem(g_vm. setpoint_T_SPALNYA); g_dm.addDataItem(g_vm. KM8_POL_TUALET); g_dm.addDataItem(g_vm. door_event1); // - ko.applyBindings(g_vm); g_dm.start(); Here we save the script and begin to disassemble xy from xy here:
- Declare variables in the string
this.”1 » = new $.csworks_core.” ”DataItem("” GUID ”", " ", " ", "tagName=” OPC , ”;", “ - 0,1101”); GUID - you need to generate your own variable for each variable, but the server GUID is not changed.
-Below this variable is entered into the knockout model
g_dm.addDataItem(g_vm.” 1 ”); “Now everything is ready, we return to the index.html template and below I will give a few examples of how to work with variables from HTML and javascript.
We work with variables from the web server
Make an indication of the state of the lamp
1) Using SVG graphics (Google to help you with this) use a rectangle
In the body template add
<svg> <rect y="100" x="100" data-bind="attr: { fill:( KM8_POL_TUALET.value() > '0') ? '#dee2e2' : '#33FF99'}" height="200px" width="200px" ></rect> </svg> As you can see here jquery is used to control the fill property - fill for rectangles. And the condition is used - if the value is greater than 0, then these properties should be assigned a value: The color is such, if not, then another. Save, check
2) The picture displays the state of the variable.
<img width="100" height="100" data-bind="attr: { src:( KM8_POL_TUALET.value() > '0') ? 'img/pol_ico_0.png' :'img/pol_ico_1.png'}" style='top: 495px; left: 659px; opacity: 0.9' > 3) Display the temperature, analog value
<a href="#">- : <span data-bind="text: AI_T_ULICA.value()"></span> C° </a> <br> 4) Display the text variable
:<span data-bind="text: door_event1.value" y="20" x="25"> </span> 5) Here is an example of a button in javascript:
$("#toggle_bms_zal_lustra").click(function () { g_vm.bms_zal_lustra.writeValue(!g_vm.bms_zal_lustra.value()); setTimeout("g_vm.bms_zal_lustra.writeValue(0);", 500); }) <div id="toggle_bms_zal_lustra" style="padding:11px 32px; border:solid 3px #004F72; border-radius:4px; color:#E5FFFF; "> </div> Basic rules to work with variables:
- if you use a variable from HTML, then access it directly door_event1
- if you are accessing from javascript, then g_vm.door_event1
- writing to a variable is writing .writeValue (VALUE) , if we read the value of a variable, then value () .
Recommendations:
- To analyze page code or search for errors in scripts, use debugger for browsers, for example, Firebug for Firefox.
- normal operation of the cs in debager looks like this:

Total
This freymwork has been working for me for more than 1.5 years on different systems Win 7, 8, 10 and in principle there are no comments (the only comment is the documentation that is very difficult to understand)). The manufacturer supports development for Silverlight, support for archive servers, alarms, but this did not work for me.
At the moment, I did not stop using this freeware as part of my apartment project and tried to use it as a support for SCADA - a system integrated at our last facility (shopping center). The result of all the work is the rapid creation of additional jobs (without management capabilities) for the management of the shopping center.
You can see a screenshot of the web page of the shopping center.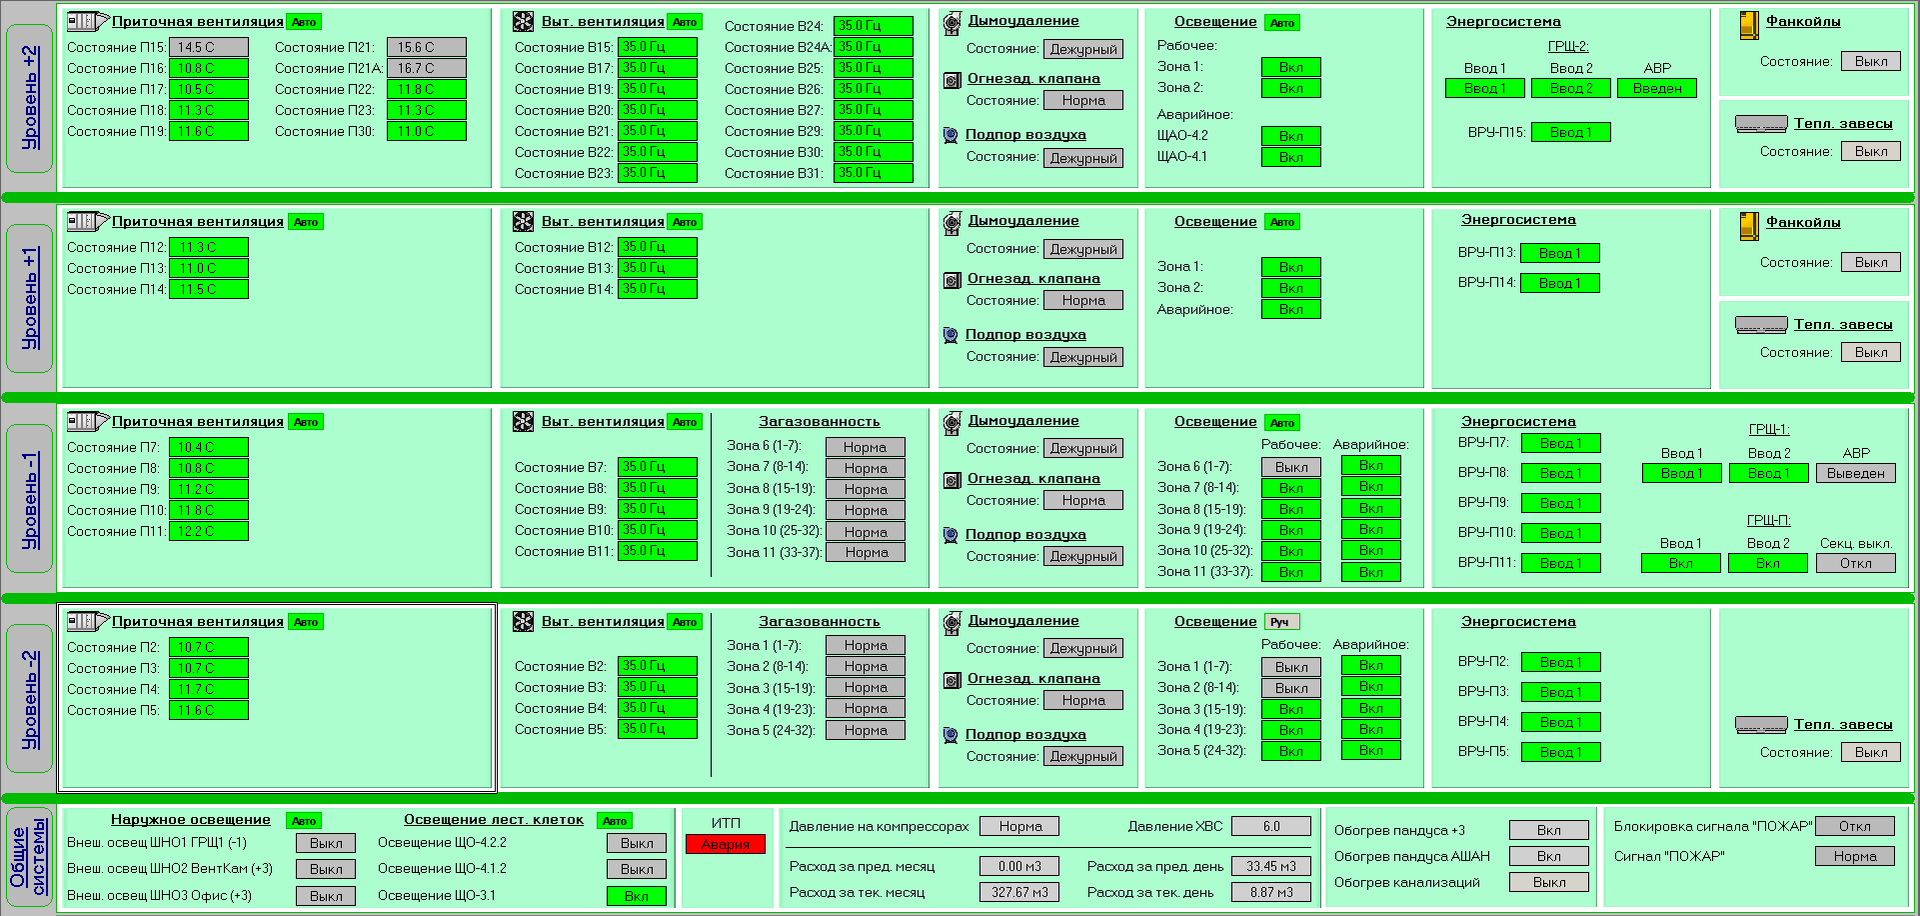
Source: https://habr.com/ru/post/278111/
All Articles