Testing plugins for Apache Cordova
I'm going to talk about one of the topics related to Apache Cordova , which is practically not covered in runet - how to test your plug-in for Apache Cordova.
In this article, we will test only JavaScript code, since such tests are fairly easy to implement and will often be sufficient. Of course, as a rule, plug-ins also contain native code for each of the supported platforms, which would also be nice to cover with unit-tests, but for now we will leave this question behind the scenes, since this aspect of testing plug-ins is practically not common and there is no toolkit for such testing. In any case, JavaScript code, as a rule, causes native logic, and therefore our tests will indirectly test and implement for each platform.
So, how is testing plugins for Apache Cordova. First of all, the test architecture consists of two parts:
In the case of plugins, the BDD framework Jasmine, which is quite popular in the JavaScript world, is used as a library. Accordingly, future tests may look something like this (the excerpt is from tests for
')
If everything is quite clear and understandable with the code of tests, in order to run them, it is necessary to do additional manipulations.
The easiest way here is to use the
Here is how it looks in work:

In addition, the
The plugin's README describes how it works and how to add tests in order for the
which will be executed when the module is loaded. The name of the functions speaks for itself.
So, after everything is prepared for writing, the plug-in framework should look something like this:

This can be done manually in your
to generate a plug-in framework and edit files manually.
We now turn directly to the writing of tests. Those who are already familiar with BDD and jasmine may skip this section, because nothing new will be here, and move on to the next.
The examples later in this article are based on a simple plugin written in 10 minutes for demonstration purposes. The plugin code can be found on github .
So, first create a test plug framework as described in the previous section and start filling it with tests.
That's enough for now. Now create a test application and run our tests. To do this, execute the following commands in the folder with the tested plugin:
and edit the
Now run the application:
and see the plugin page. Click "Autotests" and almost immediately see the jasmine report on the successful completion of tests.

Now, understanding how the
With manual tests everything works a little differently.
For example, add one manual test:
Now we need to rebuild the application with the updated plugin. To do this, simply remove the plugin from the application and try to start the application.
The
Rebuilding the application in order to run the tests again is a rather routine exercise, which of course you want to do automatically. Instead of inventing your own bike, we use the ready-made solution -
To start using
and add a couple of commands to run tests for iOS and Android.
Everything. Now, instead of assembling the application manually, edit its
And after some time we get the test results on the console:
Now it becomes very easy to run tests on a CI machine. Take for example the Travis CI and Circle CI:
Then we go to the control panel of the corresponding service, turn on the integration with GitHub and enjoy:

So, now we have a plug-in covered with automatic tests, we are able to create and run a test application in just one or two lines in the terminal, and we know the status of the code that is updated per-commit.
Finally, once again I will provide a link to the demo plugin: https://github.com/vladimir-kotikov/my-awesome-plugin . You can see the stages of adding tests by the commit history.
Have a good test!
In this article, we will test only JavaScript code, since such tests are fairly easy to implement and will often be sufficient. Of course, as a rule, plug-ins also contain native code for each of the supported platforms, which would also be nice to cover with unit-tests, but for now we will leave this question behind the scenes, since this aspect of testing plug-ins is practically not common and there is no toolkit for such testing. In any case, JavaScript code, as a rule, causes native logic, and therefore our tests will indirectly test and implement for each platform.
Some theory
So, how is testing plugins for Apache Cordova. First of all, the test architecture consists of two parts:
- Actually tests using this or that library for testing.
- The so-called test harness, or part of the code responsible for running the tests and generating test results.
In the case of plugins, the BDD framework Jasmine, which is quite popular in the JavaScript world, is used as a library. Accordingly, future tests may look something like this (the excerpt is from tests for
cordova-plugin-device , one of the plug-ins supported by the Apache Cordova community):')
it("should exist", function() { expect(window.device).toBeDefined(); }); it("should contain a platform specification that is a string", function() { expect(window.device.platform).toBeDefined(); expect((new String(window.device.platform)).length > 0).toBe(true); }); it("should contain a version specification that is a string", function() { expect(window.device.version).toBeDefined(); expect((new String(window.device.version)).length > 0).toBe(true); }); If everything is quite clear and understandable with the code of tests, in order to run them, it is necessary to do additional manipulations.
The easiest way here is to use the
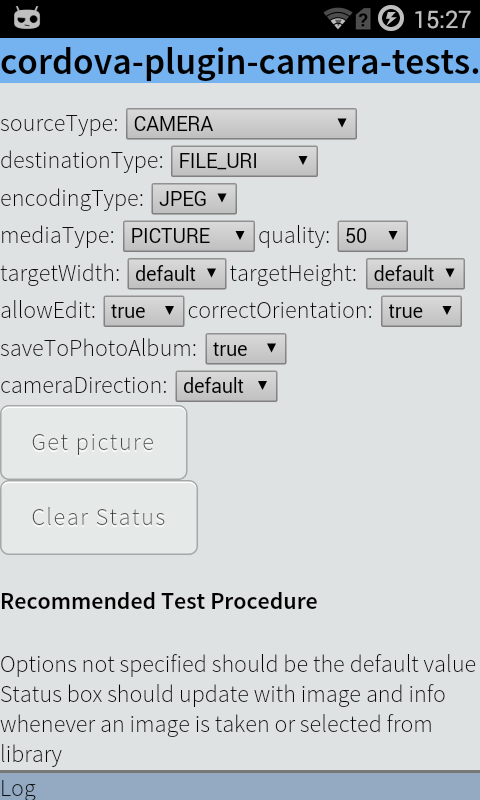
cordova-plugin-test-framework - another plug-in that adds an interface to the application to run tests as a separate page with controls to start, stop and select tests to run, and also loads all announced tests while the application is running and running them.Here is how it looks in work:
In addition, the
test-framework provides the ability to quickly create so-called. manual tests - create several buttons on a separate page with a description of the actions associated with clicking on each button and the expected behavior of the application.The plugin's README describes how it works and how to add tests in order for the
test-framework pick them up, but it contains some inaccuracies, so I’ll briefly summarize the main points here.- To declare the tests they need to be allocated in a separate plugin. The location of the plugin is not critical, but it is often located inside the subfolder
/testsmain plugin. - The tests themselves must be in a module with a name ending in
tests, (for example<js-module src="tests/tests.js" name="my.plugin.tests">) - The module with tests should export two functions:
exports.defineAutoTests = function() { }; exports.defineManualTests = function(contentEl, createActionButton) {}; which will be executed when the module is loaded. The name of the functions speaks for itself.
- It would also be useful to add the
cordova-plugin-test-framework- and perhaps also the plugin to be tested - as a dependency for your tests, so that they are installed automatically along with the tests. This is done by adding the following elements totests/plugin.xml:
<dependency id="cordova-plugin-test-framework"/> <dependency id="my-awesome-plugin" url=".." /> Create a plug-in framework
So, after everything is prepared for writing, the plug-in framework should look something like this:
plugin.xml will look like this: <plugin xmlns="http://apache.org/cordova/ns/plugins/1.0" id="my-awesome-tests" version="0.0.1"> <name>My Awesome Plugin Tests</name> <dependency id="cordova-plugin-test-framework" /> <dependency id="my-awesome-plugin" url=".." /> <js-module src="tests.js" name="tests" /> </plugin> tests.js : exports.defineAutoTests = function() { // To be done }; exports.defineManualTests = function(content, createActionButton) { // To be done }; This can be done manually in your
$EDITOR , or you can use plugman , another tool for working with Apache Cordova plugins: npm install -g plugman plugman create --name "My awesome plugin tests" --plugin_id my-awesome-plugin-tests --plugin_version 0.0.1 --path=./tests to generate a plug-in framework and edit files manually.
We write automatic tests
We now turn directly to the writing of tests. Those who are already familiar with BDD and jasmine may skip this section, because nothing new will be here, and move on to the next.
The examples later in this article are based on a simple plugin written in 10 minutes for demonstration purposes. The plugin code can be found on github .
So, first create a test plug framework as described in the previous section and start filling it with tests.
exports.defineAutoTests = function() { describe('plugin', function() { it('should be exposed as cordova.plugins.MyAwesomePlugin object', function() { expect(cordova.plugins.MyAwesomePlugin).toBeDefined(); expect(cordova.require('my-awesome-plugin.MyAwesomePlugin')) .toBe(cordova.plugins.MyAwesomePlugin); }); it('should have corresponding methods defined', function() { ['coolMethod', 'logCoolMessage'].forEach(function(methodName) { expect(cordova.plugins.MyAwesomePlugin[methodName]).toBeDefined(); expect(cordova.plugins.MyAwesomePlugin[methodName]).toEqual(jasmine.any(Function)); }); }); }); }; That's enough for now. Now create a test application and run our tests. To do this, execute the following commands in the folder with the tested plugin:
cordova create my-sample-app && cd my-sample-app cordova platform add android --save cordova plugin add .. ../tests --save and edit the
<content src="index.html" /> element in the config.xml file inside our test application — change the value to cdvtests/index.html . It is necessary that instead of the main start page when you start the application, the plugin page opens and loads the test-framework .Now run the application:
cordova run and see the plugin page. Click "Autotests" and almost immediately see the jasmine report on the successful completion of tests.
Add manual tests
Now, understanding how the
test-framework works, you can easily write any number of automated tests for your plugin.With manual tests everything works a little differently.
test-framework assumes that each test has its own button in the interface and a field common to all tests in which you can display your results. These are the createActionButton and content parameters respectively for the defineManualTests function.createActionButton is a function that creates a button, adds it to the DOM inside the specified element, and performs the specified function when the button is clicked. Function parameters look like this: `function createActionButton(' ', _, '_') {...}` content is a container on the page, inside which you can put information about the test and describe the verification process for the tester.For example, add one manual test:
exports.defineManualTests = function(contentEl, createActionButton) { var show_preferences_test = '<h3>Press "Open preferences" button to show preferences pane</h3>' + '<div id="open_prefs"></div>' + 'Expected result: A "Preferences" box should appear'; contentEl.innerHTML = '<div id="info"></div>' + show_preferences_test; var log = document.getElementById('info'); var logMessage = function (message) { var logLine = document.createElement('div'); logLine.innerHTML = message; log.appendChild(logLine); }; createActionButton('Open preferences', function() { log.innerHTML = ''; // cleanup log area plugins.appPreferences.show(function(result) { logMessage(result); }, function(error) { logMessage(error); }); }, "open_prefs"); }; Now we need to rebuild the application with the updated plugin. To do this, simply remove the plugin from the application and try to start the application.
cordova plugin rm my-awesome-plugin-tests && cordova run The
run command before building the application will restore the deleted plugin from its original location along with the updated files, and all changes will be included in the application.We run tests on CI
Rebuilding the application in order to run the tests again is a rather routine exercise, which of course you want to do automatically. Instead of inventing your own bike, we use the ready-made solution -
cordova-paramedic . This application is written specifically to automate the launch of tests for plug-ins including. and for CI. Here is what it does:- creates a new application in a temporary folder
- adds to the application are required to run tests plugins
- changes the application start page
- starts a local server to communicate with the application and process the results
- displays the result of running the tests on the console
- completes with the appropriate code depending on whether all the tests passed successfully or not.
To start using
paramedic , install it and add our plugin to the package.json : npm install cordova-paramedic --save-dev and add a couple of commands to run tests for iOS and Android.
"scripts": { ... "test-android": "cordova-paramedic --platform android --plugin ./ --verbose", "test-ios": "cordova-paramedic --platform ios --plugin ./ --verbose" }, Everything. Now, instead of assembling the application manually, edit its
config.xml , run it and then watch how the points and crosses of the passed and fallen tests appear, simply run the corresponding script, for example for Android: npm run test-android And after some time we get the test results on the console:
... Results: ran 2 specs with 0 failures result code is : 0 {"mobilespec":{"specs":2,"failures":0,"results":[]},"platform":"Desktop","version":"5.1.0","timestamp":1455530481,"model":"none"} Now it becomes very easy to run tests on a CI machine. Take for example the Travis CI and Circle CI:
.travis.yml language: objective-c install: - npm install script: - npm run test-ios circle.yml test: pre: - emulator -avd circleci-android21 -no-audio -no-window: background: true parallel: true - circle-android wait-for-boot override: - npm run test-android Then we go to the control panel of the corresponding service, turn on the integration with GitHub and enjoy:
Conclusion
So, now we have a plug-in covered with automatic tests, we are able to create and run a test application in just one or two lines in the terminal, and we know the status of the code that is updated per-commit.
Finally, once again I will provide a link to the demo plugin: https://github.com/vladimir-kotikov/my-awesome-plugin . You can see the stages of adding tests by the commit history.
Have a good test!
Source: https://habr.com/ru/post/277615/
All Articles