How we automate testing with release management - Part 1
In November 2015, we opened access to the Release Management version for public testing in Visual Studio Team Services. The materials on this blog will help you quickly start using the full range of RM capabilities. The MSDN documentation available here will allow you to deeply understand the scripts and concepts of RM.
You can use the RM service in two scenarios: to embed code in several used environments and to perform tests during product development. In this post, I’ll talk about the second scenario, namely, how we (Microsoft’s RM development team) automate testing using RM. For the past seven months, we have been using RM for testing, for which I thank my colleague Lova.
I have divided this article into two parts. The first part is a general description of our experience with the integrated test automation process. In the second part, we will discuss some design solutions, problems that we encountered in the process of testing automation, and ways to solve these problems.
')
Similarly, the RM group uses the services of SU0 in their daily work. We are developing (we supplement the code and make corrections) in the functional branch of TF Git called features / rmmaster, compile the code using the Build service and test it using the RM service.
The general purpose of our technical system is to simultaneously test each test on multiple configurations in order to detect regressions as early as possible in the development cycle. At the moment there are three stages of debugging the developed code:

We associate this assembly definition with the release definition set using the release definition trigger property. In other words, each release definition highlighted below is automatically activated at the end of the VSO.RM.CI assembly.
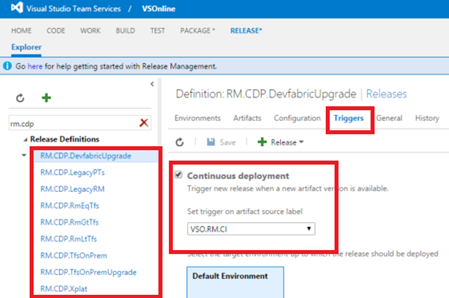
(Note that each release definition has a single environment. We were forced to use nine release definitions, because RM does not support parallel execution of environments. Such a function will appear soon. When this happens, we will combine nine release definitions into one release definition with nine concurrently running environments that improve build traceability).
The general idea is that each release definition loads the binaries needed to test it, sets up the test environment, deletes the old and new binaries (dependent services and test DLLs), runs the tests using the VsTest task (which also publishes the results , which simplifies the preparation of reports and subsequent analysis) and once again clears the environment. Later I will take a closer look at the release detection device in this blog.
The process of processing the code and publishing the test is schematically as follows:

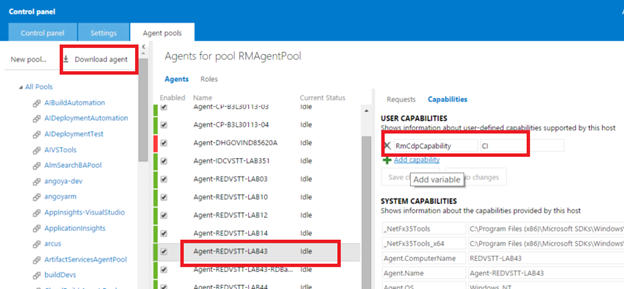
Each test had its own requirements, which did not allow the use of a hosted agent pool. For this reason, we created a single agent pool called RMAgentPool. We prepared separate computers for each RM.CDP. * Release definition, installed the build / release agent for each of them, and added these computers to the RMAgentPool pool.
(To do this, we downloaded the agent to each test computer using the “Download Agent” link, highlighted in the figure below). We unpacked the zip file of the agent and configured it by specifying our account in the URL for Team Foundation Server parameter (the URL for Team Foundation Server), for example: https://OurAccount.visualstudio.com ).
Each computer was given a new user experience called "RmCdpCapability". The value of this parameter determined the purpose of the computer: for example, on computers prepared for continuous integration assemblies, the parameter RmCdpCapability = CI was used.
Another example: For the agent on which the definition of the release RM.CDP.TfsOnPrem was performed, the parameter “RmCdpCapability = TfsOnPrem” was used.

The release definitions then used the RmCdpCapability parameter as a requirement for the tests to be performed on suitable agents.
Note that VSTS is a collection of several micro-services that are developed using a single Sprint model (all groups work in the same three-week cycle), but each group is independently deployed. RM is one of these microservices and depends on other microservices, including SPS and TFS.
A brief description of the tests we perform for RM TWA:

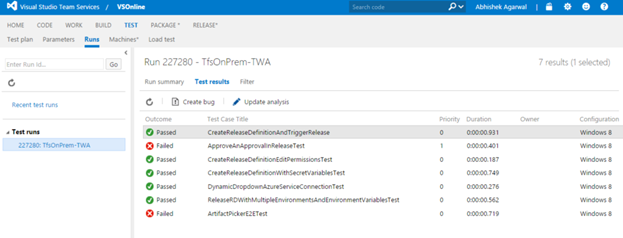
Then we go to the Test Results section of the Release Summary page and see that after this test, two user interface tests began to fail. Clicking on the highlighted link to the test, we get to the Test section:

The Test Results subtab gives us valuable background information for detailed problem analysis:
Test logs are available in the Run summary sub-tab.
We can get more detailed information about the fixations of this release in order to determine their possible connection with the regression using the Commits tab of the Release Summary page. For example, the screen shot below shows that some user interface changes in this test could have caused two failed tests.

(In the next few months, this feature will become more integrated with the Release Summary page.
Now you have an idea of how the RM development team uses RM to automate testing. We hope that our experience will give you ideas on how to automate the testing process.
In the second part of this article, we will discuss some design solutions, the problems that we encountered in the process of organizing the management of releases and ways to solve these problems.
You can use the RM service in two scenarios: to embed code in several used environments and to perform tests during product development. In this post, I’ll talk about the second scenario, namely, how we (Microsoft’s RM development team) automate testing using RM. For the past seven months, we have been using RM for testing, for which I thank my colleague Lova.
I have divided this article into two parts. The first part is a general description of our experience with the integrated test automation process. In the second part, we will discuss some design solutions, problems that we encountered in the process of testing automation, and ways to solve these problems.
Overview and General Description
VSTS consists of several scale units (SU) that provide services such as version control, build, release management, work item tracking, and others. All groups involved in the development and using VSTS tools use SU0 in their daily work. Thus, SU0 is a “working version”. As a rule, groups first deploy new code in SU0 and transfer it to other scaling units only after experimenting with it for some time.')
Similarly, the RM group uses the services of SU0 in their daily work. We are developing (we supplement the code and make corrections) in the functional branch of TF Git called features / rmmaster, compile the code using the Build service and test it using the RM service.
The general purpose of our technical system is to simultaneously test each test on multiple configurations in order to detect regressions as early as possible in the development cycle. At the moment there are three stages of debugging the developed code:
- Pre-review stage or requests to incorporate changes : At this stage, we perform mainly modular and some complex tests in order to guarantee the correct operation of the basic functions in the features / rmmaster branch.
- Note that this step is not performed if checks are enabled on the git branch.
- Continuous Integration (CI) phase: At this stage, the CI assembly is launched immediately after verification. For this assembly, we once again perform unit tests and make sure that parallel tests carried out did not lead to errors, and then publish the artifacts that were used by the RM group in test automation.
- Test automation phase : It starts at the moment of the end of the assembly and includes a set of concurrently launched Release Definitions (RD). Each release definition tests a specific scenario; output definitions collectively cover the entire product. I will pay most attention to this stage in this publication.
Configure "continuous automation pipeline"
The name of our continuous integration CI assembly is VSO.RM.CI. The assembly publishes a single artifact called “drop”, which contains all the binaries created as a result of its execution.We associate this assembly definition with the release definition set using the release definition trigger property. In other words, each release definition highlighted below is automatically activated at the end of the VSO.RM.CI assembly.
(Note that each release definition has a single environment. We were forced to use nine release definitions, because RM does not support parallel execution of environments. Such a function will appear soon. When this happens, we will combine nine release definitions into one release definition with nine concurrently running environments that improve build traceability).
The general idea is that each release definition loads the binaries needed to test it, sets up the test environment, deletes the old and new binaries (dependent services and test DLLs), runs the tests using the VsTest task (which also publishes the results , which simplifies the preparation of reports and subsequent analysis) and once again clears the environment. Later I will take a closer look at the release detection device in this blog.
The process of processing the code and publishing the test is schematically as follows:
Agent Pool Configuration
In order to proceed with the tasks, you must first configure the build / release agent for our CI continuous integration and release definitions. Typically, on some servers, tasks are first run in the assembly / release agent pool to deploy RM / SPS / TFS services, and on other servers, tests are performed for these tasks. In this case, we decided to deploy services on the agent's computer in order to simultaneously use several instances of the same test.Each test had its own requirements, which did not allow the use of a hosted agent pool. For this reason, we created a single agent pool called RMAgentPool. We prepared separate computers for each RM.CDP. * Release definition, installed the build / release agent for each of them, and added these computers to the RMAgentPool pool.
(To do this, we downloaded the agent to each test computer using the “Download Agent” link, highlighted in the figure below). We unpacked the zip file of the agent and configured it by specifying our account in the URL for Team Foundation Server parameter (the URL for Team Foundation Server), for example: https://OurAccount.visualstudio.com ).
Each computer was given a new user experience called "RmCdpCapability". The value of this parameter determined the purpose of the computer: for example, on computers prepared for continuous integration assemblies, the parameter RmCdpCapability = CI was used.
Another example: For the agent on which the definition of the release RM.CDP.TfsOnPrem was performed, the parameter “RmCdpCapability = TfsOnPrem” was used.
The release definitions then used the RmCdpCapability parameter as a requirement for the tests to be performed on suitable agents.
Review of RM.CDP. * Release definitions
Terminology note: RM based on the web client is also called Team Web Access (TWA)- The RM TWA service in VSTS is called RM Online (or RMO)
- The RM TWA service in the local TFS version control system is called RM on-prem (this service has not yet been released, but we are doing everything possible to make the release happen as soon as possible)
Note that VSTS is a collection of several micro-services that are developed using a single Sprint model (all groups work in the same three-week cycle), but each group is independently deployed. RM is one of these microservices and depends on other microservices, including SPS and TFS.
A brief description of the tests we perform for RM TWA:
- Tests for RMO:
- RM.CDP.RmEqTfs: Performs complex tests (e2e) based on the API for RMO when the release versions of the RM sprint and the dependent services (SPS, TFS) are the same. For example, RM, SPS and FTS are in the S92 sprint.
- RM.CDP.RmGtTfs: Performs complex tests (e2e) for the RMO release version when, in the scaling unit, the release version of the RM is ahead of the dependent services (SPS, TFS). For example, RM is in S92, and SPS / TFS is in S91.
- RM.CDP.RmLtTfs: Performs complex tests (e2e) for the release version of RMO when, in the scaling unit, the release version of RM lags behind the dependent services (SPS, TFS). For example, RM is in S91, and SPS / TFS is in S92.
The above test matrix allows you to deploy RMO in scaling units regardless of whether the dependent SPS / TFS services are deployed (if these services do not have dependencies on the new function; in this case, the RmGtTfs test suite will fail, at least we hope so) . - RM on-prem tests:
- RM.CDP.TfsOnPrem: performs RM on-prem tests based on both the API and the user interface.
- Update Tests
- RM.CDP.DevFabricUpgrade: tests the upgrade script for RMO (for example, from S91 to S92).
- RM.CDP.OnPremUpgrade: tests the upgrade script RM on-prem.
- Test x-plat RM, i.e. RM agent runs on Linux / iOS:
- RM.CDP.XPlat
Development of a release definition for RM.CDP. *
I will take a closer look at the definition of the release RM.CDP.TfsOnPrem, since it creates the canonical pattern used by other release definitions.- The release definition is configured to run on a suitable agent , as shown in the screenshot below: RM.CDP.TfsOnPrem -> Edit -> Environment -> ... -> Agent Options -> Options tab.
- The release definition then skips the artifact download (Skips Artifact Download) :

Downloading the artifact is skipped because our continuous integration CI build publishes a single large artifact called “drop” with a size of several GB, while all tests need different subsets of files.
(Currently, RM does not allow to easily download a subset of artifacts published by the assembly. As soon as this opportunity arises, we will do two things: (1) instead of one large drop artifact, we will start publishing smaller TfsDrop artifacts in the continuous integration assembly, "RmDrop", "SpsDrop", etc. (2) will download those artifacts that are necessary to determine the release of RM.CDP. *). - Each of the release definitions downloads a set of standard files (including the vssbinfetch.exe program, which can download specific fragments of an assembly) by executing the downloadArtifacts.ps1 file, available on the \\ file resource. The release definition then downloads the required binaries from the build for its test script using the vssbinfetch task we created, which calls the vssbinfetch.exe program. For example, RM.CDP.RmEqTfs downloads binaries for SPS, TFS, and RMO services, and RM.CDP.TfsOnPrem for TFS on-prem. These two tasks are highlighted below. The release definition cleans the computer and deletes old binaries.

- The release definition then deploys the necessary services and test dll libraries on the computer. For example, “tfat” is an internal tool that installs TFS on-prem on a computer.

- At the end, the release definition sets up the test environment file and invokes the Visual Studio Test task (or the VsTest task, which we prefer to use :)). This leads to the publication of test results called "TfsOnPrem".

- As a rule, the release definition is completed after the execution of the “Pause agent on test failure” task and cleaning, if necessary. As a rule, the “Pause” task is disabled, and I will talk more about this in the next blog post.
Analysis of test results
As developers make changes, we can easily determine whose changes caused the crashes. For example, in the screenshot below, testing began to fail after building VSO.RM.CI_rmmaster_20151231.5. Double-clicking on the selected release opens the Release Summary page:Then we go to the Test Results section of the Release Summary page and see that after this test, two user interface tests began to fail. Clicking on the highlighted link to the test, we get to the Test section:
The Test Results subtab gives us valuable background information for detailed problem analysis:
Test logs are available in the Run summary sub-tab.
We can get more detailed information about the fixations of this release in order to determine their possible connection with the regression using the Commits tab of the Release Summary page. For example, the screen shot below shows that some user interface changes in this test could have caused two failed tests.
Benefits of testing with RM
Testing with RM gives us the following benefits:- We quickly check the build due to the parallel execution of all test cases.
- We can detect the slowest release definitions and add additional agents to run test cases, which speeds up parallel processing. For example, we have two computers for building continuous integration (“RmCdpCapability = CI”), and we plan to add another one to them for RM.CDP.RmEqTfs, since its execution lasts longer than the others.
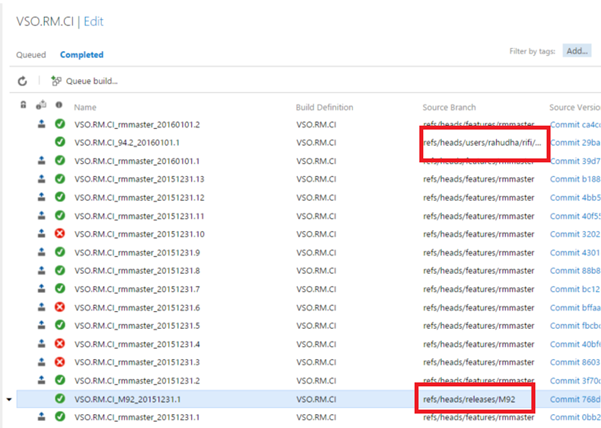
- This setup makes it easy to test different branches. Since continuous integration is configured on a branch of our function (features / rmmaster), we can just as easily put the assembly in a queue from the release branch, for example, releases / M92, as shown in the screenshot below. At the end of the build, the same release definitions RM.CDP. * Will be activated to handle the binary code from this branch of the release.
- The flexible work with branches can be expanded in the following scenario: testing the code before testing it can be tedious for developers (as a rule, developers perform it when they are going to make a large number of changes), for example, in the branch selected below / users / rahudha / rifi. The main idea is that developers can solve the same problem by reusing group resources without setting up a test infrastructure in their development environments.
- We can perform the same tests in the production environment as in the automated testing environment: Since we use RMO for deployment to the production environment (this is how we deploy RMO using RMO), we can test the deployment using the same test tasks.
- Since all test suites are applied to the same binary code set, we can easily answer the question: “What is the build quality?” As a rule, we want to know about the build quality before we deploy it in a production environment. The screen shot below shows a simple query to determine build quality.
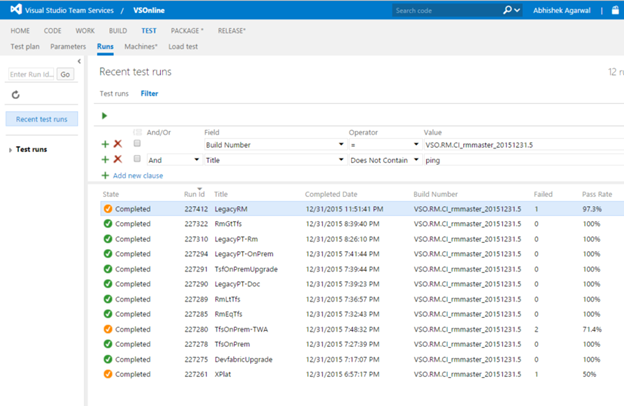
(In the next few months, this feature will become more integrated with the Release Summary page.
Conclusion
Initially, we used RMO when testing development processes only to understand its capabilities. Over time, we concluded that the efficiency of RMO is significantly higher than that of the test infrastructure we used earlier. Developers love the fact that they can test major changes without time-consuming customization of the local test environment.Now you have an idea of how the RM development team uses RM to automate testing. We hope that our experience will give you ideas on how to automate the testing process.
In the second part of this article, we will discuss some design solutions, the problems that we encountered in the process of organizing the management of releases and ways to solve these problems.
Source: https://habr.com/ru/post/277601/
All Articles