Windows 10 application with data in the cloud using Azure Mobile Apps
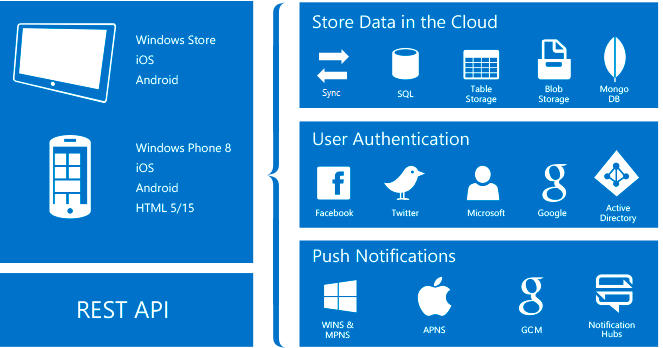
A guide on how to create a web service with a cloud database and a mobile application with access to this data using a simple configuration and a few lines of code. I will describe how to create a Windows 10 application, although the service allows you to create applications for other popular platforms. The manual will be of particular interest to students, as more recently, owners of a Microsoft Azure student subscription for DreamSpark can use the Mobile Apps service for free.
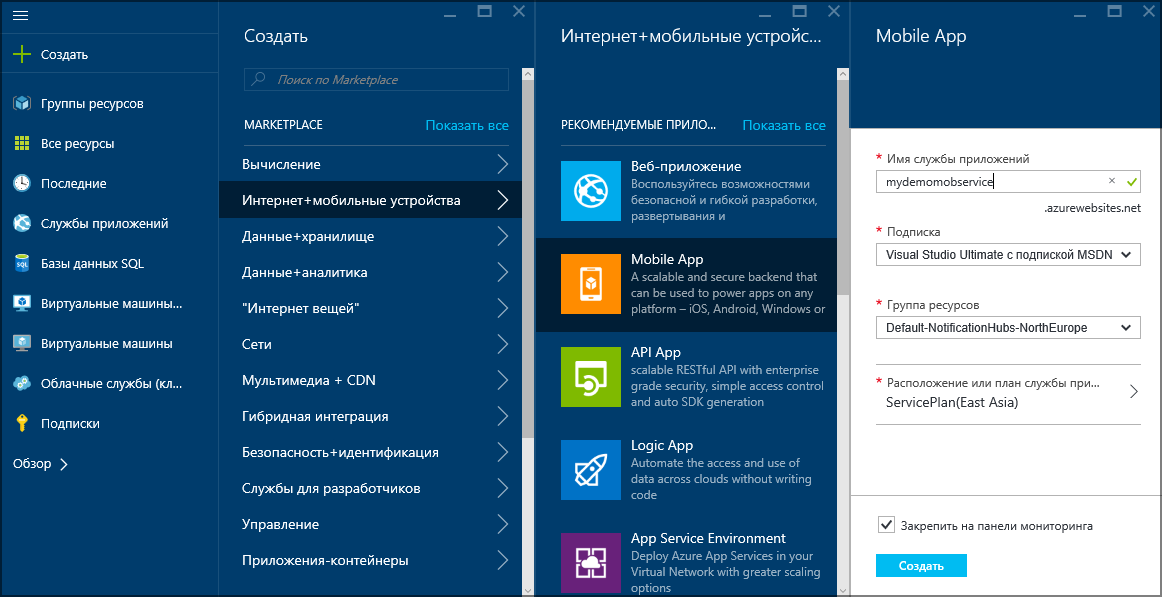
Go to portal.azure.com
And create Mobile App (mobile app)
The application takes a few minutes.
')

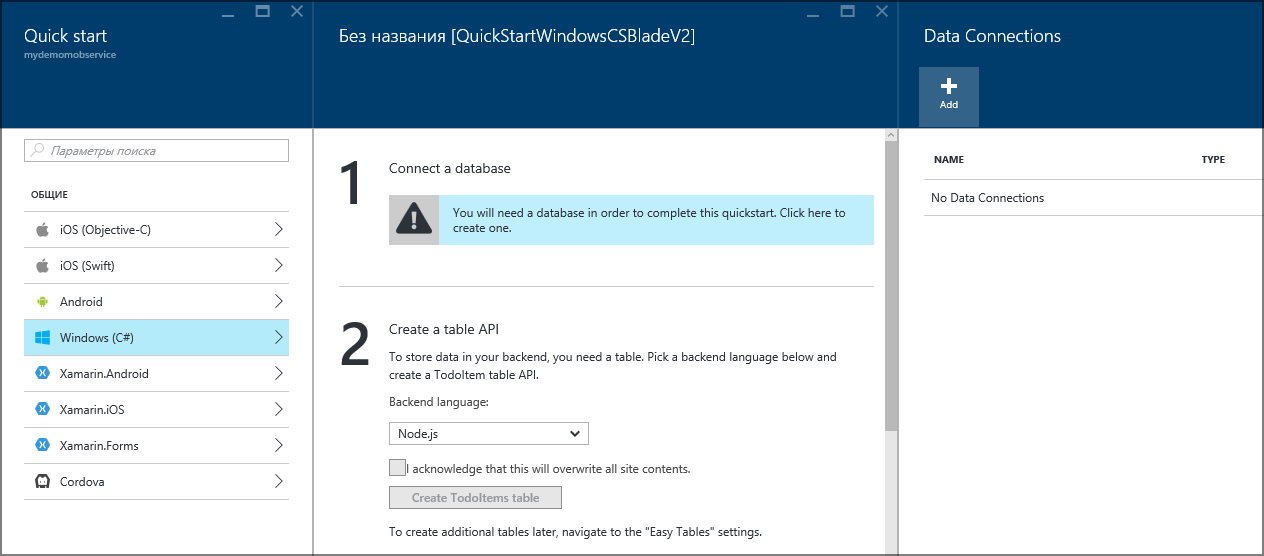
After the deployment is complete, we can begin to configure the application.

As you can see, there is an opportunity to create applications not only for different platforms, but also in different languages.
Since we have not created a database connection, we need to create it
Create a new database and a new server

Then we set the name of our connection string and the user name under which the input will be made.
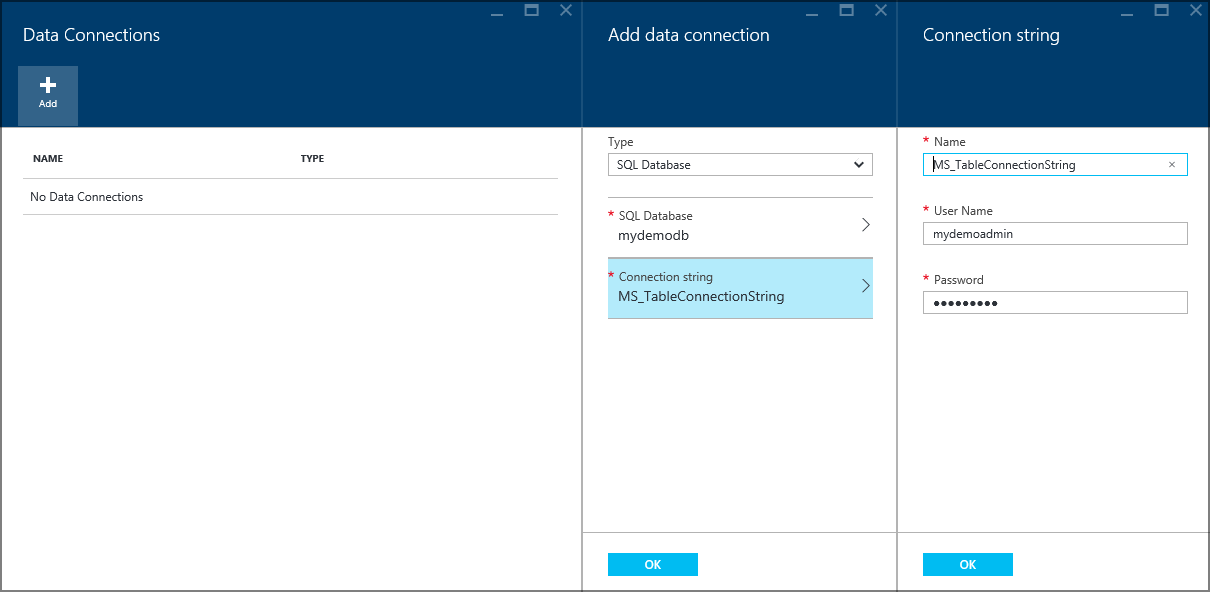
Do not forget wherever you apply the settings, click "OK".
Now we can create a backend service based on a NodeJS or based on a C # application. If you do not want to bother, choose NodeJS. In this case, it will be enough for you to just press the button and the service will be expanded. This will create a table with demo data. Alternatively, you can download the C # web application, make the changes you need, and then publish it. How to publish server project read here: A practical guide. Publish server project
Here is the window in which you need to make a choice between NodeJS and C # as a backend
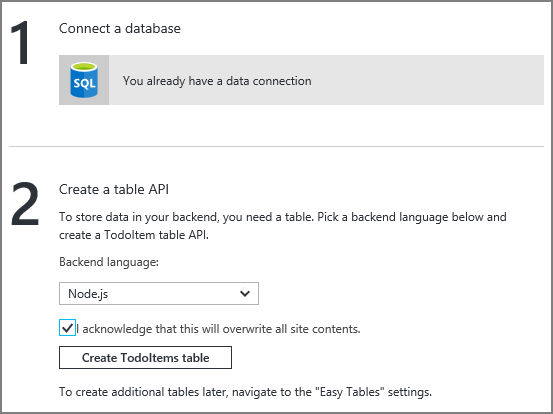
If you do not want to create a demo table, then you can activate and automatically create a web service in another place.
I would prefer to use NodeJS as an example, although for a working application I would prefer C #, since this is still the language in which I write.
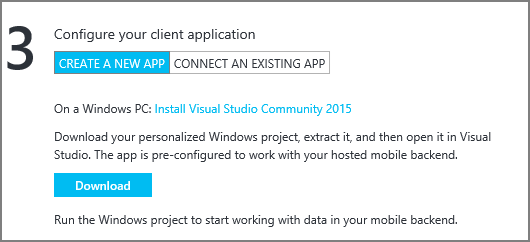
In the same window, you can download an example client application (currently Windows 8.1 applications)
The next step is working with a data table. Go to the parameters and then to the "Simple Tables"
If you did not create a backend service, you will be asked to initialize it.
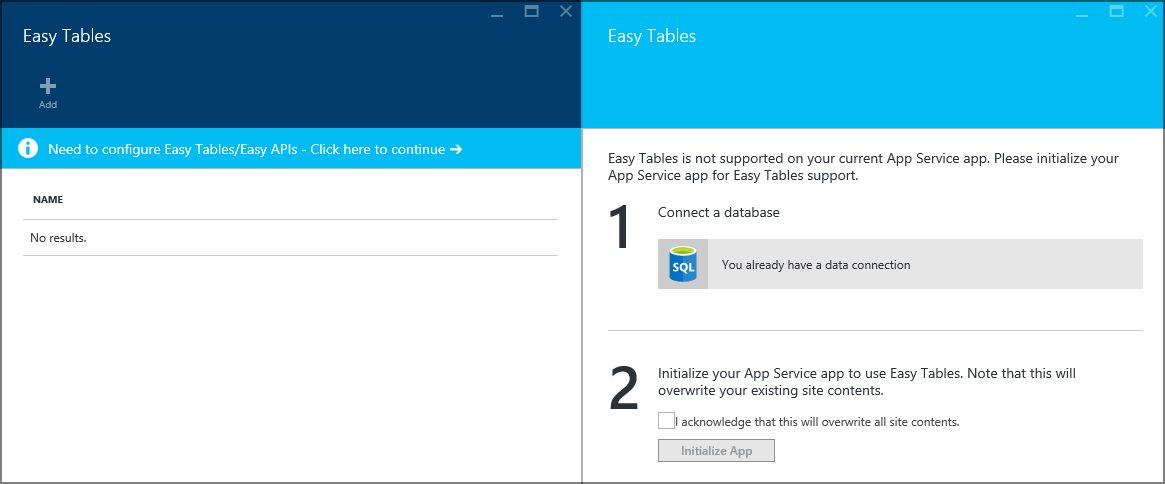
It is necessary to put a tick confirming that I am aware that the contents of my site will be replaced by the created service and click Initialize App.
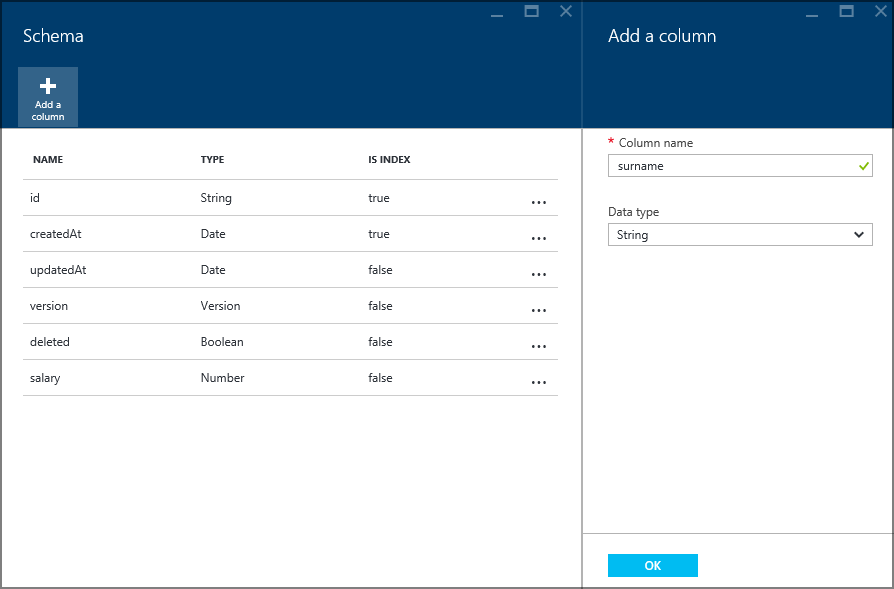
Now in simple tables you can create a new table (I created a table called mydemotable).

When creating a table, some fields are created automatically.

I will add 2 fields to them: salary and surname, in which I’ll keep my salary information and the names of my imaginary employees.
After this, the configuration phase is completed (of course, on a real project, it is possible and necessary to configure access rights and configure the backend to suit your needs).
Now you can go to the code.
In Visual Studio, we create a universal application project. In NuGet, we find and install the Microsoft.Azure.Mobile.Client package.
Add the namespace to App.xaml.cs:
using Microsoft.WindowsAzure.MobileServices; and announce
public static MobileServiceClient MobileService = new MobileServiceClient("https://mydemomobservice.azurewebsites.net"); Now we need to create a class with the structure similar to our cloud table.
public class mydemotable { public string Id { get; set; } [JsonProperty(PropertyName = "surname")] public string surname { get; set; } [JsonProperty(PropertyName = "salary")] public int salary { get; set; } } You may notice that the Id field is indicated here. This field is required, the remaining system fields of the table can be omitted. Using the JsonProperty attribute, you can map the class field name to a table column (useful if they differ).
In the code MainPage.xaml.cs (or where we need to) we also add a namespace:
using Microsoft.WindowsAzure.MobileServices; Announcing the collection:
private MobileServiceCollection<mydemotable, mydemotable> items; and you can use the following snippets (and you can write your own).
To add an item to the table:
mydemotable item = new mydemotable { surname = "Skywalker", salary = 2244 }; await App.MobileService.GetTable<mydemotable>().InsertAsync(item); To edit:
items = await demoTable .Where(y => y.salary > 100).ToCollectionAsync(); mydemotable editem; editem = items.FirstOrDefault(x => x.surname == "Weider"); if (editem != null) { editem.surname = "Yoda"; editem.salary = 555; await App.MobileService.GetTable<mydemotable>().UpdateAsync(editem); } You can add an element to the XAML. For example, such a simple ListView with data binding:
<ListView x:Name="myListView" Width="400" Height="400" Margin="20,20,0,0" ItemsSource="{Binding}"> <ListView.ItemTemplate> <DataTemplate> <StackPanel> <TextBlock Text="{Binding Path=surname}"></TextBlock> <TextBlock TextWrapping="Wrap" Text="{Binding Path=salary}"></TextBlock> </StackPanel> </DataTemplate> </ListView.ItemTemplate </ListView> And fill it in:
MobileServiceInvalidOperationException exception = null; try { items = await App.MobileService.GetTable<mydemotable>() .Where(todoItem => todoItem.salary > 100) .ToCollectionAsync(); } catch (MobileServiceInvalidOperationException ex) { exception = ex; } if (exception == null) myListView.DataContext = items; Synchronization with local SQLite database
This is all good, but every time you do not want to pull data from the Internet. Typically, developers create a local database and synchronize. This method is quite simply implemented in Mobile Apps.
It is necessary to find and additionally install System.Data.SQLite and Microsoft.Azure.Mobile.Client.SQLiteStore in NuGet
Also, install the SQLite SDK and add a link to SQLite for UWP
No changes are required in the App.xaml.cs file.
Add two namespaces to MainPage.xaml.cs:
using Microsoft.WindowsAzure.MobileServices.SQLiteStore; using Microsoft.WindowsAzure.MobileServices.Sync; and one ad:
private IMobileServiceSyncTable<mydemotable> demoTable = App.MobileService.GetSyncTable<mydemotable>(); Add a task to initialize the local database:
private async Task InitLocalStoreAsync() { if (!App.MobileService.SyncContext.IsInitialized) { var store = new MobileServiceSQLiteStore("localstore.db"); store.DefineTable<mydemotable>(); await App.MobileService.SyncContext.InitializeAsync(store); } } We run it after launching the application.
To send data to the Azure database, we can use:
await App.MobileService.SyncContext.PushAsync(); Only modified local database entries will be sent to the cloud database.
To update a fully local table:
await demoTable.PullAsync(null, demoTable.CreateQuery()); Before pull, you must push, in order to be sure that both bases have the same relationship.
It is possible to incrementally update the local table by specifying the query id with the first parameter and the query with the second parameter:
await demoTable.PullAsync("mydemotableSkywalker", demoTable.Where(u => u.surname=="Skywalker")); Request id must be unique for each request. Since it is a parameter that preserves the value of the last time this particular update was performed.
Cleaning a local table is possible with:
await demoTable.PurgeAsync(); Table cleaning should be done before updating the local database, if any rows in the cloud database have been deleted and you do not use soft delete .
A couple of useful links:
Offline Data Sync in Azure Mobile Apps
Using offline data sync in Mobile Services
In this article, you can read about the synchronization of offline and online databases in Azure Mobile Services. This service is the forerunner of Mobile Apps and you can find a lot in common.
Editing data in the cloud database
If you can use simple tables to view data in a table, you can edit them using Visual Studio. In order to open a database in it, you can go to the SQL databases and select in Tools “open in Visual Studio”

In order to open, you must click the link "firewall settings" and enter the displayed IP address into the rule (this is the address from which you are now connected)

Source: https://habr.com/ru/post/277567/
All Articles