Vision-based SLAM: monocular SLAM
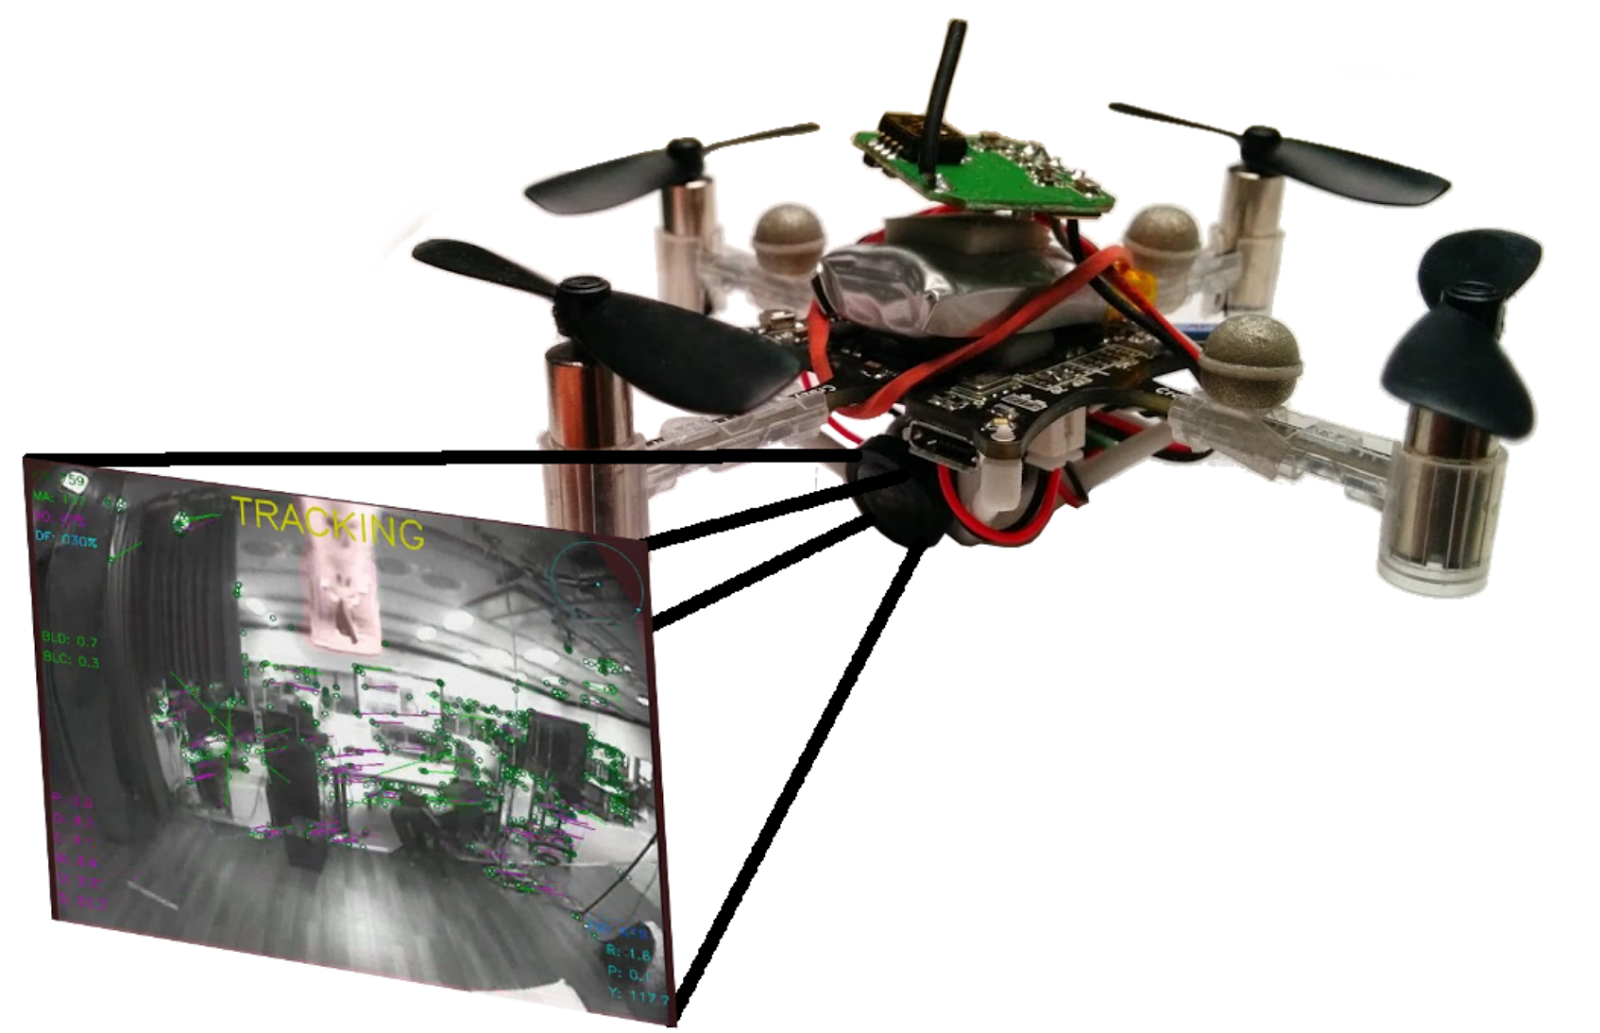
We continue a series of lesson articles on visual SLAM with a lesson on working with its monocular variants. We have already talked about installing and configuring the environment , and also conducted a general overview in the article on quadcopter navigation . Today we will try to understand how different SLAM algorithms using a single camera work, consider their differences for the user and give recommendations on the application.
For a more detailed analysis of the details today, we limit ourselves to two implementations of monocular SLAM: ORB SLAM and LSD SLAM. These algorithms are the most advanced in their class from open-source projects. PTAM is also very common, but it is not as cool as, for example, ORB SLAM.
All monocular SLAM algorithms require accurate camera calibration. We did this in the last lesson , now we will extract the camera parameters. For the camera model we use, we need to extract the camera matrix (fx, fy, cx, cy) and 5 parameters of the distortion function (k1, k2, p1, p2, k3). Go to the ~ / .ros / camera_info directory and open the YAML file with the camera settings. The contents of the file will look something like this (instead of ardrone_front there will be another name):
')
We are interested in the camera_matrix and distortion_coefficients fields, they contain the necessary values in the following format:
Save these values, they will be useful to us further.
The ORB SLAM algorithm is generally not very different in how it works from other visual SLAMs. Features are extracted from images. Further, using the Bundle Adjustment algorithm, features from different images are arranged in 3D space, while at the same time setting the camera position at the time of shooting. However, there are features. In all cases, a single feature detector is used - ORB (Oriented FAST and Rotated BRIEF) . This is a very fast detector (which makes it possible to achieve real-time without using a GPU), and the resulting ORB descriptors of features with a high degree are invariant to the angle of view, camera rotation and illumination. This allows the algorithm to track loop closures with high accuracy and reliability, and also provides high reliability during relocalization. The algorithm ultimately belongs to the class of so-called feature-based. ORB SLAM builds a sparse map of the area, but it is possible to build a dense map based on images of key frames. A closer look at the algorithm can be in the article developers .
We did not describe the installation process of the ORB SLAM in the previous lesson, so we’ll dwell on this here. In addition to the already installed environment, we will need to install Pangolin (do not clone the repository in the ROS workspace):
Next, install the ORB SLAM itself (again, you should not clone the sources into the workspace):
To use the package in ROS, you must add the path to the binaries in ROS_PACKAGE_PATH (replace PATH with the path where you installed ORB SLAM):
Now we need to enter the camera calibration data and the ORB SLAM settings into the settings file itself. Go to the Examples / Monocular directory and copy the TUM1.yaml file:
Open the copied file our.yaml and replace the camera calibration parameters with those obtained above, and also set the FPS:
Save the file. Now we can run ORB SLAM (execute three commands in different tabs of the terminal):
If everything went well, then you should see two windows:
Move the camera a little in the image plane to initialize the SLAM:

All this is great, but ORB SLAM was developed as a ROS-independent package. The binary we run is actually just an example of using the algorithm in ROS. According to unclear logic, the developers did not include the publication of the trajectory of movement in this example, and only save it as a text file KeyFrameTrajectory.txt after the work is completed. Although such a publication will take a few lines of code.
The algorithm provides very few parameters for configuration, and they are very accurately described in the startup file, as described above.
If you need a fast algorithm that should work, for example, onboard, and the environment does not contain large flat monochromatic objects - then ORB SLAM is perfect for you.
We have already briefly touched on the principle of LSD SLAM in the article on navigation experiences AR.Drone . A more detailed analysis of the algorithm clearly does not fit into the format of the lesson, you can read about it in the article of the developers .
After you have installed LSD SLAM (guided by the previous lesson), you need to prepare to start:
Run LSD SLAM (from the folder with the startup file):
If everything worked out, you should see two windows:
Also launch the point cloud viewer from the LSD SLAM distribution (in another terminal window):
The viewer should look something like this:

The algorithm provides several parameters for configuration, the most important ones are these:
If you need a dense terrain map (for example, to build an obstacle map), or the environment does not contain enough features (features), that is, it includes weakly textured large objects, and your platform provides sufficient computational capabilities, then LSD SLAM will suit you.
Comparing monocular algorithms based on features with the so-called direct algorithms that use the entire image, the creator of LSD SLAM Jacob Engel showed the following table at one of his presentations (our translation):
It's hard to add something.
All monocular algorithms have a set of similar requirements and limitations, namely:
Based on these features and our experience in using such algorithms, we conclude that monocular SLAM should be used when:
This concludes today's lesson, next time we will look at SLAM algorithms using stereo cameras and depth cameras.
Previous lesson - installation and configuration of the environment
LSD SLAM Developer Site
Developer site ORB SLAM
For a more detailed analysis of the details today, we limit ourselves to two implementations of monocular SLAM: ORB SLAM and LSD SLAM. These algorithms are the most advanced in their class from open-source projects. PTAM is also very common, but it is not as cool as, for example, ORB SLAM.
Retrieving Calibration Parameters
All monocular SLAM algorithms require accurate camera calibration. We did this in the last lesson , now we will extract the camera parameters. For the camera model we use, we need to extract the camera matrix (fx, fy, cx, cy) and 5 parameters of the distortion function (k1, k2, p1, p2, k3). Go to the ~ / .ros / camera_info directory and open the YAML file with the camera settings. The contents of the file will look something like this (instead of ardrone_front there will be another name):
')
Calibration file
image_width: 640
image_height: 360
camera_name: ardrone_front
camera_matrix:
rows: 3
cols: 3
data: [569.883158064802, 0, 331.403348466206, 0, 568.007065238522, 135.879365106014, 0, 0, 1]
distortion_model: plumb_bob
distortion_coefficients:
rows: 1
cols: 5
data: [-0.526629354780687, 0.274357114262035, 0.0211426202132638, -0.0063942451330052, 0]
rectification_matrix:
rows: 3
cols: 3
data: [1, 0, 0, 0, 1, 0, 0, 0, 1]
projection_matrix:
rows: 3
cols: 4
data: [463.275726318359, 0, 328.456687172518, 0, 0, 535.977355957031, 134.693732992726, 0, 0, 0, 1, 0]
We are interested in the camera_matrix and distortion_coefficients fields, they contain the necessary values in the following format:
camera_matrix:
rows: 3
cols: 3
data: [fx, 0, fy, 0, cx, cy, 0, 0, 1]

distortion_coefficients:
rows: 1
cols: 5
data: [k1, k2, p1, p2, k3]
Save these values, they will be useful to us further.
ORB SLAM
Principle of operation
The ORB SLAM algorithm is generally not very different in how it works from other visual SLAMs. Features are extracted from images. Further, using the Bundle Adjustment algorithm, features from different images are arranged in 3D space, while at the same time setting the camera position at the time of shooting. However, there are features. In all cases, a single feature detector is used - ORB (Oriented FAST and Rotated BRIEF) . This is a very fast detector (which makes it possible to achieve real-time without using a GPU), and the resulting ORB descriptors of features with a high degree are invariant to the angle of view, camera rotation and illumination. This allows the algorithm to track loop closures with high accuracy and reliability, and also provides high reliability during relocalization. The algorithm ultimately belongs to the class of so-called feature-based. ORB SLAM builds a sparse map of the area, but it is possible to build a dense map based on images of key frames. A closer look at the algorithm can be in the article developers .
Launch
We did not describe the installation process of the ORB SLAM in the previous lesson, so we’ll dwell on this here. In addition to the already installed environment, we will need to install Pangolin (do not clone the repository in the ROS workspace):
git clone https://github.com/stevenlovegrove/Pangolin.git cd Pangolin mkdir build cd build cmake -DCPP11_NO_BOOST=1 .. make -j Next, install the ORB SLAM itself (again, you should not clone the sources into the workspace):
git clone https://github.com/raulmur/ORB_SLAM2.git ORB_SLAM2 cd ORB_SLAM2 chmod +x build.sh ./build.sh To use the package in ROS, you must add the path to the binaries in ROS_PACKAGE_PATH (replace PATH with the path where you installed ORB SLAM):
echo export ROS_PACKAGE_PATH=${ROS_PACKAGE_PATH}:PATH/ORB_SLAM2/Examples/ROS >> ~/.bashrc source ~/.bashrc Now we need to enter the camera calibration data and the ORB SLAM settings into the settings file itself. Go to the Examples / Monocular directory and copy the TUM1.yaml file:
cd Examples/Monocular cp TUM1.yaml our.yaml Open the copied file our.yaml and replace the camera calibration parameters with those obtained above, and also set the FPS:
Configuration file
%YAML:1.0

#--------------------------------------------------------------------------------------------
# Camera Parameters. Adjust them!
#--------------------------------------------------------------------------------------------

# Camera calibration and distortion parameters (OpenCV)
Camera.fx: 563.719912
Camera.fy: 569.033809
Camera.cx: 331.711374
Camera.cy: 175.619211

Camera.k1: -0.523746
Camera.k2: 0.306187
Camera.p1: 0.011280
Camera.p2: 0.003937
Camera.k3: 0

# Camera frames per second
Camera.fps: 30.0

# Color order of the images (0: BGR, 1: RGB. It is ignored if images are grayscale)
Camera.RGB: 1

#--------------------------------------------------------------------------------------------
# ORB Parameters
#--------------------------------------------------------------------------------------------

# ORB Extractor: Number of features per image
ORBextractor.nFeatures: 1000

# ORB Extractor: Scale factor between levels in the scale pyramid
ORBextractor.scaleFactor: 1.2

# ORB Extractor: Number of levels in the scale pyramid
ORBextractor.nLevels: 8

# ORB Extractor: Fast threshold
# Image is divided in a grid. At each cell FAST are extracted imposing a minimum response.
# Firstly we impose iniThFAST. If no corners are detected we impose a lower value minThFAST
# You can lower these values if your images have low contrast
ORBextractor.iniThFAST: 20
ORBextractor.minThFAST: 7

#--------------------------------------------------------------------------------------------
# Viewer Parameters
#--------------------------------------------------------------------------------------------
Viewer.KeyFrameSize: 0.05
Viewer.KeyFrameLineWidth: 1
Viewer.GraphLineWidth: 0.9
Viewer.PointSize:2
Viewer.CameraSize: 0.08
Viewer.CameraLineWidth: 3
Viewer.ViewpointX: 0
Viewer.ViewpointY: -0.7
Viewer.ViewpointZ: -1.8
Viewer.ViewpointF: 500
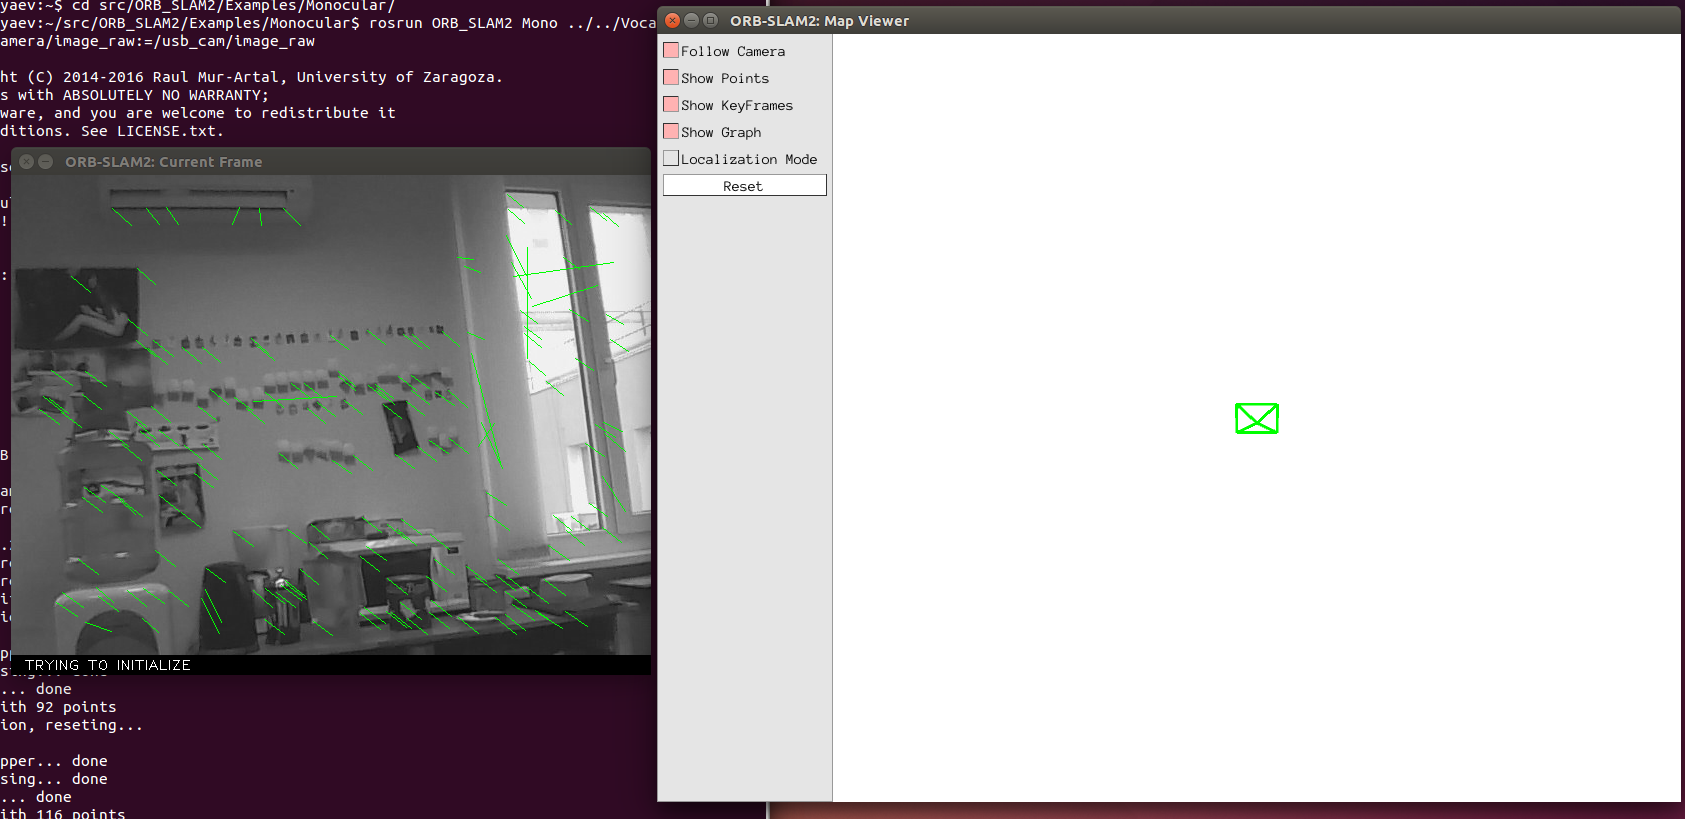
Save the file. Now we can run ORB SLAM (execute three commands in different tabs of the terminal):
roscore rosrun usb_cam usb_cam_node _video_device:=dev/video0 ← rosrun ORB_SLAM2 Mono ../../Vocabulary/ORBvoc.txt our.yaml /camera/image_raw:=/usb_cam/image_raw If everything went well, then you should see two windows:
Move the camera a little in the image plane to initialize the SLAM:
All this is great, but ORB SLAM was developed as a ROS-independent package. The binary we run is actually just an example of using the algorithm in ROS. According to unclear logic, the developers did not include the publication of the trajectory of movement in this example, and only save it as a text file KeyFrameTrajectory.txt after the work is completed. Although such a publication will take a few lines of code.
Settings
The algorithm provides very few parameters for configuration, and they are very accurately described in the startup file, as described above.
When to use ORB SLAM?
If you need a fast algorithm that should work, for example, onboard, and the environment does not contain large flat monochromatic objects - then ORB SLAM is perfect for you.
LSD SLAM
Principle of operation
We have already briefly touched on the principle of LSD SLAM in the article on navigation experiences AR.Drone . A more detailed analysis of the algorithm clearly does not fit into the format of the lesson, you can read about it in the article of the developers .
Launch
After you have installed LSD SLAM (guided by the previous lesson), you need to prepare to start:
- Camera calibration file camera.cfg
Create a camera.cfg file in the ~ / ros_workspace / rosbuild / package / lsd_slam / lsd_slam_core / calib directory
and copy the calibration parameters into the first line of camera.cfg using this sample (note that the fifth distortion parameter is not used):fx fy cx cy k1 k2 p1 p2
640 360
crop
640 480
In the next line, set the width and height of the original image, and leave the last lines unchanged. - Launch file lsd_slam.launch
<?xml version="1.0"?> <launch> <node pkg="usb_cam" type="usb_cam_node" name="camera" output="screen"> <param name="video_device" value="/dev/video0"/> </node> <node name="lsd_slam_node" type="live_slam" pkg="lsd_slam_core" args="/image:=usb_cam/image_raw _calib:=$(find lsd_slam_core)/calib/camera.cfg" output="screen"> <param name="minUseGrad" value="10" /> <param name="cameraPixelNoise" value="1"/> <param name="KFUsageWeight" value="14" /> <param name="KFDistWeight" value="14" /> <param name="useAffineLightningEstimation" value="True" /> <param name="relocalizationTH" value="0.1" /> <param name="useFabMap" value="True"/> </node> <node name="image_view_node" type="image_view" pkg="image_view" args="image:=usb_cam/image_raw" respawn="true"/> </launch>
Run LSD SLAM (from the folder with the startup file):
roslaunch lsd_slam.launch If everything worked out, you should see two windows:
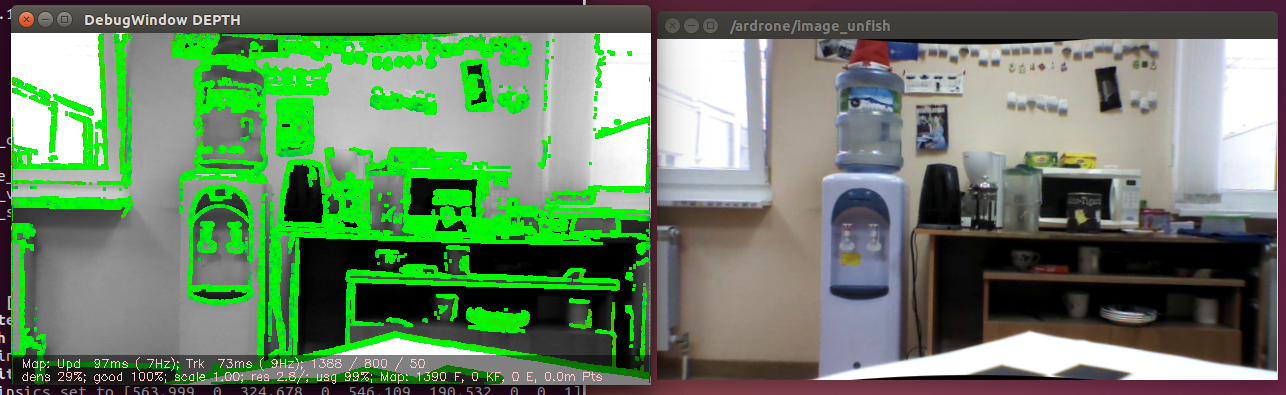
Also launch the point cloud viewer from the LSD SLAM distribution (in another terminal window):
rosrun lsd_slam_viewer viewer The viewer should look something like this:
Settings
The algorithm provides several parameters for configuration, the most important ones are these:
- minUseGrad is the minimum intensity gradient for creating a new 3D point. The smaller the value, the better the algorithm works with monochromatic objects and the denser the map. However, the lower this value, the more clearly the camera rectification errors affect the quality of the SLAM. In addition, lower values significantly reduce the performance of the algorithm.
- cameraPixelNoise - noise of pixel intensity values. It must be set to a value greater than the actual noise of the matrix in order to take into account the errors of sampling and interpolation.
- useAffineLightningEstimation - you can try to enable it to fix problems with auto exposure.
- useFabMap - enables openFabMap to search for loops.
Recommendations
- Run the algorithm on a productive CPU. Unlike ORB SLAM, LSD SLAM places significant demands on hardware. In addition, the algorithm must work in real-time, otherwise an acceptable SLAM quality is out of the question.
- Calibrate the camera as accurately as possible. Direct methods, which include LSD SLAM, are very sensitive to the quality of calibration.
- If possible, use the global-shutter camera. Rolling shutter can be used (in fact, we used only this type of shutter), but the results will be worse.
When to use LSD SLAM?
If you need a dense terrain map (for example, to build an obstacle map), or the environment does not contain enough features (features), that is, it includes weakly textured large objects, and your platform provides sufficient computational capabilities, then LSD SLAM will suit you.
Feature-based vs. Direct
Comparing monocular algorithms based on features with the so-called direct algorithms that use the entire image, the creator of LSD SLAM Jacob Engel showed the following table at one of his presentations (our translation):
| Feature-based | Direct |
|---|---|
| Use only features (for example, corners) | Use full image |
| Faster | Slower (but well parallelized) |
| Easy to remove noise (outliers) | Not easy to remove noise |
| Resistant to rolling shutter | Not resistant to rolling shutter |
| Use a small amount of information from the images | Use more complete information |
| Do not require complex initialization | Require good initialization |
| over 20 years of intensive development | about 4 years of research |
It's hard to add something.
General recommendations for use
All monocular algorithms have a set of similar requirements and limitations, namely:
- The need for accurate camera calibration. Not so critical for feature-based algorithms.
- The inability to determine the scale without the help of external sensors or user.
- Camera requirements: high FPS + wide viewing angle. These parameters are associated with each other, and with the maximum speed of movement of the camera.
Based on these features and our experience in using such algorithms, we conclude that monocular SLAM should be used when:
- You are strictly limited to one camera;
- You have the opportunity to assess the scale of localization and maps from external sources or to solve your problem the scale does not matter;
- camera characteristics meet the above requirements and allow for accurate calibration and rectification of the image.
This concludes today's lesson, next time we will look at SLAM algorithms using stereo cameras and depth cameras.
Sources
Previous lesson - installation and configuration of the environment
LSD SLAM Developer Site
Developer site ORB SLAM
Source: https://habr.com/ru/post/277537/
All Articles