Installing and configuring cacti 0.8.8f from scratch under Ubuntu 14.04

I remember the time when I was assigned a task - to install and configure cacti with 95th Percentile graphs and the ability to aggregate graphs. And these memories caught up with me sadness ... At first I tried to install and configure cacti through ppa turnips - a lot of problems came out with symlinks, rights, etc. Then he put less directly from official rap problems, but it was necessary to play around with patches, since the version of the program is a bit outdated. I was looking for installation instructions from source, but under Ubuntu everything was very raw and faced the same problems. And then he decided to take on the official documentation, which wrote about what to put in general, regardless of the distribution.
I decided to share my experience in installing cacti 0.8.8f (the latest version at the moment) under the Ubuntu 14.04 distribution.
Install the necessary packages.
root@cacti:~# apt-get install apache2 php5 php5-mysql php5-snmp snmp php5-gd rrdtool mysql-server php5-ldap zip unzip Next, we check, or we have all the modules needed for cacti php robots. There should be at least seven of them.
root@cacti:~# php -m | egrep '^(mysql|snmp|xml|session|sockets|ldap|gd)$' gd ldap mysql session snmp sockets xml All the necessary modules are. Now download the source code of cacti and unpack it into a local folder. At the moment - this is version 0.8.8f.
root@cacti:~# wget http://www.cacti.net/downloads/cacti-0.8.8f.tar.gz root@cacti:~# tar xzvf cacti-0.8.8f.tar.gz We proceed to the preparation of mysql database. To begin, create a database.
root@cacti:~# mysqladmin -p -u root create cacti Enter password: The next thing you need to fill the structure of the newly created cacti database.
root@cacti:~# mysql -p -u root cacti < cacti-0.8.8f/cacti.sql Enter password: And add a user with administration rights.
root@cacti:~# mysql -p -u root -e 'GRANT ALL ON cacti.* TO cactiuser@localhost IDENTIFIED BY "your_password"; flush privileges;' Enter password: Work with the database is completed, it now remains to register the connection settings to the database in the cacti configuration.
root@cacti:~# vim cacti-0.8.8f/include/config.php … $database_type = "mysql"; $database_default = "cacti"; $database_hostname = "localhost"; $database_username = "cactiuser"; $database_password = "your_password"; $database_port = "3306"; $database_ssl = false; … Next, we transfer the cacti pages to the / var / www folder (to the folder where the site sources will be stored) and set the owner and the www-data group (the user running the web server).
root@cacti:~# rsync -aP cacti-0.8.8f/ /var/www/cacti/ root@cacti:~# chown -R www-data:www-data /var/www/cacti You also need to add cron to work poller-a and put the right to execute it.
root@cacti:~# echo '*/5 * * * * www-data php /var/www/cacti/poller.php > /dev/null 2>&1' > /etc/cron.d/cacti root@cacti:~# chmod +x /var/www/cacti/poller.php Check / change default apache directory
root@cacti:~# cat /etc/apache2/sites-enabled/000-default.conf | grep DocumentRoot DocumentRoot /var/www The final touch reboot the web server.
root@cacti:~# /etc/init.d/apache2 restart * Restarting web server apache2 ... waiting [ OK ] Subsequent installation of cacti will take place via the web interface via the link http: // <server_ip> / cacti /.
When you go, you should see the following picture.
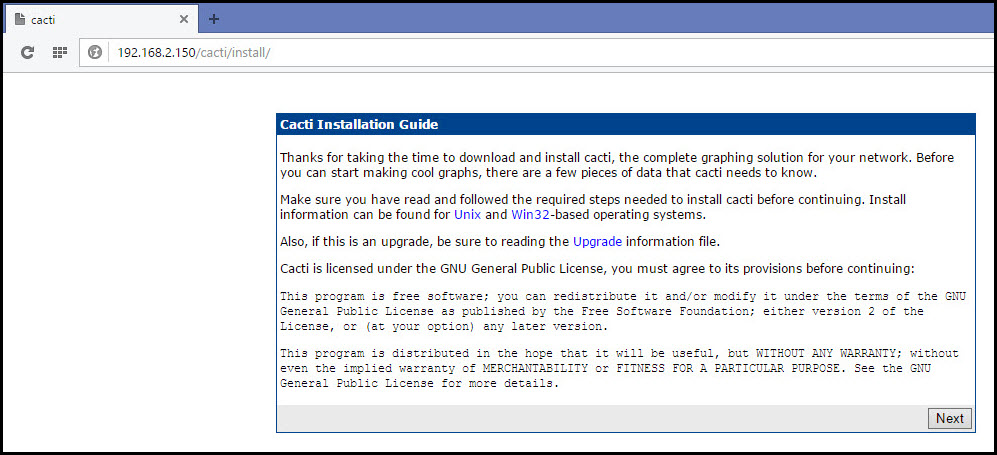
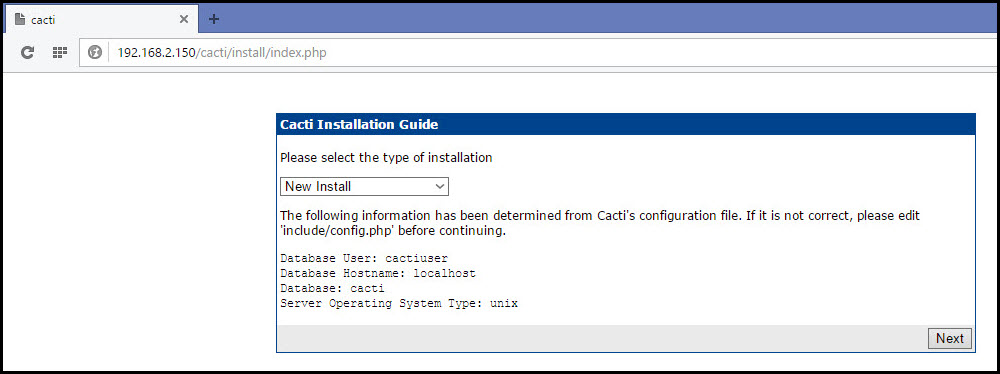
Read and click Next. Now they ask us what we want to do - update or install cacti. In our case - install. Select and click Next.
')
Now you should see and edit (if necessary) the paths to rrdtool, php, snmp, etc.
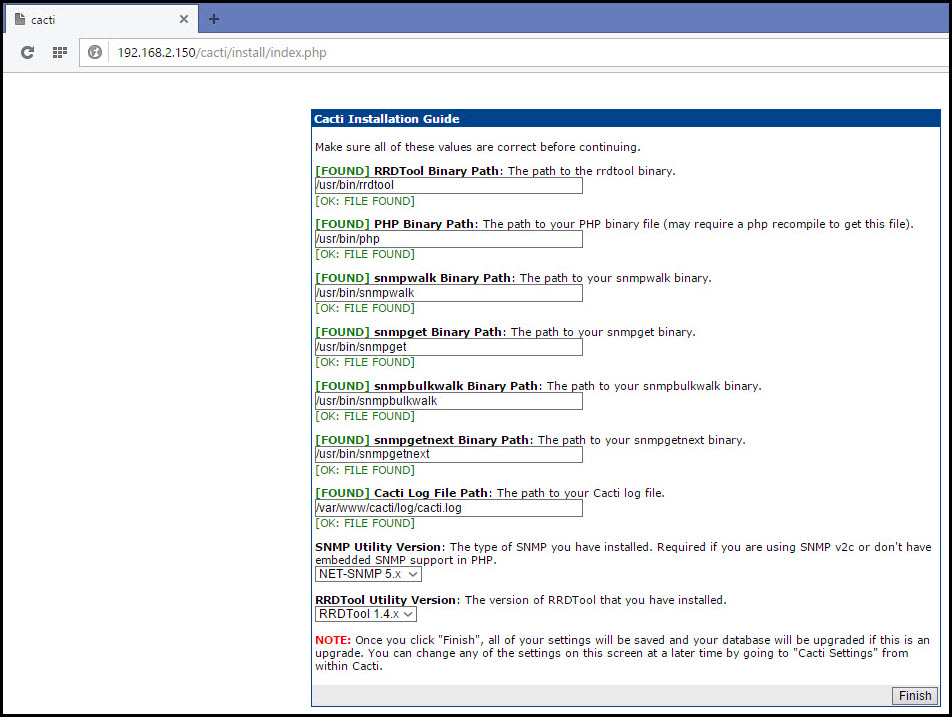
If all is good, click Next and look at the successful completion of the cacti installation.
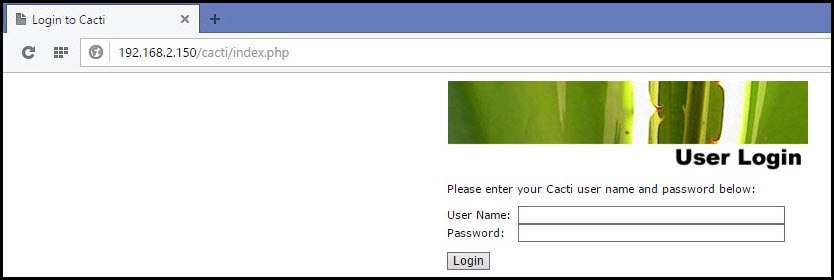
Now we enter the default login and password - admin / admin, and you will need to immediately change the default password.
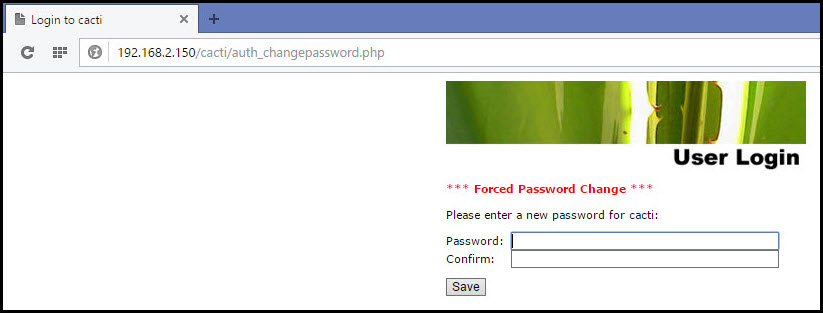
After entering a new password, you will be taken to cacti GUI. Now cacti is ready to go.
Next, install the spine poller under cacti 0.8.8f. Download and unpack to a local folder.
root@cacti:~# wget http://www.cacti.net/downloads/spine/cacti-spine-0.8.8f.tar.gz root@cacti:~# tar xzvf cacti-spine-0.8.8f.tar.gz Install the necessary packages for compilation and operation.
root@cacti:~# apt-get install libmysqlclient-dev libsnmp-dev automake libtool make Compile.
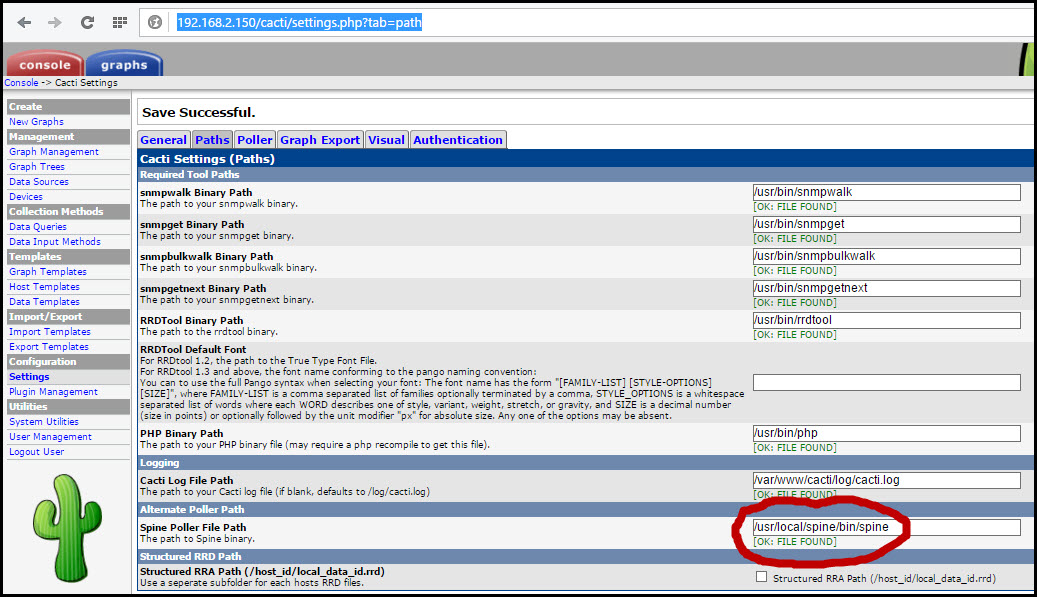
root@cacti:~# cd cacti-spine-0.8.8f root@cacti:~/cacti-spine-0.8.8f# aclocal root@cacti:~/cacti-spine-0.8.8f# libtoolize --force root@cacti:~/cacti-spine-0.8.8f# autoheader root@cacti:~/cacti-spine-0.8.8f# autoconf root@cacti:~/cacti-spine-0.8.8f# automake root@cacti:~/cacti-spine-0.8.8f# ./configure root@cacti:~/cacti-spine-0.8.8f# make root@cacti:~/cacti-spine-0.8.8f# make install make[1]: Entering directory `/home/vagrant/cacti-spine-0.8.8f' test -z "/usr/local/spine/bin" || /bin/mkdir -p "/usr/local/spine/bin" /bin/bash ./libtool --mode=install /usr/bin/install -c spine '/usr/local/spine/bin' libtool: install: /usr/bin/install -c spine /usr/local/spine/bin/spine test -z "/usr/local/spine/etc" || /bin/mkdir -p "/usr/local/spine/etc" /usr/bin/install -c -m 644 spine.conf.dist '/usr/local/spine/etc' make[1]: Leaving directory `/home/vagrant/cacti-spine-0.8.8f' From the output we can see that the spin-a binary is located along the path / usr / local / spine / bin / spine, and the configuration is here - /usr/local/spine/etc/spine.conf.dist. In order for cacti to use it, you need to rename and edit spine.conf and set the path to the spine in the GUI. To begin, rename the configuration file and add access to the database.
root@cacti:~/cacti-spine-0.8.8f# mv /usr/local/spine/etc/{spine.conf.dist,spine.conf} root@cacti:~/cacti-spine-0.8.8f# vim /usr/local/spine/etc/spine.conf … DB_Host localhost DB_Database cacti DB_User cactiuser DB_Pass your_password DB_Port 3306 … Now immediately check the spine configuration from the console.
root@cacti:/usr/local/spine/bin# cd /usr/local/spine/bin/ root@cacti:/usr/local/spine/bin# ./spine -V 5 -R If you don’t get a single line of output, then there’s a problem with accessing the database (reconfigure spine.conf).
It now remains to set the path to the spine and select as default poller. Login to the cacti web interface and go to Configuration -> Settings -> Paths or direct link http: // <server_ip> /cacti/settings.php?tab=path, set the path to spine (in our case / usr / local / spine / bin / spine) and save all.
It remains to activate a new type of poller. Go to the Poller tab and select the spine.

We save, wait for 5-10 minutes and look at the logs for errors Utilities -> System Utilities -> View Cacti Log File .
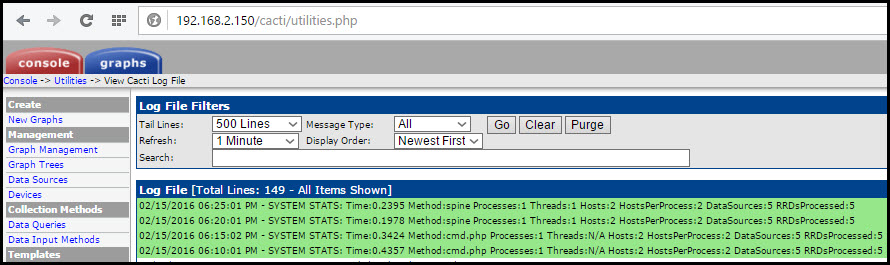
As you can see, there are no problems - and all data is normally updated with the new spine method.
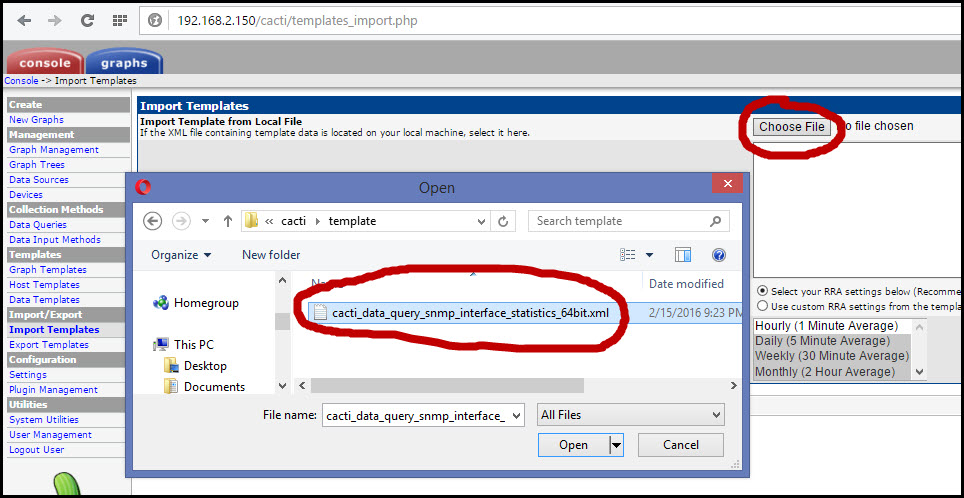
In cacti version 0.8.8f, the problem with 64 bit counters for the 95th Percentile and Total Bandwidth graphs continues to be present. To fix it, you need to add a new template. I once found it and downloaded it on the cacti forum, but where I can’t find it for sure. You can download it here .
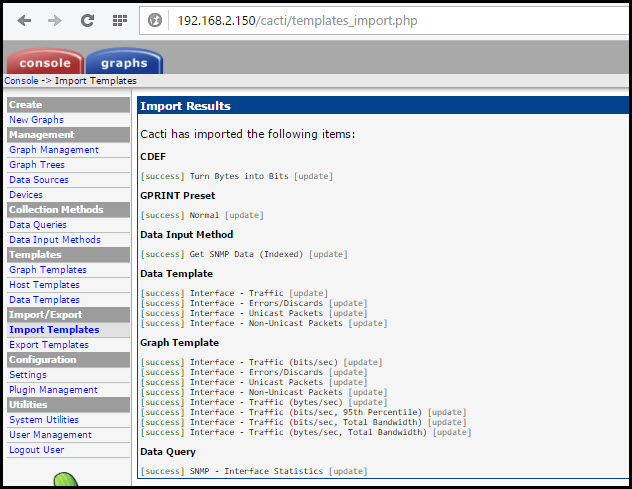
Now it just needs to be added to cacti. Go to Import / Export -> Import Templates or click the link http: // <server_ip> /cacti/templates_import.php, select the file and click Import.
And we get this result.
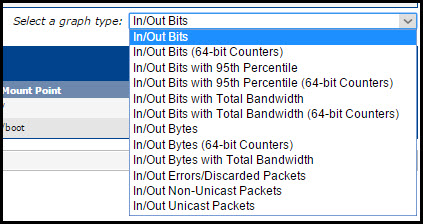
Now, when creating graphs on network interface statistics, we will have In / Out Bits with 95th Percentile (64-bit Counters) and In / Out Bits with Total Bandwidth (64-bit Counters) .
Lastly, add aggregate and weathermap plugins.
Aggregate . This plugin is used in cacti to merge several schedules into one. For example, if you need to see how much incoming and outgoing traffic the entire CDN as a whole generates, and not its separate server.
Go to the folder with cacti plugins and download the latest version of the aggregate.
root@cacti:~/cacti-spine-0.8.8f# cd /var/www/cacti/plugins/ root@cacti:/var/www/cacti/plugins# wget http://docs.cacti.net/_media/plugin:aggregate-v0.75.tgz -O aggregate-v0.75.tgz Unpack and delete the archive, also do not forget to change the owner and group for all files.
root@cacti:/var/www/cacti/plugins# tar xzvf aggregate-v0.75.tgz aggregate/ aggregate/setup.php aggregate/aggregate_functions.php aggregate/color_templates_items.php aggregate/aggregate.php aggregate/color_templates.php aggregate/README aggregate/aggregate_manual.pdf aggregate/LICENSE aggregate/color_html.php root@cacti:/var/www/cacti/plugins# rm aggregate-v0.75.tgz root@cacti:/var/www/cacti/plugins# chown -R www-data:www-data aggregate/ Now it remains to go to the web interface, install and activate the plugin.
Go to Configuration -> Plugin Management and click on the arrow in the Actions field opposite the Aggregate plugin for installation.
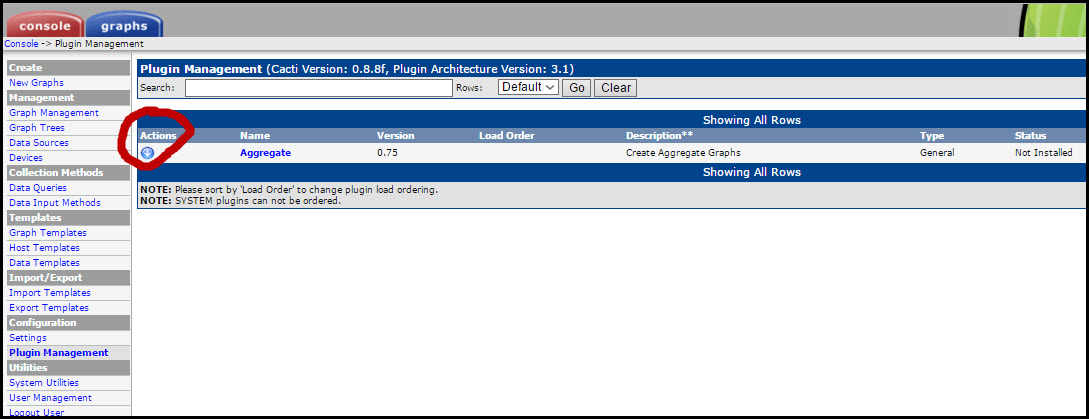
Then you need to click on the green arrow to activate.

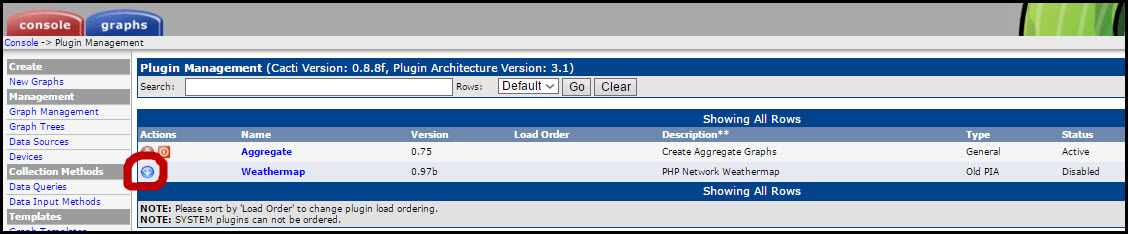
Plugin activated. How to use it you can see in the manual attached with the source.
Weathermap . This plug-in is used in cacti to build a network map with visualization of all network hops and channel loading. There are many articles with descriptions and examples, so consider only installation and activation.
Go to the folder with cacti plugins and download the weathermap archive.
root@cacti:/var/www/cacti/plugins# wget http://network-weathermap.com/files/php-weathermap-0.97c.zip Unpack and delete the archive.
root@cacti:/var/www/cacti/plugins# unzip php-weathermap-0.97c.zip root@cacti:/var/www/cacti/plugins# rm php-weathermap-0.97c.zip We change the owner and group for all files and turn on the weathermap visual editor.
root@cacti:/var/www/cacti/plugins# chown -R www-data:www-data weathermap/ root@cacti:/var/www/cacti/plugins# vim weathermap/editor.php ... $ENABLED=true; ... Now it only remains to go to the web interface and activate the plugin.
Go to Configuration -> Plugin Management and click on the arrow in the Actions field opposite the Weathermap plugin to activate.
Plugin activated. How to use it you can see on the official pages of the project.
It remains only to add hosts for monitoring - try.
Source: https://habr.com/ru/post/277375/
All Articles