Building Android applications step by step, part two

In the first part of the article, we developed an application for working with github, consisting of two screens, divided into layers using the MVP pattern. We used RxJava to simplify interaction with the server and two data models for different layers. In the second part, we will implement Dagger 2, write unit tests, take a look at MockWebServer, JaCoCo and Robolectric.
Content:
Full content
Introduction
In the first part of the article, we in two stages created a simple application for working with github.
Conditional application scheme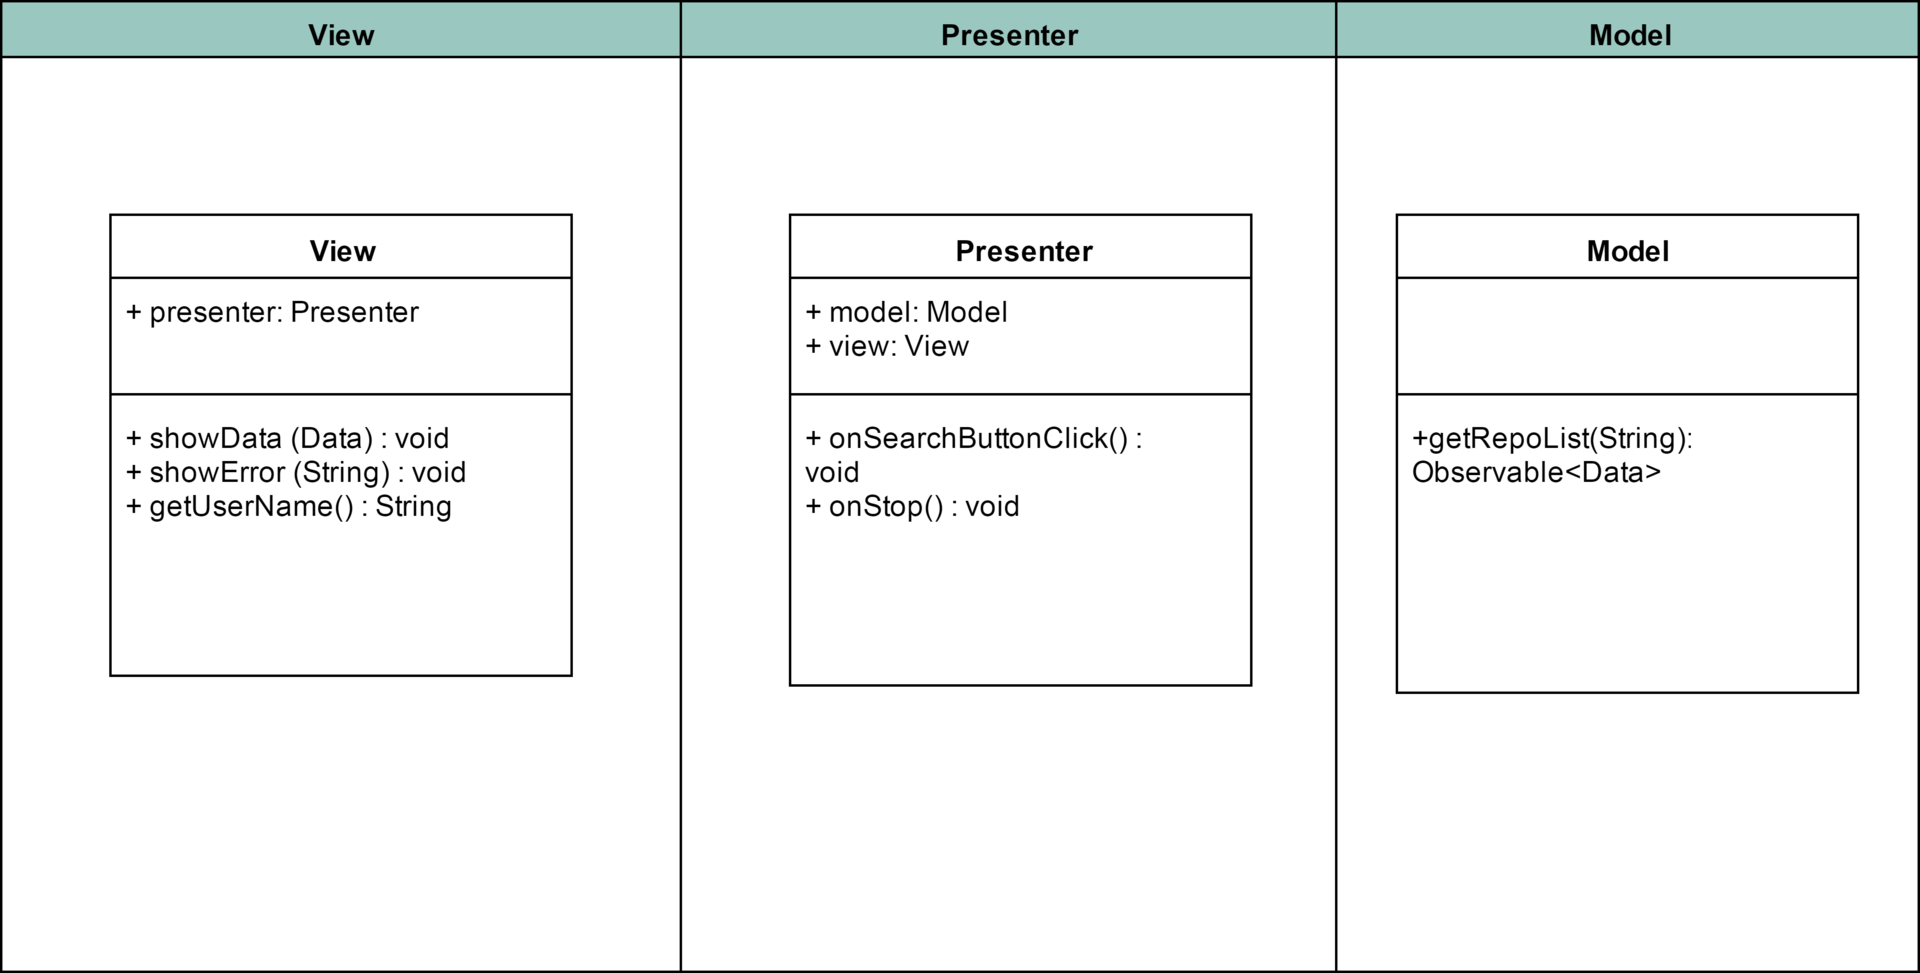
Class diagram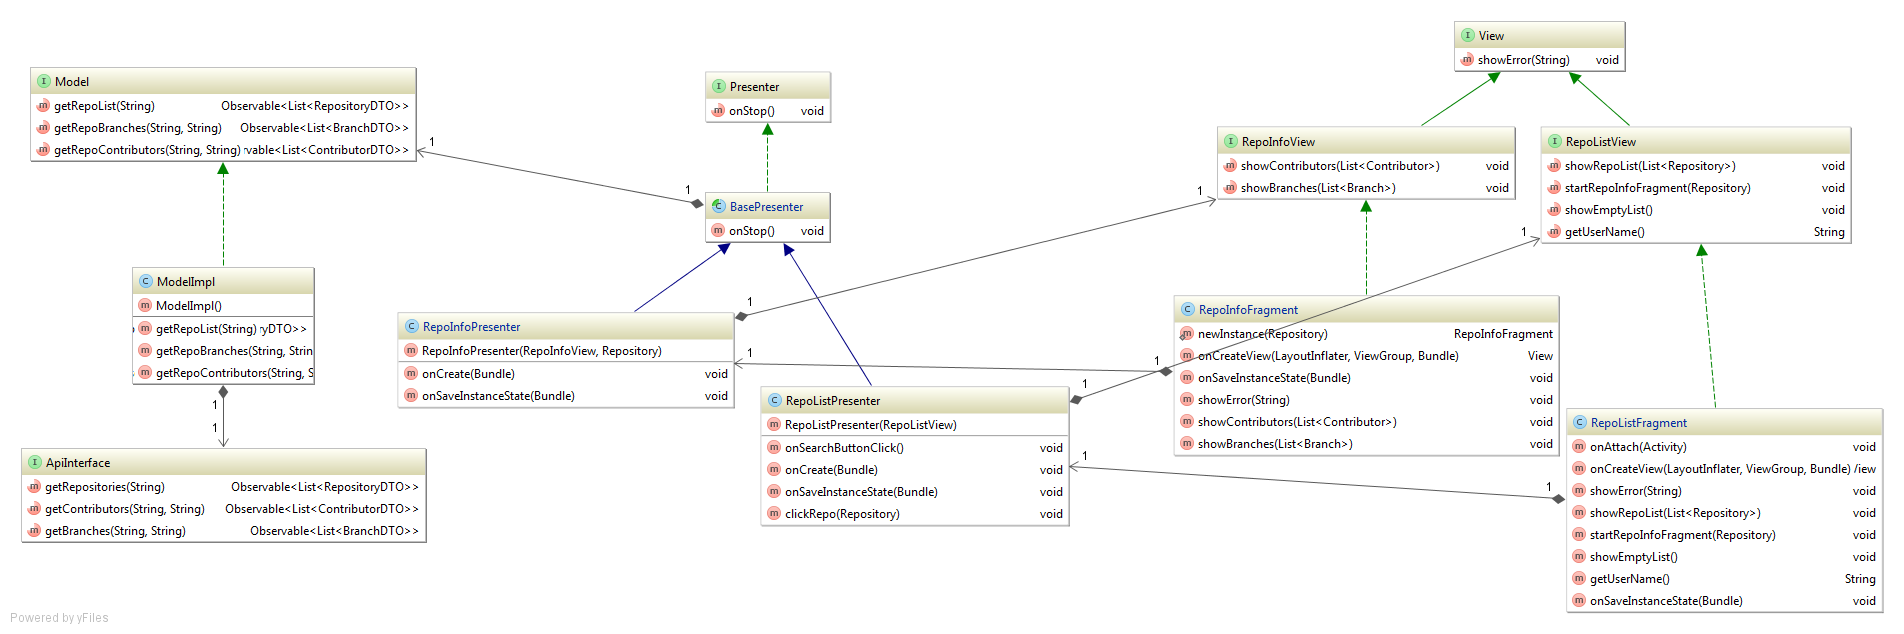
All sources can be found on Github . The branches in the repository correspond to the steps in the article: Step 3 Dependency injection - the third step, Step 4 Unit tests - the fourth step.
')
Step 3. Dependency Injection
Before you use Dagger 2, you need to understand the principle of Dependency injection (Dependency Injection) .
Imagine that we have an object A, which includes an object B. Without using DI, we have to create an object B in the code of class A. For example:
public class A { B b; public A() { b = new B(); } } This code immediately violates the SRP and DRP principles of SOLID . The simplest solution is to transfer object B to the class A constructor, thus we implement Dependency Injection “manually”:
public class A { B b; public A(B b) { this.b = b; } } Typically, DI is implemented using third-party libraries, where, thanks to annotations, an object is automatically replaced.
public class A { @Inject B b; public A() { inject(); } } Read more about this mechanism and its application on Android can be found in this article: Meet Dependency Injection using the example of Dagger
Dagger 2
Dagger 2 is a library created by Google for the implementation of DI. Its main advantage in code generation, i.e. all errors will be visible at compile time. On Habré there is a good article about Dagger 2 , you can also read the official page or a good instruction on the codepath
To install Dagger 2, you need to edit build.gradle:
build.gradle
apply plugin: 'com.android.application' apply plugin: 'com.neenbedankt.android-apt' dependencies { compile fileTree(dir: 'libs', include: ['*.jar']) compile 'com.android.support:appcompat-v7:21.0.3' compile 'com.google.dagger:dagger:2.0-SNAPSHOT' apt 'com.google.dagger:dagger-compiler:2.0-SNAPSHOT' provided 'org.glassfish:javax.annotation:10.0-b28' } It is also highly recommended to install the Dagger IntelliJ Plugin plugin . It will help you navigate where and where the injection takes place.
Dagger IntelliJ Plugin
The objects themselves for Dagger 2 implementation are taken from the module methods (methods should be marked with Provides annotation, modules - Module ) or created using the constructor of the annotated Inject class. For example:
@Module public class ModelModule { @Provides @Singleton ApiInterface provideApiInterface() { return ApiModule.getApiInterface(); } } or
public class RepoBranchesMapper @Inject public RepoBranchesMapper() {} } Fields for embedding are indicated by Inject annotation:
@Inject protected ApiInterface apiInterface; These two things are connected using components (@Component). They indicate where to get objects from and where to embed them (inject methods). Example:
@Singleton @Component(modules = {ModelModule.class}) public interface AppComponent { void inject(ModelImpl dataRepository); } For Dagger 2, we will use one component (AppComponent) and 3 modules for different layers (Model, Presentation, View).
Appcomponent
@Singleton @Component(modules = {ModelModule.class, PresenterModule.class, ViewModule.class}) public interface AppComponent { void inject(ModelImpl dataRepository); void inject(BasePresenter basePresenter); void inject(RepoListPresenter repoListPresenter); void inject(RepoInfoPresenter repoInfoPresenter); void inject(RepoInfoFragment repoInfoFragment); } Model
For the Model layer, you must provide ApiInterface and two Schedulers for flow control. For Scheduler, you must use the Named annotation for Dagger to figure out the dependency graph.
ModelModule
@Provides @Singleton ApiInterface provideApiInterface() { return ApiModule.getApiInterface(Const.BASE_URL); } @Provides @Singleton @Named(Const.UI_THREAD) Scheduler provideSchedulerUI() { return AndroidSchedulers.mainThread(); } @Provides @Singleton @Named(Const.IO_THREAD) Scheduler provideSchedulerIO() { return Schedulers.io(); } Presenter
For the presenter layer, we need to provide the Model and CompositeSubscription, as well as the mappers. Model and CompositeSubscription will be provided through modules, mappers using an annotated constructor.
Presenter Module
public class PresenterModule { @Provides @Singleton Model provideDataRepository() { return new ModelImpl(); } @Provides CompositeSubscription provideCompositeSubscription() { return new CompositeSubscription(); } } An example of a mapper with an annotated constructor
public class RepoBranchesMapper implements Func1<List<BranchDTO>, List<Branch>> { @Inject public RepoBranchesMapper() { } @Override public List<Branch> call(List<BranchDTO> branchDTOs) { List<Branch> branches = Observable.from(branchDTOs) .map(branchDTO -> new Branch(branchDTO.getName())) .toList() .toBlocking() .first(); return branches; } } View
With the View layer and the introduction of presenters, the situation is more complicated. When creating a presenter, we pass the View interface to the designer. Accordingly, Dagger should have a link to the implementation of this interface, that is, to our fragment. You can go another way by changing the presenter interface and passing the link to the view in onCreate. Consider both cases.
Passing the view link.
We have a RepoListFragment fragment that implements the RepoListView interface,
and RepoListPresenter, which takes this RepoListView as input to the constructor. We need to embed the RepoListPresenter into the RepoListFragment. To implement such a scheme, we will have to create a new component and a new module, which in the designer will receive a link to our RepoListView interface. In this module, we will create a presenter (using the RepoListView interface reference) and embed it in the fragment.
Introduction in fragment
@Override public void onCreate(@Nullable Bundle savedInstanceState) { super.onCreate(savedInstanceState); DaggerViewComponent.builder() .viewDynamicModule(new ViewDynamicModule(this)) .build() .inject(this); } Component
@Singleton @Component(modules = {ViewDynamicModule.class}) public interface ViewComponent { void inject(RepoListFragment repoListFragment); } Module
@Module public class ViewDynamicModule { RepoListView view; public ViewDynamicModule(RepoListView view) { this.view = view; } @Provides RepoListPresenter provideRepoListPresenter() { return new RepoListPresenter(view); } } In real-world applications, you will have many injections and modules, so creating different components for different entities is a great idea for preventing god object creation.
Change the code presenter.
The above method requires the creation of several files and a variety of actions. In our case, there is a much simpler way, change the constructor and pass the interface reference to onCreate.
Code:
Introduction in fragment
@Inject RepoInfoPresenter presenter; @Override public void onCreate(@Nullable Bundle savedInstanceState) { super.onCreate(savedInstanceState); App.getComponent().inject(this); presenter.onCreate(this, getRepositoryVO()); } Module
@Module public class ViewModule { @Provides RepoInfoPresenter provideRepoInfoPresenter() { return new RepoInfoPresenter(); } } Having completed the implementation of Dagger 2, we turn to testing the application.
Step 4. Unit Testing
Testing has long been an integral part of the software development process.
Wikipedia identifies many types of testing , first of all, let's deal with the unit testing.
Unit testing process in programming, allowing to check for correctness of individual modules of the program source code.
The idea is to write tests for each non-trivial method. This allows you to quickly check whether the next code change did not lead to regression, that is, to the appearance of errors in the already tested program areas, and also facilitates the detection and elimination of such errors.
We will not be able to write completely isolated tests, because all the components interact with each other. By unit tests, we will mean checking the operation of a single module surrounded by mocks. The interaction of several real modules will be checked in integration tests.
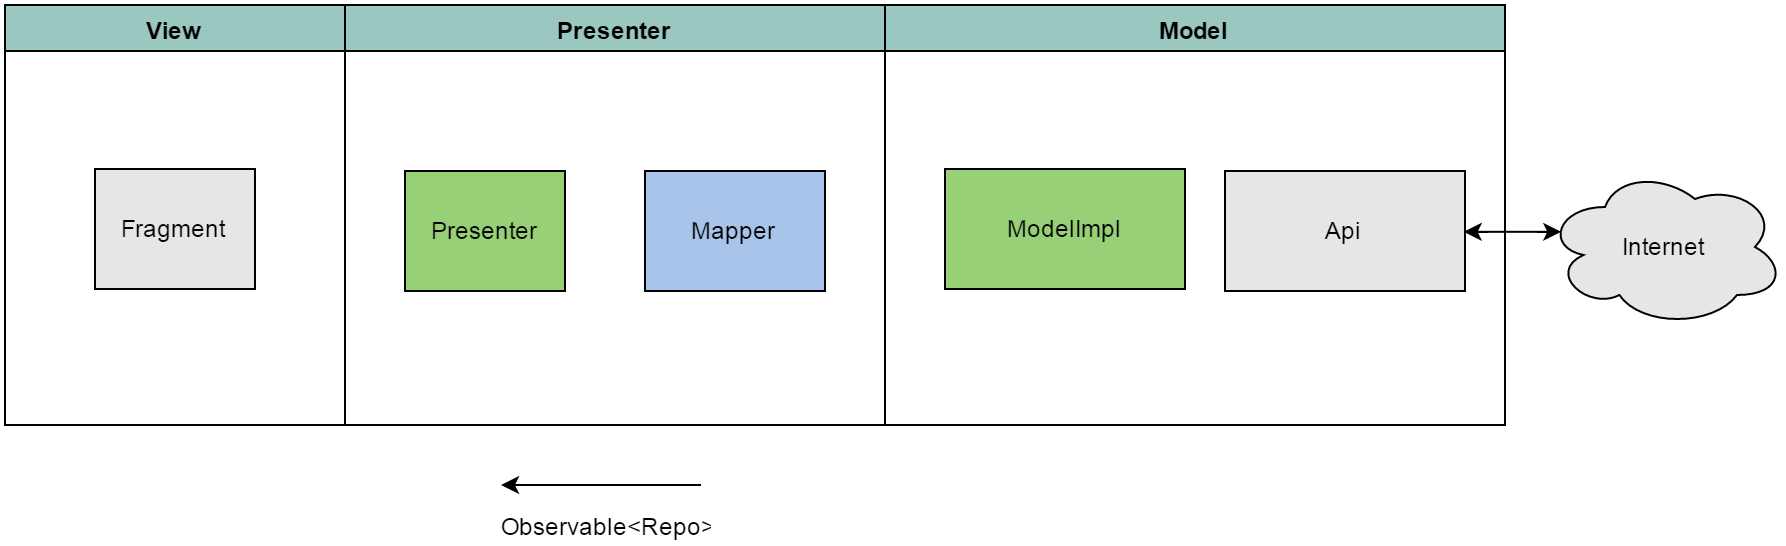
Module interaction scheme:

An example of testing a mapper (gray modules are not used, green ones are mocks, blue is a test module):
Infrastructure
Tools and frameworks improve the convenience of writing and supporting tests. A CI server that prevents you from doing a merge with red tests drastically reduces the chances of unexpected failures of tests in the master branch. Auto run tests and nightly builds help identify problems at an early stage. This principle is called fail fast .
You can read about the test environment in the article Testing on Android: Robolectric + Jenkins + Jao . In the future, we will use Robolecric to write tests, mockito to create mocks, and Jaoo to check the code coverage of the tests.
The MVP pattern allows you to quickly and efficiently write tests on our code. With the help of Dagger 2, we can replace the real objects with test mocks, isolating the code from the outside world. For this we use a test component with test modules. The substitution of a component occurs in a test application, which we specify using the Config (application = TestApplication.class) annotation in the base test class.
JaCoCo Code Coverage
Before you start, you need to determine which methods to test and how to calculate the percentage of coverage tests. To do this, use the JaCoCo library, which generates reports on the results of test execution.
Modern Android Studio supports code coverage out of the box, or you can configure it by adding the following lines to build.gradle:
build.gradle
apply plugin: 'jacoco' jacoco { toolVersion = "0.7.1.201405082137" } def coverageSourceDirs = [ '../app/src/main/java' ] task jacocoTestReport(type: JacocoReport, dependsOn: "testDebugUnitTest") { group = "Reporting" description = "Generate Jacoco coverage reports" classDirectories = fileTree( dir: '../app/build/intermediates/classes/debug', excludes: ['**/R.class', '**/R$*.class', '**/*$ViewInjector*.*', '**/*$ViewBinder*.*', //DI '**/*_MembersInjector*.*', //DI '**/*_Factory*.*', //DI '**/testrx/model/dto/*.*', //dto model '**/testrx/presenter/vo/*.*', //vo model '**/testrx/other/**', '**/BuildConfig.*', '**/Manifest*.*', '**/Lambda$*.class', '**/Lambda.class', '**/*Lambda.class', '**/*Lambda*.class'] ) additionalSourceDirs = files(coverageSourceDirs) sourceDirectories = files(coverageSourceDirs) executionData = files('../app/build/jacoco/testDebugUnitTest.exec') reports { xml.enabled = true html.enabled = true } } Pay attention to the excluded classes: we have deleted everything related to Dagger 2 and our DTO and VO models.
Run jacoco (gradlew jacocoTestReport) and look at the results:
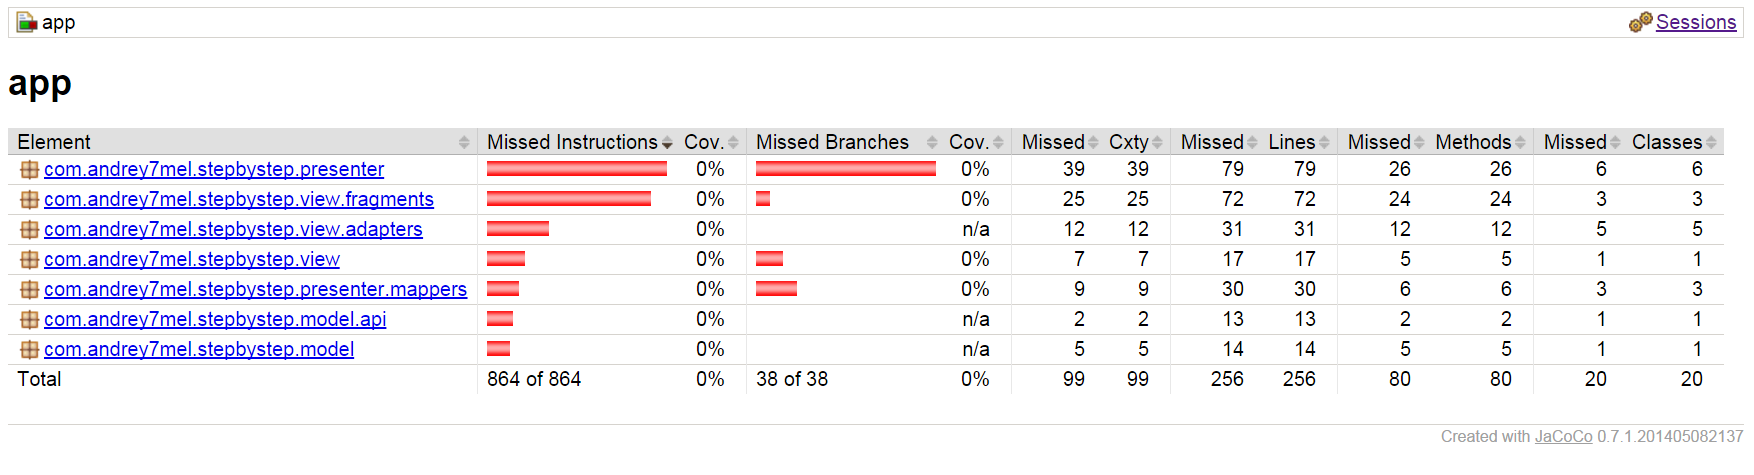
Now we have a percentage of coverage ideally coincides with our number of tests, ie, 0% =) Let's fix this situation!
Model
In the model layer we need to check the correctness of the retrofit setting (ApiInterface), the correctness of the client creation and the work of the ModelImpl.
Components should be checked in isolation, so for checking we need to emulate a server, this will help us MockWebServer . We configure server responses and check retrofit requests.
Layer Model Layout, classes requiring testing are marked in red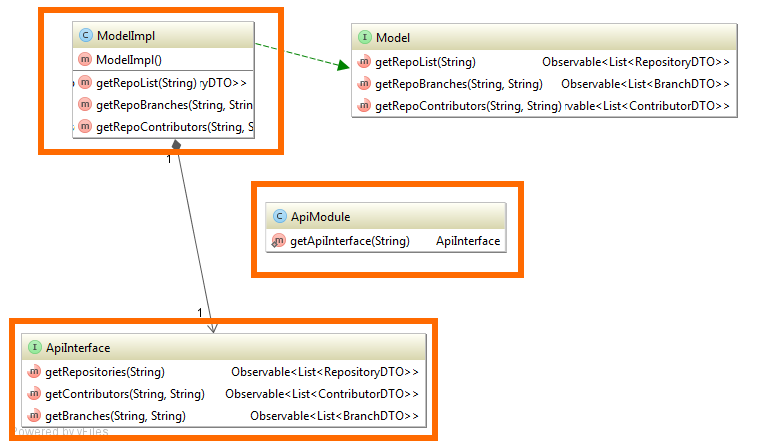
Test module for Dagger 2
@Module public class ModelTestModule { @Provides @Singleton ApiInterface provideApiInterface() { return mock(ApiInterface.class); } @Provides @Singleton @Named(Const.UI_THREAD) Scheduler provideSchedulerUI() { return Schedulers.immediate(); } @Provides @Singleton @Named(Const.IO_THREAD) Scheduler provideSchedulerIO() { return Schedulers.immediate(); } } Test examples
public class ApiInterfaceTest extends BaseTest { private MockWebServer server; private ApiInterface apiInterface; @Before public void setUp() throws Exception { super.setUp(); server = new MockWebServer(); server.start(); final Dispatcher dispatcher = new Dispatcher() { @Override public MockResponse dispatch(RecordedRequest request) throws InterruptedException { if (request.getPath().equals("/users/" + TestConst.TEST_OWNER + "/repos")) { return new MockResponse().setResponseCode(200) .setBody(testUtils.readString("json/repos")); } else if (request.getPath().equals("/repos/" + TestConst.TEST_OWNER + "/" + TestConst.TEST_REPO + "/branches")) { return new MockResponse().setResponseCode(200) .setBody(testUtils.readString("json/branches")); } else if (request.getPath().equals("/repos/" + TestConst.TEST_OWNER + "/" + TestConst.TEST_REPO + "/contributors")) { return new MockResponse().setResponseCode(200) .setBody(testUtils.readString("json/contributors")); } return new MockResponse().setResponseCode(404); } }; server.setDispatcher(dispatcher); HttpUrl baseUrl = server.url("/"); apiInterface = ApiModule.getApiInterface(baseUrl.toString()); } @Test public void testGetRepositories() throws Exception { TestSubscriber<List<RepositoryDTO>> testSubscriber = new TestSubscriber<>(); apiInterface.getRepositories(TestConst.TEST_OWNER).subscribe(testSubscriber); testSubscriber.assertNoErrors(); testSubscriber.assertValueCount(1); List<RepositoryDTO> actual = testSubscriber.getOnNextEvents().get(0); assertEquals(7, actual.size()); assertEquals("Android-Rate", actual.get(0).getName()); assertEquals("andrey7mel/Android-Rate", actual.get(0).getFullName()); assertEquals(26314692, actual.get(0).getId()); } @After public void tearDown() throws Exception { server.shutdown(); } } To check the model we mock ApiInterface and check the correctness of the work.
Sample tests for ModelImpl
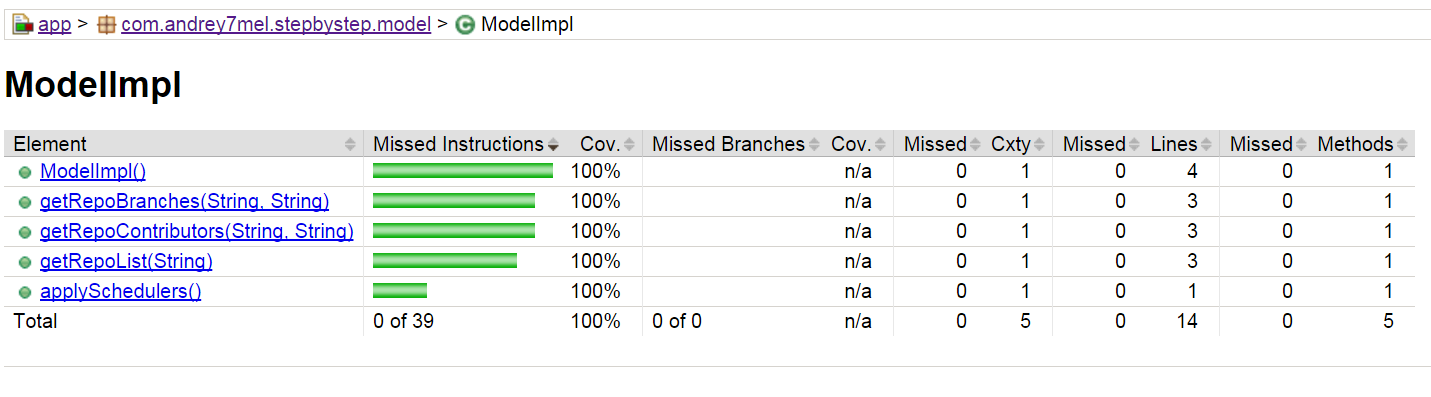
@Test public void testGetRepoBranches() { BranchDTO[] branchDTOs = testUtils.getGson().fromJson(testUtils.readString("json/branches"), BranchDTO[].class); when(apiInterface.getBranches(TestConst.TEST_OWNER, TestConst.TEST_REPO)).thenReturn(Observable.just(Arrays.asList(branchDTOs))); TestSubscriber<List<BranchDTO>> testSubscriber = new TestSubscriber<>(); model.getRepoBranches(TestConst.TEST_OWNER, TestConst.TEST_REPO).subscribe(testSubscriber); testSubscriber.assertNoErrors(); testSubscriber.assertValueCount(1); List<BranchDTO> actual = testSubscriber.getOnNextEvents().get(0); assertEquals(3, actual.size()); assertEquals("QuickStart", actual.get(0).getName()); assertEquals("94870e23f1cfafe7201bf82985b61188f650b245", actual.get(0).getCommit().getSha()); } Check the coverage in Jacoco:
Presenter
In the presenter layer, we need to test the work of mappers and the work of presenters.
Layer Presenter schema, classes requiring testing are marked in red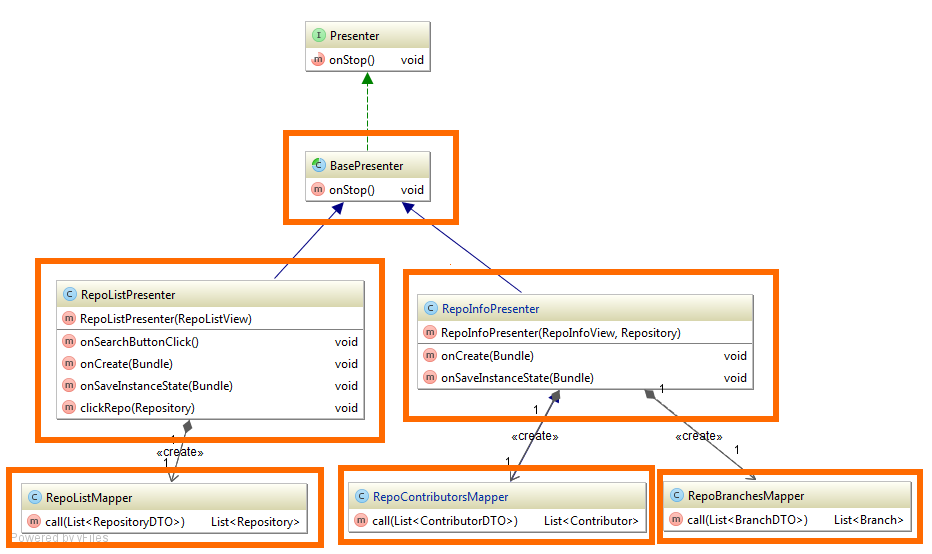
With mappers everything is quite simple. We read json from files, we will transform and we check.
With presenters, we mock the model and check the calls of the necessary methods in the view. It is also necessary to check the correctness of onSubscribe and onStop, for this we intercept the subscription (Subscription) and check isUnsubscribed
Sample tests in the presenter layer
@Before public void setUp() throws Exception { super.setUp(); component.inject(this); activityCallback = mock(ActivityCallback.class); mockView = mock(RepoListView.class); repoListPresenter = new RepoListPresenter(mockView, activityCallback); doAnswer(invocation -> Observable.just(repositoryDTOs)) .when(model) .getRepoList(TestConst.TEST_OWNER); doAnswer(invocation -> TestConst.TEST_OWNER) .when(mockView) .getUserName(); } @Test public void testLoadData() { repoListPresenter.onCreateView(null); repoListPresenter.onSearchButtonClick(); repoListPresenter.onStop(); verify(mockView).showRepoList(repoList); } @Test public void testSubscribe() { repoListPresenter = spy(new RepoListPresenter(mockView, activityCallback)); //for ArgumentCaptor repoListPresenter.onCreateView(null); repoListPresenter.onSearchButtonClick(); repoListPresenter.onStop(); ArgumentCaptor<Subscription> captor = ArgumentCaptor.forClass(Subscription.class); verify(repoListPresenter).addSubscription(captor.capture()); List<Subscription> subscriptions = captor.getAllValues(); assertEquals(1, subscriptions.size()); assertTrue(subscriptions.get(0).isUnsubscribed()); } See the change in JaCoCo:

View
When testing the View layer, we need to check only the calls of the methods of the life cycle of the presenter from the fragment. All logic is contained in the presenters.
Layer View Layout, classes requiring testing are marked in red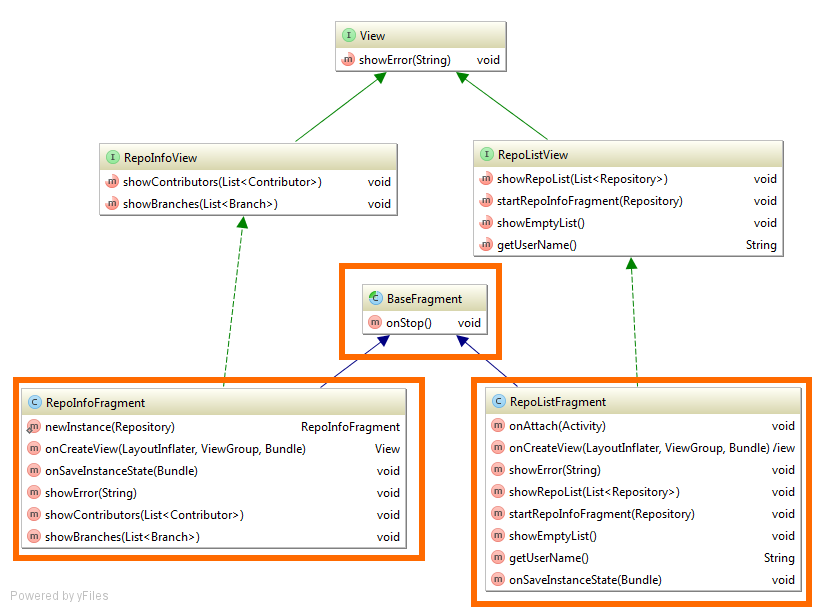
Example of fragment testing
@Test public void testOnCreateViewWithBundle() { repoInfoFragment.onCreateView(LayoutInflater.from(activity), (ViewGroup) activity.findViewById(R.id.container), bundle); verify(repoInfoPresenter).onCreateView(bundle); } @Test public void testOnStop() { repoInfoFragment.onStop(); verify(repoInfoPresenter).onStop(); } @Test public void testOnSaveInstanceState() { repoInfoFragment.onSaveInstanceState(null); verify(repoInfoPresenter).onSaveInstanceState(null); } Final test coverage:
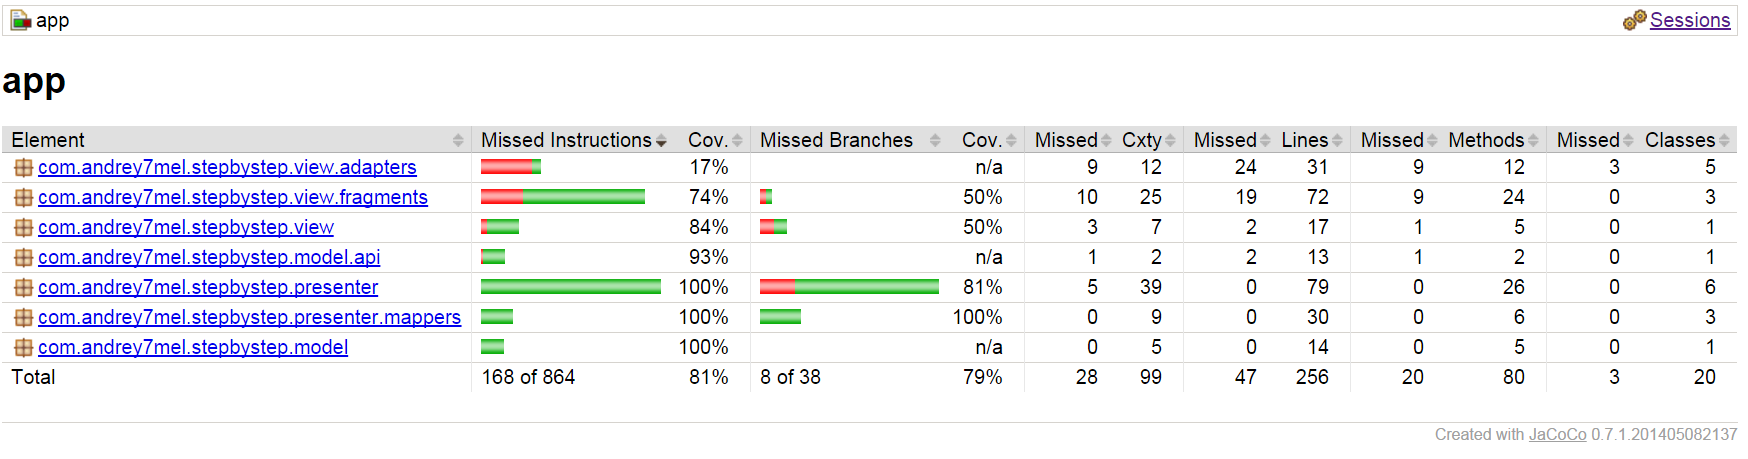
Conclusion or to be continued ...
In the second part of the article, we looked at the implementation of Dagger 2 and covered the unit code with tests. Thanks to the use of MVP and the substitution of injections, we were able to quickly write tests for all parts of the application. All code is available on github . The article was written with the active participation of nnesterov . In the next part we will look at integration and functional testing, and also talk about TDD.
UPDATE
Building Android applications step by step, part three
Source: https://habr.com/ru/post/277343/
All Articles