Vision-based SLAM: tutorial
After the publication of the article on the experience of using monocular SLAM, we received a few comments with questions about the detailed configuration. We decided to answer the song with a series of lesson articles about SLAM. Today we offer to get acquainted with the first of them, in which we will put all the necessary packages and prepare the environment for further work.
So, we are preparing three articles:
To speed up the work, we will consider the simplest configuration. For work we need:
')
Immediately remove the question of using virtual operating systems - in general, this is possible, but it carries a lot of problems (especially when it comes to visualization of the images), so if you don’t want to spend time wandering around the forums, we recommend putting it on a real OS. For those who want to deploy everything on a virtual machine, we will try to give recommendations on the problems that we ourselves have encountered at the end of the article.
So, we have installed Ubuntu 14.04, now we can put ROS on it. Why ros? Because it provides convenient wrappers for all used libraries, and also offers a good infrastructure for quickly creating a prototype. It makes no sense to describe the ROS installation here - there is a very detailed lesson on the site, the main thing is to remember that we are working with the “Indigo” version (not all the packages we need are transferred to the newer Jade. By the way, this is why we use Ubuntu 14.04). Make sure that you install the ros-indigo-desktop-full package - this will save you from having to add packages in the future.
ROS is installed, now you need to configure workspace. Workspace is the folder in which you place the ROS packages collected from sources.
ROS uses two build systems: rosbuild and catkin. Currently, the vast majority of packages have already migrated to the catkin build system, but some use old rosbuild. LSD SLAM refers specifically to them (although there are branches in the repository that seem to have migrated to catkin, in fact, there are broken scripts, and the pull request to correct these errors is not accepted). Therefore, we will spend some time and configure the workspace for both build systems.
Now we will install the necessary packages for SLAM.
For monocular SLAM, we consider two implementations: PTAM and LSD SLAM.
It is best to install RTAB-Map from binary packages:
A usb-cam package is required to use a regular RGB USB camera as a data source.
Check the camera's performance - connect the camera and see which device identifier was assigned to it:
In our case, this is video0. Next, go to the folder (after creating it) ~ / ros_workspace / test and create a text file camera.launch launch with the following content:
Launch files are special files with which you can start several ROS nodes at once and transfer parameters to them.
Using this file, we run two nodes - usb_cam_node from the usb_cam package - to get the image from our camera. And image_view from the package of the same name - with the help of this node we display the data received from the camera on the screen. We also define some parameters for the camera node, the most important of which is video_device, which corresponds to the device of our camera.
Now we execute this file with the help of the command (you need to be in the same folder as the file)
You should see a window displaying the image received from the camera:

To work with Kinect 360, we need the Freenect driver, which can be installed from binary packages:
Check how our Kinect works by running the GUI RTAB-Map command
When you first start RTAB-Map will give two windows, informing where it will save its database, configuration files, etc.


Next you should see the RTAB-Map GUI:

We need to create a new RTAB-Map database and start capturing images:


Then, if everything works correctly, you should see the images from the depth camera:

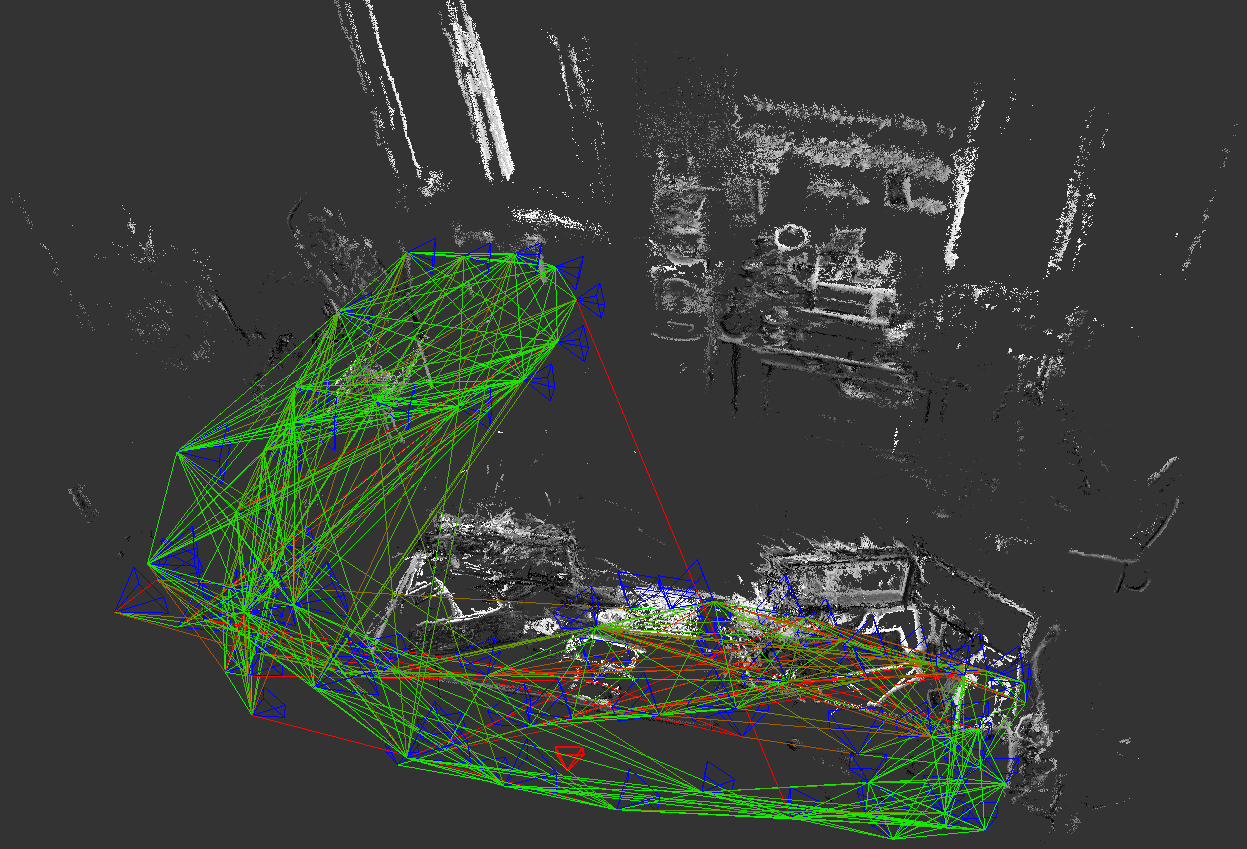
Visual SLAM algorithms require careful camera calibration and rectification of the resulting image. In most cases, a pinhole camera model is used (wall, pinhole camera). The calibration process involves the calculation of the internal parameters (intrincsics) of the model and the distortion model coefficients.
ROS has built-in camera calibration tools . Before calibrating the camera, it is necessary to prepare a calibration sample: print a chess pattern (for example, such , preferably at least A3, more - better).
Run the utility as follows:
Where
For more accurate calibration, you need to remove the calibration object in different parts of the frame with different scale and tilt / rotation. The utility will independently select the required number of frames for the calibration process. After enough frames have been collected (all indicators turn green), you can start the calibration process by pressing the “calibrate” button. Then you need to click the “commit” button to save the calibration data for the selected source.

As we promised, we will give a couple of tips on installing the whole environment inside virtual OS. As a test, we tried to install inside the Virtual Box (version 5.0.14). The problem that has delayed us for a long time is due to the download error of the vboxvideo video driver, which we have not been able to overcome in adequate time. And although Unity happily reported that 3D support is present, and even launched demos from mesa-utils, attempts to launch RViz (the visualization package included in ROS) at best led to its crash (at worst a virtual machine was cut down). A partial solution is to explicitly indicate the need to use software rendering: to do this, you must specify LIBGL_ALWAYS_SOFTWARE = 1 before the command, for example
Another problem was USB 3.0 devices, but this is solved simply by installing the VirtualBox extension pack and activating the appropriate settings in the properties of the virtual machine.
There is also a high probability that after you install everything safely, you will be in for a big disappointment. What happened in our case - when you run the examples, RViz receives only one frame from the camera, after which the data from the camera is not received. We did not overcome this problem, so we completely abandoned the use of virtual machines, which we advise you.
At this preparatory part is over. In the next part, we will begin to configure and use different types of visual SLAM.
So, we are preparing three articles:
- technical - about setting up the environment and installing the necessary for the use of SLAM packages, as well as about camera calibration
- using monocular SLAM using the example of PTAM and LSD SLAM
- using SLAM based on stereo cameras and depth cameras using the example of RTAB-Map
Initial conditions
To speed up the work, we will consider the simplest configuration. For work we need:
')
- a computer with Ubuntu 14.04 (note the version why it is — let's say below);
- USB camera for monocular vision;
- two as close as possible USB cameras for stereo viewing;
- depth camera (we used the Kinect 360).
Immediately remove the question of using virtual operating systems - in general, this is possible, but it carries a lot of problems (especially when it comes to visualization of the images), so if you don’t want to spend time wandering around the forums, we recommend putting it on a real OS. For those who want to deploy everything on a virtual machine, we will try to give recommendations on the problems that we ourselves have encountered at the end of the article.
Install Robotic Operating System (ROS)
So, we have installed Ubuntu 14.04, now we can put ROS on it. Why ros? Because it provides convenient wrappers for all used libraries, and also offers a good infrastructure for quickly creating a prototype. It makes no sense to describe the ROS installation here - there is a very detailed lesson on the site, the main thing is to remember that we are working with the “Indigo” version (not all the packages we need are transferred to the newer Jade. By the way, this is why we use Ubuntu 14.04). Make sure that you install the ros-indigo-desktop-full package - this will save you from having to add packages in the future.
Customize workspace
ROS is installed, now you need to configure workspace. Workspace is the folder in which you place the ROS packages collected from sources.
ROS uses two build systems: rosbuild and catkin. Currently, the vast majority of packages have already migrated to the catkin build system, but some use old rosbuild. LSD SLAM refers specifically to them (although there are branches in the repository that seem to have migrated to catkin, in fact, there are broken scripts, and the pull request to correct these errors is not accepted). Therefore, we will spend some time and configure the workspace for both build systems.
- Create a ros_workspace folder inside your home folder.
mkdir ~/ros_workspace - Configure catkin:
- Create a folder for the packages and go into it:
mkdir –p ~/ros_workspace/catkin/src && cd $_ - execute the initialization command:
catkin_init_workspace - let's assemble the workspace to get the configuration for use in rosbuild:
cd .. && catkin_make
- Create a folder for the packages and go into it:
- Rosbuild setup:
- create a folder and go into it:
mkdir ~/ros_workspace/rosbuild && cd $_ - install a link to the devel of our catkin workspace:
rosws init . ~/ros_workspace/catkin/devel - create a folder for packages:
mkdir packages - Add to our rosbuild workspace folder information for packages:
rosws set ~/ros_workspace/rosbuild/packages -t . - add initialization of environment variables to bashrc file:
echo "source ~/ros_workspace/rosbuild/setup.bash" >> ~/.bashrc - Restart the terminal for the changes to take effect.
- create a folder and go into it:
- To check that everything is configured, we will correctly execute the command
roscd
You must go to the ~ / ros_workspace / rosbuild folder.
Package installation
Now we will install the necessary packages for SLAM.
For monocular SLAM, we consider two implementations: PTAM and LSD SLAM.
LSD SLAM:
- We will include support for loop detection (loop closure) during assembly, so we will have to rebuild OpenCV and enable non-free modules during assembly. To do this, download the OpecCV source code (version 2.4.8 - this is also important: if you install another version, then there is a chance that some ROS modules will fall off, so to avoid dancing with tambourines, download this version .
- Unzip (no need to place OpenCV sources in the workspace, as this package does not apply to ROS) and build OpenCV:
- create a build folder and navigate to it
mkdir build && cd $_ - execute the command
cmake –D CMAKE_BUILD_TYPE=Release .. - and upon its completion
sudo make install
- create a build folder and navigate to it
- To enable loop closure support in LSD SLAM itself, you need to edit the lsd_slam_core / CmakeLists.txt file, uncommenting the following lines:
add_subdirectory(${PROJECT_SOURCE_DIR}/thirdparty/openFabMap)
include_directories(${PROJECT_SOURCE_DIR}/thirdparty/openFabMap/include)
add_definitions("-DHAVE_FABMAP")
set(FABMAP_LIB openFABMAP )
- Unzip (no need to place OpenCV sources in the workspace, as this package does not apply to ROS) and build OpenCV:
- Install the necessary dependencies:
sudo apt-get install ros-indigo-libg2o liblapack-dev libblas-dev freeglut3-dev libqglviewer-dev libsuitesparse-dev libx11-dev - Go to the folder
cd ~/ros_workspace/rosbuild/package - Clone the repository
git clone https://github.com/tum-vision/lsd_slam.git - We collect package
rosmake lsd_slam
PTAM:
- Go to the folder
cd ~/ros_workspace/catkin/src - Clone repository:
git clone https://github.com/ethz-asl/ethzasl_ptam - Go to the workspace level and build it:
cd .. && catkin_make –j4
RTAB-Map:
It is best to install RTAB-Map from binary packages:
sudo apt-get install ros-indigo-rtabmap-ros We connect the USB camera
A usb-cam package is required to use a regular RGB USB camera as a data source.
- Go to the folder
cd ~/ros_workspace/catkin/src - Clone the repository
git clone https://github.com/bosch-ros-pkg/usb_cam - we collect package
cd.. && catkin_make - we deliver the necessary dependencies:
sudo apt-get install v4l-utils
Check the camera's performance - connect the camera and see which device identifier was assigned to it:
ls /dev/video* In our case, this is video0. Next, go to the folder (after creating it) ~ / ros_workspace / test and create a text file camera.launch launch with the following content:
<launch> <node pkg="usb_cam" type="usb_cam_node" name="camera" output="screen"> <param name="video_device" value="/dev/video0"/> <param name="image_width" value="320"/> <param name="image_height" value="240"/> </node> <node pkg="image_view" type="image_view" name="viewer"> <remap from="image" to="/camera/image_raw"/> </node> </launch> Launch files are special files with which you can start several ROS nodes at once and transfer parameters to them.
Using this file, we run two nodes - usb_cam_node from the usb_cam package - to get the image from our camera. And image_view from the package of the same name - with the help of this node we display the data received from the camera on the screen. We also define some parameters for the camera node, the most important of which is video_device, which corresponds to the device of our camera.
Now we execute this file with the help of the command (you need to be in the same folder as the file)
roslaunch camera.launch You should see a window displaying the image received from the camera:
Connecting Kinect 360
To work with Kinect 360, we need the Freenect driver, which can be installed from binary packages:
sudo apt-get install freenect Check how our Kinect works by running the GUI RTAB-Map command
rtabmap When you first start RTAB-Map will give two windows, informing where it will save its database, configuration files, etc.
Next you should see the RTAB-Map GUI:
We need to create a new RTAB-Map database and start capturing images:
Then, if everything works correctly, you should see the images from the depth camera:
Camera calibration
Visual SLAM algorithms require careful camera calibration and rectification of the resulting image. In most cases, a pinhole camera model is used (wall, pinhole camera). The calibration process involves the calculation of the internal parameters (intrincsics) of the model and the distortion model coefficients.
ROS has built-in camera calibration tools . Before calibrating the camera, it is necessary to prepare a calibration sample: print a chess pattern (for example, such , preferably at least A3, more - better).
Run the utility as follows:
rosrun camera_calibration cameracalibrator.py --size 8x6 --square 0.108 image:=/camera/image_raw camera:=/camera Where
- --size 8x6 indicates the number of inner corners of the chess pattern (8x6 corresponds to the pattern of 9x7 squares)
- --square 0.108 - size (sides) of a square chess pattern in meters
For more accurate calibration, you need to remove the calibration object in different parts of the frame with different scale and tilt / rotation. The utility will independently select the required number of frames for the calibration process. After enough frames have been collected (all indicators turn green), you can start the calibration process by pressing the “calibrate” button. Then you need to click the “commit” button to save the calibration data for the selected source.
Virtual box
As we promised, we will give a couple of tips on installing the whole environment inside virtual OS. As a test, we tried to install inside the Virtual Box (version 5.0.14). The problem that has delayed us for a long time is due to the download error of the vboxvideo video driver, which we have not been able to overcome in adequate time. And although Unity happily reported that 3D support is present, and even launched demos from mesa-utils, attempts to launch RViz (the visualization package included in ROS) at best led to its crash (at worst a virtual machine was cut down). A partial solution is to explicitly indicate the need to use software rendering: to do this, you must specify LIBGL_ALWAYS_SOFTWARE = 1 before the command, for example
LIBGL_ALWAYS_SOFTWARE=1 roslaunch softkinetic_camera softkinetic_camera_demo.launch Another problem was USB 3.0 devices, but this is solved simply by installing the VirtualBox extension pack and activating the appropriate settings in the properties of the virtual machine.
There is also a high probability that after you install everything safely, you will be in for a big disappointment. What happened in our case - when you run the examples, RViz receives only one frame from the camera, after which the data from the camera is not received. We did not overcome this problem, so we completely abandoned the use of virtual machines, which we advise you.
At this preparatory part is over. In the next part, we will begin to configure and use different types of visual SLAM.
Source: https://habr.com/ru/post/277109/
All Articles