Recipes for Android: IoC with Gradle Taste
Android projects are great. Sometimes really big. One of our projects is a news application that is being developed simultaneously for two alternative platforms: Android and FireOS, which is from Amazon. This allows you to expand the circle of readers of news, because users of Kindle Fire readers love to read :). However, this also imposes an obligation to reckon with the features of each of the platforms. For example, if on Android you use GCM for push messages, then on FireOS you should use Amazon AWS for this. Similarly, for in-app shopping systems: Google in-app billing vs. In-App Purchasing. But large project size! = Large application size!
In this article, we show how to use alternative builds to optimize the application and support them without harm to the development process.

When developing a multiplatform application, a developer can deal with code that is executed only on one of the platforms, but being launched on others will be a dead weight. In addition to its existence, such a code will probably introduce all its dependencies into the project with the same cargo. This in itself is not very good, and considering the specifics of development for Android: “problem 65k”, best practice to make the downloadable file size as small as possible, with this code you definitely need to do something. But endless checks ifAndroid () or ifAmazon () want to see a little less than never.
')
If you are an experienced Android developer, you probably already have come across the Android Gradle option of the plugin as ProductFlavor.
Flavor (English) - taste, aroma
This option allows you to create alternative assemblies of the same project, including in the build files from different directories depending on the name of the flavor being collected. Often, ProductFlavor is used for all sorts of “branding” of the application, replacing resources (images, texts, links). Another frequent case is the division of the application into demo- and full versions, because the name of the collected flavor is automatically placed in the field of the BuildConfig.FLAVOR class. Its value can later be checked in runtime and not allowed to perform any actions in the demo version.
Sharing on flavor'y can not only resources, but also the code. But you need to understand that the code used in flavor1 can never interact with the code from flavor2. And the code lying in the main module can always see only one flavor at a time. All this means, for example, that you cannot write a set of utility methods in one flavor and use them in another. It is necessary to divide the code wisely and very carefully, as isolated as possible, so that the switching of alternative builds goes unnoticed by the main module. The Dependency Injection pattern will help us a lot in this. Following it, we will leave only common interfaces in the main module, and we will also expand specific implementations in flavor form. We will look at the whole process on the example of creating a simple application for searching repositories on GitHub.
So, we need:
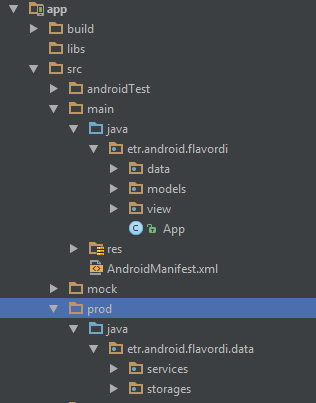
We will follow the approach of dividing the application into layers and immediately create 3 packages: .view for the presentation, .models for the business logic models, and .data for the content provider classes. In the data package, we still need 2 services and storages packages. As a result, the whole structure should look like this:

Modelki is enough for us with only one: “Repository”. You can store anything in it, but we wanted to have a description, name, and htmlUrl in it.
Now let's define the interface of the service class that will look for the AppService repositories:
Immediately create and interface class that caches the search results RepositoryStorage:
We will create and store our service and repository inside the Application class:
For the preparatory stage, it remains only to create the screen itself and write the receipt and display of the results in it. Within the framework of the demo application, AsyncTask will be enough for us to perform background work, but you can always use your favorite approach.
The implementation of the adapter and in general the whole demo project can be viewed on GitHub .
At this stage, our project can already be compiled and run, but this makes no sense, because we have not written any implementation of our interfaces AppService and RepositoryStorage , so it's time to do it.
First you need to open build.gradle in the main project module and add our flavor to it. Let's call them, for example, “mock” and “prod”
They should be added to the android {...} section at the same level as buildTypes {...} .
Be sure to then click on the Sync Project With Gradle Files button.

As soon as the synchronization is completed, new flavors will appear in the Build Variants window.

Now choose mockDebug .
Once we have defined the product flavors in the project, we can create directories of the same name for them on the same level as main . From these directories, the files will be taken during the assembly of some flavor.
Add a mock folder, repeating in it the structure of the services and storages packages :

Finally, you can proceed with the mock implementation of our interfaces:
As you can see, the mock-service gives us 10 very informative Repository models, and mock-storage does nothing at all. We initialize them in our App-class:
Now that our application is ready to be assembled and running. Now we can test and adjust the work of the UI. Now we can ... go to the real implementation of our interfaces.
In the Build Variants window, select the prodDebug option and, similarly to the mock folder, create the prod folder with the same packages and classes:
We will resort to using retrofit2 for network requests, it will work inside our implementation of AppServiceImpl:
As you can see from the code, we have made some more auxiliary classes: * Entity for parsing answers and RepositoryMapper for mapping responses into the Repository model.
Please note that all classes related to real work with the server, such as RepositoryEntity, RepositoryMapper, RetroGithubService, are in the flavor folder “prod”. This means that when building any other flavor, such as mock, these classes will not fall into the resulting apk-file .
The attentive reader may notice that the name of the class that implements the real work in the server and the name of its mock analog match: AppServiceImpl.java . This is done on purpose and thanks to this, in the main project code, which is located in the main folder, you do not need to change anything when changing flavor. When the mock flavor is selected, the application sees the AppServiceImpl class located in the mock folder and does not see the class located in the prod folder. Similarly, with the selected flavor prod .
An equally attentive reader may notice that we called the implementation cache class MockRepositoryStorage and, possibly, were sealed. But no, we did it specifically to show one of the options of how you can have different names of implementation classes, and even different constructors for each of them.
The trick is essentially simple; we will do the RepositoryStorageBuilder class of the same name for different flavors, which, depending on the flavor you choose, will give us the desired implementation.
productFlavor = prod
productFlavor = mock
And common for both initialization in Application:
Now the “honest” implementation of the work can be considered complete, but if we stop here, we will not use all the power of ProductFlavor. The fact is that the libraries used in the fair implementation of the search, which are declared in the dependencies section, get into our assembly regardless of the flavor selected. Fortunately, we can specify for each dependency separately whether we want to see it in the build by adding the desired name flavor before the word compile:
This will not only reduce the size of the application, but also increase the speed of its assembly, if the dependencies are really large.
Why use this approach to Dependency Injection, if there is Dagger2, Roboguice, if you can even write it manually?
Of course, the key difference of this approach is that the definition of implementations occurs at the compilation stage and only those dependencies that will actually be used, with all the ensuing consequences, fall into the build. At the same time, to determine dependencies at runtime, you can continue to use your favorite DI framework.
As we mentioned at the beginning, we are developing one of our projects for two platforms at once: Android and Amazon FireOS. These operating systems are basically similar to each other (of course, we all understand who and who resembles someone :)), but each of them has its own implementation of push-notifications and its own built-in shopping mechanism. For these and other platform differences, we, as in the demo project, left only common interfaces in the main module: the same registration of the device on the server of push messages, the same subscription purchase process, and specific platform-specific implementations are stored in the corresponding flavor.

We have been using this approach for a long time and are ready to share our impressions of use:
pros
Minuses
As you can see, we believe that there are 3 times more advantages :) Bon appetit to all!
In this article, we show how to use alternative builds to optimize the application and support them without harm to the development process.
What are we cooking?
When developing a multiplatform application, a developer can deal with code that is executed only on one of the platforms, but being launched on others will be a dead weight. In addition to its existence, such a code will probably introduce all its dependencies into the project with the same cargo. This in itself is not very good, and considering the specifics of development for Android: “problem 65k”, best practice to make the downloadable file size as small as possible, with this code you definitely need to do something. But endless checks ifAndroid () or ifAmazon () want to see a little less than never.
')
If you are an experienced Android developer, you probably already have come across the Android Gradle option of the plugin as ProductFlavor.
Flavor (English) - taste, aroma
This option allows you to create alternative assemblies of the same project, including in the build files from different directories depending on the name of the flavor being collected. Often, ProductFlavor is used for all sorts of “branding” of the application, replacing resources (images, texts, links). Another frequent case is the division of the application into demo- and full versions, because the name of the collected flavor is automatically placed in the field of the BuildConfig.FLAVOR class. Its value can later be checked in runtime and not allowed to perform any actions in the demo version.
Sharing on flavor'y can not only resources, but also the code. But you need to understand that the code used in flavor1 can never interact with the code from flavor2. And the code lying in the main module can always see only one flavor at a time. All this means, for example, that you cannot write a set of utility methods in one flavor and use them in another. It is necessary to divide the code wisely and very carefully, as isolated as possible, so that the switching of alternative builds goes unnoticed by the main module. The Dependency Injection pattern will help us a lot in this. Following it, we will leave only common interfaces in the main module, and we will also expand specific implementations in flavor form. We will look at the whole process on the example of creating a simple application for searching repositories on GitHub.
Ingredients
So, we need:
- Screen with input field, button and list of results (1 pc.).
- Class for working with the Github Web API: its mock and real implementation (total 2 pcs.).
- Class for caching search results: also real and mock-implementations (total 2 pcs.).
- Icons, texts, progress bars - to taste.
We will follow the approach of dividing the application into layers and immediately create 3 packages: .view for the presentation, .models for the business logic models, and .data for the content provider classes. In the data package, we still need 2 services and storages packages. As a result, the whole structure should look like this:
Modelki is enough for us with only one: “Repository”. You can store anything in it, but we wanted to have a description, name, and htmlUrl in it.
Now let's define the interface of the service class that will look for the AppService repositories:
public interface AppService { List<Repository> searchRepositories(String query); } Immediately create and interface class that caches the search results RepositoryStorage:
public interface RepositoryStorage { void saveRepositories(String query, List<Repository> repositoryList); List<Repository> getRepositories(String query); } We will create and store our service and repository inside the Application class:
public class App extends Application { private AppService appService; private RepositoryStorage repositoryStorage; public AppService getAppService() { return appService; } public RepositoryStorage getRepositoryStorage() { return repositoryStorage; } } For the preparatory stage, it remains only to create the screen itself and write the receipt and display of the results in it. Within the framework of the demo application, AsyncTask will be enough for us to perform background work, but you can always use your favorite approach.
public class MainActivity extends AppCompatActivity { @Bind(R.id.actionSearchView) Button actionSearchView; @Bind(R.id.recyclerView) RecyclerView recyclerView; @Bind(R.id.searchQueryView) EditText searchQueryView; @Bind(R.id.progressView) View progressView; private SearchResultsAdapter adapter; private AppService appService; private SearchTask searchTask; private RepositoryStorage repositoryStorage; @Override protected void onCreate(Bundle savedInstanceState) { super.onCreate(savedInstanceState); setContentView(R.layout.activity_main); ButterKnife.bind(this); appService = ((App) getApplication()).getAppService(); repositoryStorage = ((App) getApplication()).getRepositoryStorage(); recyclerView.setLayoutManager(new LinearLayoutManager(this)); adapter = new SearchResultsAdapter(); recyclerView.setAdapter(adapter); searchQueryView.setOnEditorActionListener(new TextView.OnEditorActionListener() { @Override public boolean onEditorAction(TextView v, int actionId, KeyEvent event) { querySearch(searchQueryView.getText().toString()); return true; } }); } @OnClick(R.id.actionSearchView) void onActionSearchClicked() { querySearch(searchQueryView.getText().toString()); } private void querySearch(String query) { if (TextUtils.isEmpty(query)) { return; } if (searchTask != null) { return; } InputMethodManager imm = (InputMethodManager) getSystemService(Context.INPUT_METHOD_SERVICE); imm.hideSoftInputFromWindow(searchQueryView.getWindowToken(), 0); searchTask = new SearchTask(); searchTask.execute(query); showProgress(true); } private void showData(List<Repository> repositories) { searchTask = null; adapter.setData(repositories); } private void showProgress(boolean inProgress) { progressView.setVisibility(inProgress ? View.VISIBLE : View.GONE); actionSearchView.setEnabled(!inProgress); } private void showError(@Nullable ApiException exception) { searchTask = null; new AlertDialog.Builder(this) .setMessage(exception != null ? exception.getMessage() : getString(R.string.unknown_error)) .setTitle(R.string.error_title) .show(); } private class SearchTask extends AsyncTask<String, Void, SearchTaskResult> { @Override protected SearchTaskResult doInBackground(String... params) { String q = params[0]; SearchTaskResult result = new SearchTaskResult(); try { result.repositories = appService.searchRepositories(q); repositoryStorage.saveRepositories(q, result.repositories); } catch (ApiException e) { result.exception = e; //try to show some cached results result.repositories = repositoryStorage.getRepositories(q); } return result; } @Override protected void onPostExecute(SearchTaskResult result) { if (result.exception != null) { showError(result.exception); } showData(result.repositories); showProgress(false); } } private class SearchTaskResult { List<Repository> repositories; ApiException exception; } } The implementation of the adapter and in general the whole demo project can be viewed on GitHub .
At this stage, our project can already be compiled and run, but this makes no sense, because we have not written any implementation of our interfaces AppService and RepositoryStorage , so it's time to do it.
Add taste
First you need to open build.gradle in the main project module and add our flavor to it. Let's call them, for example, “mock” and “prod”
productFlavors { mock {} prod {} } They should be added to the android {...} section at the same level as buildTypes {...} .
Be sure to then click on the Sync Project With Gradle Files button.
As soon as the synchronization is completed, new flavors will appear in the Build Variants window.
Now choose mockDebug .
Once we have defined the product flavors in the project, we can create directories of the same name for them on the same level as main . From these directories, the files will be taken during the assembly of some flavor.
Add a mock folder, repeating in it the structure of the services and storages packages :
Finally, you can proceed with the mock implementation of our interfaces:
public class AppServiceImpl implements AppService { @Override public List<Repository> searchRepositories(String query) { if (query.equals("error")) { throw new ApiException("Manual exception"); } List<Repository> results = new ArrayList<>(); for (int i = 1; i <= 10; i++) { results.add(new Repository("Mock description " + i, "Mock Repository " + i, "http://mock-repo-url")); } return results; } } public class MockRepositoryStorage implements RepositoryStorage { @Override public void saveRepositories(String q, List<Repository> repositoryList) {} @Override public List<Repository> getRepositories(String q) { return null; } } As you can see, the mock-service gives us 10 very informative Repository models, and mock-storage does nothing at all. We initialize them in our App-class:
@Override public void onCreate() { super.onCreate(); appService = new AppServiceImpl(); repositoryStorage = new MockRepositoryStorage(); } Now that our application is ready to be assembled and running. Now we can test and adjust the work of the UI. Now we can ... go to the real implementation of our interfaces.
In the Build Variants window, select the prodDebug option and, similarly to the mock folder, create the prod folder with the same packages and classes:
We will resort to using retrofit2 for network requests, it will work inside our implementation of AppServiceImpl:
public class AppServiceImpl implements AppService { private final RetroGithubService service; public AppServiceImpl() { service = new Retrofit.Builder() .baseUrl("https://api.github.com/") .addConverterFactory(GsonConverterFactory.create()) .build().create(RetroGithubService.class); } @Override public List<Repository> searchRepositories(String query) { Call<ApiRepositorySearchEntity> call = service.searchRepositories(query); try { Response<ApiRepositorySearchEntity> response = call.execute(); if (response.isSuccess()) { ApiRepositorySearchEntity body = response.body(); List<Repository> results = new ArrayList<>(); RepositoryMapper mapper = new RepositoryMapper(); for (RepositoryEntity entity : body.items) { results.add(mapper.map(entity)); } return results; } else { throw new ApiException(response.message()); } } catch (Exception e) { throw new ApiException(e); } } } public interface RetroGithubService { @GET("search/repositories") Call<ApiRepositorySearchEntity> searchRepositories(@Query("q") String query); } As you can see from the code, we have made some more auxiliary classes: * Entity for parsing answers and RepositoryMapper for mapping responses into the Repository model.
Please note that all classes related to real work with the server, such as RepositoryEntity, RepositoryMapper, RetroGithubService, are in the flavor folder “prod”. This means that when building any other flavor, such as mock, these classes will not fall into the resulting apk-file .
The attentive reader may notice that the name of the class that implements the real work in the server and the name of its mock analog match: AppServiceImpl.java . This is done on purpose and thanks to this, in the main project code, which is located in the main folder, you do not need to change anything when changing flavor. When the mock flavor is selected, the application sees the AppServiceImpl class located in the mock folder and does not see the class located in the prod folder. Similarly, with the selected flavor prod .
An equally attentive reader may notice that we called the implementation cache class MockRepositoryStorage and, possibly, were sealed. But no, we did it specifically to show one of the options of how you can have different names of implementation classes, and even different constructors for each of them.
The trick is essentially simple; we will do the RepositoryStorageBuilder class of the same name for different flavors, which, depending on the flavor you choose, will give us the desired implementation.
productFlavor = prod
public class RepositoryStorageBuilder { private int maxSize; public RepositoryStorageBuilder setMaxSize(int maxSize) { this.maxSize = maxSize; return this; } public RepositoryStorage build() { return new InMemoryRepositoryStorage(maxSize); } } productFlavor = mock
public class RepositoryStorageBuilder { public RepositoryStorageBuilder setMaxSize(int maxSize) { return this; } public RepositoryStorage build() { return new MockRepositoryStorage(); } } And common for both initialization in Application:
@Override public void onCreate() { super.onCreate(); ... repositoryStorage = new RepositoryStorageBuilder() .setMaxSize(5) .build(); } Now the “honest” implementation of the work can be considered complete, but if we stop here, we will not use all the power of ProductFlavor. The fact is that the libraries used in the fair implementation of the search, which are declared in the dependencies section, get into our assembly regardless of the flavor selected. Fortunately, we can specify for each dependency separately whether we want to see it in the build by adding the desired name flavor before the word compile:
dependencies { compile fileTree(dir: 'libs', include: ['*.jar']) testCompile 'junit:junit:4.12' prodCompile 'com.squareup.retrofit:retrofit:2.0.0-beta2' prodCompile 'com.squareup.retrofit:converter-gson:2.0.0-beta2' prodCompile 'com.google.code.gson:gson:2.5' compile 'com.android.support:appcompat-v7:23.1.1' compile 'com.android.support:recyclerview-v7:23.1.1' compile 'com.jakewharton:butterknife:7.0.1' } This will not only reduce the size of the application, but also increase the speed of its assembly, if the dependencies are really large.
What for?
Why use this approach to Dependency Injection, if there is Dagger2, Roboguice, if you can even write it manually?
Of course, the key difference of this approach is that the definition of implementations occurs at the compilation stage and only those dependencies that will actually be used, with all the ensuing consequences, fall into the build. At the same time, to determine dependencies at runtime, you can continue to use your favorite DI framework.
True story
As we mentioned at the beginning, we are developing one of our projects for two platforms at once: Android and Amazon FireOS. These operating systems are basically similar to each other (of course, we all understand who and who resembles someone :)), but each of them has its own implementation of push-notifications and its own built-in shopping mechanism. For these and other platform differences, we, as in the demo project, left only common interfaces in the main module: the same registration of the device on the server of push messages, the same subscription purchase process, and specific platform-specific implementations are stored in the corresponding flavor.
We have been using this approach for a long time and are ready to share our impressions of use:
pros
- Exclusion from the resulting assembly of all the code and its dependencies, which will never be used on any of the platforms.
- Reduced project build time only selected (active) flavor is collected.
- All the benefits of using IoC, separating the interface from the implementation, and no ugly if isAndroid () style
Minuses
- Android Studio simultaneously sees only the selected flavor and its directory. Because of this, automatic refactoring, search by java-classes, search by resources does not work fully. It does not work in the sense that it does not apply to inactive flavors. After refactoring, sometimes you have to switch between flavors and repeat refactoring separately for each of them.
As you can see, we believe that there are 3 times more advantages :) Bon appetit to all!
Source: https://habr.com/ru/post/276927/
All Articles