Procedurally generated world maps on Unity C #, part 3
This is the third article from the series on procedurally generated maps using Unity and C # maps of the world. The cycle will consist of four articles.
Content
Part 1 :
')
Introduction
Noise generation
Beginning of work
Generate elevation map
Part 2 :
Map folding on one axis
Map folding on both axes
Neighbor Search
Bit masks
Fill
Part 3 (this article):
Heat map generation
Humidity Map Generation
River generation
Part 4 :
Biome generation
Spherical map generation
Heat map generation
The heat map determines the temperature of the generated world. The heat map we create will be based on the height and latitude data. These latitudes can be obtained by a simple noise gradient. The Accidental Noise library provides the following function:
ImplicitGradient gradient = new ImplicitGradient (1, 1, 1, 0, 1, 1, 1, 1, 1, 1, 1, 1); Since we are folding the world, as a heat gradient we will have only one gradient along the Y axis.
To generate a heat map texture, add a new function to the TextureGenerator class. It will allow us to visually monitor changes occurring with the heat map:
public static Texture2D GetHeatMapTexture(int width, int height, Tile[,] tiles) { var texture = new Texture2D(width, height); var pixels = new Color[width * height]; for (var x = 0; x < width; x++) { for (var y = 0; y < height; y++) { pixels[x + y * width] = Color.Lerp(Color.blue, Color.red, tiles[x,y].HeatValue); //darken the color if a edge tile if (tiles[x,y].Bitmask != 15) pixels[x + y * width] = Color.Lerp(pixels[x + y * width], Color.black, 0.4f); } } texture.SetPixels(pixels); texture.wrapMode = TextureWrapMode.Clamp; texture.Apply(); return texture; } Our temperature gradient will look like this:
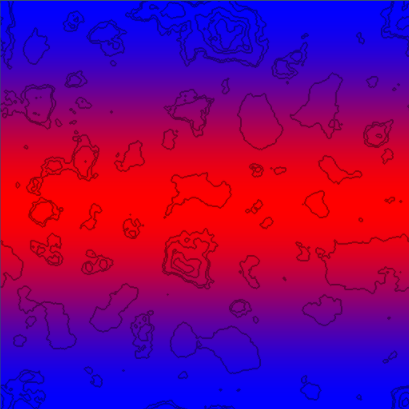
This data is a great start, because we need a warm strip in the center of the map, similar to the equator of the Earth. This will be the basis of the heat map on which we will begin work.
Now we need to assign HeatType areas (heat types) that are similar to the HeightType areas (height types) from the previous part of the article.
public enum HeatType { Coldest, Colder, Cold, Warm, Warmer, Warmest } We will make these types of heat customizable from the Unity inspector using new variables:
float ColdestValue = 0.05f; float ColderValue = 0.18f; float ColdValue = 0.4f; float WarmValue = 0.6f; float WarmerValue = 0.8f; In LoadTiles, based on the heat value, we will assign a HeatType for each tile.
// if (heatValue < ColdestValue) t.HeatType = HeatType.Coldest; else if (heatValue < ColderValue) t.HeatType = HeatType.Colder; else if (heatValue < ColdValue) t.HeatType = HeatType.Cold; else if (heatValue < WarmValue) t.HeatType = HeatType.Warm; else if (heatValue < WarmerValue) t.HeatType = HeatType.Warmer; else t.HeatType = HeatType.Warmest; Now we can add new colors for each HeatType to the TextureGenerator class:
// private static Color Coldest = new Color(0, 1, 1, 1); private static Color Colder = new Color(170/255f, 1, 1, 1); private static Color Cold = new Color(0, 229/255f, 133/255f, 1); private static Color Warm = new Color(1, 1, 100/255f, 1); private static Color Warmer = new Color(1, 100/255f, 0, 1); private static Color Warmest = new Color(241/255f, 12/255f, 0, 1); public static Texture2D GetHeatMapTexture(int width, int height, Tile[,] tiles) { var texture = new Texture2D(width, height); var pixels = new Color[width * height]; for (var x = 0; x < width; x++) { for (var y = 0; y < height; y++) { switch (tiles[x,y].HeatType) { case HeatType.Coldest: pixels[x + y * width] = Coldest; break; case HeatType.Colder: pixels[x + y * width] = Colder; break; case HeatType.Cold: pixels[x + y * width] = Cold; break; case HeatType.Warm: pixels[x + y * width] = Warm; break; case HeatType.Warmer: pixels[x + y * width] = Warmer; break; case HeatType.Warmest: pixels[x + y * width] = Warmest; break; } // , if (tiles[x,y].Bitmask != 15) pixels[x + y * width] = Color.Lerp(pixels[x + y * width], Color.black, 0.4f); } } texture.SetPixels(pixels); texture.wrapMode = TextureWrapMode.Clamp; texture.Apply(); return texture; } By generating this heat map, we get the following image:
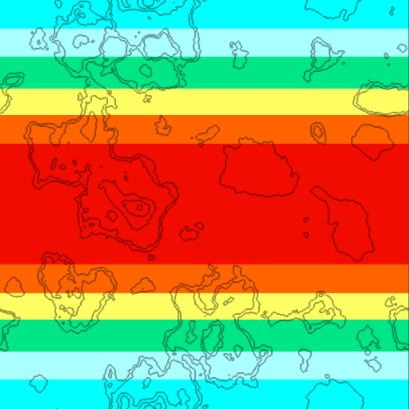
Now we can clearly see the designated areas of HeatType. However, this data is still only stripes. They tell us nothing but temperature data based on latitude. In reality, temperature depends on many factors, so we will mix fractal noise with this gradient noise.
Add a couple of new variables and a new fractal to the Generator:
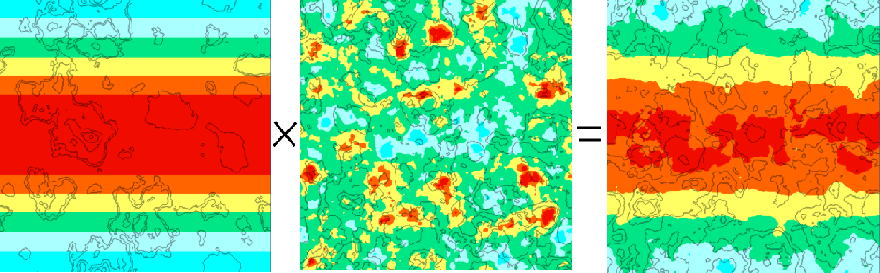
int HeatOctaves = 4; double HeatFrequency = 3.0; private void Initialize() { // ImplicitGradient gradient = new ImplicitGradient (1, 1, 1, 0, 1, 1, 1, 1, 1, 1, 1, 1); ImplicitFractal heatFractal = new ImplicitFractal(FractalType.MULTI, BasisType.SIMPLEX, InterpolationType.QUINTIC, HeatOctaves, HeatFrequency, Seed); // HeatMap = new ImplicitCombiner (CombinerType.MULTIPLY); HeatMap.AddSource (gradient); HeatMap.AddSource (heatFractal); } When combining a fractal with a gradient using a multiply operation (Multiply), the final noise is multiplied based on the latitude. The Multiply operation is illustrated below:
Gradient noise on the left, fractal noise in the middle, the Multiply operation result on the right. As you can see, we have a much more pleasant heat map.
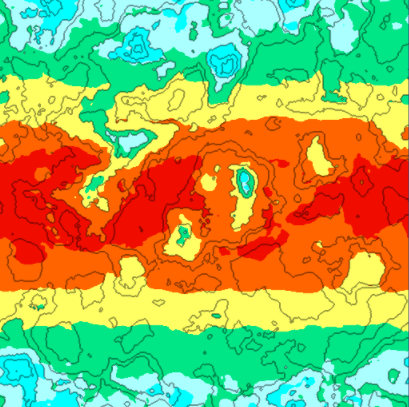
Now let's do the breadth. We need to take into account the height map: we want the peaks of the highest mountains to be cold. This can be configured in the LoadTiles function:
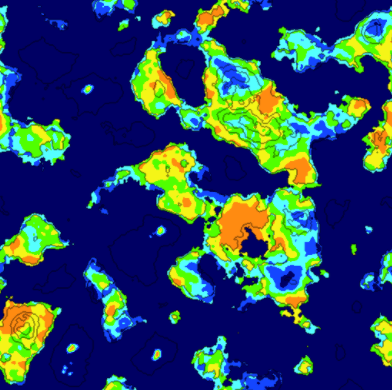
// . = if (t.HeightType == HeightType.Grass) { HeatData.Data[tX, tY] -= 0.1f * t.HeightValue; } else if (t.HeightType == HeightType.Forest) { HeatData.Data[tX, tY] -= 0.2f * t.HeightValue; } else if (t.HeightType == HeightType.Rock) { HeatData.Data[tX, tY] -= 0.3f * t.HeightValue; } else if (t.HeightType == HeightType.Snow) { HeatData.Data[tX, tY] -= 0.4f * t.HeightValue; } This setting gives us the final heat map, which takes into account both latitude and height:
Humidity Map Generation
The humidity map is similar to a heat map. First, generate a fractal to fill the base with random values. Then we change this data based on the heat map.
We will look at the moisture generation code in brief, because it is very similar to the heat map code.
First, let's add the Tile class to the new MoistureType:
public enum MoistureType { Wettest, Wetter, Wet, Dry, Dryer, Dryest } The Generator class will need new variables visible from Unity Inspector:
int MoistureOctaves = 4; double MoistureFrequency = 3.0; float DryerValue = 0.27f; float DryValue = 0.4f; float WetValue = 0.6f; float WetterValue = 0.8f; float WettestValue = 0.9f; In TextureGenerator, a new moisture map generation function (MoistureMap) and its associated colors are needed:
// private static Color Dryest = new Color(255/255f, 139/255f, 17/255f, 1); private static Color Dryer = new Color(245/255f, 245/255f, 23/255f, 1); private static Color Dry = new Color(80/255f, 255/255f, 0/255f, 1); private static Color Wet = new Color(85/255f, 255/255f, 255/255f, 1); private static Color Wetter = new Color(20/255f, 70/255f, 255/255f, 1); private static Color Wettest = new Color(0/255f, 0/255f, 100/255f, 1); public static Texture2D GetMoistureMapTexture(int width, int height, Tile[,] tiles) { var texture = new Texture2D(width, height); var pixels = new Color[width * height]; for (var x = 0; x < width; x++) { for (var y = 0; y < height; y++) { Tile t = tiles[x,y]; if (t.MoistureType == MoistureType.Dryest) pixels[x + y * width] = Dryest; else if (t.MoistureType == MoistureType.Dryer) pixels[x + y * width] = Dryer; else if (t.MoistureType == MoistureType.Dry) pixels[x + y * width] = Dry; else if (t.MoistureType == MoistureType.Wet) pixels[x + y * width] = Wet; else if (t.MoistureType == MoistureType.Wetter) pixels[x + y * width] = Wetter; else pixels[x + y * width] = Wettest; } } texture.SetPixels(pixels); texture.wrapMode = TextureWrapMode.Clamp; texture.Apply(); return texture; } Finally, the LoadTiles function will set the type of moisture (MoistureType) based on the value of moisture (MoistureValue):
// float moistureValue = MoistureData.Data[x,y]; moistureValue = (moistureValue - MoistureData.Min) / (MoistureData.Max - MoistureData.Min); t.MoistureValue = moistureValue; // if (moistureValue < DryerValue) t.MoistureType = MoistureType.Dryest; else if (moistureValue < DryValue) t.MoistureType = MoistureType.Dryer; else if (moistureValue < WetValue) t.MoistureType = MoistureType.Dry; else if (moistureValue < WetterValue) t.MoistureType = MoistureType.Wet; else if (moistureValue < WettestValue) t.MoistureType = MoistureType.Wetter; else t.MoistureType = MoistureType.Wettest; When rendering the original noise for a MoistureMap, we get the following:

The only thing left for us is to adjust the humidity map according to the height map. We do this in the LoadTiles function:
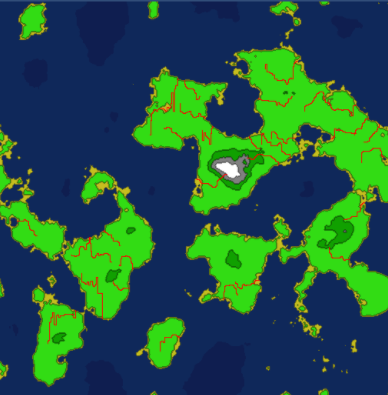
// if (t.HeightType == HeightType.DeepWater) { MoistureData.Data[tX, tY] += 8f * t.HeightValue; } else if (t.HeightType == HeightType.ShallowWater) { MoistureData.Data[tX, tY] += 3f * t.HeightValue; } else if (t.HeightType == HeightType.Shore) { MoistureData.Data[tX, tY] += 1f * t.HeightValue; } else if (t.HeightType == HeightType.Sand) { MoistureData.Data[tX, tY] += 0.25f * t.HeightValue; } After adjusting the humidity map to the height of certain tiles, the updated humidity map looks much better:
River generation
The way of generating rivers, which I will describe, is an attempt to solve the problem of creating convincing-looking brute-force rivers.
The first step of the algorithm is the selection of a random tile on the map. The selected tile must be dry and have a height value above a certain limit.
Starting from this tile, we determine which neighboring tile is located below all, and move to it. In this way, we create a path until a water tile is reached.
If the generated path meets our criteria (river length, number of bends, number of crossings), we save it for future use.
Otherwise, we discard it and try again. The code below will allow us to start:
private void GenerateRivers() { int attempts = 0; int rivercount = RiverCount; Rivers = new List<River> (); // while (rivercount > 0 && attempts < MaxRiverAttempts) { // int x = UnityEngine.Random.Range (0, Width); int y = UnityEngine.Random.Range (0, Height); Tile tile = Tiles[x,y]; // if (!tile.Collidable) continue; if (tile.Rivers.Count > 0) continue; if (tile.HeightValue > MinRiverHeight) { // River river = new River(rivercount); // , river.CurrentDirection = tile.GetLowestNeighbor (); // FindPathToWater(tile, river.CurrentDirection, ref river); // if (river.TurnCount < MinRiverTurns || river.Tiles.Count < MinRiverLength || river.Intersections > MaxRiverIntersections) { // - for (int i = 0; i < river.Tiles.Count; i++) { Tile t = river.Tiles[i]; t.Rivers.Remove (river); } } else if (river.Tiles.Count >= MinRiverLength) { // - Rivers.Add (river); tile.Rivers.Add (river); rivercount--; } } attempts++; } } The recursive function FindPathToWater () determines the best selectable path based on the height of the land, existing rivers and the preferred direction. Sooner or later she will find a way to the water tile. The function is called recursively until the path is completed.
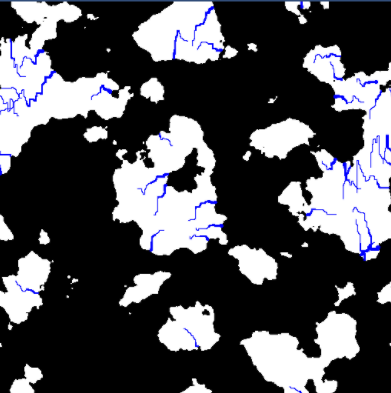
private void FindPathToWater(Tile tile, Direction direction, ref River river) { if (tile.Rivers.Contains (river)) return; // , if (tile.Rivers.Count > 0) river.Intersections++; river.AddTile (tile); // Tile left = GetLeft (tile); Tile right = GetRight (tile); Tile top = GetTop (tile); Tile bottom = GetBottom (tile); float leftValue = int.MaxValue; float rightValue = int.MaxValue; float topValue = int.MaxValue; float bottomValue = int.MaxValue; // if (left.GetRiverNeighborCount(river) < 2 && !river.Tiles.Contains(left)) leftValue = left.HeightValue; if (right.GetRiverNeighborCount(river) < 2 && !river.Tiles.Contains(right)) rightValue = right.HeightValue; if (top.GetRiverNeighborCount(river) < 2 && !river.Tiles.Contains(top)) topValue = top.HeightValue; if (bottom.GetRiverNeighborCount(river) < 2 && !river.Tiles.Contains(bottom)) bottomValue = bottom.HeightValue; // , , if (bottom.Rivers.Count == 0 && !bottom.Collidable) bottomValue = 0; if (top.Rivers.Count == 0 && !top.Collidable) topValue = 0; if (left.Rivers.Count == 0 && !left.Collidable) leftValue = 0; if (right.Rivers.Count == 0 && !right.Collidable) rightValue = 0; // , if (direction == Direction.Left) if (Mathf.Abs (rightValue - leftValue) < 0.1f) rightValue = int.MaxValue; if (direction == Direction.Right) if (Mathf.Abs (rightValue - leftValue) < 0.1f) leftValue = int.MaxValue; if (direction == Direction.Top) if (Mathf.Abs (topValue - bottomValue) < 0.1f) bottomValue = int.MaxValue; if (direction == Direction.Bottom) if (Mathf.Abs (topValue - bottomValue) < 0.1f) topValue = int.MaxValue; // float min = Mathf.Min (Mathf.Min (Mathf.Min (leftValue, rightValue), topValue), bottomValue); // - if (min == int.MaxValue) return; // if (min == leftValue) { if (left.Collidable) { if (river.CurrentDirection != Direction.Left){ river.TurnCount++; river.CurrentDirection = Direction.Left; } FindPathToWater (left, direction, ref river); } } else if (min == rightValue) { if (right.Collidable) { if (river.CurrentDirection != Direction.Right){ river.TurnCount++; river.CurrentDirection = Direction.Right; } FindPathToWater (right, direction, ref river); } } else if (min == bottomValue) { if (bottom.Collidable) { if (river.CurrentDirection != Direction.Bottom){ river.TurnCount++; river.CurrentDirection = Direction.Bottom; } FindPathToWater (bottom, direction, ref river); } } else if (min == topValue) { if (top.Collidable) { if (river.CurrentDirection != Direction.Top){ river.TurnCount++; river.CurrentDirection = Direction.Top; } FindPathToWater (top, direction, ref river); } } } After performing the process of generating rivers, we will have several paths leading to the water. It will look something like this:
Many paths intersect, and if we dug these rivers now, they would look a little strange, because their dimensions would not match at the intersection point. Therefore, we need to determine which of the rivers intersect, and group them.
We need the RiverGroup class:
public class RiverGroup { public List<River> Rivers = new List<River>(); } As well as code grouping intersecting rivers:
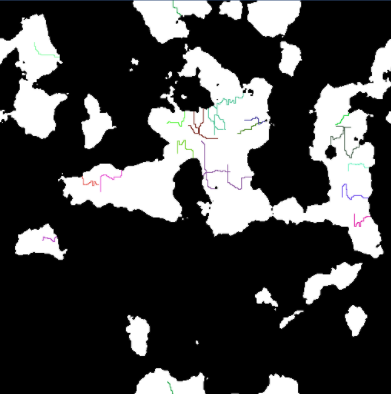
private void BuildRiverGroups() { // , for (var x = 0; x < Width; x++) { for (var y = 0; y < Height; y++) { Tile t = Tiles[x,y]; if (t.Rivers.Count > 1) { // == RiverGroup group = null; // ? for (int n=0; n < t.Rivers.Count; n++) { River tileriver = t.Rivers[n]; for (int i = 0; i < RiverGroups.Count; i++) { for (int j = 0; j < RiverGroups[i].Rivers.Count; j++) { River river = RiverGroups[i].Rivers[j]; if (river.ID == tileriver.ID) { group = RiverGroups[i]; } if (group != null) break; } if (group != null) break; } if (group != null) break; } // -- if (group != null) { for (int n=0; n < t.Rivers.Count; n++) { if (!group.Rivers.Contains(t.Rivers[n])) group.Rivers.Add(t.Rivers[n]); } } else // -- { group = new RiverGroup(); for (int n=0; n < t.Rivers.Count; n++) { group.Rivers.Add(t.Rivers[n]); } RiverGroups.Add (group); } } } } } So, we have groups of rivers that intersect and flow to the water. When rendering these groups, the following is obtained, each group is represented by its own random color:
With this information, we can begin to "dig" our rivers. For each group of rivers, we begin by digging the longest river in the group. The remaining rivers are digging on the basis of this longest journey.
The code below shows how we begin to dig groups of rivers:
private void DigRiverGroups() { for (int i = 0; i < RiverGroups.Count; i++) { RiverGroup group = RiverGroups[i]; River longest = null; // for (int j = 0; j < group.Rivers.Count; j++) { River river = group.Rivers[j]; if (longest == null) longest = river; else if (longest.Tiles.Count < river.Tiles.Count) longest = river; } if (longest != null) { // DigRiver (longest); for (int j = 0; j < group.Rivers.Count; j++) { River river = group.Rivers[j]; if (river != longest) { DigRiver (river, longest); } } } } } The river digging code is a bit more complicated as it tries to randomize as many parameters as possible.
It is also important that the river expands when approaching the water. The DigRiver () code is not very beautiful, but it copes with the task:
private void DigRiver(River river) { int counter = 0; // ? int size = UnityEngine.Random.Range(1,5); river.Length = river.Tiles.Count; // int two = river.Length / 2; int three = two / 2; int four = three / 2; int five = four / 2; int twomin = two / 3; int threemin = three / 3; int fourmin = four / 3; int fivemin = five / 3; // int count1 = UnityEngine.Random.Range (fivemin, five); if (size < 4) { count1 = 0; } int count2 = count1 + UnityEngine.Random.Range(fourmin, four); if (size < 3) { count2 = 0; count1 = 0; } int count3 = count2 + UnityEngine.Random.Range(threemin, three); if (size < 2) { count3 = 0; count2 = 0; count1 = 0; } int count4 = count3 + UnityEngine.Random.Range (twomin, two); // , if (count4 > river.Length) { int extra = count4 - river.Length; while (extra > 0) { if (count1 > 0) { count1--; count2--; count3--; count4--; extra--; } else if (count2 > 0) { count2--; count3--; count4--; extra--; } else if (count3 > 0) { count3--; count4--; extra--; } else if (count4 > 0) { count4--; extra--; } } } // for (int i = river.Tiles.Count - 1; i >= 0 ; i--) { Tile t = river.Tiles[i]; if (counter < count1) { t.DigRiver (river, 4); } else if (counter < count2) { t.DigRiver (river, 3); } else if (counter < count3) { t.DigRiver (river, 2); } else if ( counter < count4) { t.DigRiver (river, 1); } else { t.DigRiver(river, 0); } counter++; } } After digging the river we get something like this:
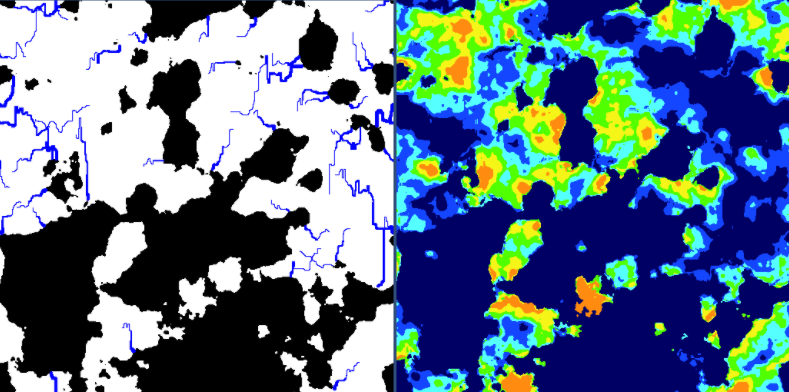
We received convincing-looking rivers, but we need to make sure that they provide moisture maps. Rivers do not appear in desert areas, so you need to check whether the area around the rivers is dry.
To simplify this process, we will add a new function that will customize the humidity map based on the river data.
private void AdjustMoistureMap() { for (var x = 0; x < Width; x++) { for (var y = 0; y < Height; y++) { Tile t = Tiles[x,y]; if (t.HeightType == HeightType.River) { AddMoisture (t, (int)60); } } } } The added moisture varies based on the distance from the original tile. The farther from the river, the less moisture the tile receives.
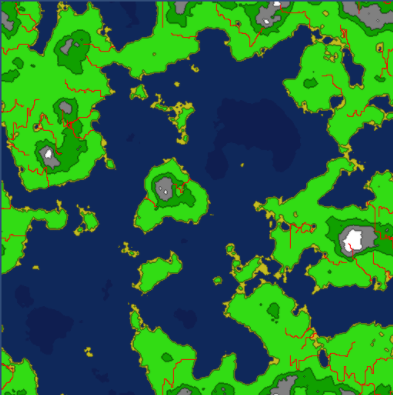
private void AddMoisture(Tile t, int radius) { int startx = MathHelper.Mod (tX - radius, Width); int endx = MathHelper.Mod (tX + radius, Width); Vector2 center = new Vector2(tX, tY); int curr = radius; while (curr > 0) { int x1 = MathHelper.Mod (tX - curr, Width); int x2 = MathHelper.Mod (tX + curr, Width); int y = tY; AddMoisture(Tiles[x1, y], 0.025f / (center - new Vector2(x1, y)).magnitude); for (int i = 0; i < curr; i++) { AddMoisture (Tiles[x1, MathHelper.Mod (y + i + 1, Height)], 0.025f / (center - new Vector2(x1, MathHelper.Mod (y + i + 1, Height))).magnitude); AddMoisture (Tiles[x1, MathHelper.Mod (y - (i + 1), Height)], 0.025f / (center - new Vector2(x1, MathHelper.Mod (y - (i + 1), Height))).magnitude); AddMoisture (Tiles[x2, MathHelper.Mod (y + i + 1, Height)], 0.025f / (center - new Vector2(x2, MathHelper.Mod (y + i + 1, Height))).magnitude); AddMoisture (Tiles[x2, MathHelper.Mod (y - (i + 1), Height)], 0.025f / (center - new Vector2(x2, MathHelper.Mod (y - (i + 1), Height))).magnitude); } curr--; } } This setting gives us an updated map of humidity, taking into account the presence of rivers. It will come in handy in the next part, in which we will begin to generate biomes.
The updated humidity map will look something like this:
The fourth part of the article will be ready soon. This will be the best part in which we use all the maps we have generated to create the world.
The source code for the third part on github: World Generator Part 3 .
The fourth part, the last .
Source: https://habr.com/ru/post/276533/
All Articles