A new version of Veeam Backup FREE Edition has been released: a brief overview and useful information about NFR-keys to the full version
I support the tradition of reviews of new versions of Veeam solutions and briefly tell you about the recently released version 9.0 of the free Veeam Backup FREE Edition . (In the last release, a separate post on Habré was devoted to new commercial and free editions, this time several articles are planned, including a review of Veeam ONE, also included in Veeam Availability Suite 9.0).
So, what made our developers happy with the new version?

Let's start with the changes in the backup. In addition to the fact that the backup does not include paging files ( pagefile.sys ), now the hibernation file ( hiberfil.sys ) will also not be included in it by default, as well as files and blocks that have been deleted.
When this happens the following:
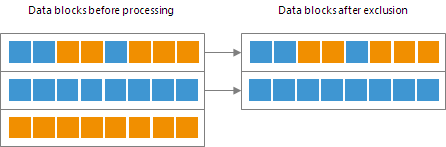
In the left part of the picture we see what happened after step 1 (the “zeroed” blocks are marked in orange), and on the right the result of step 2 (i.e., what goes into the backup copy):
')
Similarly, Veeam comes in with “dirty” blocks, i.e. with those that have been marked as deleted (deleted): first (before data transfer starts) it detects such blocks using the MFT and fills them with zeros, and then analyzes the VM image and transmits only useful, useful blocks to the storage location; “Null” blocks are not placed in the backup. So a new feature called Veeam BitLooker helps reduce traffic and improve performance when backing up.
Important note: The default block exclusion settings will apply only to machines where the guest file system is Microsoft NTFS.
For machines whose files are stored on NFS storage, a new data transfer method is proposed - bypassing the hypervisor, working with the help of a specially designed Veeam NFS Client. This method uses the Veeam Backup Proxy component (by default it runs on the Veeam backup server), for which two conditions must be met:
The method works like this:
The new method is activated automatically (if the above conditions are met) and allows minimizing the load on the hypervisor, as well as increasing the speed of backup, recovery and migration of virtual machines. It is described in more detail here (albeit, so far only in English).
Important! For this method to work correctly during backup, you need to make sure that VMware Tools quiescence is not involved - you need to open the VeeamZIP settings and in the Guest processing section check that the check box Disable guest quiescence is checked (performs crash consistent backup) .

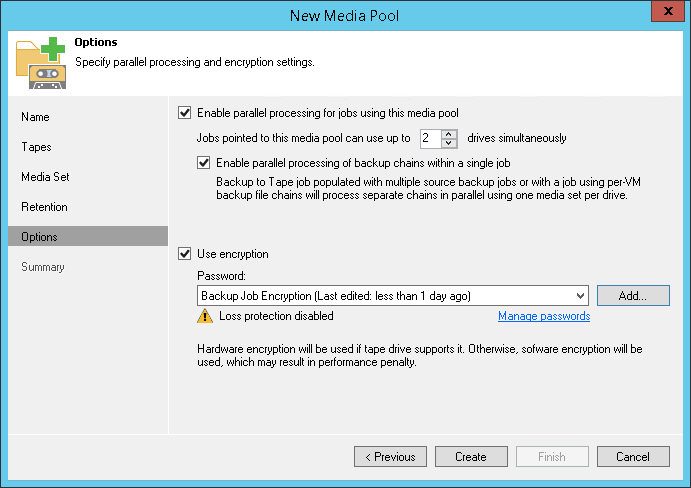
First, it is support for parallel recording. If your device archiving files on a tape has several writing heads, you can use parallel processing of archiving tasks - in this case several heads will write to the tape simultaneously. This is useful, for example, if you need to record a large amount of data in a very limited time of the backup window.
This option will work for custom media pools; for each such pool, you can specify the maximum number of writing heads that can be used for parallel writing. To do this, open the properties of the pool, go to the wizard step called Options and then select the option Enable parallel processing for jobs using this media pool .
Then we indicate how many heads you can use a maximum (default 2).
Secondly, once we are talking about media pools, I inform you that in v9 all pools become global. This means that pools are no longer tied to the library (writer), as it was before - in the new version, the default media pool may include tapes from different libraries, so now, for example, there is no need to do cataloging every time You are moving a cassette from one device to another. As you can see, at the Tapes step in the list of libraries that provide cassettes for the pool, the default is Multiple Libraries :

Important note: If you use archiving at the device level (hardware encryption) when archiving, keep in mind that you will need a device similar to the recording device (that is, with the built-in encryption enabled by the same standard) to read the encrypted tape.
Third, support for "unknown" libraries, that is, those for whom the Windows driver was not found, is implemented. It should be borne in mind that to work with such devices you need to connect via SCSI, and in the device management console of Microsoft Device Manager such devices should be displayed as Unknown Medium Changer . And, of course, it is recommended to work with devices for which there are “native” drivers from the manufacturer (OEM).
In more detail about the supported devices I recommend to read in system requirements .
Now you can install the console separately from the server and no longer nervous because of RDP sessions or because others who want to change the backup with their connections do not allow to work quietly. By default, the console is installed with the backup server, but in the setup you can select and install the console separately:
System requirements for the console can be found here (Microsoft .NET Framework 4.5.2 is included in the setup). Of course, you should ensure a decent connection to the Veeam backup server (at least 1 Mbit / s), because otherwise the joy of the users of the standalone console will quickly go out.
When installing, specify the path to the folder where we want to install the console. After installation and launch, you will need to tell which server you want to connect to; if this is not a local server, then specify the server, port (default 9392 ), username and password. You can use the account under which you work in this Windows session - then tick Use Windows session authentication . In any case, the account must be a member of the local Users group on the Veeam server, or a domain group that has rights to access it.
Useful: In order not to start a session of working with Veeam Backup each time by entering connection parameters, save them by creating a shortcut for the desktop (that is, by clicking on Save shortcut ):

Conveniently, during the setup, along with the console, Veeam PowerShell snap-in is put, and the connection to the Veeam server can then be performed using the Connect -VBRServer cmdlet.
Further work happens as usual. Among the useful features of a standalone console is the ability to serve as a connection server (mount server) for local restoration (that is, to a local site). For example, if you start recovering the guest OS files of the virtual machine from the console, then the backup copy as is will be mounted on this very mount server - a “mount point” will be created in the C: \ veeamflr \ VM_ folder , but not on the server Veeam backup, and on the local machine where the console is running. Then everything, as always: in the Veeam Backup Browser, select the files you need and specify where to save them.

Veeam backup server is thus freed from the additional role of the "fitter", which it performed in previous versions. And if you restore application objects, keep in mind that Veeam Explorers tools can also be run from a standalone console (local restoration will save you traffic). Details of the restoration can be found here .
Note: To install a full-fledged Veeam backup server on a machine with a console, you first need to demolish the console.
This season, for holders of recognized IT certificates in the industry, a new trial license for a comprehensive solution Veeam Availability Suite 9.0 (combines Veeam Backup & Replication and Veeam ONE) with a free NFR key (Not-For-Resale, “not for sale”) is offered. This is a 1-year license (instead of the usual 30 days), designed for 2 sockets and intended for use in a test environment or in a home laboratory, as a rule, in order to familiarize and learn how to work with the product. It can be used for the hypervisor of one of the platforms (VMware vSphere and / or Microsoft Hyper-V) or combinations of these.
Question: Who can get such a license?
Answer: If you have at least one of the following certificates, or you are one of the leaders of the local VMware Users Group community (VMUG), then surely this is your key. Veeam ProPartners program participants and those who blog on IT topics will also be able to claim it.
Here is a list of certifications (the latest version available to me):
If you are in the ranks of applicants, then simply fill out the form on the right side of the page and get the coveted letter with the license. If you have not found your title in the list, but would very much like to receive a free one-year license to explore the full range of features of Veeam Availability Suite v9, or you have questions about obtaining a key, you can write to Veeam_team@veeam.com and you will be tried to help.
So, what made our developers happy with the new version?
Veeam BitLooker
Let's start with the changes in the backup. In addition to the fact that the backup does not include paging files ( pagefile.sys ), now the hibernation file ( hiberfil.sys ) will also not be included in it by default, as well as files and blocks that have been deleted.
When this happens the following:
- Before starting to copy the virtual machine data, Veeam analyzes the Master File Table on the guest for the presence of the pagefile.sys and hibernate.sys blocks and scores the detected blocks with zeroes (zeroes out).
- Then, when copying the VM image to the target location (i.e., with the actual backup), the following check is performed: if the data block of the VM image includes only such “null” blocks, then this block does not go to the backup, and if it contains others - useful - it goes.
In the left part of the picture we see what happened after step 1 (the “zeroed” blocks are marked in orange), and on the right the result of step 2 (i.e., what goes into the backup copy):
')
Similarly, Veeam comes in with “dirty” blocks, i.e. with those that have been marked as deleted (deleted): first (before data transfer starts) it detects such blocks using the MFT and fills them with zeros, and then analyzes the VM image and transmits only useful, useful blocks to the storage location; “Null” blocks are not placed in the backup. So a new feature called Veeam BitLooker helps reduce traffic and improve performance when backing up.
Important note: The default block exclusion settings will apply only to machines where the guest file system is Microsoft NTFS.
Direct NFS Access data transfer method (for VMware platform)
For machines whose files are stored on NFS storage, a new data transfer method is proposed - bypassing the hypervisor, working with the help of a specially designed Veeam NFS Client. This method uses the Veeam Backup Proxy component (by default it runs on the Veeam backup server), for which two conditions must be met:
- Access to NFS storage
- Minimum ReadOnly / Write rights and access to the root folder on NFS storage.
The method works like this:
- The Veeam Backup Proxy component sends a request for ESX (i) in order to find out the location of the VM on the storage system.
- The hypervisor finds the right VM.
- It receives metadata (physical addresses of VM data blocks) about the location of VM disks on the storage system.
- It then sends this metadata to the Veeam Backup Proxy component ...
- ... which uses them to copy VM data blocks directly from the storage system using the local network.
- Then Veeam Backup Proxy processes these blocks and sends them to the target storage system.
The new method is activated automatically (if the above conditions are met) and allows minimizing the load on the hypervisor, as well as increasing the speed of backup, recovery and migration of virtual machines. It is described in more detail here (albeit, so far only in English).
Important! For this method to work correctly during backup, you need to make sure that VMware Tools quiescence is not involved - you need to open the VeeamZIP settings and in the Guest processing section check that the check box Disable guest quiescence is checked (performs crash consistent backup) .
New tape archiving
First, it is support for parallel recording. If your device archiving files on a tape has several writing heads, you can use parallel processing of archiving tasks - in this case several heads will write to the tape simultaneously. This is useful, for example, if you need to record a large amount of data in a very limited time of the backup window.
This option will work for custom media pools; for each such pool, you can specify the maximum number of writing heads that can be used for parallel writing. To do this, open the properties of the pool, go to the wizard step called Options and then select the option Enable parallel processing for jobs using this media pool .
Then we indicate how many heads you can use a maximum (default 2).
Secondly, once we are talking about media pools, I inform you that in v9 all pools become global. This means that pools are no longer tied to the library (writer), as it was before - in the new version, the default media pool may include tapes from different libraries, so now, for example, there is no need to do cataloging every time You are moving a cassette from one device to another. As you can see, at the Tapes step in the list of libraries that provide cassettes for the pool, the default is Multiple Libraries :
Important note: If you use archiving at the device level (hardware encryption) when archiving, keep in mind that you will need a device similar to the recording device (that is, with the built-in encryption enabled by the same standard) to read the encrypted tape.
Third, support for "unknown" libraries, that is, those for whom the Windows driver was not found, is implemented. It should be borne in mind that to work with such devices you need to connect via SCSI, and in the device management console of Microsoft Device Manager such devices should be displayed as Unknown Medium Changer . And, of course, it is recommended to work with devices for which there are “native” drivers from the manufacturer (OEM).
In more detail about the supported devices I recommend to read in system requirements .
Standalone console
Now you can install the console separately from the server and no longer nervous because of RDP sessions or because others who want to change the backup with their connections do not allow to work quietly. By default, the console is installed with the backup server, but in the setup you can select and install the console separately:
System requirements for the console can be found here (Microsoft .NET Framework 4.5.2 is included in the setup). Of course, you should ensure a decent connection to the Veeam backup server (at least 1 Mbit / s), because otherwise the joy of the users of the standalone console will quickly go out.
When installing, specify the path to the folder where we want to install the console. After installation and launch, you will need to tell which server you want to connect to; if this is not a local server, then specify the server, port (default 9392 ), username and password. You can use the account under which you work in this Windows session - then tick Use Windows session authentication . In any case, the account must be a member of the local Users group on the Veeam server, or a domain group that has rights to access it.
Useful: In order not to start a session of working with Veeam Backup each time by entering connection parameters, save them by creating a shortcut for the desktop (that is, by clicking on Save shortcut ):
Conveniently, during the setup, along with the console, Veeam PowerShell snap-in is put, and the connection to the Veeam server can then be performed using the Connect -VBRServer cmdlet.
Further work happens as usual. Among the useful features of a standalone console is the ability to serve as a connection server (mount server) for local restoration (that is, to a local site). For example, if you start recovering the guest OS files of the virtual machine from the console, then the backup copy as is will be mounted on this very mount server - a “mount point” will be created in the C: \ veeamflr \ VM_ folder , but not on the server Veeam backup, and on the local machine where the console is running. Then everything, as always: in the Veeam Backup Browser, select the files you need and specify where to save them.
Veeam backup server is thus freed from the additional role of the "fitter", which it performed in previous versions. And if you restore application objects, keep in mind that Veeam Explorers tools can also be run from a standalone console (local restoration will save you traffic). Details of the restoration can be found here .
Note: To install a full-fledged Veeam backup server on a machine with a console, you first need to demolish the console.
"... and consider that the key is in your pocket!"
This season, for holders of recognized IT certificates in the industry, a new trial license for a comprehensive solution Veeam Availability Suite 9.0 (combines Veeam Backup & Replication and Veeam ONE) with a free NFR key (Not-For-Resale, “not for sale”) is offered. This is a 1-year license (instead of the usual 30 days), designed for 2 sockets and intended for use in a test environment or in a home laboratory, as a rule, in order to familiarize and learn how to work with the product. It can be used for the hypervisor of one of the platforms (VMware vSphere and / or Microsoft Hyper-V) or combinations of these.
Question: Who can get such a license?
Answer: If you have at least one of the following certificates, or you are one of the leaders of the local VMware Users Group community (VMUG), then surely this is your key. Veeam ProPartners program participants and those who blog on IT topics will also be able to claim it.
Here is a list of certifications (the latest version available to me):
- VMware vExperts
- VMware Certified Professionals (VCPs)
- VMware Certified Advanced Professionals (VCAPs)
- VMware Certified Instructors (VCIs)
- VMware Certified Design Experts (VCDXs)
- Microsoft Most Valuable Professionals (MVPs)
- Microsoft Certified Solutions Experts (MCSEs)
- Microsoft Certified Trainers (MCTs)
- Microsoft Certified Professionals (MCP)
- Microsoft Certified Technology Specialists (MCTS)
- Microsoft Certified Solutions Associates (MCSA)
- VTEC Members
- Cisco Champions
- PernixPro Members
- Local VMware User Group (VMUG) Leaders
- Bloggers
If you are in the ranks of applicants, then simply fill out the form on the right side of the page and get the coveted letter with the license. If you have not found your title in the list, but would very much like to receive a free one-year license to explore the full range of features of Veeam Availability Suite v9, or you have questions about obtaining a key, you can write to Veeam_team@veeam.com and you will be tried to help.
Useful resources
- Download link Veeam Backup FREE Edition 9.0: https://www.veeam.com/ru/virtual-machine-backup-solution-free-download.html
- Solution page (in Russian): https://www.veeam.com/ru/virtual-machine-backup-solution-free.html
- Comparison of free and commercial versions: https://www.veeam.com/veeam_backup_9_0_free_vs_paid_comparison_ru_ds.pdf
- Article on Habré about the new features of the tools Veeam Explorers: https://habrahabr.ru/company/veeam/blog/270955/
- Veeam Backup FREE Edition User Manual (in English): http://helpcenter.veeam.com/backup/free/
- Frequently asked questions: https://www.veeam.com/en/system-requirements.html
Source: https://habr.com/ru/post/276433/
All Articles