Work with HealthKit. Part 2
The end and the beginning of the year for developers, as a rule, are always filled with a large number of projects. Having dealt with urgent matters and rolled up our sleeves, we at Techmas promised to share even more of our developments with colleagues.
Despite the growing popularity of applications that HealthKit is already using, the demand for mobile health assessment solutions continues to grow .
To clarify all the basic principles of working with the platform, we decided to return to the example from the last publication and supplement it with work with data samples from Health.
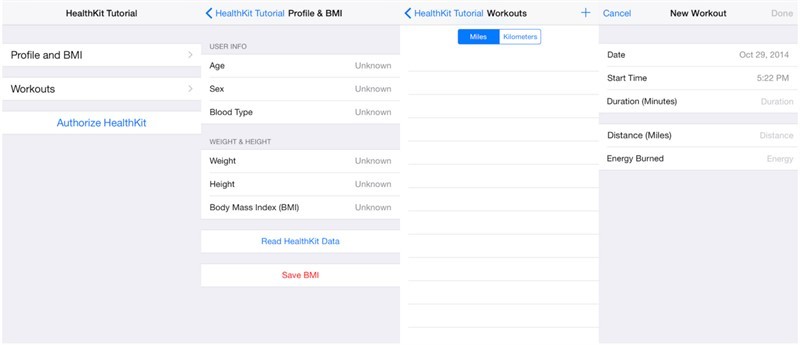
Recall that earlier we made an overview of the overall functionality of HealthKit, reviewed the application for authentication in Health and the output characteristics of the user. Now we will deal with samples ( samples ) for reading and writing new training data.
')
Samples ( samples ) differ from characteristics ( characteristics ) in that they change over time and depend on user behavior. For example, samples are used to add new training data, visualize them, define and calculate additional parameters.
In the example, we show how to read data on the height and weight of the user from the Health application. Next, we calculate the BMI (Body Mass Index) indicator and add the resulting value to track the dynamics of its change.
So back to the application from the previous section. His code is here .
Create test data for the sample into the Health application.
To do this, select the Weight item on the Body Measurements tab and enter several key points with information about the weight (weight) via Add Data Point.
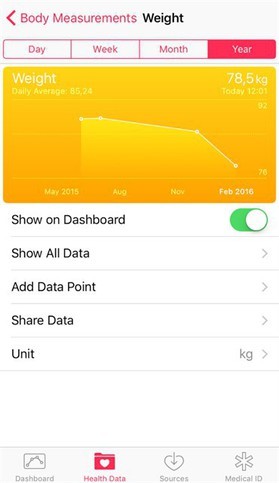
Data can be entered in any number and number at different intervals.
Now we get permission to work with the parameters of the sample. Add authorizeHealthKit () to the authorization function (separately we talked about authorization earlier):
In our example, we will create the readMostRecentSample () function, which will read the indicators by date and type.
To obtain a sample, you must use a subclass of HKSampleQuery , which is inherited from HKQuery . In essence, it works similar to Core Data's NSFetchedRequest .
When forming the request, the following parameters are available:
1. Sample type (for example, weight or height), Type .
2. Conditions for the selection of the sample (period, values, etc.), NSPredicate .
3. Sort method, NSSortDescriptors .
The second and third parameters are optional. After forming the query, executeQuery () must be executed to display its result.
In our example, we will create a method to get the last value for the specified sample type. Add the following code to the readMostRecentSample () function:
Our function allows you to get the latest data on samples of a particular type. For simplicity, the readMostRecentSample () call will be added to the viewDidLoad () method:
Here we use quantityTypeForIdentifier to determine the required sample, in our case HKQuantityTypeIdentifierBodyMass .
Now we will create a set for calculating and recording BMI. It will be calculated by the formula:
As shown above, select the weight value (weight) from Health. In the same way, we will get the height (height) of the user (replacing the data type and format, we use HKQuantityTypeIdentifierHeight) .
Here we need the HKQuantitySample object. You must also specify:
• HKQuantityType object type to save. In our case, this is HKQuantityTypeIdentifierBodyMassIndex .
• HKQuantity object. It is initialized with the passed value from the bmi parameter. It is important that HKUnit.countUnit () is used to convert the Double scalar type, which allows you to convert types to the necessary units.
Then the BMI calculation will be as follows:
Also note the use of formatting results using NSMassFormatter . NSMassFormater itself, in essence, is not part of HelathKit, but it allows you to work with Health data types. In particular, if kilograms are used in the application, and the device does not use the metric system, we are able to bring the units of measurement to the desired form.
We will not dwell on issues of the interface, so the results will display in the console.
Finally, to write the resulting BMI value to HelathKit, create a saveBMISample method (bmi: Double, date: NSDate) . Output parameters: the BMI value itself and the date of its registration.
The new BMI value is available for both standard viewing and can be used by a third-party authorized application.
In practice, it makes sense to put all methods for working with HealthKit into a separate class.
For our example, we limited ourselves to a demonstration of the key stages of working with the platform.
The code for the final application is here .
Despite the growing popularity of applications that HealthKit is already using, the demand for mobile health assessment solutions continues to grow .
To clarify all the basic principles of working with the platform, we decided to return to the example from the last publication and supplement it with work with data samples from Health.
Introduction
Recall that earlier we made an overview of the overall functionality of HealthKit, reviewed the application for authentication in Health and the output characteristics of the user. Now we will deal with samples ( samples ) for reading and writing new training data.
')
Samples ( samples ) differ from characteristics ( characteristics ) in that they change over time and depend on user behavior. For example, samples are used to add new training data, visualize them, define and calculate additional parameters.
In the example, we show how to read data on the height and weight of the user from the Health application. Next, we calculate the BMI (Body Mass Index) indicator and add the resulting value to track the dynamics of its change.
So back to the application from the previous section. His code is here .
Sample preparation
Create test data for the sample into the Health application.
To do this, select the Weight item on the Body Measurements tab and enter several key points with information about the weight (weight) via Add Data Point.
Data can be entered in any number and number at different intervals.
Now we get permission to work with the parameters of the sample. Add authorizeHealthKit () to the authorization function (separately we talked about authorization earlier):
let healthKitTypesToWrite = Set(arrayLiteral: HKObjectType.quantityTypeForIdentifier(HKQuantityTypeIdentifierBodyMass)!, HKObjectType.quantityTypeForIdentifier(HKQuantityTypeIdentifierActiveEnergyBurned)!, HKObjectType.quantityTypeForIdentifier(HKQuantityTypeIdentifierDistanceWalkingRunning)! ) Reading a sample from Health
In our example, we will create the readMostRecentSample () function, which will read the indicators by date and type.
To obtain a sample, you must use a subclass of HKSampleQuery , which is inherited from HKQuery . In essence, it works similar to Core Data's NSFetchedRequest .
When forming the request, the following parameters are available:
1. Sample type (for example, weight or height), Type .
2. Conditions for the selection of the sample (period, values, etc.), NSPredicate .
3. Sort method, NSSortDescriptors .
The second and third parameters are optional. After forming the query, executeQuery () must be executed to display its result.
In our example, we will create a method to get the last value for the specified sample type. Add the following code to the readMostRecentSample () function:
// 1. let past = NSDate.distantPast() let now = NSDate() let mostRecentPredicate = HKQuery.predicateForSamplesWithStartDate(past, endDate:now, options: .None) // 2. let sortDescriptor = NSSortDescriptor(key:HKSampleSortIdentifierStartDate, ascending: false) // 3. let limit = 1 // 4. let sampleQuery = HKSampleQuery(sampleType: sampleType, predicate: mostRecentPredicate, limit: limit, sortDescriptors: [sortDescriptor]) { (sampleQuery, results, error ) -> Void in if let queryError = error { completion(nil,error) return; } // let mostRecentSample = results!.first as? HKQuantitySample if completion != nil { completion(mostRecentSample,nil) } } // 5. self.healthKitStore.executeQuery(sampleQuery) Our function allows you to get the latest data on samples of a particular type. For simplicity, the readMostRecentSample () call will be added to the viewDidLoad () method:
// 1. HKSampleType let sampleType = HKSampleType.quantityTypeForIdentifier(HKQuantityTypeIdentifierBodyMass) // 2. self.readMostRecentSample(sampleType!, completion: { (mostRecentWeight, error) -> Void in if( error != nil ) { print("Error reading weight from HealthKit Store: \(error.localizedDescription)") return; } Here we use quantityTypeForIdentifier to determine the required sample, in our case HKQuantityTypeIdentifierBodyMass .
BMI value calculation
Now we will create a set for calculating and recording BMI. It will be calculated by the formula:
bmi = weight / height ^ 2 As shown above, select the weight value (weight) from Health. In the same way, we will get the height (height) of the user (replacing the data type and format, we use HKQuantityTypeIdentifierHeight) .
Here we need the HKQuantitySample object. You must also specify:
• HKQuantityType object type to save. In our case, this is HKQuantityTypeIdentifierBodyMassIndex .
• HKQuantity object. It is initialized with the passed value from the bmi parameter. It is important that HKUnit.countUnit () is used to convert the Double scalar type, which allows you to convert types to the necessary units.
Then the BMI calculation will be as follows:
var weight: HKQuantitySample var weightLocalizedString = “empty" weight = (mostRecentWeight as? HKQuantitySample)!; kilograms = weight.quantity.doubleValueForUnit(HKUnit.gramUnitWithMetricPrefix(.Kilo)) let weightFormatter = NSMassFormatter() weightFormatter.forPersonMassUse = true; weightLocalizedString = weightFormatter.stringFromKilograms(kilograms) print(weightLocalizedString) let weightInKilograms = kilograms let heightInMeters: Double = 180 let bmi = weightInKilograms / heightInMeters * heightInMeters print(String(format: "%.02f", bmi)) Also note the use of formatting results using NSMassFormatter . NSMassFormater itself, in essence, is not part of HelathKit, but it allows you to work with Health data types. In particular, if kilograms are used in the application, and the device does not use the metric system, we are able to bring the units of measurement to the desired form.
We will not dwell on issues of the interface, so the results will display in the console.
Adding a new sample to Health
Finally, to write the resulting BMI value to HelathKit, create a saveBMISample method (bmi: Double, date: NSDate) . Output parameters: the BMI value itself and the date of its registration.
// 1. BMI let bmiType = HKQuantityType.quantityTypeForIdentifier(HKQuantityTypeIdentifierBodyMassIndex) let bmiQuantity = HKQuantity(unit: HKUnit.countUnit(), doubleValue: bmi) let bmiSample = HKQuantitySample(type: bmiType, quantity: bmiQuantity, startDate: date, endDate: date) // 2. Health healthKitStore.saveObject(bmiSample, withCompletion: { (success, error) -> Void in if( error != nil ) { println("Error saving BMI sample: \(error.localizedDescription)") } else { println("BMI sample saved successfully!") } }) The new BMI value is available for both standard viewing and can be used by a third-party authorized application.
Note
In practice, it makes sense to put all methods for working with HealthKit into a separate class.
For our example, we limited ourselves to a demonstration of the key stages of working with the platform.
The code for the final application is here .
Source: https://habr.com/ru/post/276429/
All Articles