Recognize emotions in a UWP application using the Project Oxford API

Most likely, you have heard at least once about the unusual cloud service from Microsoft, which allows you to recognize a person's emotions from a photo.
The emotion recognition service along with other well-known and so far little known to the general public services of face recognition, speech and text is included in the project called Oxford .
')
You can try to recognize emotions yourself at the following link: Emotion Recognition
There are 8 emotions available: Happiness, Sadness, Fear, Neutrality, Anger, Disgust, Contempt, Surprise.
I suggest you create a C # / XAML Windows 10 application that will use the API and recognize emotions from the camera shot.
First of all, download the SDK from the site .
Find in the folder Emotion project ClientLibrary.
Open it and build. Links are restored during the build. If the links are not restored and there is a request to install the missing packages from NuGet, then install manually. Close this project. Create a universal Windows application project. We add the ClientLibrary project to the solution of our UWP application, after which we add a link to it (a link to the Microsoft.ProjectOxford.Emotion project). Build a solution.
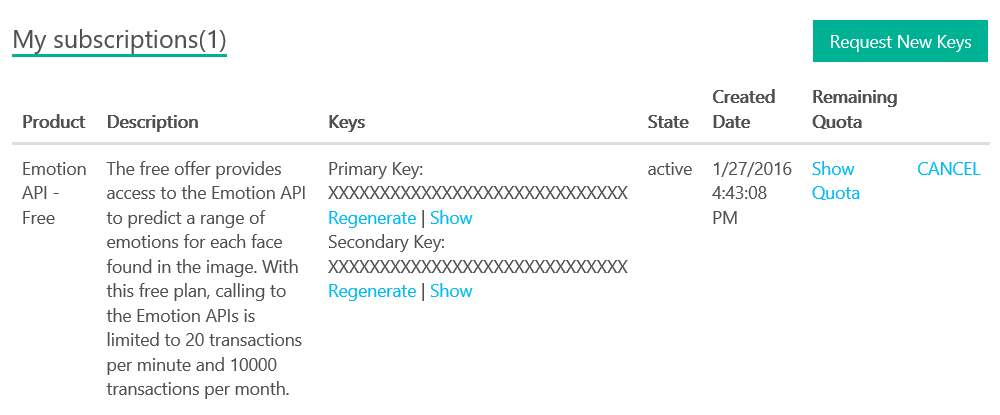
Now we need to get the subscriber key. You can activate a free subscription called “Emotion API - Free”, which has the following limitations: 20 recognitions per minute and 10,000 recognitions per month.
Go to the project site, log in with your Microsoft account, go to the Emotion APIs page and click on the “Try for free” button, and then go to the subscriptions page. Here click "Request New Keys" and select the "Emotion API - Free" subscription. As a result, we get a page on which we can get a Primary Key. Without it, the application can not be created.
Open the UWP application and add the following features to the manifest: Internet (client and server), Webcam. You can add both in a graphic editor, and through the code, using the following tags:
<Capabilities> <Capability Name="internetClientServer" /> <DeviceCapability Name="webcam" /> </Capabilities> Add XAML markup to MainPage:
<ScrollViewer> <StackPanel Orientation="Vertical" HorizontalAlignment="Center"> <StackPanel Orientation="Horizontal" HorizontalAlignment="Center" Margin="0,10,0,10"> <Button x:Name="btnStartPreview" Background="Gray" Click="btnStartPreview_Click" Margin="0,0,0,0" Content="Start preview"/> <Button x:Name="btnTakePhoto" Background="Gray" Click="btnTakePhoto_Click" Margin="10,0,0,0" Content="Take a photo"/> <ProgressRing x:Name="progring" IsActive="False" Width="25" Height="25" Margin="10,0,0,0" /> </StackPanel> <Grid> <Image x:Name="captureImage" Width="400" Height="400" Visibility="Visible"/> <CaptureElement x:Name="previewElement" Width="400" Height="400" Visibility="Visible"/> </Grid> </StackPanel> </ScrollViewer> Since it’s not a fact that the entire contents of the page fit on the device’s screen, I placed it in the ScrollViewer so that you can scroll if necessary. The contents are 2 buttons and a Grid, inside which 2 elements are superimposed on each other - Image and CaptureElement. That is, only one of them can be visible at a time. In order to be able to show the user that data is being processed, the ProgressRing element is added.
Now for the C # code. In order not to mention the namespace each time we will render them:
using System.Threading.Tasks; using Windows.Media.Capture; using Windows.UI.Xaml.Media.Imaging; using Windows.Media.MediaProperties; using Windows.Storage.Streams; using Microsoft.ProjectOxford.Emotion; using Microsoft.ProjectOxford.Emotion.Contract; Add the class scopes:
MediaCapture mediaCapture; bool isPreviewing = false; Emotion[] emotionResult; public System.Collections.ObjectModel.ObservableCollection<Emotion> emo = new System.Collections.ObjectModel.ObservableCollection<Emotion>(); Using the mediaCapture element, we will shoot the video and display the preview. The isPreviewing variable will store the current view state. An array of Emotion class elements is needed to get data from the service. Then we add the first element of this array to the ObservableCollection. ObservableCollection is needed in order to be able to bind data to page elements. Binding data to a collection of this type is much easier than binding to an array.
Add the Loaded attribute to the XAML page and implement an event to which we add the async attribute (since the mediaCapture object is initialized asynchronously):
private async void Page_Loaded(object sender, RoutedEventArgs e) { MediaCaptureInitializationSettings set = new MediaCaptureInitializationSettings(); set.StreamingCaptureMode = StreamingCaptureMode.Video; mediaCapture = new MediaCapture(); await mediaCapture.InitializeAsync(set); } Since we did not add the ability to use the microphone to the application manifest, the mediaCapture capture mode only needs to set the image capturing of StreamingCaptureMode.Video.
In the XAML code, we have 2 buttons. Add the implementation of a click event for one of them:
private async void btnStartPreview_Click(object sender, RoutedEventArgs e) { if (isPreviewing == false) { previewElement.Source = mediaCapture; await mediaCapture.StartPreviewAsync(); isPreviewing = true; } previewElement.Visibility = Visibility.Visible; } Here everything should be clear - we show the picture from the camera in the previewElement element. Again, we add async to the event, since it contains an asynchronous operation. Before we realize the event of pressing the second button, I want to remind you that we will have the result in the emo collection. We will tie this collection to our XAML in this markup:
Bindings of the same type of XAML code
<Grid HorizontalAlignment="Center"> <Grid.RowDefinitions> <RowDefinition /> <RowDefinition /> <RowDefinition /> <RowDefinition /> <RowDefinition /> <RowDefinition /> <RowDefinition /> <RowDefinition /> </Grid.RowDefinitions> <Grid.ColumnDefinitions> <ColumnDefinition /> <ColumnDefinition /> </Grid.ColumnDefinitions> <TextBlock Grid.Row="0" Grid.Column="0" Foreground="Black" FontSize="14" TextAlignment="Right" Margin="0,0,5,0">Happiness</TextBlock> <ProgressBar Grid.Row="0" Grid.Column="1" IsIndeterminate="False" Width="200" Maximum="1" SmallChange="0.0001" LargeChange="0.1" Value="{Binding Scores.Happiness, Mode=OneWay}" /> <TextBlock Grid.Row="1" Grid.Column="0" Foreground="Black" FontSize="14" TextAlignment="Right" Margin="0,0,5,0">Anger</TextBlock> <ProgressBar Grid.Row="1" Grid.Column="1" IsIndeterminate="False" Width="200" Maximum="1" SmallChange="0.0001" LargeChange="0.1" Value="{Binding Scores.Anger, Mode=OneWay}" /> <TextBlock Grid.Row="2" Grid.Column="0" Foreground="Black" FontSize="14" TextAlignment="Right" Margin="0,0,5,0">Contempt</TextBlock> <ProgressBar Grid.Row="2" Grid.Column="1" IsIndeterminate="False" Width="200" Maximum="1" SmallChange="0.0001" LargeChange="0.1" Value="{Binding Scores.Contempt, Mode=OneWay}" /> <TextBlock Grid.Row="3" Grid.Column="0" Foreground="Black" FontSize="14" TextAlignment="Right" Margin="0,0,5,0">Disgust</TextBlock> <ProgressBar Grid.Row="3" Grid.Column="1" IsIndeterminate="False" Width="200" Maximum="1" SmallChange="0.0001" LargeChange="0.1" Value="{Binding Scores.Disgust, Mode=OneWay}" /> <TextBlock Grid.Row="4" Grid.Column="0" Foreground="Black" FontSize="14" TextAlignment="Right" Margin="0,0,5,0">Fear</TextBlock> <ProgressBar Grid.Row="4" Grid.Column="1" IsIndeterminate="False" Width="200" Maximum="1" SmallChange="0.0001" LargeChange="0.1" Value="{Binding Scores.Fear, Mode=OneWay}" /> <TextBlock Grid.Row="5" Grid.Column="0" Foreground="Black" FontSize="14" TextAlignment="Right" Margin="0,0,5,0">Neutral</TextBlock> <ProgressBar Grid.Row="5" Grid.Column="1" IsIndeterminate="False" Width="200" Maximum="1" SmallChange="0.0001" LargeChange="0.1" Value="{Binding Scores.Neutral, Mode=OneWay}" /> <TextBlock Grid.Row="6" Grid.Column="0" Foreground="Black" FontSize="14" TextAlignment="Right" Margin="0,0,5,0">Sadness</TextBlock> <ProgressBar Grid.Row="6" Grid.Column="1" IsIndeterminate="False" Width="200" Maximum="1" SmallChange="0.0001" LargeChange="0.1" Value="{Binding Scores.Sadness, Mode=OneWay}" /> <TextBlock Grid.Row="7" Grid.Column="0" Foreground="Black" FontSize="14" TextAlignment="Right" Margin="0,0,5,0">Surprise</TextBlock> <ProgressBar Grid.Row="7" Grid.Column="1" IsIndeterminate="False" Width="200" Maximum="1" SmallChange="0.0001" LargeChange="0.1" Value="{Binding Scores.Surprise, Mode=OneWay}" /> </Grid> 8 identical pairs of elements inside the Grid. The values of the ProgressBars are bound by {Binding Scores.Surprise} to the value of the emo collection.
Now let's break down the event code btnTakePhoto_Click
First of all, we lock the buttons and read the picture from the camera stream, then display the picture to the user and hide the video preview. In the variable st, we get a stream that must be sent to the service for analysis:
btnTakePhoto.IsEnabled = false; btnStartPreview.IsEnabled = false; InMemoryRandomAccessStream stream = new InMemoryRandomAccessStream(); await mediaCapture.CapturePhotoToStreamAsync(ImageEncodingProperties.CreateJpeg(), stream); stream.Seek(0); // 0 BitmapImage bitmap = new BitmapImage(); bitmap.SetSource(stream); captureImage.Source = bitmap; stream.Seek(0); // 0 Stream st = stream.AsStream(); // InMemoryRandomAccessStream System.IO.Stream if (isPreviewing == true) await mediaCapture.StopPreviewAsync(); isPreviewing = false; previewElement.Visibility = Visibility.Collapsed; We send the stream and get the result (asynchronously, of course):
progring.IsActive = true; try { EmotionServiceClient emotionServiceClient = new EmotionServiceClient("12345678901234567890123456789012"); emotionResult = await emotionServiceClient.RecognizeAsync(st); } catch { } progring.IsActive = false; Here, instead of “12345678901234567890123456789012”, we indicate our key, which we received earlier on the site.
Then we read the result (if any) into the emo collection and activate the buttons:
if ((emotionResult != null) && (emotionResult.Length > 0)) { emo.Clear(); emo.Add(emotionResult[0]); this.DataContext = emo.ElementAt(0); } btnStartPreview.IsEnabled = true; btnTakePhoto.IsEnabled = true; After the DataContext is set to the first item in the emo collection, the ProgressBar values will be updated automatically. By the way, please note again that in this case we use only the first element of the array. There can be several faces in the photo and, accordingly, there are also several elements in the emotionResult [0] array. In addition to the emotions contained in the Score, the array also contains the parameters of the coordinates / size of faces of the Rectangle class.
The application is ready. You can
The source is available on GitHub .
I tried the application in action and that's what I got:

By the way, there is an alternative to save a snapshot from the camera to a file like this:
// Windows.Storage.StorageFile photoFile = await Windows.Storage.KnownFolders.PicturesLibrary.CreateFileAsync( "lastphoto.jpeg", Windows.Storage.CreationCollisionOption.ReplaceExisting); await mediaCapture.CapturePhotoToStorageFileAsync(ImageEncodingProperties.CreateJpeg(), photoFile); IRandomAccessStream photoStream = await photoFile.OpenReadAsync(); BitmapImage bitmap = new BitmapImage(); bitmap.SetSource(photoStream); captureImage.Source = bitmap; photoStream.Seek(0); // 0 Stream st = photoStream.AsStream(); // IRandomAccessStream System.IO.Stream Based on this example, it is easy to write code that will open a file stored on a device and send it to an emotion definition service.
The service is experimental and not always guaranteed accurate recognition. For people who install the application on a phone or tablet, I want to note that the face should be in the photo in a normal vertical position. If you take a photo at an angle of 90 degrees, your emotions will not be recognized.
What ideas of the application did I immediately have? You can make analytics of customer satisfaction (blackjack?). You can use the assessment of emotions as a voting option (for the funniest joke, for the most beautiful girl or photo, etc.). As an option - to make a game in which you need to portray the desired emotion or create a simulator for artists. You might have some funny or serious idea to use the Oxford Emotions API.
The service is cloudy and cross-platform, so you can develop applications not only under UWP. In Microsoft Garage even developed an Android application called Mimicker Alarm , which will turn off the alarm bell only if you depict the necessary emotion.
Although, for example, it would be difficult for me to depict happiness at 6 in the morning.
Source: https://habr.com/ru/post/276411/
All Articles